Search the Community
Showing results for 'overhead rebuild'.
-
 Old post, maybe some ideas...https://toyotamotorhome.org/forums/index.php?/topic/11277-sunrader-interior-wallsroof-support-for-rebuild/#comment-105727
 -
 Edited 4/3 to add some pics of the floor damage and initial repair I did so all of the project is in one thread. Found a rotten floor under the propane tank and the fresh water tank in the 1985 Sunrader I just purchased in December. I cut out all the rotten wood, replaced with 3/4" PT ply and then built up from there. I also added 1" square tube wings underneath welded to the frame to add support to the sides in the back. From there I rebuilt the floor with new plywood, glued and screwed the layers together and finished with some primer on top and the edges. And so began the process of the rebuild of the sunrader. I recently repaired the floor in my 85 Sunrader, but the plywood pieces I added do not line up flush and the floor is not flat. Does anyone have a recommendation on how to level and flatten the floor? So far my ideas are to glue and screw down more wood, build up the low spots and then plane it back down to flush and flat, but that seems like a lot of work. My other idea is to use a epoxy fairing compound to build up the low spots and then sand flat and level but am concerned about the vibration and movement from driving down the road. I'm trying to flatten this surface as opposed to adding another layer of ply to even it out because head room is a scarce commodity! I want to just lay peel and stick tile on top of this surface. Any advice or suggestions will be greatly appreciated! Thanks, Jay
-
 Bob, Thanks. Yes, I was studying that very thing today - how the sides bow a bit with the roof re-arching. This caused me to take an extra step with the roof re-arch. When you have only a small bow (I think it's about 2" in the center of about a 6 foot length), maintaining the bow with weight on it relies upon the strength of the wall where the bows meet the wall. If the weight on the bow can push the wall out even a fraction of an inch - the bow can collapse. So I'm going to install a thick aluminum plate full length for the bows to push against without moving that section of the wall. So, thanks. Working on finding that plate material and have a sample already in my garage "spares" box from some other wacky project. And yes - removing the paneling so I can start with bare fiberglas by adding insulation, then new paneling material (no ideas yet....). So, did not mess with anything further today but the roof as I've got to get it arched, stable, and winter worthy asap. Last week I bought 4 joist jacks which you place a length of wood atop and then can screw to force the ceiling up with. Just to see what's possible, I placed 3 of them down the centerline and put only moderate pressure on the roof, actually lifting the post at about 70% of my max strength and bringing the jack up under it to hold it. Not using mechanical advantage yet. I ended up with 6'2" down the centerline, which I'm really pleased with. So, I'm moving on to buying rectangular aluminum hollow stock for the roof beams, which will press against that thick aluminum plate. I'll need to find a way to gently arch them - shopping for a wheel bender this evening. I don't want a shop to arch them as I may need to change the arch a bit depending on how things go as I start at the rear and go forward and the last thing I want is to find the single arch shape is all I have. I plan to bed the beams all the way across the roof with a thick bed of 2 part epoxy, essentially making them into a single bonded structure. I'm looking for 3/4" by 2" stock. Of course, I'll sand and prep the roof surface (that's going to suck overhead and I have to do the entire roof as I'm also glueing Owens Corning Foamular to the ceiling between the beams and need a good bond there for strength addition) before epoxying. The foam will add strength between the beams for walking on as well. Still unsure about beam spacing, but I'm going to err on the close side - perhaps only a foot apart the entire roof length. I also ordered a two burner propane Magic Chef cooktop. Details later, but my plan is to shrink the length of the kitchen counter, but eliminate the cooktop. So the cooktop will only appear when needed (what - .5% of the time when you're actually cooking?). I'll reveal how I'm going to do that later but it's cool. So it's exciting to have the fridge and cooktop handled. Next as we're eliminating the stove/oven unit, we'll be replacing it with a convection/microwave. Wow - expensive but I saved a bunch on the fridge so am still on budget. So, the roof is my current focus. Here's how it looked before I touched it: Here it is now with just quickly putting up the 3 poles. The roof has a nice arch and the fore and aft ridgeline is nearly straight. Yes folks, that's my work area for the winter up here 90 miles from the Canadian border. And that's our current "weekend escape capsule" - our restored 1988 VW Vanagon: And here's an interior shot with the 3 jack/beams just pushed up by hand (no cranking yet). Getting the wood out of the corner up where the roof and walls meet was a pain. The left side wood piece yielded to simple prying and popped out in several lengths to bare fiberglas. The right one must have been installed by the better worker as he was liberal with the resin and I needed to use my hatchet being pounded with a hammer to essentially chop it away from the fiberglas to make room for the thick aluminum beam. That beam will also do double duty as a strong base to mount an awning to later. I'll try to leave access to it so i can drill through it and use real fasteners (stainless nuts, bolts, washers) to attach the awning. Possibly also a roof rack will attach there.
-
Hi, I'm having trouble finding information about what shocks would be sufficient for my foolie 16.5ft sunrader. I know that the foolie axle is unsafe but being that mine is the super shorty model, i don't think i need to worry as much about it right now but i do have a 1 ton ff axle i've yet to install. I do want to continue to drive it while i rebuild the ff axle but the rear air shocks are shot so they need to be replaced. Any suggestions on which ones i should buy? Thanks
-
 Hey IdahoDoug, After you get the Black tank thing solved..... My rig was an 18' and, before I removed it entirely, I stored the bathroom shell up in the upper sleeping overhead while I did the floor. It worked OK to get it out of my way. I do believe that the bathroom shells were dropped in before attaching the top "clamshell" of the coach. I got mine out, but I had to remove the entire floor and both rear lateral braces that Sunrader welded in/installed to lift the rear frame and slide the bath-shell out under the rear bodt/frame. I tried everything else, including removing the front seats and doors. Dedication or insanity, I've been accused of both. BR, TG
 -
These are some VERY general thoughts on the "Sunrader sag". The design of the floor is OK, but the frame support design is the weak point. The failure mode is there is minimal support from the chassis to the edge of the shell. Over time the foam in the floor fails and the weight of the shell causes the edge of the floor to sag. To prevent the sag from coming back you need to add support from chassis to the edge of shell. Here is ONE answer...https://toyotamotorhome.org/forums/index.php?/topic/11856-sunrader-floor-repair-gut-and-rebuild/
-
 Hey all, I have a 1985 Dolphin with 60,xxx miles that I've owned for a couple years and I put half of that mileage on. This rig has been the most reliable vehicle that I've owned and have driven it coast to coast 6 times. I am an experienced tradesman and I recently endeavored on some minor repairs. Well you can guess what happens next...I have totally gutted this vehicle to find that practically every popsicle stick they put it together with is going to need to be replaced, and I was hoping to elicit some inspiration from stories of recovery from the brink of death, or when it was finally time to put an end to a motorhome's suffering. By the way, it wouldn't ever go to the junkyard, it would be turned into a badass flatbed truck. If anyone has done the latter, have you had any issues registering the MH as a flat bed?
-

Looking for some insight into owning a Toyota RV
mokabronze replied to Hill's topic in General Discussion
That is good to know, I'm trying not to become discouraged. I'm seeing so many people who purchase and there's tons of wood rot. I don't think I have the bandwidth to get in there and do a total/partial rebuild. Maybe with help, but alone and all the learning curves it would take me more than a year. I'm ready to retire but realistically should wait 2 more years, so I would only have a few hrs per day with exception of off days to even attempt the labor intensive process. Dang singledom has been a peaceful notion til I embarked on this dream... I need another set of hands now... let him be both a carpenter and mechanical. LoL. Kidding with a lil' bit of truth. -
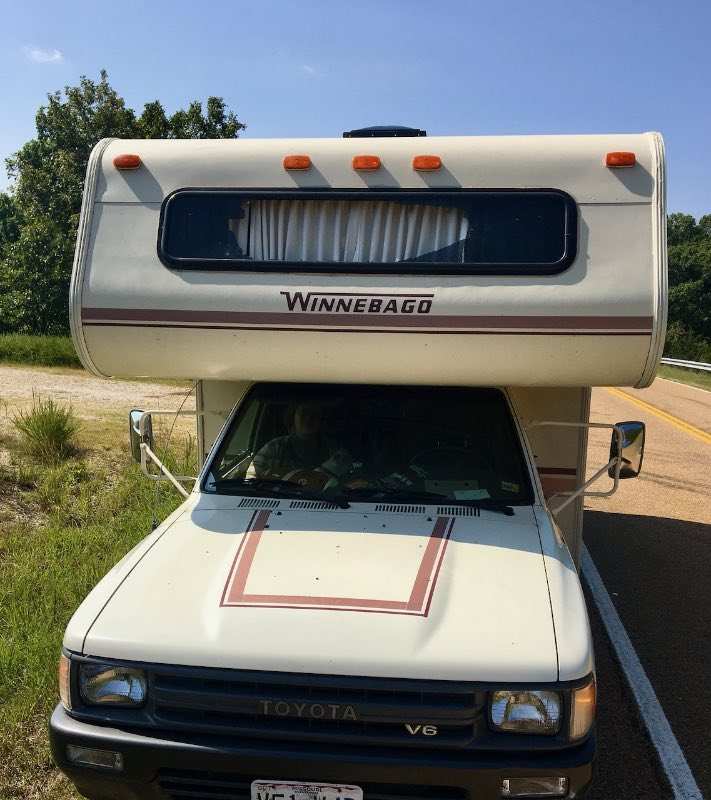
Just finished a nice little trip to Lake of the Ozarks SP over a long weekend. Great weather, nice scenery, and tons of surprisingly tame, white-tailed deer, right up around the Warrior for most of our stay. Brought our e-bikes along, per usual, and the wife and I had a great time buzzing around the area. Unfortunately, heading out of the park and down the main park entry road on our way home, a loud crash was heard overhead, then a few pieces of debris rained down on the hood. The large 59x12" cabover window is gone, as you can see—most of the glass ended up inside the window curtain and on the mattress. Not sure if a falling branch struck the window or if a large bird impacted or what - ?! We drove home just fine but kept it under 55mph. First time that's happened to us in our eight years of ownership. So the question is whether to try and replace the glass... or to block off that unlucky window opening completely. The large rubber window seal is in pretty good shape, it appears, but I know these Class C cabover windows tend to be problematic, even from the factory. I'm reading through the forum posts on the subject, but feel free to chime in here if you have any thoughts/suggestions. Thanks!
-
 Hi everyone, I posted about a month ago about my suspension causing damage to the vehicle. I fixed the part of the carb that had fallen off, but now the actual weber carb that is on there has wiggled loose and has created a massive vacuum leak while I was on a 1200-mile trip. I didn't have too much of a way to fix this, but now I am stationary and am going to rebuild the carb and replace the gasket. I will be using Loctite on the screws this time as well. I definitely need to do something about this ride because, even if i don't have any more issues with the carb from this, I am not enjoying the ride. Every little bump feels like a big pothole and it can make driving stressful. My question is: should I just go ahead and replace the leaf springs, add helper springs, and get new shocks, or could I just get away with helper springs and new shocks? Any combination of airbags, new shocks, new leaf springs, and helper springs I guess would be possible, but I just purchased this camper recently, so the funds are a little tight. Also, I have gathered that bilstein seems to be the way to go with shocks. Has anyone has good experience with other brands? Any specific product recommendations are welcomed Thanks!
 -
 Hey everyone. My steering box rebuild has been completed by Marty @ Powersteering.com and it is supposed to arrive back here tomorrow. I have a camping trip this weekend and I would like to try to get the rig fixed before that so that I don't have to use a tent. I was hoping I could get any advice that comes to your mind before putting it back together regarding: Connecting steering shaft - How do I do it. will it need some tapping with a hammer or should it slide in fairly easy? Steering shaft alignment - Will it be obvious how the alignment marks should align or do they leave room for misinterpretation? Pitman arm alignment - Same question here. Is it somewhat self explanatory or doe it leave room for misinterpretation? Pitman arm installation - Do I put the pitman arm on the receiving part and then just tighten the crown nut until tight and put the pin through or anything else that needs to be considered Any specific recommended order for putting it back in (For example: 1. fix PS box to frames with bolts, 2. reinstall pitman arm, 3. reinstall steering shaft,) Last but not least, I was told that i need to bleed the power steering fluid system. How do I do it? Any recommendations? Thank you all so much. Super pumped to soon have a rig that is not dripping everywhere.
 -
Hello everyone I'm new to the group I just bought a 83 Gran Sport Ranger which was in pretty good original shape other that the motor I just had to rebuild do to a ring that let loose in the #1 cylinder I was just wondering about what years, options if any and how many were made I haven't been able to find out much of any info on them? Thanks in advance! 83 Ranger
-
 I posted this in the Yahoo group, but since all things Yahoo are wholly lame, I like this forum much better. I've learned a lot about the A43D tranny in the last couple of weeks - I have two broken down in, uh, my kitchen undergoing overhaul. It's actually not difficult at all, and I'll have two excellent rebuilds for $600, including all the tools and reference. There's a good kit on eBay right now for $45, vs. the $250+ plus that's normal for a master kit with steels. My failure, which I wrote about in detail on an earlier post about the saga of picking up my 86 Sunrader, was a loss of gears from OD on down. Made it from St. Pete FL to mid-LA when I started losing gears. Got home to Texas with occasional 3rd gear operation. Maintained the unit, test drove it a bunch, and it was fine. Worked very well, actually. So, being completely nuts, we drove it to Denver to see a concert, then all through the mountains and even some steep, snowy stuff in March. Performance, for a MH, was excellent. We got to commandeer an entire CO state park that hadn't opened yet. Awesome trip. Then, on the way home, we ascended the steep pass east out of Angelfire NM. Near the top, we were almost rolling backwards (and laughing like oooo). That was the only oddity, though, and we made it over the top. Shortly thereafter, it started slipping out of 3rd. The worst part is that it happened while listening to Pink Floyd's Echoes, one of the greatest works in history. How utterly uncool. We pulled over and spent the night with about 100 loud cows (which was pretty fun, really) and limped about 650 miles home. We only got one shift from 1st to 2nd per fluid warm-up. That made for an interesting trip - coundn't go fast enough for the interstate, but lost 2nd gear every time we slowed down. It was like a less-trying version of the film Speed. Too bad Dennis Hopper didn't come with us. Every time I coaxed her into second, we yelled "gooooooooooaaaaaaal" like at the Mexican soccer game. Finally we just said "ta oooo wid it" and jumped on I-20. The 22RE likes being wound up, and we managed 50mph and some of middle fingers from our kind fellow citizens. After the last fuel stop, 100 miles from home with no more slowdowns to cripple us, a TX DPS trooper left his speed trap position and chased us down for not having mudflaps on a dual axle. My understanding is that a MH is not required to have mudflaps, and installing them on a Sunrader is an interesting proposition in itself. Sheeeesh. So we had to sit on the side of I-20, watching The Simpsons on the laptop, waiting on the fluid to cool one more time. Our desire to get home to a city which (on a good day) we loathe was overwhelming. We got underway again and made it home, the last 20 miles being pure insanity, battered by the worst thunderstorms in many years. 3 times now Toyotas that shoudn't have made it have gotten me home. The transmission autopsy was a big event in our home, 'cause we like stuff like that. It's the only part of one of these rigs I've not dismantled and reassambled - I have 89 and 87 4Runners too. What went wrong in my 70K tranny? My 89 4Runner has 168K, towed another 4Runner from MA to TX, and shifts like silk. Being 0-for-6 in major drivetrain repairs from the sleazy mechanics that rule this area, we knew well that we'd do a better job than a rebuilder who gets fired if he takes too much time examining and cleaning parts. I can't tell you how many atrocious tranny rebuilds I've seen. I got one once that lasted less than 100 miles. Stuff like that made me abandon all vehicles outside of the 1st generation 22RE Toy pickup class, build a home workshop, and say goodbye to car payments and outrageous repair bills forever. 3 vehicles heades for the crusher restored to glory for less than half of what my 2001 Chevy cost. An? one of ?em has this rather splendid fiberglass house on the back. The fluid was dark, especially for so little mileage on it, but wasn't full of metal. But, before I originally left FL with the rig, I changed the tranny fluid and had no way to examine it. Subcomponents kept coming out looking good. Valve body looked good. Then, the rear parts group and output shaft didn't want to pull out by hand like they should. Spent an hour coaxing it, then slept on it before putting it on the press. It popped out with a tiny amount of pressure. Woo hoo. I looked at the tailshaft and in my best surly blue collar voice, growled "there's yer problem". On the last inch of the output shaft inside the case (not the extension housing, but the case itself), there are 3 metal interlocking oil sealing rings. Two of them had broken and gouged the bore at the rear of the case. It was pretty nasty. The rings were shaved across their diameter like a deli slicer worked 'em over. I've never seen anything quite like it. The bore looked like it was supposed to be grooved, but got chewed up too. Yes, a worst "case" scenario - the case is the most expensive hard part, but I quickly found a $100 donor unit at the junkyard just 6 miles away. I efficiently broke her down in just a few minutes, and this time the tailshaft group slid out with no problem, but..... TWO OF THE THREE AFOREMENTIONED OIL SEALING RINGS WERE BROKEN! So now we're zero for two trannys with sound sealing rings. Only these had not come out of the grooves to wreak havoc - thank goodness the rear case bore was smooth. But, the rings were shaved down like mine were - one is about 1/4 its original thickness. My original case was gouged so badly that I didn't realize the rear bore was supposed to be smooth until I examined the donor unit. These rings separate fluid passages to the governor, which controls shifting based on fluid pressure and centrifugal force as it rides on the tailshaft. Disrupt pressure to it, and it wreaks havoc on upshifting. Nowadays, the governor is replaced by electronic speed sensors and solenoids on most cars, but the A43D's only electronic control is the OD system. Amazingly, the pieces of metal were mostly stuck to the side of the center support and did no other damage. Hard parts look great, and the clutch discs had plenty of life remaining (but were replaced anyhow). So that solves the mystery of the shifting problem, but what caused this with so little mileage on a pretty durable tranny design? Toyota sez that if a bushing is out of spec, you replace the whole subassembly. Yeah, nice work if you can get it, but I wasn't born yesterday and, consequently, can change bushings. When looking at my nice new extension housing ("asscone") bushing from the A43D kit, I remarked on the apparent design improvement - a big X-shaped oiling groove in the bore. But, when looking closely in my asscone, I saw faint marks of what was once those same oiling grooves. Wowzers! The bushing was so worn that it appeared to be smooth inside! I measured it - 1.536", far in excess of the 1.4996 spec. TOAST. 36 thou might not seem like a lot, but it might as well be a mile in this application. The picture becomes clearer still.... See, the bushing wear was caused by the shaft wallerin' 'round in my asscone. No, really As the wear increased, the rear case bushing began to grind out of spec (only .009" over max, but still bad). What sits between the asscone bushing and the rear case bushing? The three oil seal rings that seem prone to coming apart! The rings are metal and have right-angle claw ends that interlock to make a kind of smooth unit that spins freely in a groove. Many of these in different sizes are found in the A43D, and now they scare the freakin' crud outta me. I theorize that on the first trip, the rings came loose and caused moderate problems. On the second, they held up for 4 days, then came really, really loose and ate up the case. The heat from that malfunctioning comprimised the torque converter which, after we got home, was performing poorly. No surprise there. The junkyard case donor I broke down looked fine too, other than those bleepin' rings. I wonder how many crappy rebuilds certain chain tranny shops have sold when all that was needed was a new TC, oil sealing rings, and two bushings? I wonder how many of those times the victims were told they needed a bunch of hard parts, too? I've seen people almost taken for THREE THOUSAND FROGSKINZ when all they needed was a throttle cable adjustment. So, the last part of the mystery...why did the extension housing, or asscone if you prefer, bushing get waller'd out like that? Research indicates it's not uncommon for Volvos running the same tranny (with a different asscone and bushing) to need the bushing done at 120K. A 21' Sunrader is obviously stressing the drivetrain a bit more than a Swedish turbobrick, so that likely accounts for some of it. I marked the driveshaft, of course, but since I'm not the original owner I can't be sure that my marks mean anything. Some of the work I've found on the rig is below even goober standards. I'll closely examine the driveshaft, center bearing, and probably change the likely-20-year-old U-joints while the shaft's out and pay special attention to good driveshaft phasing. Our recollection is that, especially on the second trip after adding new tires and Bilsteins, the ride was pretty sweet. No strange noises or vibrations, but a long shaft like that can get freaky if installed out of phase. I know why the tranny went nuts now, but can't tell if it was just normal wear or if an imbalance behind the tranny accelerated the wear. Again, we noticed no evidence of such a problem. Sometimes, problems like that are indicated by a leak at the rear seal, but the Toyota is very well sealed - a rubber metal-clad inner riding against a metal-clad felt-lined outer. That's awesome if you hate tranny leaks, but it will help a bushing wearing out of spec go unnoticed. So what in the name of tow trucks are you supposed to do? I'd pull that asscone every few years as part of routine maintenance. Drop the driveshaft, pull the speedo, six bolts holds the tail on. The bushing only costs a few bucks, cuts out easily with a hacksaw blade (large oil channels under it make damaging the bore a nonissue), and presses in easily. Make sure you line up the oil hole just right. A shop shouldn't dream of charging more than $100 to do the whole thing, or $20 to press the bushing. If the bushing looks really bad, check the driveshaft and u-joints. This can save transmission that should have run for many more years. Unfortunately, you can?t access the three oil seal rings without disassembling the transmission. You might have to tap the cone some with a rubber mallet to separate it. The housing gasket, which goes on dry, is likely to be a real nightmare to deal with, especially while under the vehicle. Scraping off the old gasket at the kitchen table was very time-consuming. Actually, it was the worst part of the rebuild so far. I guess that's, in a way, great news. I've always applied a light coat of grease to most gaskets to make future disassembly a snap. All my 22REs are assembled with grease instead of RTV (except a few special spots like half moons, oil pump bolt, etc.) and have never leaked a drop. The tranny is a pain to pull from the vehicle. Unlike on my 4Runners, the crossmember does not pull out. It's welded in. ACK! Getting that thing out from under that low-sitting vehicle is the stuff nightmares are made of. I think, actually, it might be impossible. It's easier for me to pull the motor. Pop the mounts and move the engine/tranny forward and you have easy access to the infamous two upper 17mm bellhousing bolts. Yoink the motor out, then tranny comes out easily through the hood. By watching eBay I was able to equip my home shop for absurdly cheap. Got a rebuild kit on there for $60, then another for $45. Shop equipment was accumulated by watching local auctions for heavy stuff. Got a two ton engine crane, two engine stands, and a load leveler for $100. And, got stuck in the mud in a national forest with all that stuff in the back of my Blazer as a game warden gave me an undeserved ticket. It?s a long story?? Disregard the $400 Toyota SST tool kit. Almost everything I needed was already on the workbench, and I fashioned most of the rest. A clutch spring compressor, $36 eBay, was the only tool I had to buy. Compared to the cost of rolling the dice on a half-assed rebuild, doing it yourself, even if you have to buy a lot of shop gear, is a blast. And, you get to keep the tools. The 1993 A43D Toyota manual is excellent, with much more information than the '80's FSM's. We supplemented the 4 manuals used with lots of notes and dimensions, plus over 1000 photos. What was once the greatest mystery on the vehicle I now know like tha back of my hand. Our attention to detail in measuring, examining, and cleaning was fanatical - much more than any shop would use - and no repair we've done has ever failed. If you can work efficiently and follow directions well, there's no reason why most can't rebuild the A43D. And so goes my strange tranny story, so far. I'm going to rebuild and soup up a spare 22RE for her, so it will be a little while before I'm rolling again. It?s too hot outside to go boondocking anyhow. I'll post more info and photos shortly.
 -
Does anyone know where I can find an exposed framing view of the left rear area on a rear-dinette 1984 Dolphin, or maybe an x-ray sketch of the framing? I've seen a lot of videos out there that have shots of segments of the framing, but so far they're either of a different section or of a different model. The part I need to rebuild is below the rear window to the left of the cubby, and around and below the escape window. Thanks!
-
 yes 2 lines one high pressure (in) 1 low pressure (out). no drain plug. have something available to plug the low pressure hose to keep most fluid in the pump. hose with clamp is low pressure yes bleed steering after rebuild
 -
Could be. I'm pouring it into the little dipstick container and the liquid I'm filling in says ATF (and some other stuff). It's definitely for the power steering because when empty, the sound when steering is as painful as running a nail over a chalkboard. Puh, this makes it sound a little more complicated - So there are two fluid lines going into the box or one in and one out? Is there a drain plug to empty it prior to taking the box out? When you say bleed the system, do you mean bleed the power steering system? And this is done after the rebuild box goes in? Sorry for all the questions. With each answer, I have 5 questions. 🤔
-
Thanks for answering my question Linda. The one I'm going to look at is in Covington Washington about 5 hrs from me. He is asking 6800 for it. It looks ok inside if you look past all the clutter in it. The outside looks like it might have some issues. He painted the coach a ugly grey and not the cab. He also said the roof was redone with plywood and a rubber membrane by the PO. The few pics I have found online it looks like they changed the roof line up front at the overhead bed. I'm a little leery going that far to find it's not as nice as he is saying it is.(5) Marketplace - 1986 D(5) Marketplace - 1986 Dolphin ez rider _ Facebook.mhtmlolphin ez rider _ Facebook.mhtml
-
 I had a similar issue with my steering box. I had a very difficult time getting the correct steering box when I ordered a 'remanufactured' one. There are like two companies that do pretty much all the remans and both companies have the same messed up database with regards to my particular box in a '87. If you go the route of buying a rebuilt box just make sure you are getting the right one.. I can't remember all the details but likley I cold dig up some info if necessary. I believe it's the 1-ton vs not 1-ton that is the problem. Note that one 'rebuild' I ordered that turned out to be the wrong one had worse play than the one I wanted to replace. When talking to a person at one of these companies he said that wasn't uncommon - they have pretty loose tolerances for the rebuild and some are just plain lousy but with good seals. This is a reason to go with having your unit rebuilt instead of getting a reman from an auto parts place. He also thought that my issue with not being able to get the right box for a 87 1-ton was because neither of these 2 reman companies have a rebuild protocol for that specific unit. Just beware of this issue - it cost me a lot of time and trouble... I decided to have my box rebuild instead of getting a remaned unit. I paid $300 to Marty at powersteering.com, shipped it to him, and he got my steering box tightened up really well (plus the seals, etc). (edit: just noticed his price now is $339 plus shipping, but still a great deal IMHO) These heavy rigs put a lot of stress on the steering gears and it's very noticeable having a newly rebuilt one. Much less sway from heavy cross winds for example. I'm very pleased with the work Marty did. My suggestion would be to asses the wear of your box and if it has any significant play in it then consider the Marty rebuild. Whatever you do, do NOT give anyone your box until you are 100% certain that you are all set.
 -
Well thats an interesting place for an O-ring. About the only place it could come from is where the shaft goes into the steering box. Although I would have thought that the shaft would have a seal instead of an O-ring. If you can remove the steering box, people make a rebuild seal kit for them. A rebuilt box seems to be in the $300-700 range
-
 Thanks for the info, all. It's definitely helpful. I plan on keeping the 4.30's in there, since the vehicle also has a W55 trans with OD. I'm looking more for the step-by-step process and specs for the rebuild. Mainly, backlash, pinion nut torque, etc. Resources for the semi-floating rear ends are plentiful but below are the only two links I've been able to find and I can't verify the specs (or find PNs for anything.) https://www.yotatech.com/forums/f120/need-info-repack-bearings-do-brakes-1-ton-full-floating-rear-axle-wheels-268282/ https://www.differentials.com/technical-help-2/set-up-specs/ A FSM would be SUPER helpful if anyone has a line on one.
 -
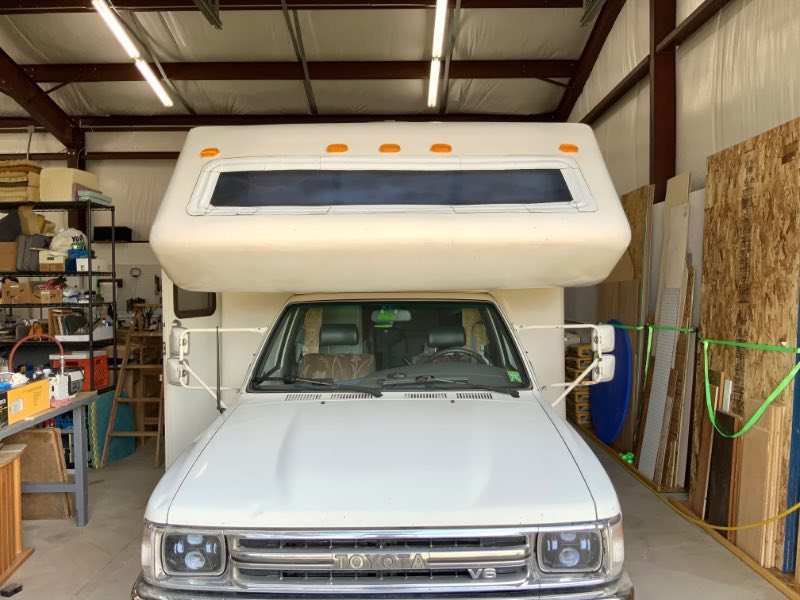
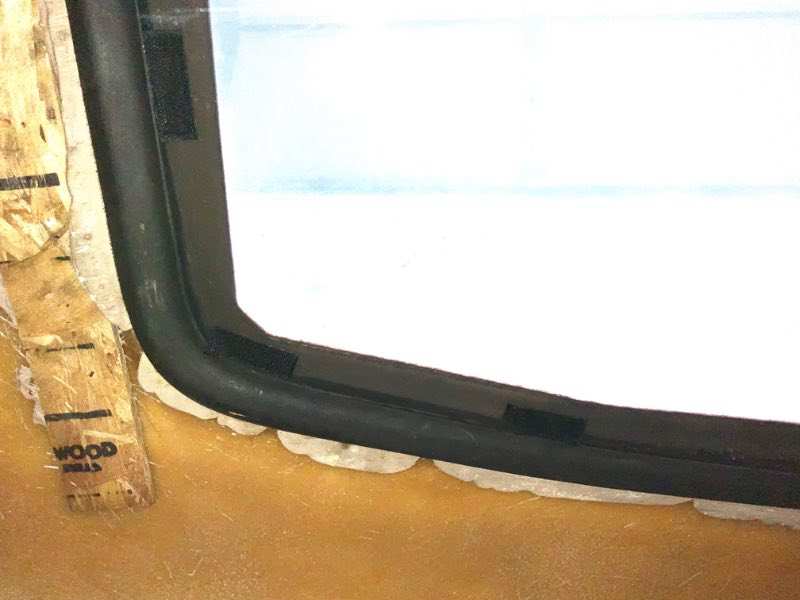
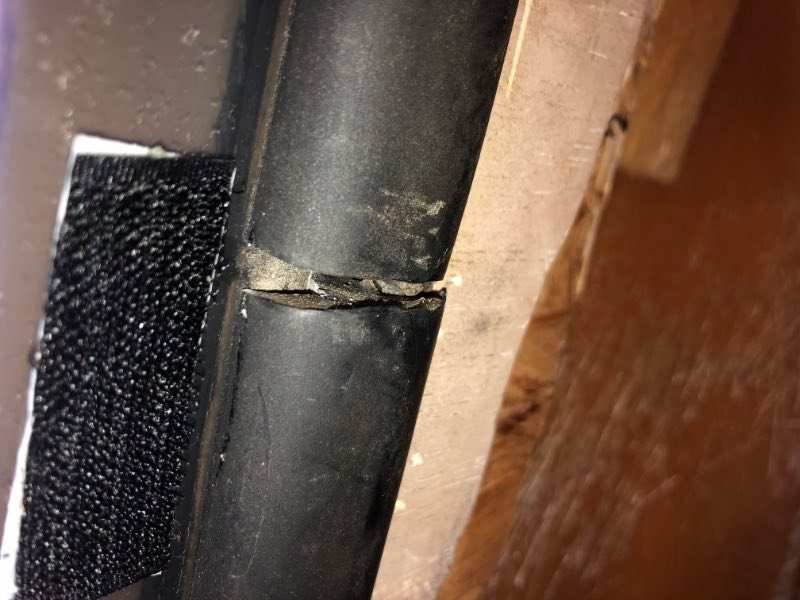
Hi, has anyone replaced the Cabover window on their Americana? It is slightly curved around the front of the Cabover area and held in a rubber gasket material, no other frame. Looking for options on materials, methods, sealants, etc. NOT presently looking at fiberglassing over the window and deleting it. I currently have it sealed on the outside with a border of Eternabond tape. It works but isn’t pretty. We are looking at completing out interior rebuild and hoping to replace the window first before we finish the bunk area. Thanks!
-

Question about 1984 Gran Sport pop-up mini.
83 Ranger replied to clemensfield's topic in General Discussion
Just purchased an 83 myself I'll be the 4th owner Just looking it over and have to get the engine rebuild the rings let loose on the #1 cylinder and scored it pretty bad Hopefully getting a motor for it built in the next few weeks Luckily I was able to get the price down enough to pay for an engine Everything works and it looks very solid Can't wait till I can take it out -
 Actually! Thanks to AtlantaCamper for the help via PM. I decided to just tap into the 12v connection to the overhead lights, since it was available. Thanks all!
 -
Hello All. Not sure where to post this for sale as the site doesn't work. I have been a member of this site for years, just a listener, site has been a great help.I am selling my 88 odyssey due to age. (mine). There is nothing wrong with the unit, lots of upgrades, and additions. Forgot---speedo is in error for last 10K miles since I swapped in a 4.88 rear. approx 85 k miles, 22 footer, 8" wider and 2" higher than most toyota units recent new roof and a/c unit raised 200 watts solar 2k inverter 3k onan onboard generator new floor, propane furnace and shore line charger panel aluminum radiator , 22 re engine auto transmission rebuild 10k ago 2" exhaust---sr5 gauge cluster with tach 6 bolt live axle rear with rear mounted spare new fixtures and toilet--led lighting, silent remote controlled roof fan, tv, new matress both a/c units work, roof will run on onan recent awning, entry grab bar,microwave,water pump This is the floor plan with the bath in the rear, full shower, closet, sliding bath door with pantry on kit side I am the third owner, it came from arizona, not driven in winter, zero rust, lots of documentation of repairs etc. It is truly ready to go, runs excellent and in very nice condition I can send photos, located in NY, 12776, asking $14000 also have spare 1 ton rear, complete and wheels email tr3rdster@gmail.com John H then we can connect by phone
-
 Well I'm not that much help. My Nissan site can't process the vin. Happens when they get pretty old. My Toyota site can't process my vin either and that's an 86. Do you have the registration? You probably have to go by what that says for the year but when selling make sure you add it has the full float axle. It definitely needs some sprucing up. Some paint, at least a futon in the overhead. Wash the cushion covers. Selling is driven by first impressions. Make a good one. Kind of sorry you never fell in love with it. None of my children or grandkids LOVE mine either. Such an important part of my life makes me sad to think it will have to be sold after I die for someone else to love it. Linda S


.jpg.6f65969998cd275070435ec323c3d30c.jpg)