Ctgriffi
-
Posts
632 -
Joined
-
Last visited
5 Followers


About Ctgriffi

Recent Profile Visitors
4,535 profile views


Ctgriffi's Achievements
")
Collaborator (7/14)
-
 Rare
Rare
-
 Rare
Rare
-
 Rare
Rare
-
 Rare
Rare
-
 Rare
Rare
Recent Badges
-
 Ended up having to run a new wire from 10A Engine Fuse behind driver’s kickpanel; the red wire on the 3-wire Alt plug is supposed to have continuity back to the Engine Fuse (IG2 wire I think it’s called), and it did not. Using a fuse tap made this pretty simple. Truck is charging again at 14.5V and didn’t even have to replace Alt.
 -
After much testing, swapping out alternators, checking fuses, and digging into diagrams, etc, I've determined that, of the the three wires that connect to the alternator (not including the large B+ post wire), the RED wire is dead and has zero voltage with Key On Engine Off. The other two wires in that 3-wire alt connector, the white and the yellow, seem to be doing what they should be doing and show close to battery voltage, which is about 12.6v at the moment. (Sidenote: the truck runs and idles very well... until the battery runs way down, of course.) Anybody ran across this before and/or have a suggestion to troubleshoot the red wire? This wire is supposed to carry 12V from the ignition switch to the alternator, far as I can tell, but it looks like it's probably shorted/cut/chewed-through or something. I'm thinking I've got to trace the route through the entire harness, somehow, or just run a new wire from the fuse panel at driver's feet out to the alt. But, you can tell me if I'm wrong! 😀 I've got a question out on YotaTech about all this too, but I know people here are pretty quick to respond, usually. Thanks as always.
-
No affiliation with this product but thought I'd mention: lots of these old trucks no longer have a good/working battery hold-down. I purchased this low-price, OEM-style bracket off eBay recently, and it fits perfectly and works great. Includes all the necessary hardware. https://www.ebay.com/itm/296318108252
-
Never seen this before. What a fantastic idea!
-
Sounds like a great first trip, and thanks for the cool pics! Yeah, these rigs don't break down often (one BIG reason for the cult following), but you really have to allow a lot more travel time typically. I will road-trip a car for 10-12 hrs solid if I have to do so, but I limit our Toyota RV trips to ~6hrs/day, tops... which gets us about 330 miles or so with stops.
-
I'm sure they're fine/good. I ran Nexen SV820 tires for 8+ years and only recently bought a set of Thunderer Ranger tires (still need to get 'em mounted). 185R14 is an unusual and rare size as you found out! I think lots of us will a) buy these tires through Walmart and get them mounted in-store OR b) just source the tires ourselves online and then find a local shop to mount. Reason being: it's usually much cheaper, not to mention most modern tire shops aren't used to dealing with these rigs and know less about 'em than we do.
-
Pretty normal and doubtful that it’s the chassis or frame. There’s a lot of weight on these little trucks, springs get old/tired, and most rigs don’t have perfectly even weight distribution of appliances, furniture and equipment. Do you know how many psi are in the bags? If you have a separate left/right air bag setup, you can try adding more air to the low side, to even things out. Sometimes just loading up for a trip, filling the fresh water tank, etc. can cause the tilt you’re seeing. What tires did you go with, if you don’t mind?
-
May or may not be relevant at this juncture but just chiming in to say that, whenever a caulk/sealant application needs to look REALLY good, I'm all about laying down plenty of masking tape on both sides of the seam first, making sure the gap between is straight and even: that way, you can apply the bead of product, tool it down, then carefully pull away all the tape for a factory-crisp line. Looks good, feels great!
-
I don't have a Sunrader but, when the truck is off, the isolator and all that stuff is basically out of the equation (that's kinda the point of that little gizmo). I think you need to be looking at the coach battery more closely (what is its current voltage right now?) and checking the connection between it and your rig's power center. There may be some corroded connections, or a bad fuse, or malfunctioning auto-resetting circuit breaker between the coach battery and the power center.
-
Household extension cord of heavy gauge will work (10 gauge is best), and you may need a special plug adapter if you don’t have one yet. Note: If you plan on using roof AC, better make sure that nothing else is running on the circuit where your extension is plugged in, or it will likely trip the breaker. 50A vs 30A refers to the amount of current that is available, and our rigs typically only need 30 amp service because we don’t have large power requirements. (Both 50A and 30A are standard 120 volts so you can technically connect to either, but the plugs do differ… so another adapter is needed, if you go that route.) Someone else will chime in if I’ve missed anything 😁
-
Thanks folks! Sounds like I better go head and do it.
-
So we're just hitting 9 years on the Nexen SV820 tires that I purchased in early 2015 (all manufactured in '14 according to date codes). They all have 6/32" or better tread with no signs of cracking or dry rot, and we've put roughly 18,000 miles on 'em. And, I'm pretty close to pulling the trigger on a full set of Thunderer Ranger R101 tires, but I thought I'd run it by all of you first, to get any thoughts/comments: Is tire replacement WAY overdue at this point? (Internet says YES) Do any of you guys run rubber older than this and care to admit it? Who's currently got the Thunderer Rangers and love/hates 'em?
-
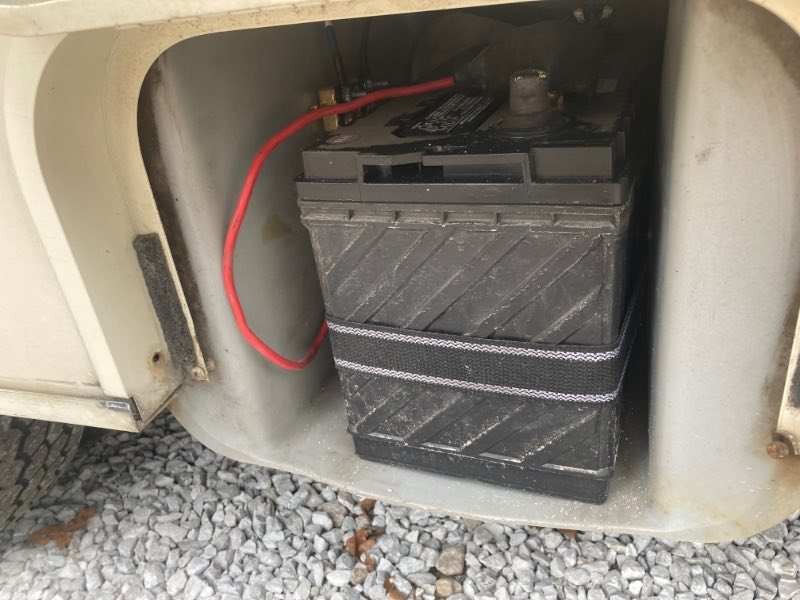
Mine's pretty close to 14" deep like yours but doesn't have the bump. Is it really in the way of the the battery? Maybe you don't have any wiggle room on the right-and-left? Here's what my Group 27 looks like when strapped in:

-
Group 27 seems to fit fine on my 91 Warrior; it's in an exterior box, down low and to the left of the entry door. Maybe yours is in a different place?