ToyoGuy
-
Posts
331 -
Joined
-
Last visited
1 Follower

About ToyoGuy

Recent Profile Visitors
3,408 profile views


ToyoGuy's Achievements
")
Enthusiast (6/14)
-
 Rare
Rare
-
 Rare
Rare
-
 Rare
Rare
-
 Rare
Rare
-

Recent Badges
-
 Hey Idaho, Take lotsa pictures when it's apart and you're in process. Some day 10 yrs from now, somebody's going to ask you how to do it. BR, TG
 -
Hey IdahoDoug, After you get the Black tank thing solved..... My rig was an 18' and, before I removed it entirely, I stored the bathroom shell up in the upper sleeping overhead while I did the floor. It worked OK to get it out of my way. I do believe that the bathroom shells were dropped in before attaching the top "clamshell" of the coach. I got mine out, but I had to remove the entire floor and both rear lateral braces that Sunrader welded in/installed to lift the rear frame and slide the bath-shell out under the rear bodt/frame. I tried everything else, including removing the front seats and doors. Dedication or insanity, I've been accused of both. BR, TG
-
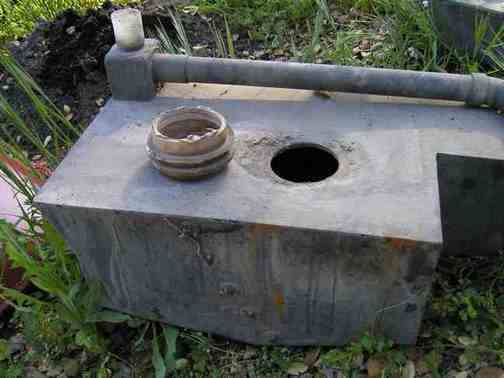
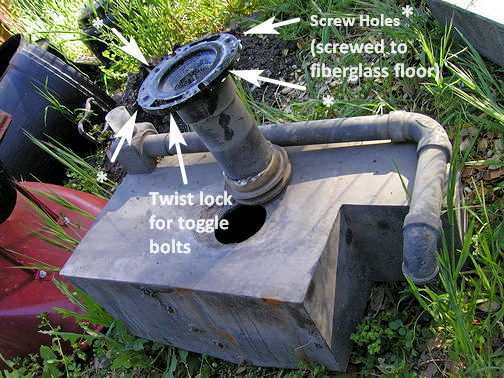
Hey Idaho Doug / All, Doug, my flange was (sort of) held on by 4 stripped screws that went through the toilet flange-lip into the fiberglass bathroom floor. (I can't see yours, but it sounds like they tried to solve the stripped-screw problem by using rivits with backing washers) My process for removing rivits is to use an appropriate-size drill bit* and drill the centers out. * One that will just cut off the head of the rivit. Here's some pix of my old assembly in the raw. The rubber gasket is tucked into the opening in the BW tank. (I'd re-seal as needed) As you can see in the photos , there are slotted holes for T-bolts in common house installation, so I think that's where someone threw out the explanation "unscrew it". Toggle bolts just twist, then they release. Because the fiberglass on my rig was about 1/8" thick, I used MG plywood to reinforce the bottom from underneath the FG, but my whole bath was out and on saw horses. I would consider gluing something under the fiberglass that the flange attaches to, to better hold screws or rivits whichever you end up using to hold the flange down. Hope this helps, BR, TG

-
Hey yestertech, Wow. Saw this impressive and thoughtful plan and execution, and looked at your previous contributions here. Beautiful stuff. I don't know what you used to do, but they probably didn't pay you enough. The "BFD" acronym inspired multiple alternative phrases to me, all quite useful in a fabrication shop. Keep up the great work! BR, TG
-
Hey 5Toyota, Will miss your posts, but congrats on your sale. Best Regards, ToyoGuy
-
Intimidated by floor repair, looking for guidance
ToyoGuy replied to daveemac's topic in General Discussion
Hi daveemac, This below, is just my observations, experience and opinion(s) on a big floor job that turned into an entire rehab due to "evolved moisture invasion". I am one of the SunRader guys you mentioned, so I can't define a fix for you, but when I did my extensive floor repairs, there were few people who could tell me exactly "what to do" as well, and I had to figure most of it out anyway. I had to buy or find portions of materials and adhesives and experiment with Linda's and others suggestions on the bench, not on the rig. I also had a fairly evolved skillset including woodworking, fiberglass, welding and adhesives. ie. Asking how to do some of this more complex stuff online can be like attempting brain-surgery on a walkie-talkie. I mean, how bad does plywood have to "look" to say "tear it out" ? Key points IMHO: You mention lots of re-fab on this rig, and that this particular work was done incorrectly. I would be somewhat suspicious of other repairs and look more closely at the rest of the rig and think about what it's worth. This is the time to re-inspect and re-evaluate your skill level, tolerance for learning how to safely work, willingness to spend money (it's always more than you think) , your time availability (mine took way longer than expected) and space to work safely and efficiently. I do not see this as a quickie, unless you want to adopt the PO's results. You mention " I have pretty much zero fiberglass experience..." I have seen mobile-RV repair guys on CL in your area, as there are a preponderance of RV's in Sac. and I don't think it will cost anything to hear what someone would charge and how they would deal with it. (Read "Aw yeah, here's how I did the last one of these" here) Still want take the plunge? Look for someone (again, maybe Craig's List) who has some skills on RV's and fiberglass/epoxy resins. Your previous posts are on an Oddessy 1 yr earlier, you may be able to learn some useful techniques from looking at that rig. Not trying to dampen your enthusiasm, just wish I had done some of the above before I ended up waaay more invested in time and money than I thought I would be. And lastly.................. " I saw a thread from 10 years back where a forum expert said there was an easy way to do it, but he didn't explain the method." Ummm, no comment. BR, TG -
Hi there Spooky, Very cool looking rig! We don't see many w/o rear wheel cutouts. Got a kinda classy "post-industrial" look to it. Can you let us know what year and maybe some interior photos? I am not the end all rear axle-guy-tire, but it's Pop's day and I am not, so.... Looking at your photo, if the current axle is original, there's no way "foolies" came on it originally. Looking at the wheel hub location as close as it is to the sidewall of your coach, there's simply not enough room for foolies. So,... if that's the original axle and it's correctly rated for the stock weight, and the interior is stock,(prior owners sometimes modify and put the darndest heavy stuff in RV's), you can start by looking at the interior and gross vehicle weight tag to see if it makes sense. (likely iin the cab door port) It's kinda about what's still inside compared to the weight of it's original configuration. There was a guy on the forum once, who stripped out a SunRader and just put a couch and a small propane tank back in it (not a good idea) and made it a surf-wagon, then went to a single wheel, like yours. For safety, it's about what you weigh when loaded for a trip, and choosing the correct load range ratings on tires you buy. Lot's of us have just weighed our rigs on a truck scale, with them loaded, for a correct weight, The listed Gross Vehicle Weight on the tag can to be somewhat "optomistic" on some of these rigs. Others can suggest particular tires, when you/we know more about your RV's actual weight and any past mods. BR, TG
-
Het BTB, I tried to address these in order: I used polyester resin in my build all the way through, just personal experience and knowing the product. I did do a thinner saturating "wash-coat" of both the scuff- sanded wall of the interior of the coach and about 8" in on the top of the raw marine grade ply I used, to insure adhesion of the main layup of the coving. The FRP bottom / road facing of my rig is also fiberglass-coved and water proofed around the entire perimeter, so I just primed and painted the underside of my flooring with a good paint and called it good. 6 or more years now, not a sign of any moisture. I used alternating oriented strand (read surfboard-type cloth, for the uninitiated) and random strand (stranding each which-way, no order). At previous points of obvious original stress failure, I used a heavier oriented strand cloth as well on top. You can see the heavier cloth on top in the third of my pictures of my floor in this thread. Yeah, I got foam material from a friend in the fiberglass business to shape into triangular-shaped strips to get a nice sturdy, even and round cove behind the cloth. Five layers at the wall, as I recall.... and a single oriented strand over the lateral floor seams, (because they are so well mounted). Again, not a hair's width of movement of any of it in 6 yrs. Sounds good, fasteners are cheap, it'd be a drag to address this later. Mine is secured at 12 points besides the preimeter 'glass. No rattles, no flexing, no distortion, no stress-popping. Life is good. My thoughts exactly. Others may think this stuff is overkill, but I don't regret a single minute of planning. There's enough to do in/on RV's without "re-do's". Thanks for the compliment. Credit where it's due...... I've learned so much from the people who run this site and others who shared. Enjoy the process. BR, TG
-
Hey BTB, Been outta town... Looking at the sub-frame in your pictures and following as best I can, your plan for A/C conduit "sammiched" in the floor.... as long as your PVC isn't under, or too close to, the birch ply seam, it all sounds / looks good. There's a lot of steel under that floor (good thing it's a pull-behind, behind a good truck!) I'd just make sure you have good adhesive and prepping. BR, TG
-
Always a late comer to the party here. Summer's coming and the annual heating issues with it. I always wait for the old-timers to report back on problem solving and listen-up, it hasn't failed me yet. Linda, WME, et al. I agree with Linda-check the stat on the stove and use IR or a good thermometer to check exact water temp. Leave it in for a while and see if it stays open. You're looking for specs and behavior. Agree with WME, bad mojo to mix coolants. Alas, at 105K mi, I think, do not rule out overlapping issues. The hole-drilling is usually to cure the water temp / gauge slamming into the trouble-zone 3-5 min after startup, ditto the $60 "special" stat that Toyota will sell you with an additional smaller opening to cure same. Once they're open, it's about flow. Because you were running at "above half" at the beginning,... do a careful check of temp gauge sender-unit per fac.manual specs. Again, like Linda said on the stat, kitchen stove, kitchen-thermometer will work, but will need ohmeter here. That said, I have now owned 4 of these little beasts, both carb'd and injected and will report that I have bought new 3-row radiators (not aluminum, made in Mexico) that were bad out of the box and, upon inspection were just badly built. I talked to the owner at 22 RE Performance, the most premium engine builder I know of some time ago, and he told me that he had so many problems with these MIM one's, that he has them, brand new in boxes, stacked up in the rafters of his shop. This was also confirmed by YodaMan in my home area in Cali. He paid for repairs on one of mine and several others under warranty, and won't touch them now. My last radiator purchased was aluminium because of the high cost of a responsible copper/brass rebuild and it's just OK so far. I have kept the old style copper core and will pay to re-build "next time". Other thoughts, timing correct? Is engine breathing easy? i.e. air box, filter, any obstruction in intake air flow? I don't know your skill level, but I'd do both a hot compression check and combustion gas test in water in the driveway, or like Linda said, mobil guy can do this easily. Especially if your guy's telling you the head's the problem and want's to send you to another shop. I keep hearing about "these guy's" who do work on your rig, then want to send you to another mechanic. It's becoming a thing these days and I think it's not a good sign. You keep good notes, that will help. BR, TG
-
By God Bob, you're a credit to the forces of mechanical obsession... Of course, without being there, ....one can only speculate on your/Bob's final out come, but I will say personally, that I got to the same place on my build, and like you said, had to work with what came out of the mold and just get on with it. Sounds like you've done everything possible to insure success. On the above however, If you've got a set of the rivet-on original fender flares with your donor, (thought I saw one in an earlier picture) you should be able to cheat one side either forward or back to get the wheel centered front-to-back on whatever "offending" side might need it. The inset of either tire/wheel of only 1/2" will only bother you and no one else will likely notice. The most careful vehicle restoration I ever did was a '71 Dodge Powerwagon and I searched endlessly for a replacement driver's side door without the later model inset around the door handle. Finally gave up, mounted the later one, prepped and painted. In all the years I had that truck, no one ever said a word about the doors not matching because they never saw them both at once. Looking really good. BR, TG
-
https://sfbay.craigslist.org/nby/rvs/d/geyserville-78-sunrader/7624851748.html A 20R with a 70K mi motor (dual-row timing chain?), w/good Ca smog. Lot's of new stuff. Oh man, good thing there's no room in my driveway. Got "foolies" of course, and would need more pictures, but looks pretty straight from this angle. Could be "the one". BR, TG
-
Heya Bob, So, 76" from top of floor to the bare shell/ceiling , then, minus at least 5/8" for insulation and paneling for the ceiling (more, if you're going to put in braces across the top), minus 1 1/2"-2" for light fixtures, (unless they're side-mounted under cabs). So it sounds like you're ending up at 73" +/- in height (I did re-read and seem to recall, you're a bit over 6'), so it sounds do-able. No vents on top?.....well hmmm, I gotta figure you have an excellent alternate cross-ventilation plan. ; ) The clearance block to fill the step-well is a very good plan. The aluminum "blade" that surrounds the entry-door port and provides a surface for the door to seal against, is commonly bent in at the bottom threshold in most SunRaders I've seen, from people bearing their entire weight on it, instead of stepping in onto the floor or in the stepwell. I spent an afternoon straightening mine and still have to warn people not to step directly on the door frame. "smaller wheels & tires", now why the heck didn't I think of that? I agree on strength of the floor as suggested. I measured my coach and found to my surprise, that I have about 1" more height at the rear dinette. My recollection is that I stayed with the stock floor margin and just raised it equally around the whole perimeter to allow for my slightly thicker floor. Not sure why I'm including that here... Random thought. Maybe burn one afternoon, and rig the whole frame/floor height/ ground clearance-wheel-tire size/ ceiling height/hitch height thing up temporarily with blocks (looks like you got a few) and back up the tow vehicle for hitch geometry (I mean, what the heck, my neighbors already thought I was crazy when I did mock-ups) After setting it all in place, you may find that, with your planned design(s), that the slant or reveal of the top or bottom of your coach looks kind of "wonky". That kind of result drives me crazy after all those work hours, welding wire and resin. Also something to think on as you go on.... Under the ("there is always something afterwards") subject, I upgraded all my wire gauge and wish I has installed some PVC or similar tubing from front to back, for a raceway to keep the wire bundle clean and also throw an extra circuit or two for the future projects. The downside is, that you can't just splice into the bundle half-way because it's contained in the tube. Could leave a couple of 10" gaps, I guess. I'll be interested in what you're doing with the sides for strength. The proof that my rig suffered from severe "oil-canning" (walls puckering or distorting in the wind) was that all of the stock 4' x 2" x 5/8" lateral plywood stringers originally glassed to the walls for reinforcement were laying loose in the walls when I did my tear-out. Well, that's all my brain is good for, for now, Your planning and quality of work is really impressive and inspiring. Especially at our age. BTW, when young people who have bought a project SunRader talk to me during a build and ask about seemingly impossible show-stoppers, (after encouraging them as much as possible), I tell them a side-benefit is that, by the time they are done, they will be able to perform at least one major engineering / fabricating miracle per week! BR, TG
-
Hey there BTB, Looks about like mine did, but you don't have a frame to trip over, I'm jealous. Soooo... on the other stuff. Yeah, I use(d) the same oscillating tool for some plunge-cuts, but I have some old carpal tunnel issues from using cast-cutters all day for years, that it aggravates, so I am limited that way. Also, I seem to go through the blades pretty fast on fiberglass cuts. Really nice to hear about the lack of dust though. I got to hate that stuff, I did so much glassing for my build. I knew I'd be coving the perimeter above and below the floor and road barrier, so it was nice for me to use the angle grinder to take care of the cutting-back of the old rotten stuff and do the 4" scuff-prep above and below the floor margins for good adhesion prep on the 23 yr old fiberglass. On floor height at the bottom of the door thought, ....the entry step-down in the stock setup (I had to rebuild mine entirely) actually has a drain hole most people don't know about for when it's raining sideways and you're getting in and out of the coach. Kinda nice to have one place on the floor to put really wet shoes/stuff that'll drain. Other thoughts on where the floor goes... like things you mentioned.... road clearance (sounds like you know what you want) , thickness of the floor top to bottom, ceiling thickness (insulation and any reinforcements at the ceiling) (don't forget to figure for light fixtures). I'm a shorter guy, and I think I ended up at 5' 10" of total ceiling height, but that would be unacceptable for lots of folks. Of course, good to consider overall height of the rig (any plans for racks on top?), In my opinion, the stock 'Rader is plenty exciting in a "robust" cross-wind. You're doing a trailer, and you gotta figure your tolerance for that and how much your "provisioned" weight/height will be. I have been known to fill the regular gas tank, fill an extra 5 gal Jerry can and top off the fresh water tank to get up CA 395 through Bishop in a stiff blow before Since you're almost starting with a kind of blank slate, I'd think a lot. (it's cheap), measure twice and ..... well, you know. There's a lot unsaid/unread about the plans for closing off the cab pass-through. (I'd better read through prior posts, I'm showing my age here) My rig is 9' 6" from the ground to the tops of the coach vents when they're closed, but... it's a 4x4 w/a 1" lift kit and stock 2wd are lower, I'm sure. (Maybe Linda can help?) "Inside door trim screws" you mean the aluminum trim that pulls the door frame into the port? IMHO gotta be able to get to those to tighten occasionally. Well heck, that's a lot said for not much said. It's looking great so far, BR, TG
-
I absolutely agree with WME on weight. One of the most interesting challenges for my build was figuring out where I wanted to allow for more weight and strength in materials to improve original designs and where I could lighten up other areas to make up for more robust portions. (no MDF or particle board in cabinets and shelving) Engineering is fun. Just another note on variation on different SunRaders.... Mine was entireley missing the 1/8" lower plywood / luan sheet between the road-barrier aluminum sheet and the pine 1" x 2" frame. See below a portion I sawed-out and saved for posteriority. TG