Search the Community
Showing results for 'overhead rebuild'.
-
 Finally got my shower project done, the back wall was wavy from what I thought was a leak from the shower, turned out to be a screw through the seam of the top and sides. Much brighter than wallpaper now anyway and looks sparkly clean.
-
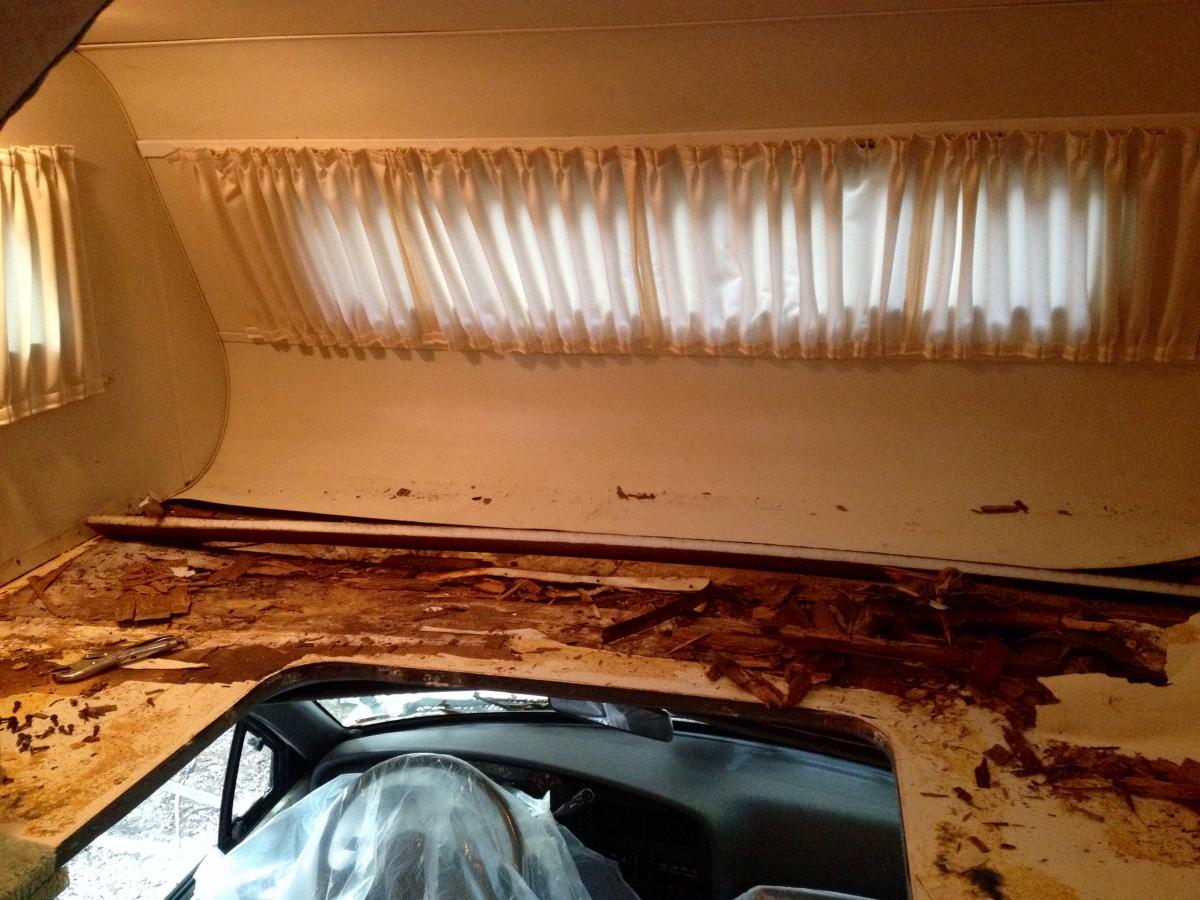
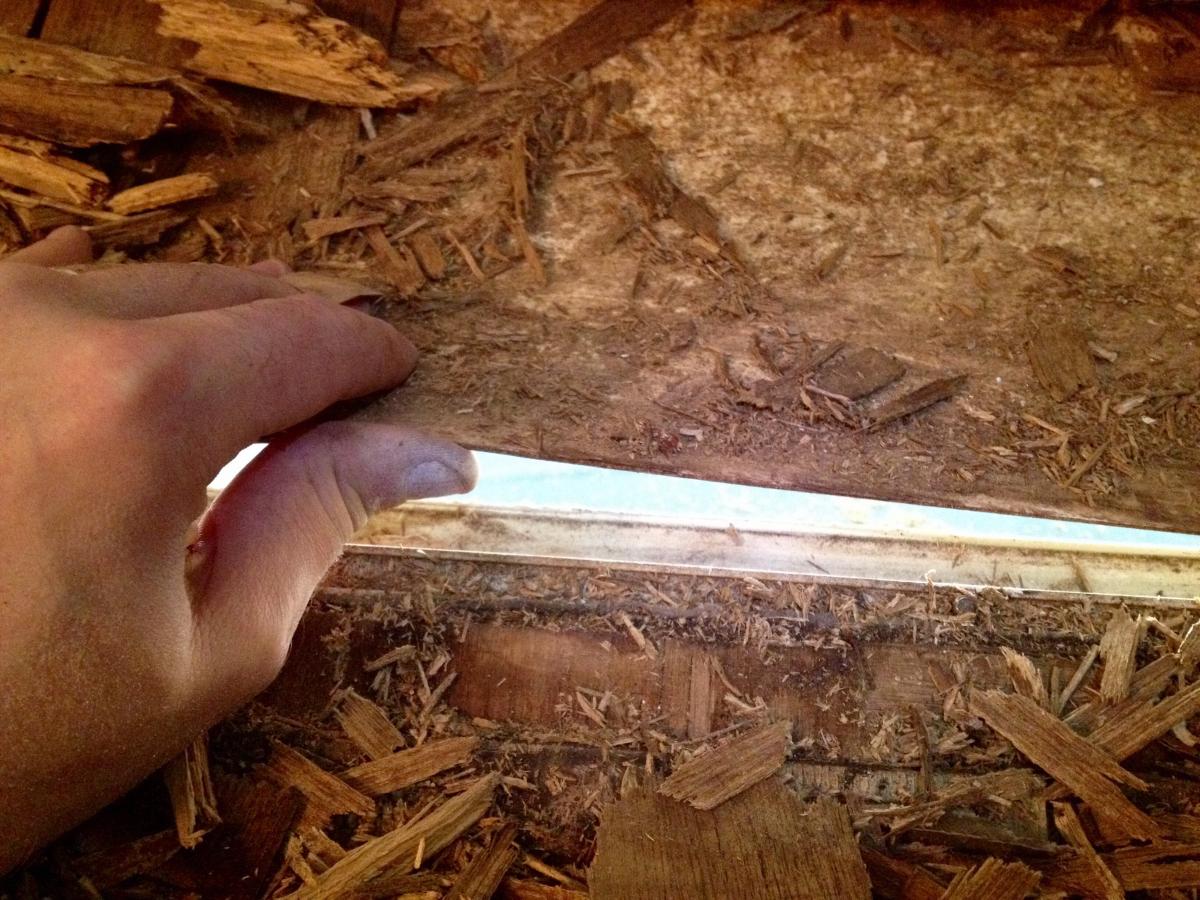
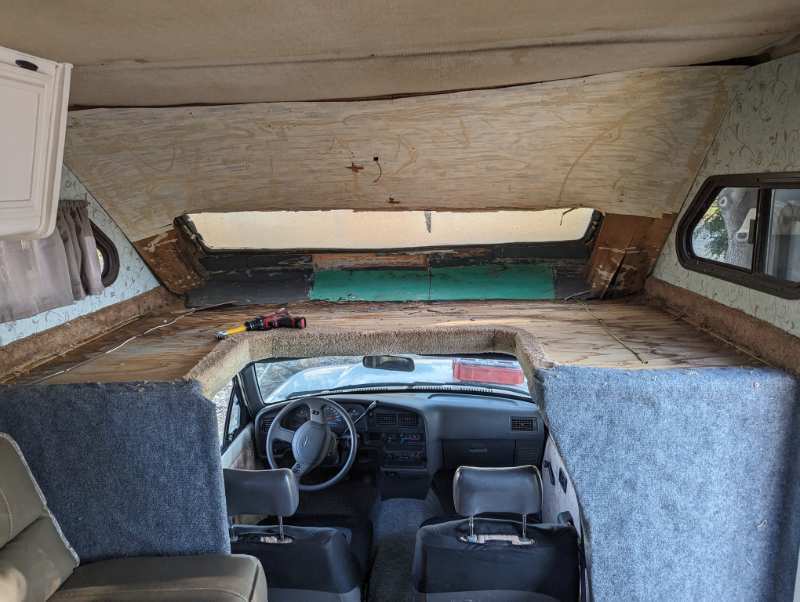
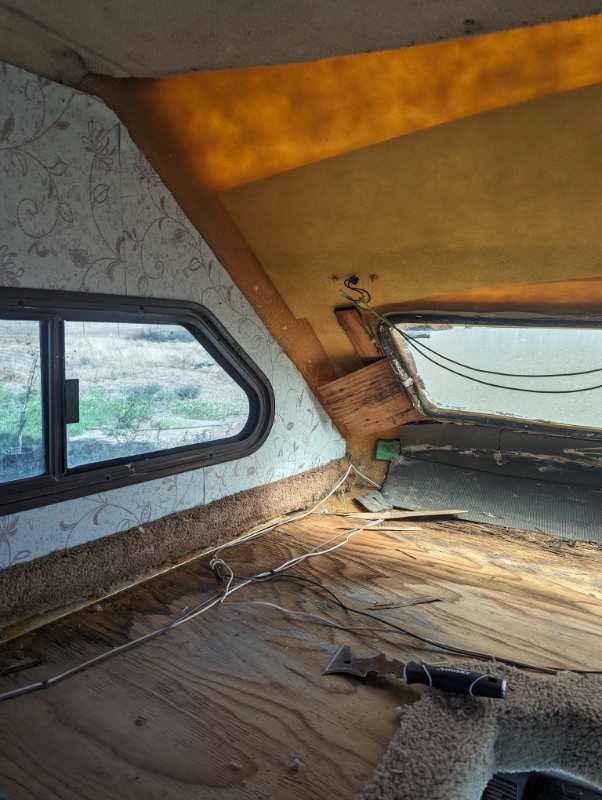
While doing some routine maintenance, I was alarmed to find some moisture under the cabover bed today. Our 91 Warrior stays under a cover 24-7 to help prevent this kind of water damage: http://www.amazon.com/dp/B007TKJLRW/ref=pe_385040_121528360_TE_dp_1 My alarm turned to complete dismay when I discovered layer after layer of mushy, rotten wood over the cab. I'm going to need your tips/tricks to figure all this out, for sure. To start, here are a few questions: 1) Do covers really offer much protection from rain? 2) Just about everything under the bed is ruined, but the sidewalls seem firm/solid; will I need to tear those vertical sidewalls apart in order to rebuild the "base" area? 3) Does anyone have a drawing that might correspond to the structure of my Winne? 4) In the second photo I'm attaching, you can see the piece that joins the two outer sections of fiberglass skin. There was no trace of adhesive/caulk/butyl where those pieces come together... I know this seam is on the underside, but surely there's still a need for some waterproofing. (?)
-
Hello, All - First time caller, long time listener. Thanks so much for letting me lurk in this group and learn SO much from y'all over the years! It gave me the confidence to bring home our new (to us) 1989 Gulf Stream Conquest. Now the real fun begins! It may be a while before I'm putting any new / dry materials into the over cab bed area, but like many of you before me, I've gotten it stripped down to the fiberglass. My question is - does the first layer next to the fiberglass HAVE to be luan? And regardless of what the substrate is (luan or something else) does it HAVE to be glued to the fiberglass? I do want to see if I can tighten the fiberglass back up, some (it was hauling a lake!) but am wondering about screwing it to the aluminum frame in order to accomplish that. Thanks so much for any advice on the rebuild!
-
Hi, JayBees - Did you ever get an answer to this? I'm going to need to rebuild the sidewalls of our overcab bed, and I, too, am wondering about that outer layer of luan (next to the Fiberglass) and whether it is necessary. AND if it CAN be replaced, does the replacement substrate NEED to be glued to the fiberglass? I'm looking into a product called GoBoard and a plastic wall panel on the inside - and wondering if that could replace the rigid insulation and exterior luan (and NOT be glued to the exterior fiberglass). Thanks, in advance, for any advice and experience anyone can offer.
-
 Got a 1990 Toyota motor home I’m planning to rebuild the rear end, it’s got the 6 lug dually rear end. Just wondering if anybody knows a kit I can buy that includes all seals and bearings and I’ll probably do brakes and hardware. Or part numbers. Thank you.
 -
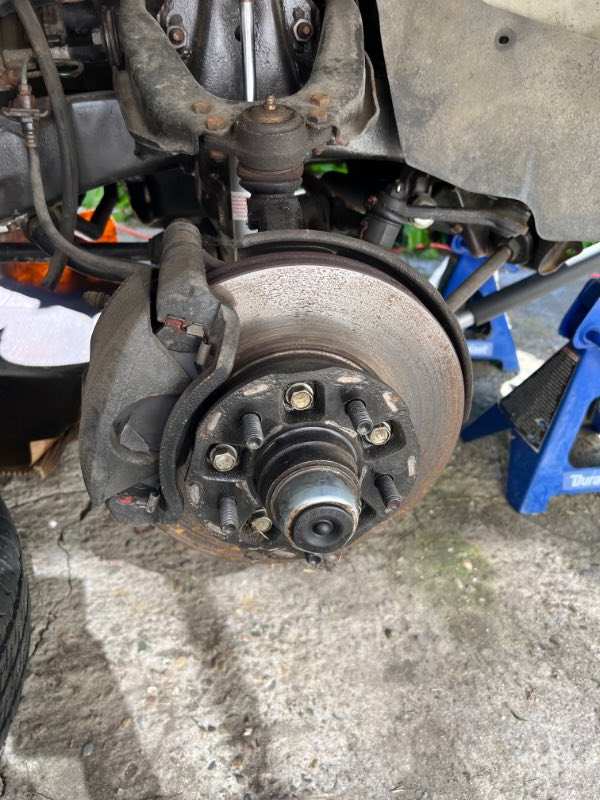
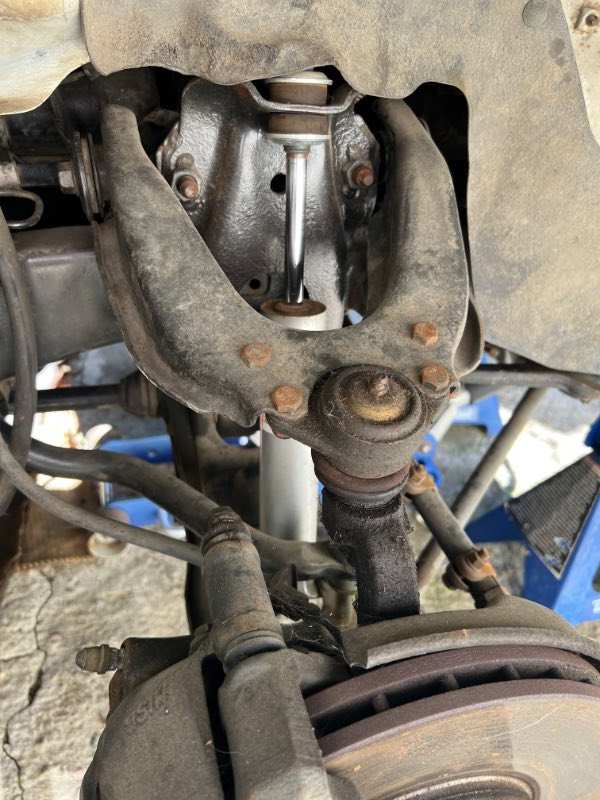
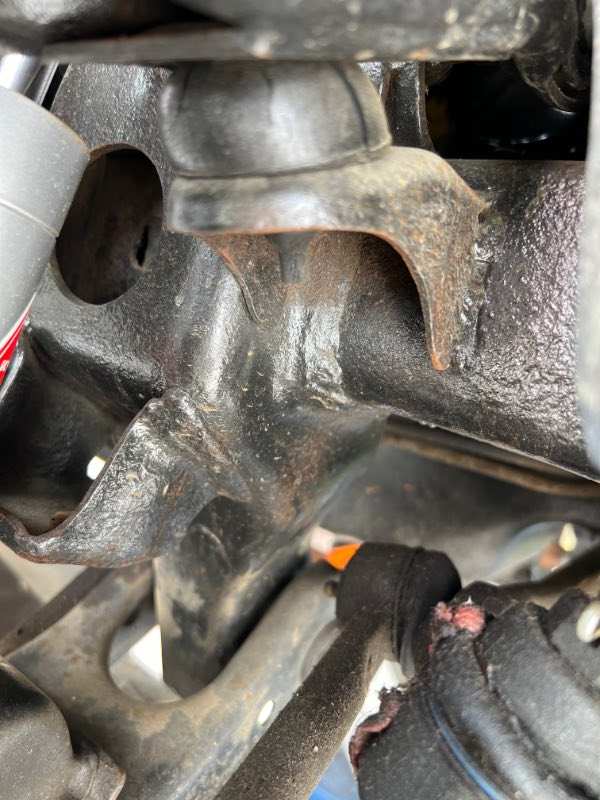
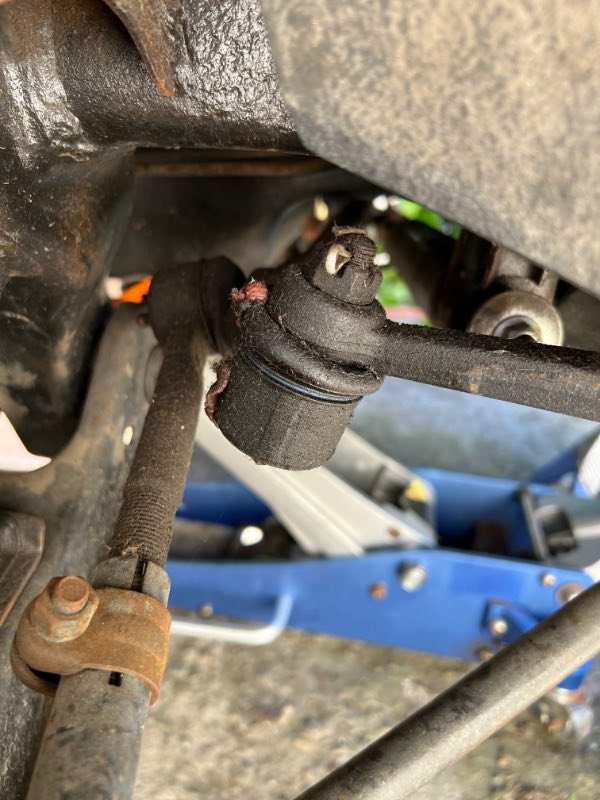
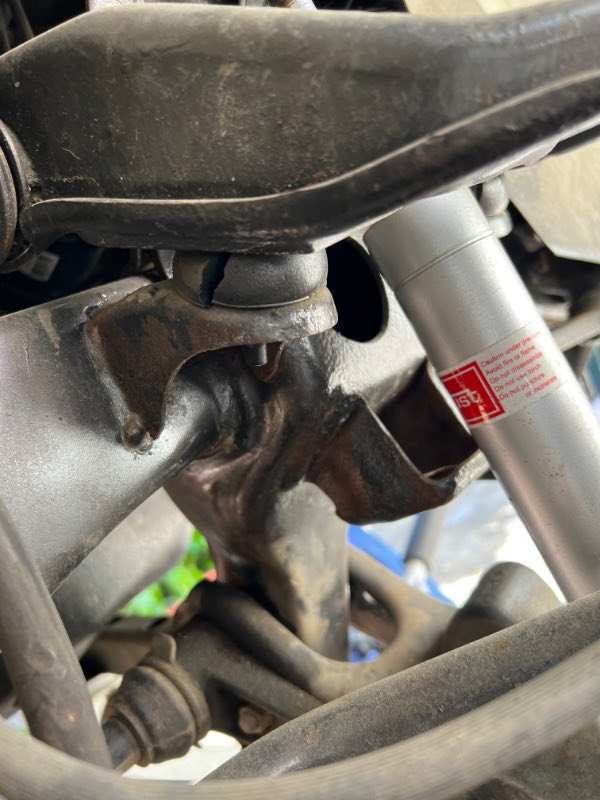
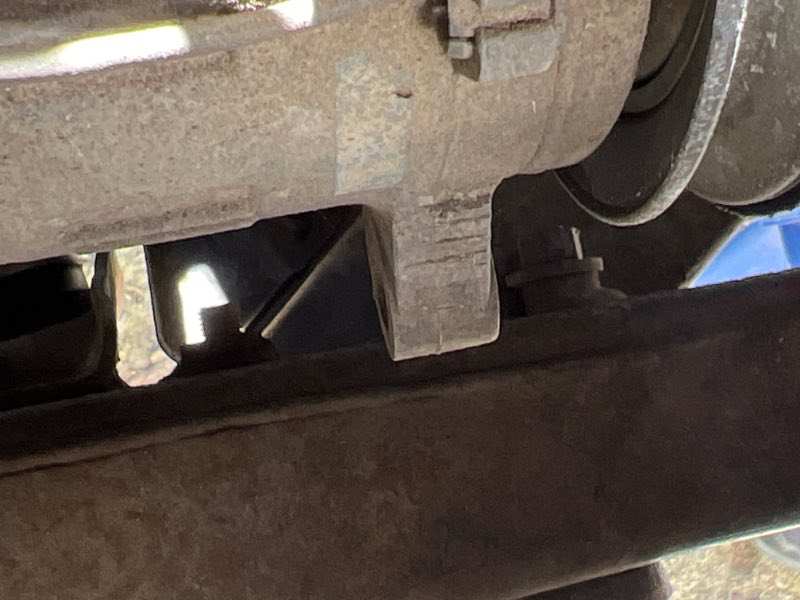
 Update to condition of front end rebuild. The idler arm came loose. What side of the bolt should the washers install?
-

New Buyer - 1986 Toyota Coachmen - Advice Please!
Scott iv replied to haleyryan7722's topic in General Discussion
From the pictures looks like a nice model. Rear dining area is desirable. No specific info on that model from me but a few general considerations as an owner of a non fiberglass unit and owner of numerous other campers: - Coachman was a reputable brand then and made quality campers - I am envious of the manual transmission and think that is a big plus. Clutch replacement is more manageable than automatic transmission replacement if ever needed. My understanding is the gear ratio on the manual transmissions work well. - Hunt for leaks in the camper ceiling by looking in cupboards, corners, and the overhead bed compartment. Inquire about what current owner did to repair the leaks and plan on researching ways to address and prevent leaks; all non fiberglass Toyota motorhomes leak at this point unless the owners have been incredibly diligent. Touch and press on spots in the ceiling that look unusual, discolored or wrinkled to determine integrity; is the wood firm, soft, crunchy, etc... - fridge is a pricey item, be sure to inquire about function in all 3 ways; gas, electric, dc. Look at the propane tank and see whether the valve is open or closed. If the valve is closed ask why so you know about propane leaks. Ask about all camper appliances and heater. Look in water heater area for water damage; not just the outside compartment, but inside as well. - the 22re motor was designed to not leak any fluids. Look underneath the engine for drips of any fluids. Leaks will have to be addressed promptly. Ask the owner whether the motor has ever overheated while they owned it. Take it easy with it if you buy it for a few until you can be sure the cooling systems are working properly (radiator, hoses, fan clutch, belts, pulleys, temp gauge in the cab). Ownership of these is a labor of love. Plan on needing to repair and maintain the vehicle no matter what the owner says about it due to age. Overall, very reliable once you address aged components. -
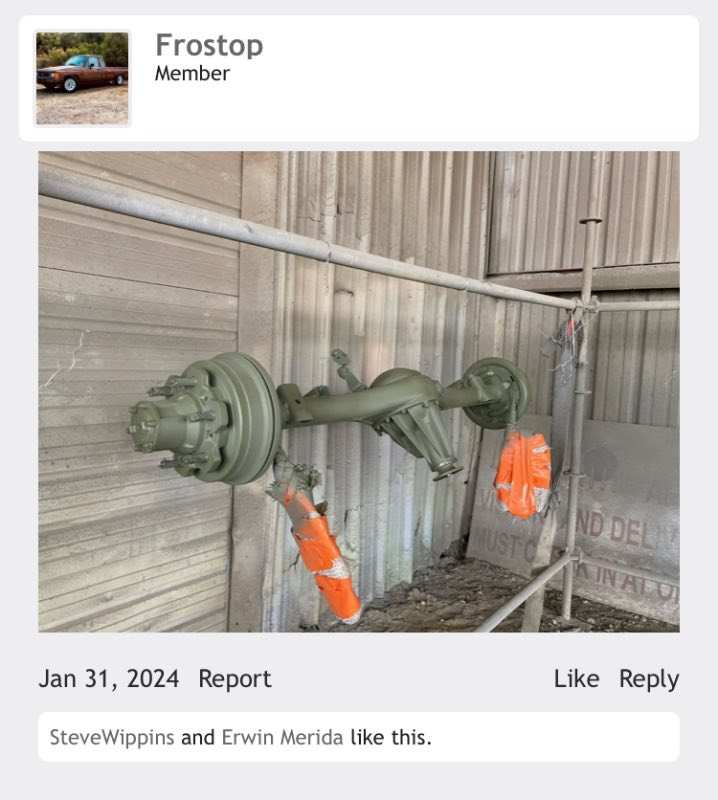
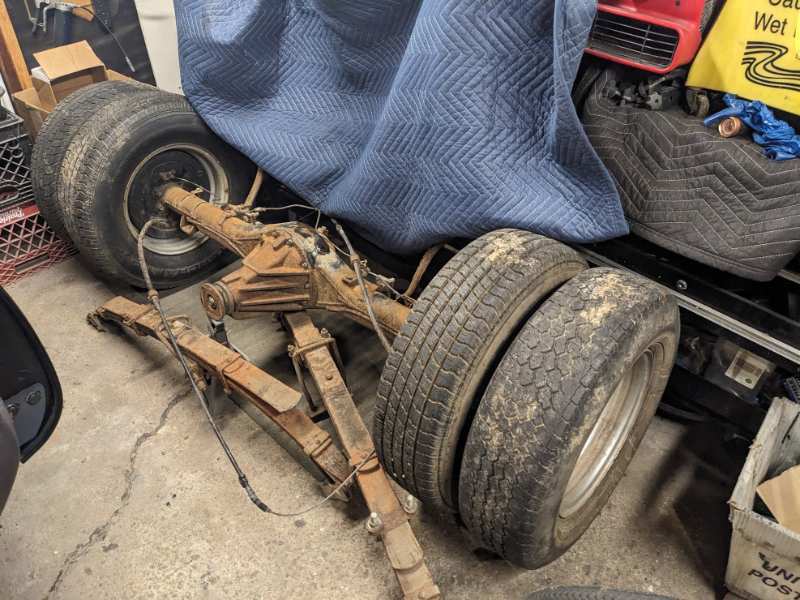
 There’s a forum for Toyota mini trucks I belong to. A member there is building a flatbed using the 6 lug ff axle. According to his build thread he’s sourced most all the parts for the rebuild from box stores. I was unable to copy the link, so did a screenshot of his axle. The site is toyotaminis. com. I’ve been a member for over 10 years. Very knowledgeable people for Toyota mechanical’s. He would be a good resource for your axle
-
Does anyone know where I can find an exposed view of the left rear framing on a rear-dinette 1984 Dolphin, or maybe an x-ray sketch of the framing? I've seen a lot of videos out there that have shots of segments of the framing, but so far they're either of a different section or of a different model. The part I need to rebuild is around and below the escape window. Thanks!
-
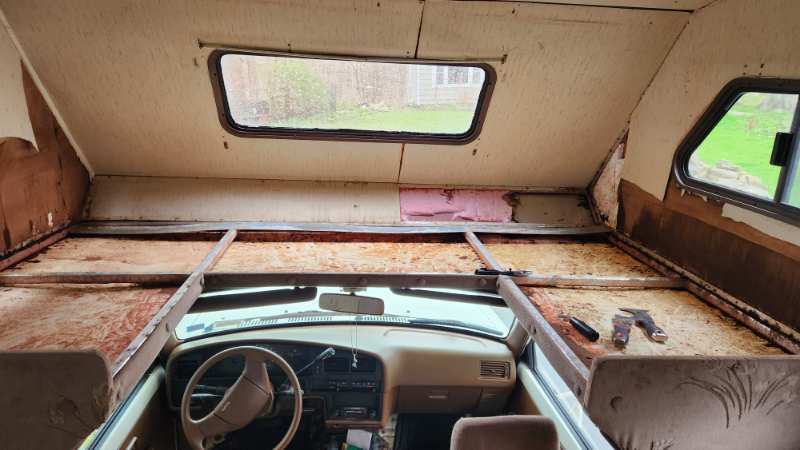
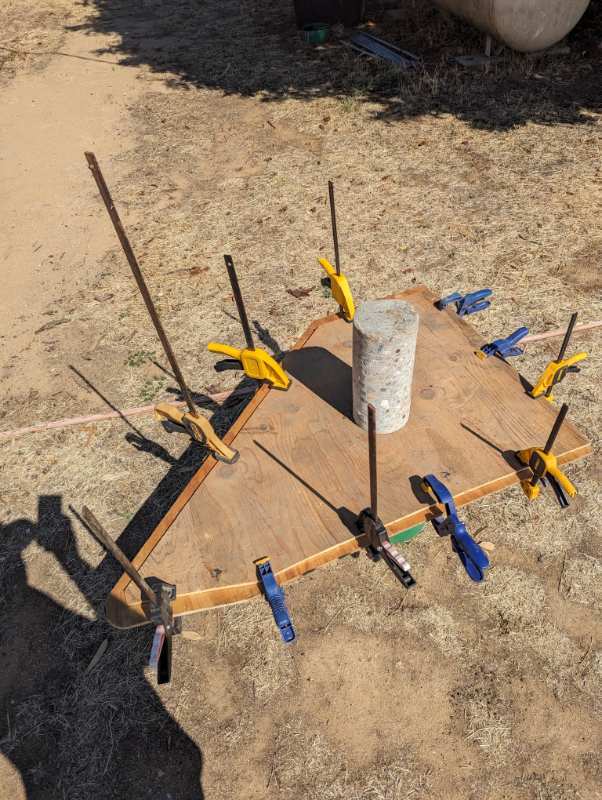
 Thanks for the props! So the side plates cured over night just fine. Putting the beams up - disaster. When I picked up the aluminum beam, it's sold in a 20 foot length. So they asked how long to cut them and I said 74" which would have given me extra to trim back. If they were going in the back where the other 11 went. Got nailed by the "measure twice, cut once" factor. I missed the fact that the upper ceiling is wider up front in the sleeper, so the two cut pieces are now scrap, and the third longer piece that WAS going to be scrap is now the only beam I could put up today. Argh. Gotta order another full beam just to cut a 78" piece from it and that will take 2 days to arrive. Lesson learned. EDIT: And right on cue this morning. "Sorry, but due to logistics issues we are now out of stock on that item..." Double Argh The gentle stomping got a nice curve out of the beam, and for the second time I'll say to anyone following my lead that you can do this versus all the trouble and time I spent using a high end roller bender machine. Although for maximal/optimal strength you do want the beams uniformly curved. However, I can tell this level of strength is such overkill that a minor degradation would not make any practical difference in handling walking or roof loads, or literally 5 feet of snow. I curved this beam to a 2" peak (measured from the ground to the bottom of the arch). I'd estimate in the sleeper this was flattened a half inch during installation, then headroom minus the I" thickness of the beam itself and I barely got increase in headroom. I figured this would be the case, but I wanted the strength for walkability, and snow load, plus I wanted two hard points to mount overhead storage, and handles to ease getting in and out of the bunk. The factory puts only one handle along the right wall, and it's so close to you when you try to pull yourself in/up it doesn't really help you pull yourself up in one motion. I wanted stable handles at different points for late night bathroom visits, getting over a sleeping spouse, etc. Plus, the incredible strength back in the living area from these beams made me feel if offers protection from something like a falling branch, and laying in the sleeper at night in a windstorm some future night thinking "why didn't I put those protective beams up here where we sleep?" was another benefit. And I plan to make my sleeper hatch that covers the access hole a hinged piece, so I'll be able to use the beam above to mount a stout hard point to hold the hatch open while driving. The side plates may also make for a nice tie down mount some day, simply by drilling all the way through and using a washer on the inside to spread what could be a very considerable load from the outside such as a hammock rope, an awning tie down, etc. Here's the first sleeper beam up:
-
All I'm looking for is someone who can tell me what converter, fuse panels, power center, etc I should buy. There are so many systems out there now due to the vanlife craze. Some of them are needlessly expensive due to the brand name, but I'm sure others offer durability and reliability without that added cost. First, an overall comment that I am not a tech junky, so I would prefer simple solutions, and I would hope I can do this without each component needing its own LCD screen on a wall in such a small vehicle as the Sunrader. I'd rather have a system that quietly does its job, vs one I have to use a touch screen (that will eventually break) to do everything. So, expressing a preference for minimum interaction needed. By way of example on the course of my complete Sunrader rebuild, there will be absolutely zero light switches that are the press and hold to your desired brightness. I have purchased compatible switches where you just click them on and rotate the knob until they're bright enough and walk on just like houses had for 50 years. Not a fan of the new press and hold, wups too bright, let go, double click to reverse direction and start dimming, wups too dim, etc things. Here's what I am doing with the build that will impact the electrical system. At least one lithium house battery, plus a normal underhood lead/acid battery. Prewire for future solar (though we live up North). Prewired for future roof A/C (we rarely need this and it may not get installed based on years of camping without A/C in our Vanagon). I have a 3 way fridge, a gas cooktop, gas water heater, will have a 1500w AC microwave, a 1500w AC electric house heater (edit: only for shore power use, as will also have the original gas furnace which works great), may add a roof mounted 12v electric winch to pull kayaks up onto the roof, and would like to avoid a generator. I'm happy to upgrade the alternator if needed. I'd like to have an onboard charger that activates whenever we're on shore power. If a second lithium house battery ($800?) solves something, would consider that to get a 2nd day of boondocking, etc. My Sunrader is completely empty right now and I will be building the interior from scratch, so no limitations on space as I'll design around the components. Here's my expected use case. We will be hooked to shore power only 10% of the time its in use. The rest of the time we will boondock, but rarely more than 2 days and nights in one place before driving off and having a recharge ability while underway. If anybody has either a prefabbed "system" I should look at, or knows enough to design a group of components for less money, I'd love to have a discussion about it and perhaps others in the future would benefit on the forum as they consider upgrading. Thanks in advance!
-
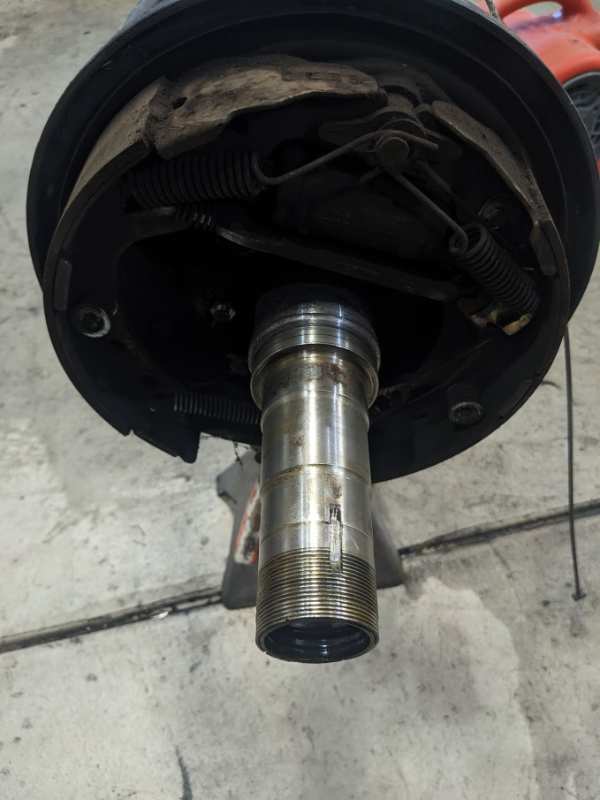
 About 6 months ago I purchased a full floating 1 ton 2WD axle to swap into my 76 Chinook. Today, I finally got around to tearing it down only to find that the previous owner galled the threads on the axle housing. I was able to get the retaining nut off (it was a total PITA!) without screwing up the threads any worse than they already were, but need to chase the threads on the axle housing before I can rebuild it. Does anyone know what size / pitch the threads are for this? I've looked online and cant really find any info. Thanks!
-
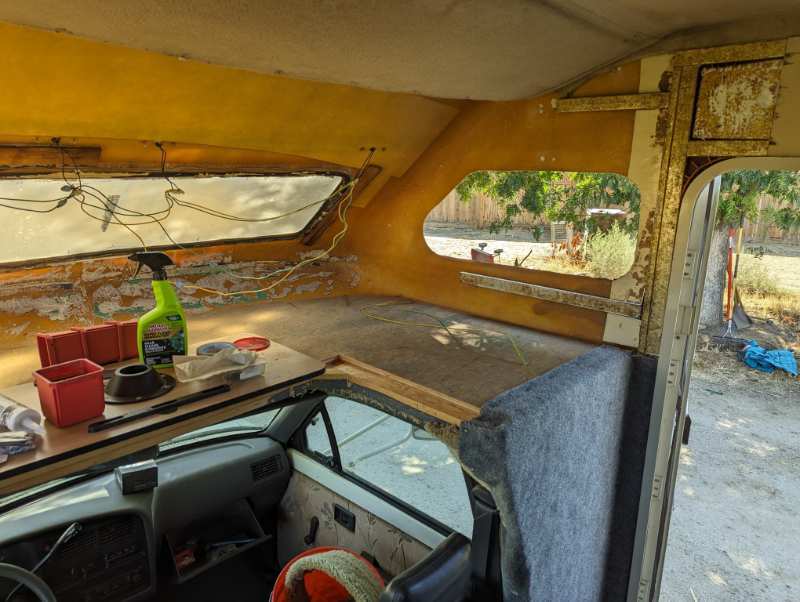
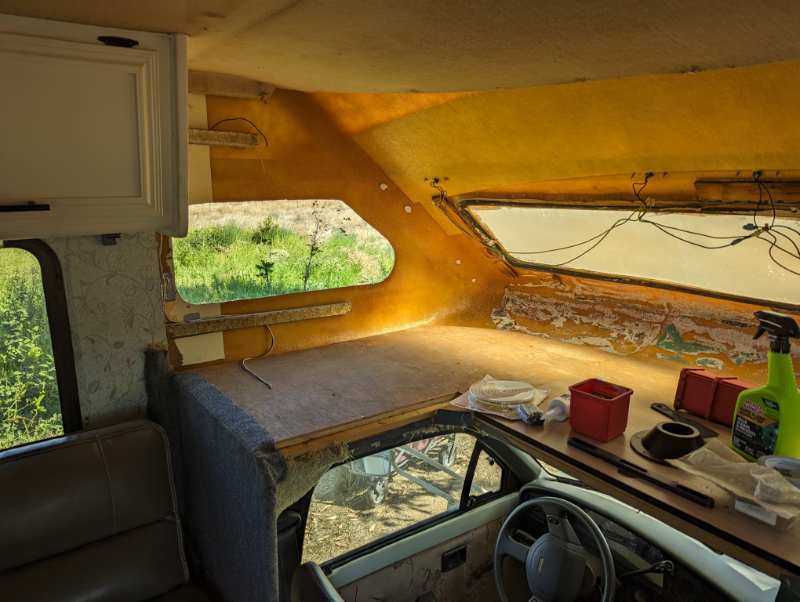
Well, the BMW fix did not work. Parts on the way. Argh. On the Sunrader, I finally got out to work on it after weeks of intense cold, then a heavy snow. Here, I can see the aluminum roof beams are going to be thermal conductors. Oh well, I am confident the average insulation value of the roof is much higher than factory with twice the insulation thickness between the beams, and a new generation foam versus that styrofoam: I got back on the sleeper today. Made the decision to install aluminum beams on it's roof also - primarily to install a handle, and use as a structure to install some ceiling netting above our heads to hold cell phones, books and such up out of the way. I was going to do a shelf, but it would interfere with the insulation layer, foam layer and padding layer enough that would have diverted too much time. Overhead netting is a better move as you can look up and see what you need to grab, vs feeling blindly up on a shelf. Plus underway, nothing will fall, again vs a shelf above our heads. So I decided where the gooseneck reading lamps will go and glued up mounts (tape is holding them in picture) and painted the "floor" with Kilz to block off a bit of mildew there. I replaced the far corner of the floor with new, caulked the edges as the factory should have, and now its painted. Before doing that, I decided where the two roof beams will go and reground the with the sander to be sure I will get a secure grip with the epoxy, then vacuumed the entire ceiling and floor before painting. This sleeper is driving me crazy, frankly. Thinking of ways to cover the windows, power for cell chargers, reading lamps, new wraparound windows, the ceiling, etc. I'm starting to ratchet down some of the details in favor of keeping the project moving. I need to insulate it, and install the ceiling and wall upholstery, so I can install the piece of wall behind the bath and reinstall it. Those two wall surfaces come together.
-
Hello, A little info about me. I have never owned an RV! I live in Denver and am curious about owning something to take to the mountains for ski season as well as summer camping! One more thing - I work remotely and drive hardly at all. Once a week to the grocery store and once a week to a class I attend. Odds and ends beyond that. So, it's possible this RV would also function as a driver around town. I have found a 1991 Toyota Winnebago in Denver. It has 39K miles, and asking price is $17K. I would probably not be able to afford that but would like to haggle. I'm curious the overall reliability of this vehicle. It is the V6 3.0l Dually version. It appears to be in great shape. The owner said that he fixed a leak professionally over the overhead cab and it cost him $4K. Maybe this is why he wants $17K.... Based upon my little research it seems that $12K would be a reasonable price. His ad also mentions that he has never used the toilet, shower, or sink but that the pump appears to be working. Would it be a problem if this system sat unused for years or is this a potential plus? Other random questions: - any other small sized RVs i should be considering? I like the idea that this vehicle is basically a toyota tacoma with an RV lol. Its also small for parking in denver - Winter Camping? any special considerations - Power: any special considerations for running heat in the winter? In the summer, it is cold enough in colorado I will likely not need to run a/c. - reliability? - toilet/plumbing reliabilty - Anyone else rv around the mountains here and have pointers for places to stay overnight? Sounds like ski season at the resorts may not be the best option Thank you so much for the help!
-
I was able to score a 1 ton 8" axle out of an old Dolphin from Facebook marketplace and plan to swap my G082 diff for the full floater. I'd like to rebuild it before installing it, but I can't really find any resources on specs. While I'd imagine the center section is basically the same, does anyone know if there are any resources for rebuild procedures, torque specs, etc. for the 1 ton?
-
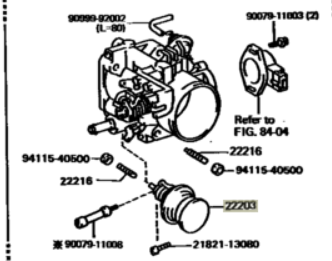
 Thank you so much, re: the dashpot, and thanks Linda for your trusty reply 😀 No, I haven't removed it and cleaned it, maybe I oughta give that a try. https://toyotamotorhome.org/forums/index.php?/topic/20504-engine-problems-egr-vacuum-hose-leak-tps/#comment-134310Here , btw, is my problem, posted last week Since I haven't found a rebuild kit for said throttle body, and rebuilding it seems like a long shot, except for maybe a new gasket. I'll come back to one of my original questions re: an Upgrade. Anyone know if my 3.0L 3VZ-E throttle body can be replaced with another, more modern Toyota throttle body, one that is still actually for sale? (already replaced TPS, EGR, and will, later today, the fuel pressure gauge) As always, Many Thanks!
 -
 No new ones anywhere on the planet. I checked the whole site and I see many posts about cleaning them and a few about having a machine shop rebuild them. Have you taken yours off and cleaned it thoroughly? Here's the other part you asked about. Here's the part number but it's been discontinued too Linda S
-
I've been away from this forum for a few years. I finally retired and was ready to "Rock and Roll" down the camping road, but first... Four disks needed to be taken out of my neck and a titanium plate attached to 5 vertebra , both hips needed total replacement, and just when I thought that was it, a hernia surgery. That wasn't in the plans nor were the forest fire evacuations. But now, dusting myself off... I've got the 21' Sunrader RD 22RE running again, and the rear brakes are really not very good. The totally new front brakes (Calipers, Pads) will lock up on dry pavement, but the rears are just plain pathetic. So I have been tooling around this site looking for part numbers for all of the parts needed for a totally new rear brake rebuild. From the Master Cylinder to the wheel cylinders, rear shoes, hoses, and the seals required to do the job. I have already blocked the load proportioner valve totally open. I have read that aftermarket shoes don't seem to match the drums. Can you steer me to the appropriate links?
-
 I recently purchased a 1990 Dolphin and the previous owner removed the dinette. I'd like to rebuild it and wanted to see if anyone had the stock measurements. I'm mostly just looking for the seat height, as it came with the cushions so I can use those to figure out the width and the seat back height. This dolphin has the dinette located on the passenger side behind the door and in front of the fridge. I will need to build a box around where the wheel well is as it looks like that will be right in between the seats. Thanks!
 -
Another update after the fuel system rebuild! No longer getting a rich / lean check engine light, fuel economy increased to 11.5 which i’m pretty happy with considering the vehicle and being a 4x4 house!
-
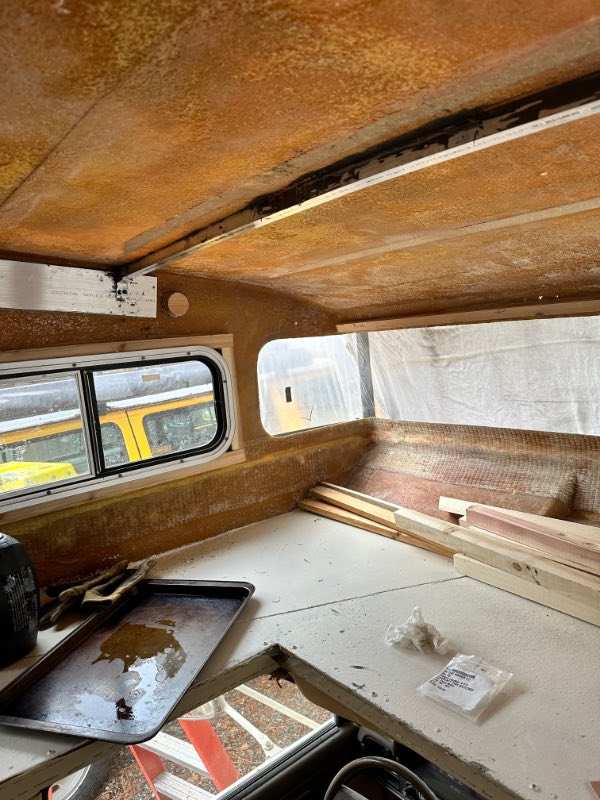
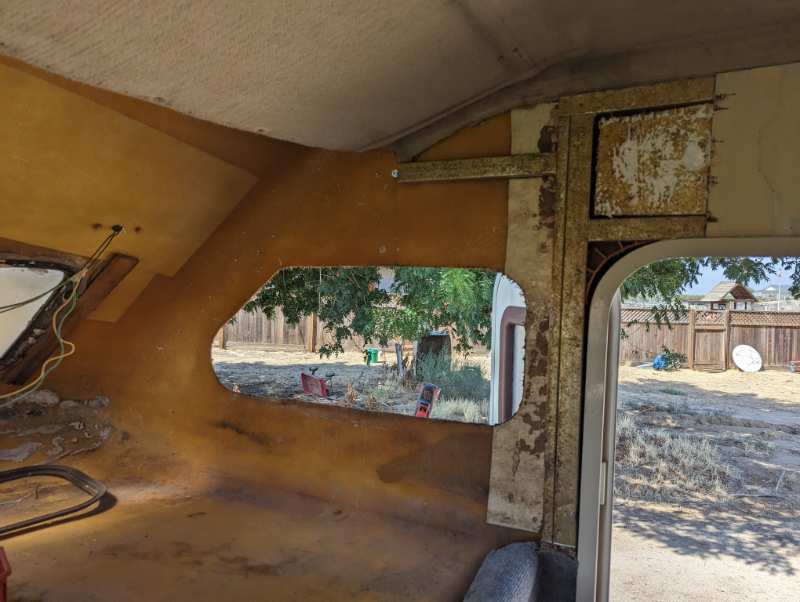
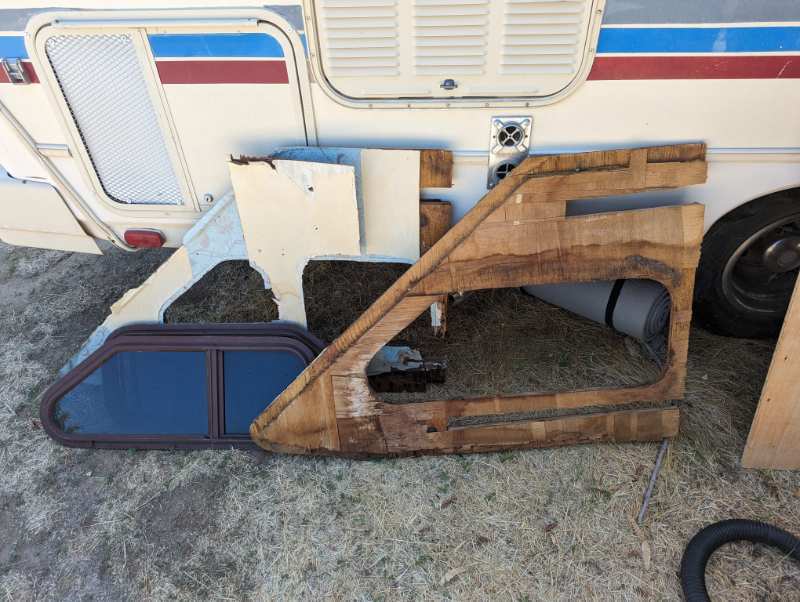
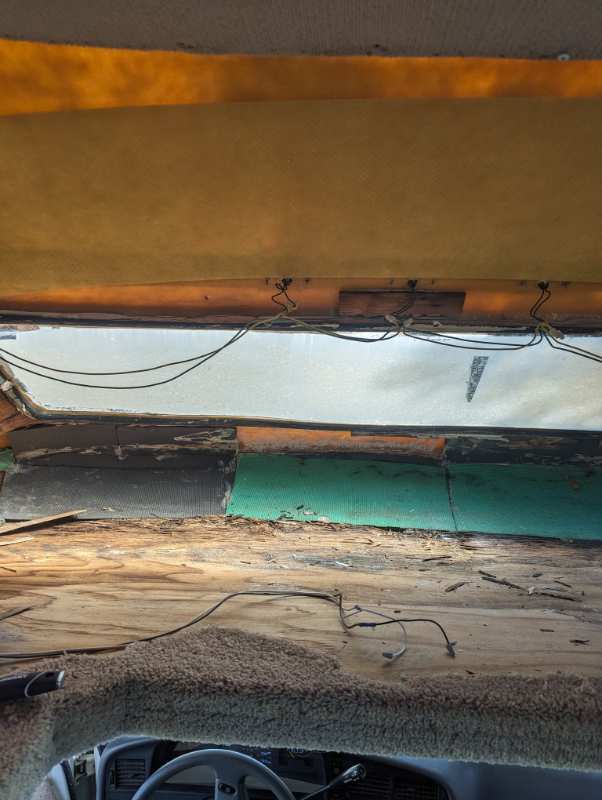
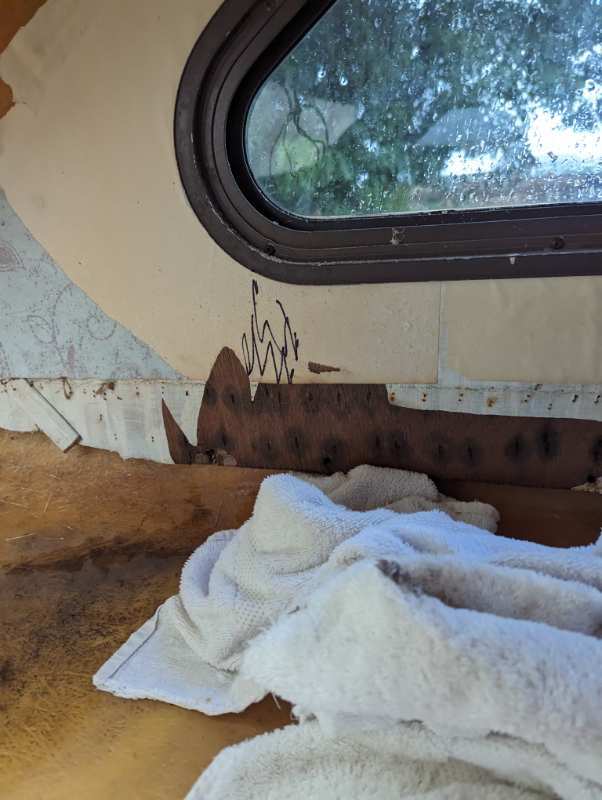
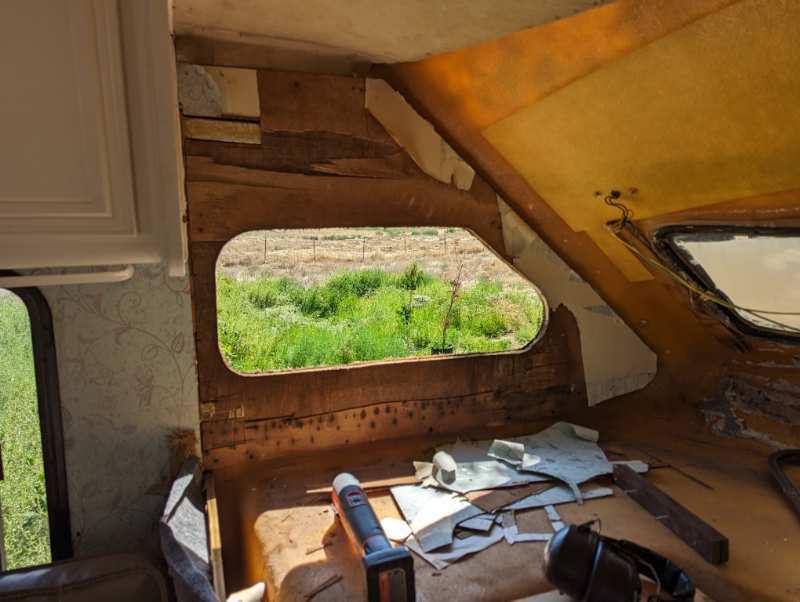
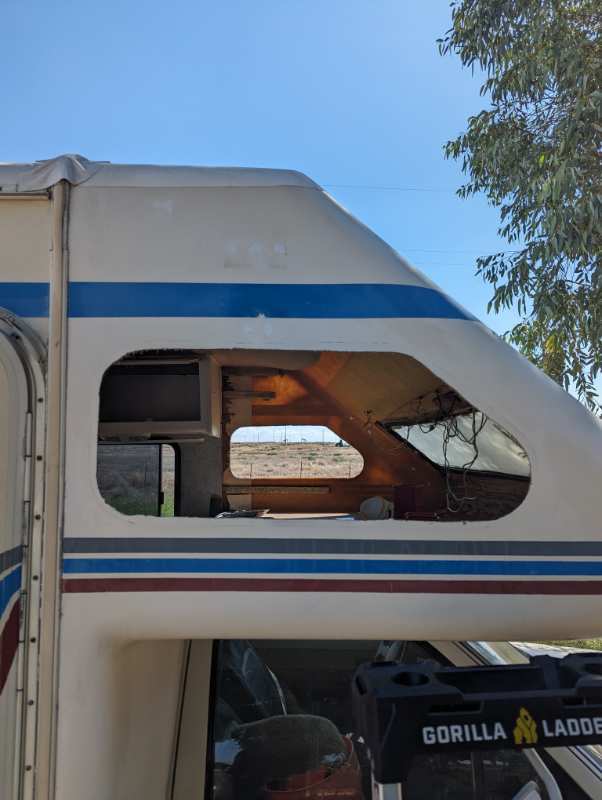
Good Morning my new friends, about a month ago I was able to pick up my first Toyota Camper! We had been looking for a long time and the timing lined up right for us to get this 1990 Americana. It looked like it had been re-modeled well with some nice addition like solar and a deiseal furnace but some other area where more just patch up, band aid jobs like the over cab section. I didn't take any before pictures but when we got it there was a piece of plastic siding covering up the front window. Once I got it home and took off the siding I was able to start seeing the water damage and mold, not a nightmare amount but enough to warrant a remodel. After looking around the forums and watching every youtube video that came up when I searched "Toyota RV Remodel" I found out that there was not a lot of info on this particular model. I am about half way through rebuilding the over cab floor and walls and wanted to start posting the progress in hopes that it may help someone in the same situation as I am. One question I have is this, I was going to just copy what was originally installed for the side walls (two layers of plywood with a thin layer of veneer) but I was thinking about changing it and doing two layer of insulation board with a layer of veneer. Any thoughts?
-
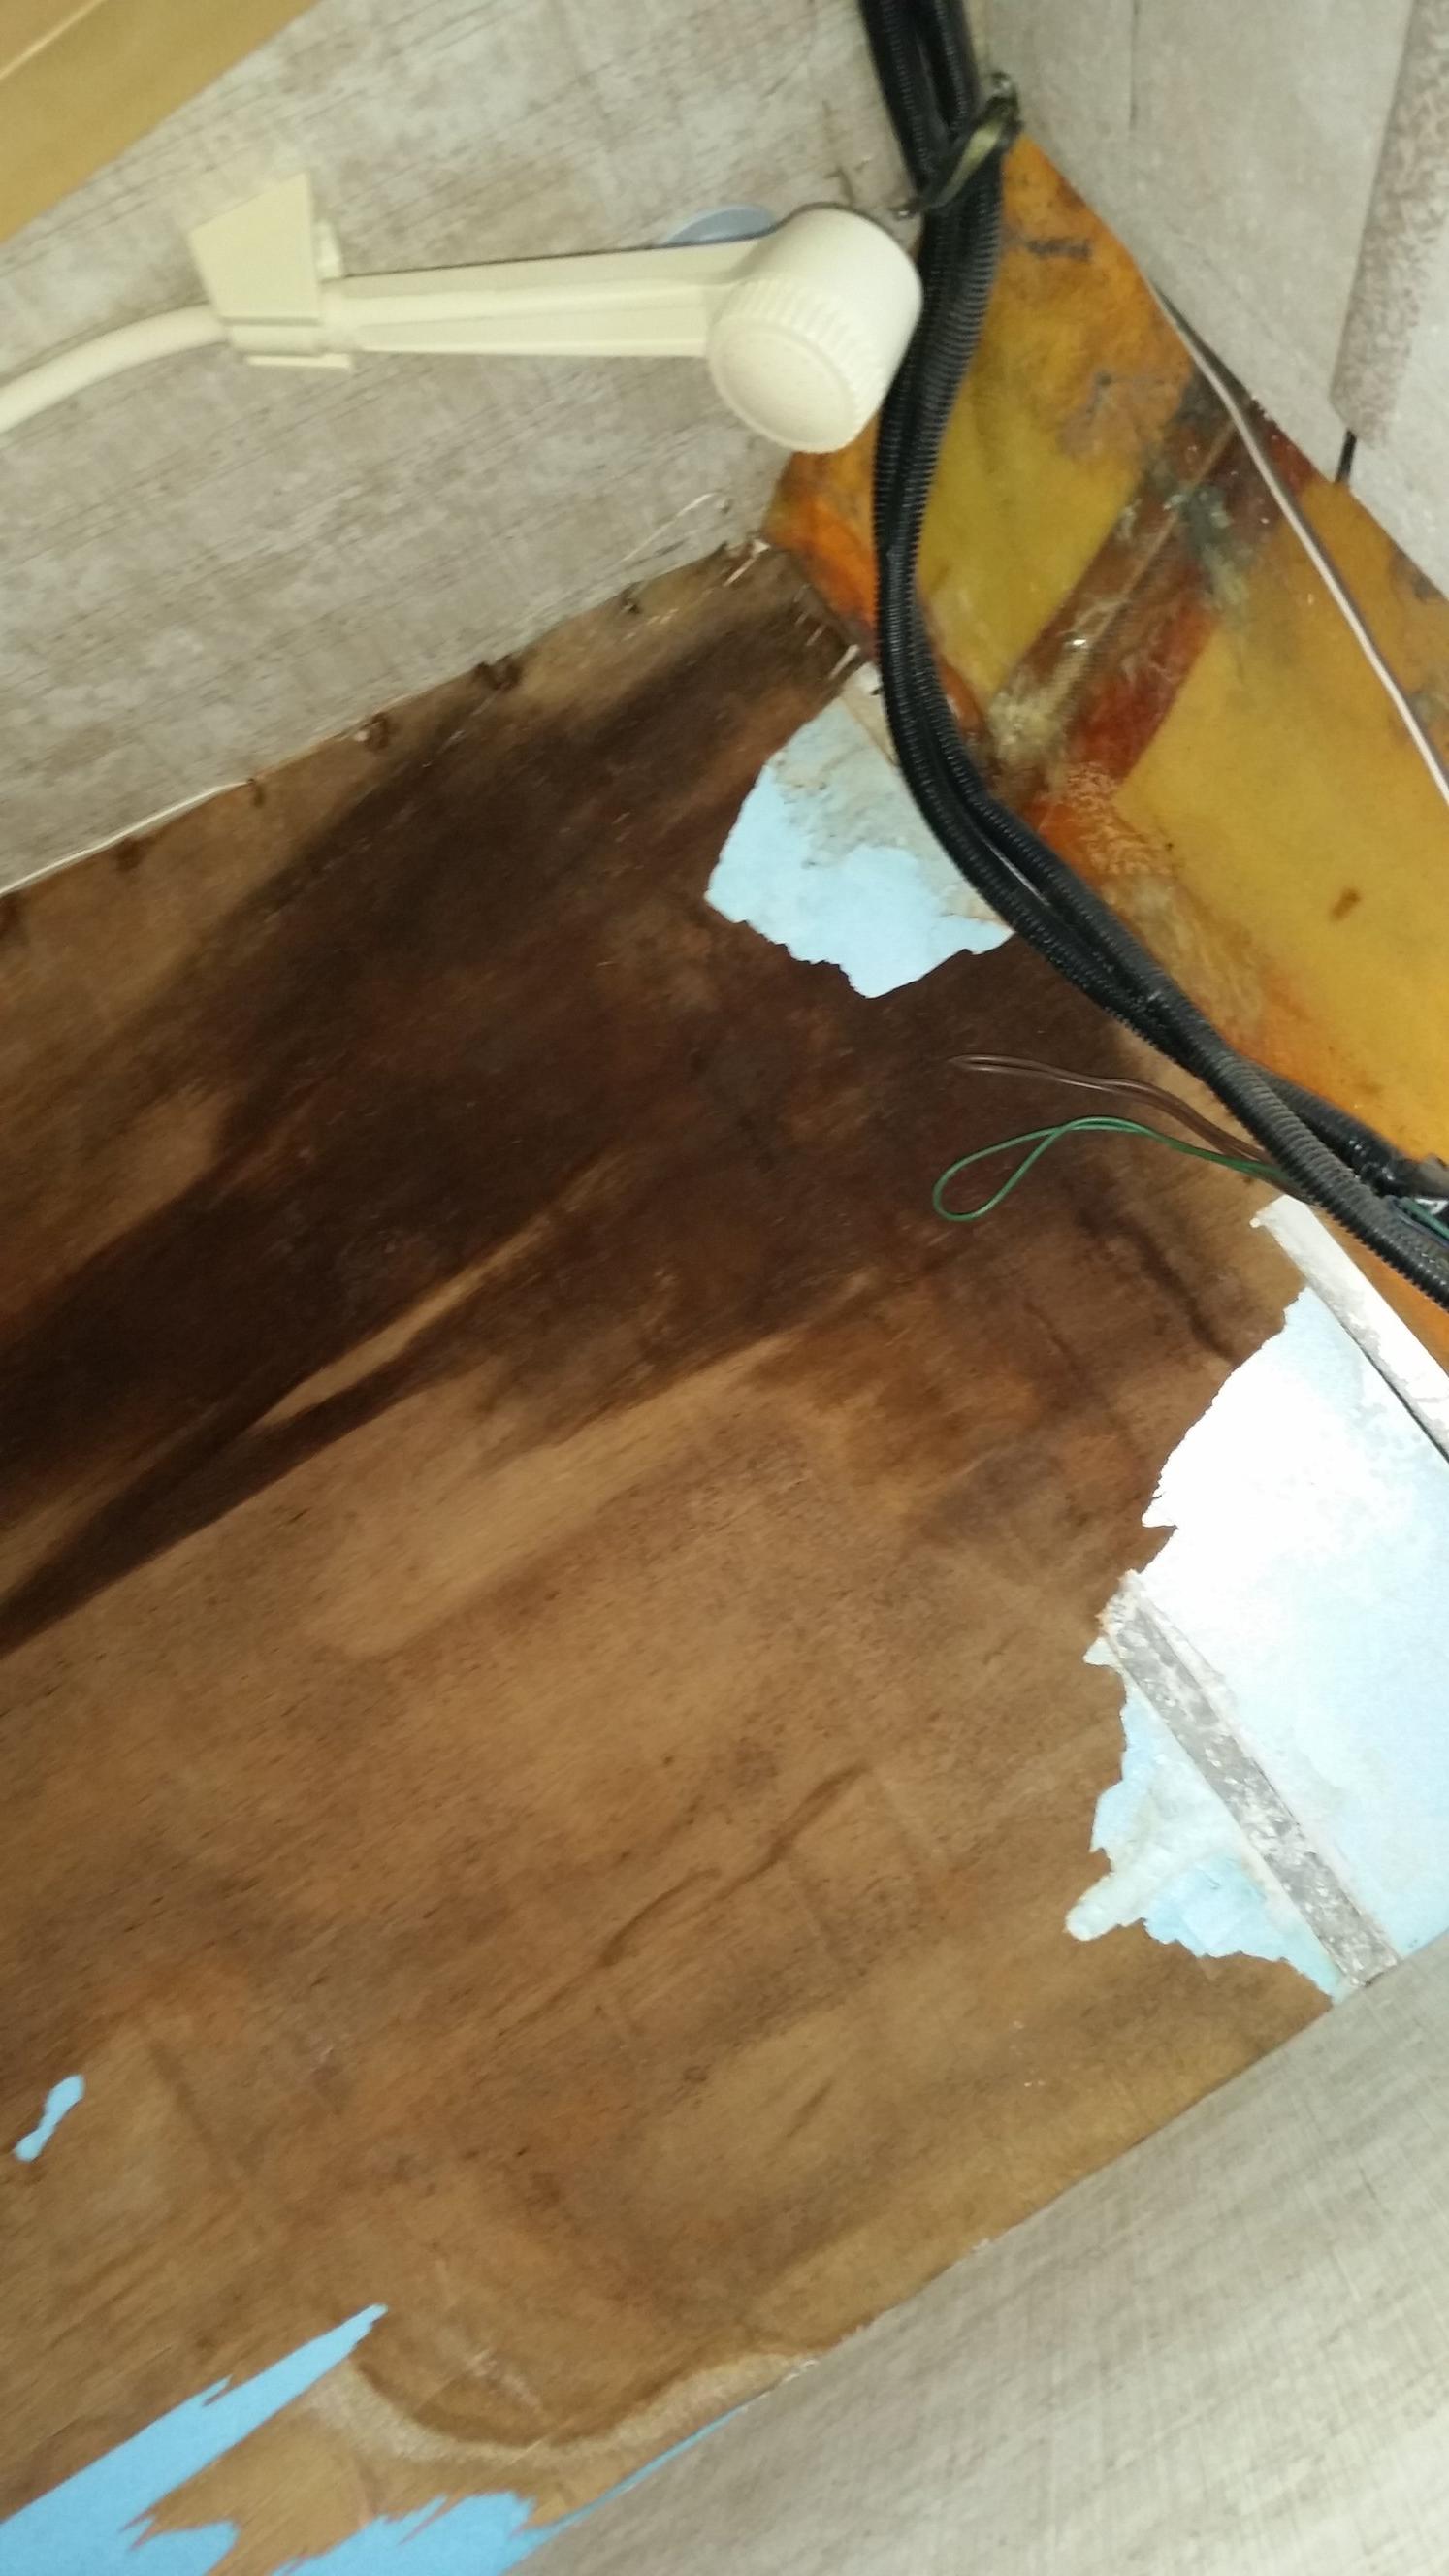
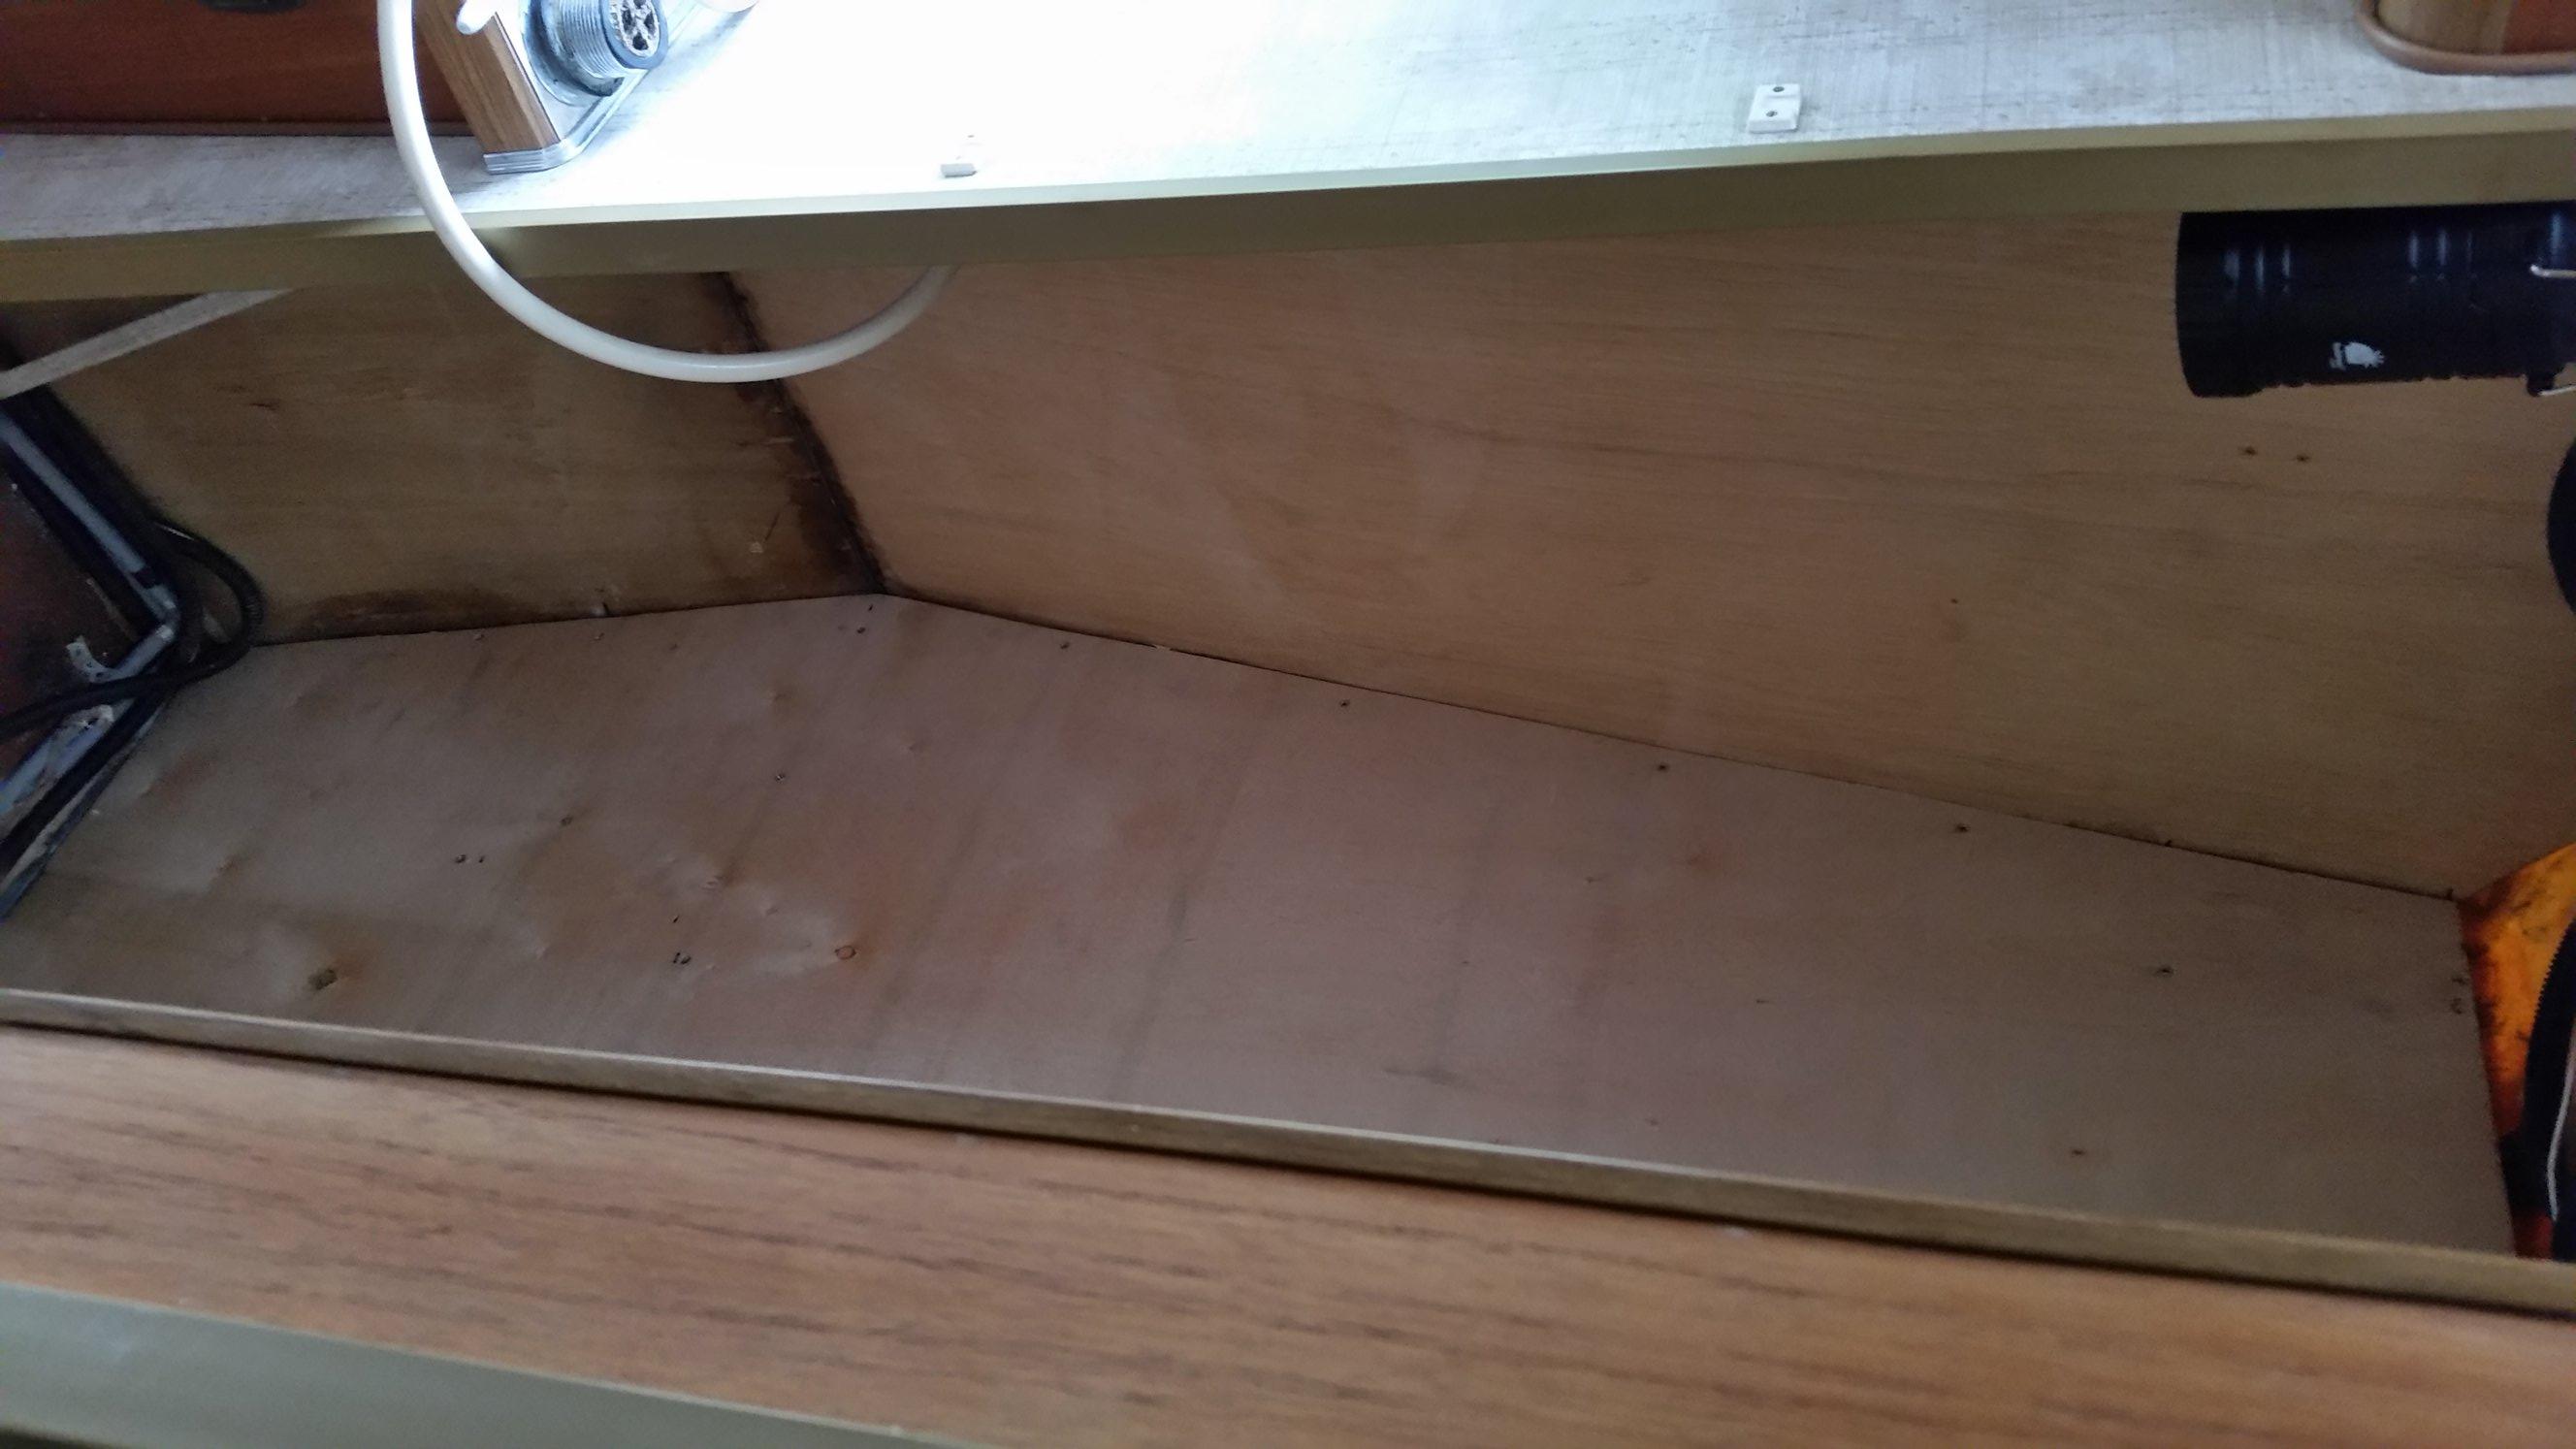
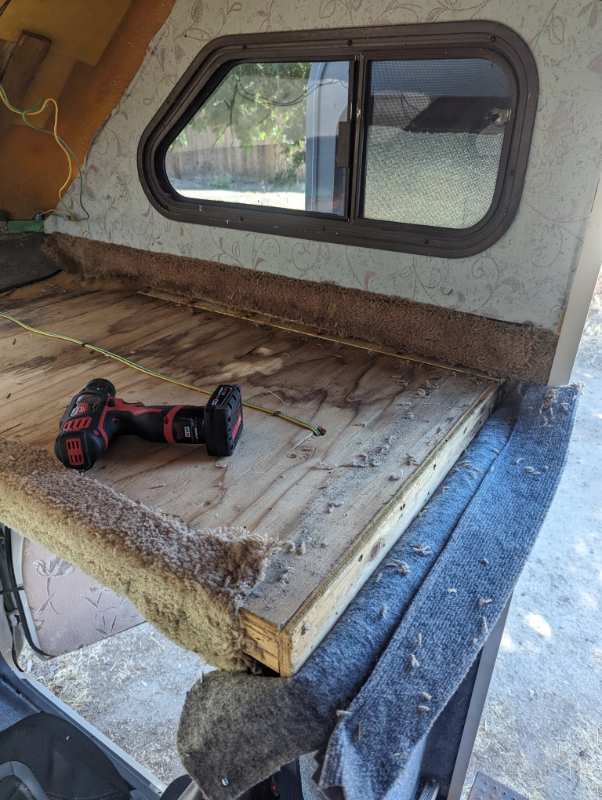
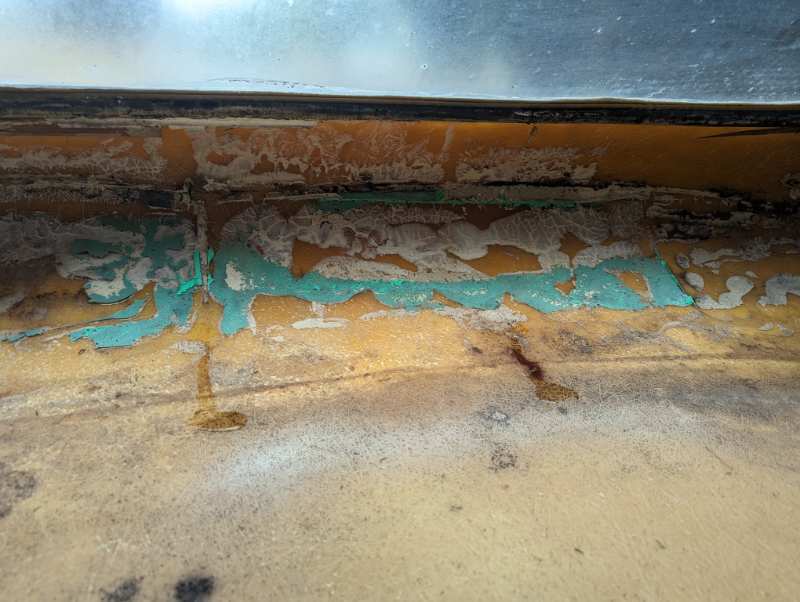
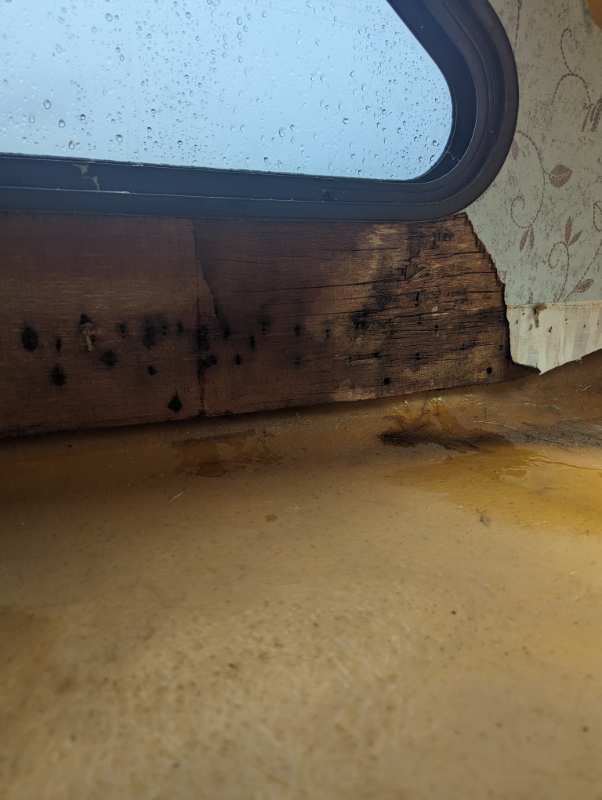
 1991 Warrior. One of the previous owners had water damage from the overhead AC area leaking all over the place. I repaired the roof and ceiling but the floor was still soft. When you actually look at the flooring there isn't really much there other than a very thin layer of aluminum on the bottom and plywood on top of it. Not sure of the plywood thickness? The issue with repairs is that the camper is assembled in stages at the factory and it's a challenge to tear out sections of a 4x8 sheet or larger underlayment, mine still has carpeting. I decided to repair from below by strengthening using 3/4" plywood coated with oil based kilz and 3/4" square steel tubing welded to the frame. The difference was noticable right away, so far so good.
-
 I have a 1990 Toyota Dually VZN-95L with a 10 foot van body w/overhead door, I purchased from Penske Truck rentals in 1993. I realize I'm a few years late in this discussion, but I have over 270,000 miles and over 30 years behind the wheel of this truck. I'm a locksmith (lots of brass and steel), so my poor little 1-Ton truck is grossing over 8,000 lbs. I've beefed up both the front and rear suspensions, and there are some hills where my maximum speed is 15mph floored. Because of the weight, my gas mileage dropped from about 12mpg (empty) to about 8. I go through tires, calipers and shoes every 10,000 miles, and rotors and drums every 20,000, being resurfaced at 10k. I have PLENTY of miles on this truck running at it's maximum capability. I wore out, and replaced the engine with a rebuilt at about 240K, and rebuilt the worn out transmission at about 260k. Here's my experience with the ETC transmission and Over Drive. These speeds are all approximate as I'm generally not focused on them, and some stuff I still haven't figured out. Regardless of the ETC setting, flooring it is designed take the engine to it's maximum RPM (horsepower); somewhere around 30mph in 1st and around 55mph in second. I've never topped it out in 3rd, I stay within the speed limits. Over-Drive is just a 4th gear designed to save RPMs (and gas). Once I got the down-shift cable adjusted correctly, it would automatically shift back into 3rd on a slight upgrade. I only use OD on the highway because when you touch the brakes in OD the engine RPMs slow down. I'm pretty sure it's not "freewheeling" or shifted into neutral, because the RPMs don't drop that much. My guess is that the Lock-Up Torque Converter releases. At any rate, whatever it does, it loses engine breaking, and at 8,000lbs, I want all the engine breaking I can get! I ALWAYS take it out of Over-Drive when slowing on the highway, and ALWAYS down shift when slowing on a hill. The transmission will NOT downshift into an over-rev condition. If you pull the lever into "L" at 70mph, it'll go into 2nd at about 60, and 1st at about 35. The "ECT" switch ONLY effects mid-throttle stuff. I always drive in the power mode and my normal up shift speeds are 1st to 2nd between 19 to 24mph, and 2nd to 3rd between 30 to 45mph. I have experimented with the "Normal" mode a few times (out of curiosity), and it seems like everything happens about 5 to 10 mph earlier (slower). It all depends on throttle position. I just started having early shifting problems with my transmission. Sometimes from a stop sign, it will shift 1st, 2nd, 3rd, 4th, and lockup the torque converter, before it hits 15mph. I had the ECU next to the passengers right foot rebuilt, but everything is still virtually the same. Does anyone know what tells this transmission how fast the vehicle is going?
 -

I really miss my Mini Cruiser, what next???
thewanderlustking replied to thewanderlustking's topic in General Discussion
Well we have been looking for a while now, and actually went RV shopping today. We found a Winnie we lREALLY liked on a 2007 dodge/mercedes chassis. But it was $50k. We liked it enough that we seriously considered getting it on the spot. We refuse to do such a large purchase impulsively though, and spent the rest of the day looking at options and REALLY talking about it. As we really seriously looked at the options, she mentioned a couple times that we probably should have just farmed out the repairs on the roof/interior of our old Mini Cruiser. 10-12k there would have been manageable. But we didn't and I think there are some better layouts in some of the other options. We are both leaning heavily towards a 13' Scamp. There are a good handful close enough and in a price range we can manage. She also loved the 18' Sunrader's we looked at online and if we found the right one at the right price would be willing to stretch to that. Scamps though are pretty awesome and very few negatives to owning one. I am still concerned with towing one with my 1994 4Runner, and I have never towed before either. That would be a slight learning curve. The 4Runner needs a front end rebuild, swaybars replaced (currently have, but not installed), and shocks upgraded. The anemic 3.0 engine is also a concern, but some of that issue was recently fixed with replacing the ECU. It still needs a bit more power unleashed though. The conclusion we both came to was any overloading type of setup contained in the 4Runner itself, was unlikely to be comfortable enough for us. Still a possibility since essentially free and already on hand... A small class C like the Dodge j23 would be ideal for longer trips, but very hard to justify the price if not used constantly. But a Scamp hits somewhere in the middle and if it only got used a couple times a year, would still be worth it. And a Scamp is much less of a long term commitment. I say it counts as a "Toyota RV" if towed with the 4Runner and Heritage style stickers are made up for it. Anyways the plan is to move forward with a refresh on the 4Runner suspension so towing with it becomes an option. My buddy has a pop-up camper we might take for a weekend to try towing and camping in it out. It is likely light enough I could try it out before the suspension refresh. -
Looking for first RV, 1991 Toyota/Winnebago Warrior
thewanderlustking replied to dayman's topic in General Discussion
Hello Dayman! Welcome to the forum! Lots of questions, where to start lol... Toyota RV's are very reliable, with a few small catches. Both the 4cly and 6cyl models are considered underpowered. The 22RE 4cly gets an even worse rap on this than the 6cyl. But when I was done with it my 2RE powered '86 Mini Cruiser actually had more get up and go than my '93 6cyl 4Runner has. YMMV lol. In fairness I did a couple serious upgrades to the Mini Cruiser to get it there. 1) Upgraded exhaust including headers. Not hard, but not a quick/cheap buy 1 simple/full kit to do it type of job. 2) Rear end gear ratio swap. WAY cheaper than the exhaust, sorta. Parts were only $250 for this. But I am a mechanic and have access to a full shop. A coworker did the actual teardown on the pumpkin and rebuild after I pulled it out. Surprisingly this job was WAY easier than the exhaust. But if you can't DIY this one and had to pay to have the removal and rebuild done, it would easily be 5-7hrs of labor time. I bring this up as you mention "mountains" and should be aware of this. Plenty of our members here though have driven them everywhere. But power and brakes are more of a concern in that situation. Toyotas 3VZE 3.0 6cyl engine had longstanding recalls for blowing head gaskets. On the heavier RV's, this is even more common than on the regular trucks. Usually if the real ha been done, regular maintenance will go a LONG way to preventing further issues. I would not consider head gaskets on the 3.0 to be a DIY driveway job even for more advanced DIY type people. I would do it in mine, but I sure wouldn't be excited to do so... The 22RE 2.4 4cly engines are probably the most bulletproof engine Toyota has made. We do still see incidents on here of them popping head gaskets. But I think this is more a case of poor maintenance and older vehicles. These get worked HARD driving around with a house on top of them. I wouldn't flinch doing a head gasket on one of these in an Autozone or Walmart parking lot though. Autozone would be preferable, shorter walking distance to get supplies LOL! The drivetrain and rest of the platform are pretty simple, and reliable Toyota. You are talking about older vehicles, so pretty normal maintenance and nothing really stands out here other than avoiding the earlier axle issues (before 1985-ish). Oh one thing, Toyota used a proportioning valve for the rear brakes that can add in some shenanigans. There is a LOT of information in this forum on those though. The rest of the "house" stuff is basic RV, and pretty generic. Essentially all older RV's of this era used crappy power converters. If you leave them plugged into shore power, they overcharge and cook your house battery(s). Winter camping. Many of these have a built in furnace that runs on LPG. Never used mine, no clue on how good they work. A Mr Buddy heater though will solve any issues you have there if the Toy doesn't have one, or if it doesn't work well enough. Thats probably a try it out and see kinda deal. All RV's essentially have the same issues and solutions as far as this goes. Yes, there are PLENTY of awesome small RV' out there to pick from. In fact the wife and I went RV shopping today and fell in love with a Winnie on a Dodge/Mercedes 23j platform. But if your budget is less than 17k, that essentially knocks everything off your possible list except these Toyotas, and utter piles of garbage. The 2006 Winnie was $50k... And that's not a crazy premium dealer price for one either. There are a lot of Ford platform RVs out there that could come in close to your target. More power, WAY MORE gas guzzling. Most of the older ones run the V10. Pretty reliable overall, but known for injector and coil issues. And unless you are a very skilled DIY who loves to suffer, this is not an easy job to tackle. As a Mechanic, I DREAD working on these engines. It is also extremely common for these to need front end work. Even at lower mileages. Some have a weird twin beans suspension on the front that is prone to tire wear. Nothing can be done other than rotating tires regularly, and replacing them. If any RV on a Ford platform doesn't drive straight and smoothly down the road, walk away. I would not even consider one of these unless it came across my path at a very good price. The reason why these Toyota have near a cult like following though, is their reliability and ease to work on, ESPECIALLY when compared to other RVs of the '90's and '00's. I wouldn't flinch at getting one from the '80's either. Think about the fact that mot of these are 30-40 years old. And there are still plenty of them out there to pick from! They survive. $17k for one with only 39k on it could be a pretty fair price. Depending on how well repairs were done and how decent the rest of the house is. If you want a way better deal, be prepared to get your hands dirty and have some DIY projects to tackle.