thewanderlustking
-
Posts
520 -
Joined
-
Last visited
2 Followers


About thewanderlustking

Recent Profile Visitors
2,066 profile views


thewanderlustking's Achievements
")
Rising Star (9/14)
-
 Rare
Rare
-
 Rare
Rare
-
 Rare
Rare
-
 Rare
Rare
-
 Rare
Rare
Recent Badges
-
Looking for first RV, 1991 Toyota/Winnebago Warrior
thewanderlustking replied to dayman's topic in General Discussion
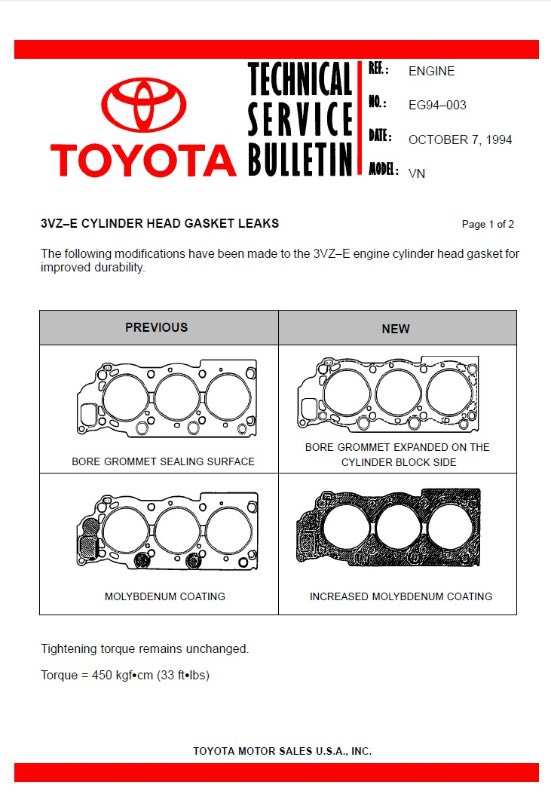
Toyota told me that, so are they wrong... ??? And if you also pull up Toyota's official recall campaign, it clearly states 8 years from time of first use or 100k miles. But I also know that others have gotten Toyota to do it much more recently. Hence why I said: (I misspelled campaign lol...) The head gaskets all fail, almost every single last one, at the very same point. Back side of the head where the crossover pipe goes by. It is a very well documented issue, head over to any of the off-road Toyota forums and it is easy to find. Keeping the cooling system functioning well helps, and most don't delver any further into it. The heat shielding Toyota used back there is also a big help. And some go and wrap the exhaust crossover back there also. The actual issue is the exhaust being too hot and cooking the head gasket. Yes, keeping the engine running cool helps a lot. Why? A hot engine runs leaner, leaner exhaust is hotter, hotter exhaust cooks that head gasket. Then you add in the EGR system and you add another layer of oops to the problem. It also isn't that the head gaskets were actually defective. It is a poor head design, specifically poor cooling in the back. Another reason why improving the cooling system actually helps with this, and overheating it can cause a premature failure. Hence why some engines needed MULTIPLE repairs, and some never needed any. This was from one of Toyota's internal campaign documents, and I have seen this referenced in some of the head gasket manufactures docs. Toyota solved this by changing the head gasket properties and completely redesigning the head gasket. They went from a partially mollebeyum coated gasket to a full coated one, and drastically increased the bore rings. Yay, I actually found a copy of that campaign note! Another factor I have yet to see mentioned, is an old or damaged catalytic converter. A clogged catalytic can/will also increase exhaust temperature, cook the manifold and crossover pipe, and overheat that corner of the head. I am not trying to argue, but these things are not usually black and white and because of that I am VERY careful with the words I use. I rarely speak in absolutes, so please be careful before you come back telling me I am wrong. I also know that people tend to skim through my more detailed descriptions, so I try to simplify and frequently that leaves bits of information out. There is also a huge difference between a campaign and a recall. Campains have an expiration. But in my own experience of working at a dealership, the service advisor can choose to honor an expired campaign. Recalls are different and have no expiration if they are safety, compliance, or emissions related. The 3VZE head gasket issue here, was a campaign and NOT a recall. Lets get back to the statement I made though, "You can always try." I am not sure how many of you own new Toyotas and have had experience dealing with them. Toyota is NOT your "normal" company satisfied with an "average" customer experience. They strive to be the best and and seriously care about their reputation and the customer experience. They go an extra 100 miles for their customers, not just 1. I had a weird issue and needed a special Toyota ABS diagnostics tool for my 1994 4Runner. This tool hasn't been made in well over 20yrs... I went to my local dealership parts department and explained the problem. Cost wasn't even an issue, I needed the tool. Another parts advisor overheard this and thought he knew where one might be. A few phone calls and a day later they handed me the special tool ON LOAN. It had been hand delivered from across the state! Yeah, it helped that I personally knew the parts guy, and had worked with him and the parts manager before, so perhaps they assumed some risk for this others might not have, and they knew I actually knew how to use said tool. But the other store had no such relationship with me and still went out of their way to get it to us. Toyota knows it is cultivating a relationship like this that pays off and generates customers for life. And it does. Last weekend we bought a brand new 4Runner with only 2 miles on it off the showroom floor! So with that said if there is any way they can get away with honoring the campaign, if the right people are involved there is a better than average chance they will do so. But technically, it is long since expired and they don't HAVE to do so. This can be seen and proven
-
Looking for first RV, 1991 Toyota/Winnebago Warrior
thewanderlustking replied to dayman's topic in General Discussion
I think the question being asked is if Toyota would still honor the warranty/recall repair. The camping was quietly ended around 2004, but you can always try. I wouldn't worry about it too much though. Both the brakes and the head gaskets are not critical concerns, just something to read up on. Take care not to overheat the engine. I run Toyota coolant and add in a thing of Redline Water Wetter to mine. Overkill? Yes. But it makes me feel better and the Water Wetter does give me about 10-15 degrees more cooling. My old Mini Cruiser also ran, well runs Toyota red coolant and it never gave me or its current owner any issues. I think it is actually showing up later this weekend lol! The pictures of it look very promising! I can't really see anything of concern. Just look over the front section VERY closely in person. 17k seems a pretty reasonable price. Have the owner show you everything is working, and how to operate it all. You might ask he has the fridge going too prior so you can verify it gets cold. Here is a link to some further details on the recall. -
I really miss my Mini Cruiser, what next???
thewanderlustking replied to thewanderlustking's topic in General Discussion
Well we have been looking for a while now, and actually went RV shopping today. We found a Winnie we lREALLY liked on a 2007 dodge/mercedes chassis. But it was $50k. We liked it enough that we seriously considered getting it on the spot. We refuse to do such a large purchase impulsively though, and spent the rest of the day looking at options and REALLY talking about it. As we really seriously looked at the options, she mentioned a couple times that we probably should have just farmed out the repairs on the roof/interior of our old Mini Cruiser. 10-12k there would have been manageable. But we didn't and I think there are some better layouts in some of the other options. We are both leaning heavily towards a 13' Scamp. There are a good handful close enough and in a price range we can manage. She also loved the 18' Sunrader's we looked at online and if we found the right one at the right price would be willing to stretch to that. Scamps though are pretty awesome and very few negatives to owning one. I am still concerned with towing one with my 1994 4Runner, and I have never towed before either. That would be a slight learning curve. The 4Runner needs a front end rebuild, swaybars replaced (currently have, but not installed), and shocks upgraded. The anemic 3.0 engine is also a concern, but some of that issue was recently fixed with replacing the ECU. It still needs a bit more power unleashed though. The conclusion we both came to was any overloading type of setup contained in the 4Runner itself, was unlikely to be comfortable enough for us. Still a possibility since essentially free and already on hand... A small class C like the Dodge j23 would be ideal for longer trips, but very hard to justify the price if not used constantly. But a Scamp hits somewhere in the middle and if it only got used a couple times a year, would still be worth it. And a Scamp is much less of a long term commitment. I say it counts as a "Toyota RV" if towed with the 4Runner and Heritage style stickers are made up for it. Anyways the plan is to move forward with a refresh on the 4Runner suspension so towing with it becomes an option. My buddy has a pop-up camper we might take for a weekend to try towing and camping in it out. It is likely light enough I could try it out before the suspension refresh. -
Maybe the axles can handle the single wheel, maybe not. I will leave that to Fred and Linda to tell you. What I can tell you about those footie wheels though is from personal experience working on them. They ABSOLUTELY SUCK to put tires on. You are VERY unlikely to find any shop in your travels with a tire guy who has done even one set, let alone is actually experienced at doing them. In my 30 years of doing tires, I have only done one set and I remember them like it was yesterday they were SO BAD. And then after all that, we had no way to balance them, and we had more options than most tires shops do as we also did agricultural and truck tires also. In other words if you have a blowout, good luck finding a shop that can change them. ANY shop experienced enough to have seen another set, will also likely tell you to go pound sand lol. And if they realize what they are, will refuse on principal of safety alone. Now the foolie setup I worked on was a single wheel that had two tires mounted on it. I am not sure if they all were this same configuration, or if some were setup like a dually with one wheel flipped backwards? Whatever the case, running those wheels adds in too many additional issues on top of the safety ones. These days anyone coming across a set is likely to be curious enough to look it up, will quickly figure out what they are, find the axle recall information, and refuse to touch them.
-
It will be 8x1.25 and however long you need it to be. I would go with grade 8 or better. Standard hardware store fare, car parts store, or a local specialty bolt shop like Fastenall will have it on the shelf. Nothing about it is special. Unless you get the old broken off bolt out of the hole cleanly though, a simpler path might be to just drill it out (or punch it out with an air hammer) and go bigger with a through bolt and nut. But because the bolt broke off, you may be able to grab the backside with vise grips and continue working it out through. There is a fair chance the bolt isn't tight in the hole, unless it broke trying to take it out. Soak it over a couple days with PB Blaster if it doesn't spin easily. If you are going to try heat, you need a GOOD source of it, not a little butane torch but like an oxy/accetaline setup. You would need to get the swaybar and bracket out of the way and try heat the surrounding area, not directly the bolt itself. Heating expands metal and you want to loosen the bolt. If this came into the shop, that would be my approach. See if enough of the bolt sticks out and try to get something on it. Try some heat, try again. Soaking it with good penetrating oil between steps. But I would quickly resort to blowing out the bolt and welded nut with an air hammer and then using a through bolt and nut. When working on stuff like this (in general), I can't stress the importance enough of using the right tools. Don't use steady force with a long ratchet trying to break it free. Either an air impact gun hitting rappidly and fast, or a quality electric impact will actually get out most bolts that would break when done by hand. If something is stuck, soak with penetrant, and short hits with the gun. Sitting on a tight bolt for long bursts, will heat it up until it breaks. I have a small Milwauke M12 1/2" impact gun that was able to take apart every single thing I tried on my Mini Cruiser including a full front end swap.
-
This question has gone unanswered for a bit as there is such a broad range that it is kinda hard for a simple "here is a list" kinda deal. First off good luck finding 4Runners of that vintage cheaply. But good news is the desirable ones are all 4wd and you need 2wd. A google search does bring up a LOT of information. Just look for anything fitting the criteria, and not for RV specific. You have a 1982 or 1983 2wd Toyota Pickup. If you are looking for a little extra power, consider exhaust and header upgrades before transmission swap. I (personally) wouldn't bother with the swap, unless you have a failed 4spd.
-
Looking for first RV, 1991 Toyota/Winnebago Warrior
thewanderlustking replied to dayman's topic in General Discussion
Hello Dayman! Welcome to the forum! Lots of questions, where to start lol... Toyota RV's are very reliable, with a few small catches. Both the 4cly and 6cyl models are considered underpowered. The 22RE 4cly gets an even worse rap on this than the 6cyl. But when I was done with it my 2RE powered '86 Mini Cruiser actually had more get up and go than my '93 6cyl 4Runner has. YMMV lol. In fairness I did a couple serious upgrades to the Mini Cruiser to get it there. 1) Upgraded exhaust including headers. Not hard, but not a quick/cheap buy 1 simple/full kit to do it type of job. 2) Rear end gear ratio swap. WAY cheaper than the exhaust, sorta. Parts were only $250 for this. But I am a mechanic and have access to a full shop. A coworker did the actual teardown on the pumpkin and rebuild after I pulled it out. Surprisingly this job was WAY easier than the exhaust. But if you can't DIY this one and had to pay to have the removal and rebuild done, it would easily be 5-7hrs of labor time. I bring this up as you mention "mountains" and should be aware of this. Plenty of our members here though have driven them everywhere. But power and brakes are more of a concern in that situation. Toyotas 3VZE 3.0 6cyl engine had longstanding recalls for blowing head gaskets. On the heavier RV's, this is even more common than on the regular trucks. Usually if the real ha been done, regular maintenance will go a LONG way to preventing further issues. I would not consider head gaskets on the 3.0 to be a DIY driveway job even for more advanced DIY type people. I would do it in mine, but I sure wouldn't be excited to do so... The 22RE 2.4 4cly engines are probably the most bulletproof engine Toyota has made. We do still see incidents on here of them popping head gaskets. But I think this is more a case of poor maintenance and older vehicles. These get worked HARD driving around with a house on top of them. I wouldn't flinch doing a head gasket on one of these in an Autozone or Walmart parking lot though. Autozone would be preferable, shorter walking distance to get supplies LOL! The drivetrain and rest of the platform are pretty simple, and reliable Toyota. You are talking about older vehicles, so pretty normal maintenance and nothing really stands out here other than avoiding the earlier axle issues (before 1985-ish). Oh one thing, Toyota used a proportioning valve for the rear brakes that can add in some shenanigans. There is a LOT of information in this forum on those though. The rest of the "house" stuff is basic RV, and pretty generic. Essentially all older RV's of this era used crappy power converters. If you leave them plugged into shore power, they overcharge and cook your house battery(s). Winter camping. Many of these have a built in furnace that runs on LPG. Never used mine, no clue on how good they work. A Mr Buddy heater though will solve any issues you have there if the Toy doesn't have one, or if it doesn't work well enough. Thats probably a try it out and see kinda deal. All RV's essentially have the same issues and solutions as far as this goes. Yes, there are PLENTY of awesome small RV' out there to pick from. In fact the wife and I went RV shopping today and fell in love with a Winnie on a Dodge/Mercedes 23j platform. But if your budget is less than 17k, that essentially knocks everything off your possible list except these Toyotas, and utter piles of garbage. The 2006 Winnie was $50k... And that's not a crazy premium dealer price for one either. There are a lot of Ford platform RVs out there that could come in close to your target. More power, WAY MORE gas guzzling. Most of the older ones run the V10. Pretty reliable overall, but known for injector and coil issues. And unless you are a very skilled DIY who loves to suffer, this is not an easy job to tackle. As a Mechanic, I DREAD working on these engines. It is also extremely common for these to need front end work. Even at lower mileages. Some have a weird twin beans suspension on the front that is prone to tire wear. Nothing can be done other than rotating tires regularly, and replacing them. If any RV on a Ford platform doesn't drive straight and smoothly down the road, walk away. I would not even consider one of these unless it came across my path at a very good price. The reason why these Toyota have near a cult like following though, is their reliability and ease to work on, ESPECIALLY when compared to other RVs of the '90's and '00's. I wouldn't flinch at getting one from the '80's either. Think about the fact that mot of these are 30-40 years old. And there are still plenty of them out there to pick from! They survive. $17k for one with only 39k on it could be a pretty fair price. Depending on how well repairs were done and how decent the rest of the house is. If you want a way better deal, be prepared to get your hands dirty and have some DIY projects to tackle. -
Self welding wheel bearing!
thewanderlustking replied to Toycollector47's topic in Whoops, Mishaps and Murphy's Law
The correct tool is out there for dirt cheap. https://www.ebay.com/itm/174403066935 I love your DIY solution though! Lol I was digging through bins today looking for other parts and found mine in a box with two extra brand new axle gaskets. I will probably scan one to get slightly better fitting file to cut out. My Lucky Charms cereal box gasket I made on the Cricut is still holding up perfectly! EDIT: I saw the 75mm vs 70mm... I don't remember if I ever pulled it out and actually tried it on the Mini Cruiser. I think I had verified the gaskets were the same but I am also pretty sure the tool came well after I had put it all back together. I could send the tool off with Viktor to check when he comes by later today if somebody really wants to know lol. -
A bump for "this project isn't completely dead yet" updates! As many know, my 22RE powered Mini Cruiser was passed on to my best friend Viktor. I actually went and got a 1994 4Runner and have been living with it, and more importantly daily driving it for almost a year now! But the Mini Cruiser only lives a few miles from me, and most of the parts for the conversion are actually sitting on my dining room table right now. I just went hunting through the garage and boxes and boxes of parts to make a pile of goodies. I found two extra MegaSquirt ECUs I can choose from for this. A couple weeks ago I had my first ever REAL issue with the 4Runner. (I am not counting the leaking radiator I had to replace, it was 30 years old and gets a freebie there lol!) Fuel economy on it has always been a very steady but bad 10.5mpg. A few weeks ago it starter feeling low(er) on power and it had dropped to 8.5mpg. Then over lunch one day, it died on me. Lots of shenanigans followed. Diagnosing it WAS NOT FUN. We were able to use a scan tool and actually get the codes out on the ECU and look at data PIDS. So slow they were essentially useless. Oddly, I couldn't get the blink code check method to work on this original ECU... It sent us on a wild goose chase with bogus codes. It went downhill from there with hours spent hunting with an oscilloscope, issues found, ecu replaced, and then suddenly truck is running fine on either ECU... Anyways this has all led me to sitting here at the dining room table with the FSM, the electrical FSM, my diagrams for the Mini Cruiser, and making up new diagrams for the 4Runner. The management for the 3VZE is VERY similar to the 22RE, just adding in a few more silly layers of over complication. Enough so that there are no documented conversions, and only a few "I know a guy that did it" references... My application adds in the complexity of the 4x4 system being integrated into the transmission and engine controller also. So while I will be able to make significant improvements to power and economy, it is unlikely to be a simple or cheap blueprint to follow. Ironically though it looks like the ECU for the 22RE and 3VZE will be identical other than programming... The pinout wiring is different, but since I am not using PNP units, that's taken care of in the breakout box wiring anyways.
-
On the automatic trucks the ones that came with the Turbo 22RE were a bit beefier, I imagine the same will be true on the manual ones. This is a slightly obscure question, but I bet there is a chart/lost around somewhere. Google this: 1983 Toyota pickup 4spd to 5spd swap (No sarcasm or snarky meant by that lol)
-
i simply zipped mine down with a small 3/8" impact and then probably hand tightened/checked them. 20-30 ft lbs is about right. It isn't a super critical number. Now you didn't specify, but I believe you are referring to the outer pumpkin nuts? The internal specs are VERY critical, don't guess on those. If you need internal specs and can't find them, hit us back up with year, model etc and I will see if I can log into Allldata or Identafix from home. If you just swapped the whole pumpkin assembly, then you shouldn't have messed with anything critical for torque specs.
-
NO you should not run a vehicle long term with just water, but for testing and getting it down the road, just water is fine. It is also more "environmentally responsible" if you don't have other ways of looking for a coolant leak (like the specialized tools used by mechanics and avid DIYers). But even if you just use water and don't do a complete drain and refill later, you can correct the levels with a partial drain, a simple (and cheap) hydrometer, and concentrated coolant. And as Linda said between the lines, the hose that came off in the picture above is a vacuums hose anyways. It is frustrating for us too... A lot is lost in translation with words and pictures that many of us I am sure could figure out with half an hour spent on the truck and either have it running, or have a solid answer/direction to go in. My advice would be to tie the bullet and pay for a second professional opinion. You are here posting, so I would assume you don't have a personal mechanic friend/relitive you could get either FaceTime or realtime help with. A mobile mechanic would be a pretty feasible option. Old vehicles usually have a tipping point where you finally get the critical systems all sorted out and if it is a quality built/maintained vehicle you are good once you get pass that. If you have an older vehicle that hasn't been maintained well, then unless you can learn to do it, you will quickly go broke. Toyotas and especially the 22RE are well built and robust though. Even poorly maintained, it shouldn't take too much to get it back into reliable shape. As for the current situation you are in and the potentially unscrupulous mechanic, it is hard to say for sure since we aren't there, but yeah some things just aren't adding up and it does look pretty suspicious from this side of the story. Simply put I have seen PLENTY of cars and trucks with blown head gaskets and one thing is common, I have never once in 30+ years seen a blown head gasket cause one to not run AT ALL. Is it possible? Sure, but the amount of catastrophic damage that needs to occur quickly is pretty impressive, and would also come with some impressive noises. I see no signs of coolant that a blown hose would leave everywhere. So unless you had clouds of vapor that you know was hot coolant, I would be checking other things for the issue. I think it is much more likely your fuel pump died. But this is speculation and simple tests could quickly determine this, or narrow it down to something else.
-
Linda, is it my imagination or is her ignitor module on the coil unplugged??? I can't make things out too well over there... Jane, define "engine won't start" for us. Does it spin/crank over normally, but just not catch and fire? Does it try to sputter and fire at all?
-
The 22RE though can be greatly upgraded in performance with a rear end gear change, header, and exhaust upgrades. My Mini Cruiser with the 22RE was significantly more peppy than my 4Runner is with the 3.0 3VZE. Although I went through all that because the 22RE was pretty bad out of the box.... I am not tempted enough to repeat that on the 4Runner yet.
-
First off the best thing about owing one of thee little Toyota Motorhomes, is all of you guys and gals here! Linda especially has probably rolled here eyes at possibly more than once, yet still gives awesome help and rarely beats me up too badly! LOL! And I defiantly deserve any grief she may have given me! -=wink=- Linda really hit one home though. I had too many projects, and too many unrealized ideas on the Mini Cruiser. For me, it eventually became too much. The mechanicals, I enjoyed. But rebuilding the interior and restoring the damaged roof correctly was just too much and it became more of a chore than a joy. It taught me a lot though, and I absolutely fell in love with Toyotas! Getting an older 4x4 became my dream. Last year Hurricane Ian really changed my perspective and priorities. I knew after that, I HAD to have a 4x4. I had been looking for a while, but until I decided I was done with the Mini Cruiser, nothing really happened. Then it all fell together and I managed to pick up a 1994 4Runner last December (2022). I literally drove the Mini Cruiser over to my best friends house, and we left from there to go pick up the 4Runner and bring it home. It was clean, and CHEAP. So of course it came with some issues. Some of the odder ones I even solved with some help on here! But mechanicals I can manage even on a bad day. Like today I discovered the storm had done some whacky stuff the the electrical system. As tired as I was after work, I enjoy it enough that I was able to force myself to go work on it. And got everything sorted out pretty quickly. Anyways, enough waffling about on that, moving to something else... The "wanderlust" is still there and I do miss the "RV" aspect of the Mini Cruiser. The wife wants to get another RV, or some other contained "camping" option. She wants brand new, but might be convinced with a squeaky clean used example. I've also tried to impress on her that brand new is almost as bad as Vintage in the RV world. The ownership experience of the Mini Cruiser taught me enough that I am pretty comfortable looking at another used RV and intelligently picking out/finding its flaws. I also work on lots of trucks and more than a few RV's all day long. I don't do a whole lot on the house side of things, but the chassis and mechanicals are easy. I see three paths in front of me. Most important factor though is I don't want a big set of burdensome projects to tackle with any of these. 1) Overland the 4Runner. It is already more than halfway there. SUPER comfortable road trip vehicle, other than being SLOW. Like seriously, the 4cyl Mini Cruiser had more power!!! Granted, I put the work in to get it that way... I'm sure I can get the 4Runner performance up a bit with minimal work too. It already has been outfitted with bigger KO2 trail tires, a snorkel, and a SLEW of other parts that make it a pretty capable trail/offroad truck. I am not sold on doing a rooftop tent though... Too much weight up high, and not easily removable. I can do a simple removable bed/platform and it looks like I can actually fit a Full size mattress back there. This doesn't leave any real space for anything else though. If it was just me, a smaller mattress and a slide out kitchen setup would fit nicely. I don't have any ideas that would make it self contained and comfortable, without the rooftop tent. And first and foremost this is now my daily driver, no point in carrying around a bunch of extra weight unless it is being used. 2) A camping trailer of some sort. There are a few options out there. The 4Runner supposedly can tow 3500lbs with a 200lb tongue weight. Not sure I believe that, but whatever lol. Light weight is going to be key and the lower I can keep it, the better. Plenty of pop up trailers at almost nothing prices. Some even free. While a project for sure at the lower end, probably small enough to be manageable. But a pop up isn't much more than a tent with a camp kitchen in it. A 13' Scamp is a VERY interesting choice, and they can be ordered brand new. I LOVE how they look. And with the bathroom option they are almost livable longer than a weekend. The 16' Scamps I would even consider long term usable. The Scamps are essentially the Sunraders of the trailer world with there one piece fiberglass shells. At only 1500lbs, the 13' might be comfortable to tow with the 1993. The 16' is 1900lbs dry. The 13' is a little more realistic to tow though I suspect. Three are other options in this category. Some of the "canned ham" trailers are extra nice. One of those could even be built from scratch. I think that falls into the "too big of a project" category though. I would rather get on the waiting list and pay for a Scamp. 3) Prices are coming back down to more reasonable amounts for our favorite Toyota RV's. I think the RV boom created by the pandemic is finally tapering off to more sane levels. I found a Dolphin for $10k that looks like it is nice enough to not be too big a project. I also found a nice Sunrader for $30k. I don't know what realistic prices for other RVs were in B.P. days. But they are currently kinda stupid. I am not seeing a lot of options below my ideal limit of $30k that I would really consider. And anything above about $5k would probably need to be financed. I really want s fiberglass type of option, like a Sunrader. Anything else would HAVE to be clean and leak free, and I am not sure there is a Dolphin, Winnie, Mini Cruiser, etc that can live up to that. I think I am leaning the most towards something in the option 2 range. Like a brand new option like the Scamp 13" that I can finance and do payments on. For the right price I would pick up an older Castia or similar, even if it needed a little work. If a Toyota Sunrader came along cheap, I would snap it up1 If I could figure out a plan that didn't involve selling the 4Runner to get it...