Search the Community
Showing results for 'overhead rebuild'.
-
 Just wondering. Has anyone built lightweight cabinets for their camper by using styrofoam insulation board and fiberglass? I know about the guy on U-tube with the van, but I mean taking some time and making really decent looking ones. I built a prototype 4-piece 12" x 14" square (meaning no front or back)with 1 inch pink styrofoam board and 1 layer of very thin, I think 1.5oz) fiberglass cloth on the inside and outside just to test the possibilities. Rounding the outside corners helps the fiberglass lay down smooth and I used a roller so that the weave was smooth with no air bubbles. They end up with the weave showing as a pattern kinda like the rv wallboard paneling. My wife says she would just paint them, but I'm wondering about a coat of gelcoat on the outside, (more strength). I've only built one so far but it is amazingly strong and LIGHTWEIGHT! I can sit on it and that is without a front or back! I'm wondering how strong it would be fiberglassed or glued up on the wall like a shadow bow with a cutout front and a net to keep stuff in or possibly a short bottom rail and bin boxes. You could shape the back to match the wall profile and run them up or across the wall overhead. If anyone out there has tried this I would like to compare some notes.
 -
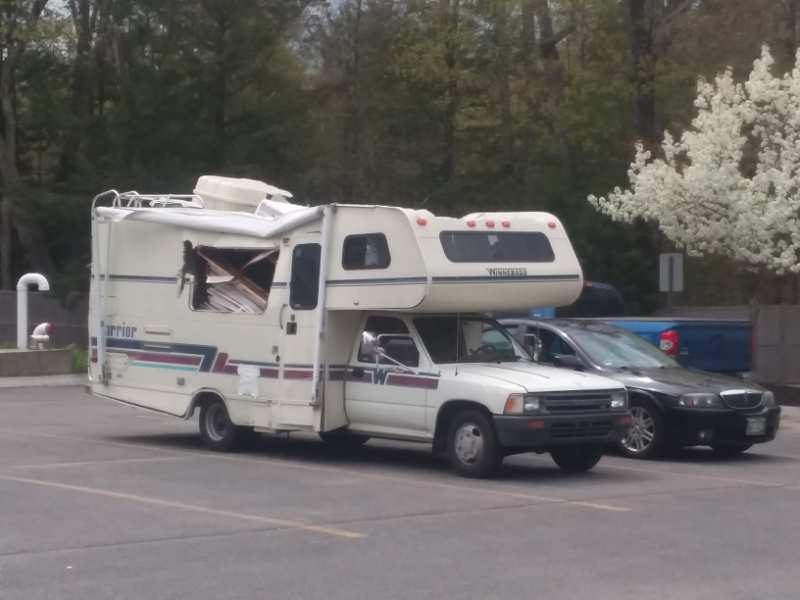
Been spending time going through 10 plus years of Digital Photos of various projects I have done. The 1991/1992 Warrior while still a work in progress is well worth sharing with others. A few pictures to start with then I will add more with some commentary.. When I purchased the 1991 it had just come from an Insurance auction. It had been declared a total loss from an encounter with a pine tree. There was a branch 5 inches around driven through the floor just missing the fuel tank. It had staked the rig to the ground and someone had used a chainsaw to free it from the ground so it could be towed away.

-
I rebuilt my 1988 toyhome overhead with thin tongue and groove cedar from home depot and glued it with 3m 5200. It was a relatively easy rebuild and I stopped and enjoyed the rig for a few years before digging deeper.
-
New member hello and intro here. So, I've always liked these clamshell designs, and I have a few classic Toyotas and once worked at Toyota HQ in the US. We've been camping and adventuring around the Pacific NW and Canada for 15 years in classic VW Vanagons. First a Syncro, and now a Wolfsburg tin top. We always marvel at the space efficiency as it has an actual queen bed, and with a cassette toilet it pretty much makes a perfect all weather base camp. So when an 82 Sunrader with 32k miles popped up on CL, we went to look on Sunday morning. The snow has pushed the roof down, cracking the roof vent seals and leaking water into the interior for years. The cabinetry is warped, the floor is spongy, the original wood veneer ceiling is coming down. We hemmed and hawed about it, but I'd brought overalls to crawl under and to my surprise there is an intact metal floor under the interior floor, which meant floor replacement was simply a matter of laying down fresh plywood as a base. Interestingly, there was no mold, and no mildewy smell - defies logic. The Toyota cab is pristine - nearly new looking. It's also a 4 speed, and combined with the venerable 22R means I will have zero work on the chassis. So we bought it for a crazy low price of $1500 figuring we couldn't go wrong. It started right up, and drove like a champ all the way home. One mishap was it was nearly out of gas so I stopped to fill it up. More fuel ended up on the ground than in the tank. I bent down and could see a pop can with hose clamps held onto the filler hose in the wheelwell. With a 6 foot diameter pool of Premium rapidly spreading. I opted for the cowards way out and simply hopped in and left rather than needing to fill out some environmental spill paperwork or whatever the station might have had in mind for me. I watched a few videos on people stripping them out down to the bare fiberglass and building an interior, so that's what our plan is. We want to keep the bath/shower as it's right sized, and the enclosure looks very well designed against leaks. We'll also keep all the appliances and tankage. The ceiling is a mess and I will be gutting the interior to redo it - so months away from actual use of the vehicle. The moisture also messed up most of the cabinets on the right side of the vehicle, so I'll be using them just for templates to make new, and shrinking them by a few inches here and there to open things up. I actually think the Sunrader has too much hard space dedicated to storage, which significantly shrinks the interior. By that, I mean the overhead cabinetry is a little much, and as ours is a rear dinette model, the overhead cabinets back there seem to shrink the space. The lower level cabinetry is pretty huge, and the hanging closet is as well. The flooring is soft in spots as well, so will lay down new plywood and start from there. I'll find a way to add some foam insulation to isolate the wood thermally from the metal floor, but I suspect I will end up with a thinner solution than the original with today's higher grade and stronger choices. Good news on the classic sagging roof is that I experimented yesterday with a floor jack to see how easy/hard it is to move the roof back up and it's pretty easy. So I'm going to add curved external metal ribs to hold its shape and make it strong enough to walk on and load kayaks, etc. A custom welded aluminum rack might also do it, but that requires a level of precision I'm not sure can be achieved. Meaning if I mount the rack and then find I cannot get the roof pulled all the way up to mate with the rack's curved crossmembers, I will have created a leakage and wind noise nightmare. My plan is to make a curved "ram" to push up the roof every 18" or so using the floor jack inside. And curved 1" aluminum pipes up on the outside I'll form with a tubing bender from Harbor Freight. I haven't ruled out other options for those strengthening external ribs, so let me know if you have other ideas. I don't want to do internal ribs due to the loss of headroom, and the need to have them anchored to the sidewalls - creating issues with each rib going through cabinets, the bathroom, etc. The interior ceiling will have a thick 1" wide aluminum strip to spread the load of the fasteners against fiberglass. I'll bed the ribs in 3M Marine bedding compound for a decade of waterproof sealing. The emphasis on the roof is twofold. First, I'm not sure anyone's ceiling is near the height it was and I was amazed how high I was able to raise it with my experiment. It really changed the feel in there - I lifted mine probably 2.5 inches, and I really liked that sudden open feeling where I had a few inches above my head, vs brushing it with my hair (5'10"). Second, we are still active and will carry kayaks, it can then handle our snow loads, and we may also sit up there. So I like the idea of being able to turn the roof into a utility area. I'll install stout tiedowns on the ribs for securing things, and may build a simple pulley system to lift kayaks up the side to roof level - again using the ribs as a solid hard point/foundation. Lots to do, but those are the bones of a plan at this point. I've read some of the forum info, also. One item I'm trying to figure out is what does this thing weigh with all the tanks full as I'm looking at tires? Ours does not have the 1 ton axle and I don't plan to change it at this point as after one season of use, I may consider lifting it and converting it to 4WD with solid f/r axles. Since the axle issue is rooted in wheel bearing failure, I'll see if the rear bearings are (hopefully) the old fashioned repackable type and just keep them in good nick for now. So, happy to be here and happy to see some other nice folks willing to share information and the like. I'm pretty mechanical, and hope to contribute on that end as well! Tally Ho.
-
 Always a late comer to the party here. Summer's coming and the annual heating issues with it. I always wait for the old-timers to report back on problem solving and listen-up, it hasn't failed me yet. Linda, WME, et al. I agree with Linda-check the stat on the stove and use IR or a good thermometer to check exact water temp. Leave it in for a while and see if it stays open. You're looking for specs and behavior. Agree with WME, bad mojo to mix coolants. Alas, at 105K mi, I think, do not rule out overlapping issues. The hole-drilling is usually to cure the water temp / gauge slamming into the trouble-zone 3-5 min after startup, ditto the $60 "special" stat that Toyota will sell you with an additional smaller opening to cure same. Once they're open, it's about flow. Because you were running at "above half" at the beginning,... do a careful check of temp gauge sender-unit per fac.manual specs. Again, like Linda said on the stat, kitchen stove, kitchen-thermometer will work, but will need ohmeter here. That said, I have now owned 4 of these little beasts, both carb'd and injected and will report that I have bought new 3-row radiators (not aluminum, made in Mexico) that were bad out of the box and, upon inspection were just badly built. I talked to the owner at 22 RE Performance, the most premium engine builder I know of some time ago, and he told me that he had so many problems with these MIM one's, that he has them, brand new in boxes, stacked up in the rafters of his shop. This was also confirmed by YodaMan in my home area in Cali. He paid for repairs on one of mine and several others under warranty, and won't touch them now. My last radiator purchased was aluminium because of the high cost of a responsible copper/brass rebuild and it's just OK so far. I have kept the old style copper core and will pay to re-build "next time". Other thoughts, timing correct? Is engine breathing easy? i.e. air box, filter, any obstruction in intake air flow? I don't know your skill level, but I'd do both a hot compression check and combustion gas test in water in the driveway, or like Linda said, mobil guy can do this easily. Especially if your guy's telling you the head's the problem and want's to send you to another shop. I keep hearing about "these guy's" who do work on your rig, then want to send you to another mechanic. It's becoming a thing these days and I think it's not a good sign. You keep good notes, that will help. BR, TG
 -
Yeah, TG. I finally figured it's like that old adage, "Nobody will notice it on a galloping goose, they will be busy watching the goose gallop!" Another what if? If I glue in a length of 3/4 PVC tubing across the top of the first layer of floor in the seam between my styrofoam insulation, will it weaken the floor structure? I'm thinking I could run my 110V through it for AC which will be overhead the refrigerator above the pass side wheel well. Possibly another at the next seam of styrofoam for ? I plan to stagger all the seams of each layer so that none will match out of the total floor construction anyway. Pros, cons? More minds make a better finished product!
-
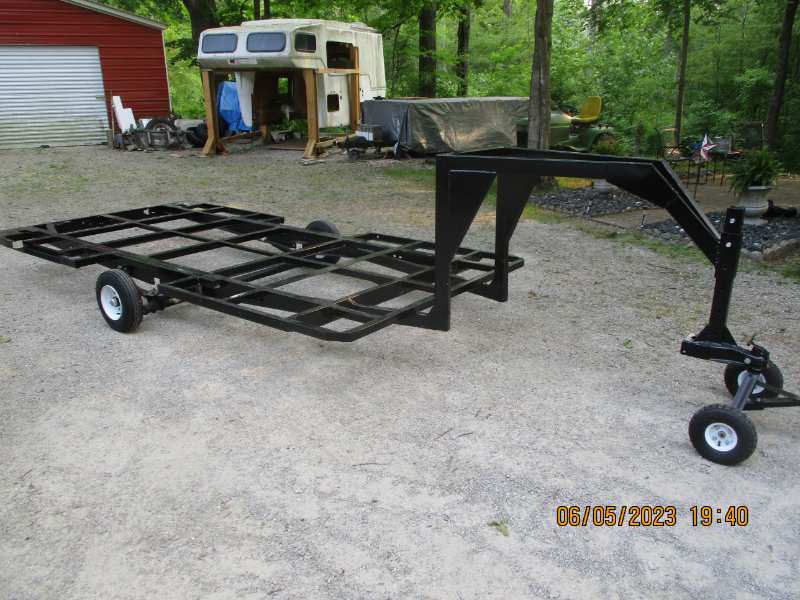
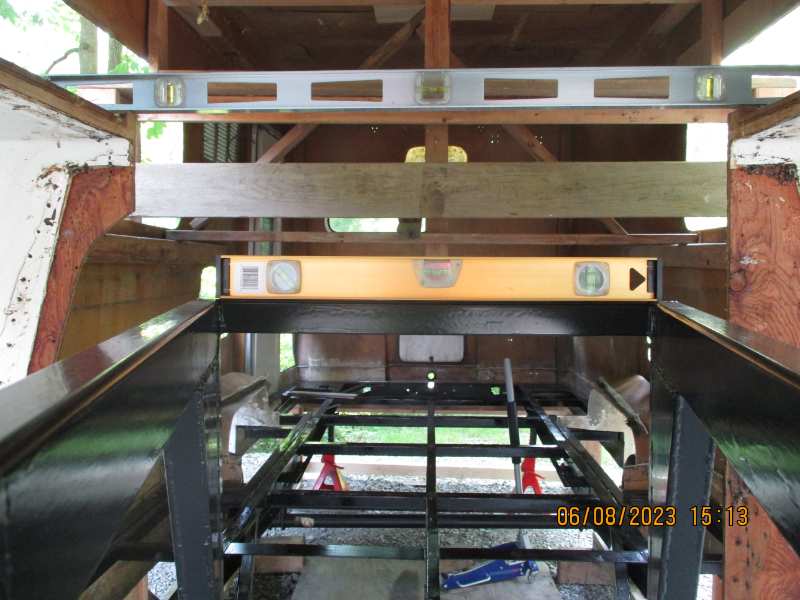
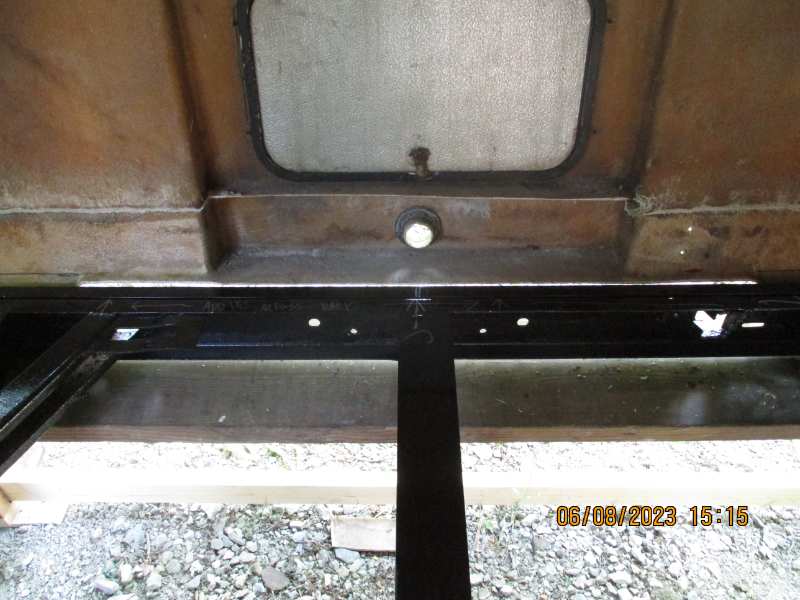
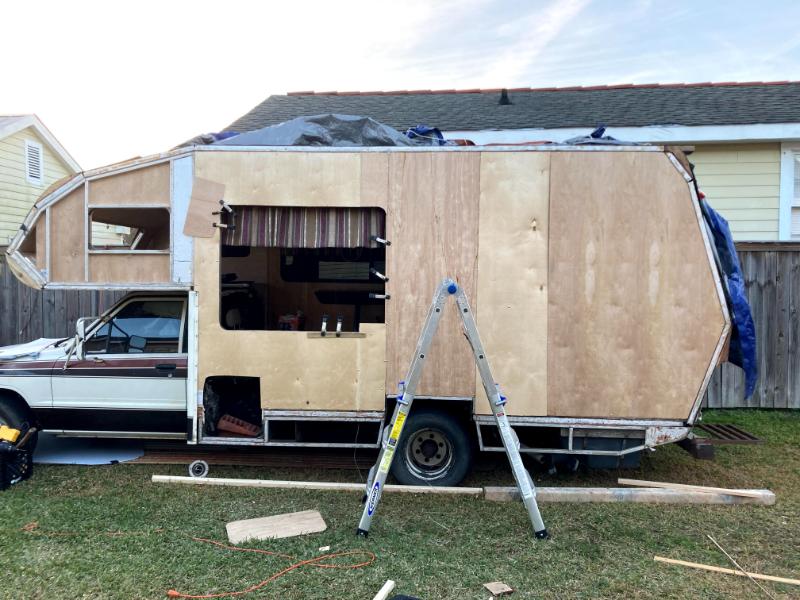
OK, it's been a couple weeks or so. Life, (wife's garden, painting the house, landscaping, etc) has slowed the build for a bit but back to it now. Gooseneck trailer and edge wings are done and it's time to get serious about mating these two together for the final time. I'm sure you guys already know this, but there is absolutely nothing about this Sunrader body that is even remotely level, equidistant, or symmetric from side to side, corner to corner or front to back! It's kinda like trying to center an egg around a perfectly formed rectangular platform without two matching places to measure from. Finally had to turn off a bit of OCD that I didn't know I had and rely on common sense generalizing. Leveled the trailer frame, (the easy part), at a starting height close to the approximate floor height on the shell that I'm after. Centered the rear of the trailer frame on the hole in the back (which by eyeball measuring with a tape on the outside is pretty much center of the shell at that level), then measured side to center on the front pass-thru opening at floor level. On my shell, the opening for the pass-thru appears to be centered in the overall width across the front of the shell, (again with eyeballing the tape measure). I had to adjust the height of the shell in the front a smidgen to get the window cutouts to read level across the bottom front to back. As ToyoGuy had suggested, I had already mocked up approximate ride level, orientation of the shell, and after many conversations with "Bob" decided that I had arrived at the profile I wanted to present. The trailer is level, the shell reads level across the back bottom transom fold in the middle, the front pass-thru reads level across the top of the overhead opening and the center of the gooseneck reads level and is centered in the pass-thru opening. This will give me 77" at the rear, tapering toward the front to 76" (before the floor thickness),and will position the final top of the floor surface approx 1/4" above the door transom. The walls at this point are free floating with no obstruction on the sides since they are suspended on the columns. When I position the interior wheel well caps level according to where the original floor was glassed, the width from centerline of the trailer to either side wall is within 1/4" both in front of and behind the wheel wells. So I'm saying I am satisfied this is as good as it's gonna get. Now for the oddball stuff. The axle is off on one side by 1/2" from being centered in the wheel well when comparing side to side. It is also off about 1/2" in and out when compared side to side. The equidistant line that I marked around the interior perimeter by measuring straight down from the original floor glass line is tapered down from the front of the wheel well to the front corner (both sides), by close to 1/2". I know that fiberglass things out of a mold are not entirely exact and nobody can look down both sides at the same time, so I'm going to go with where it's at. However, if any of you technical people spot something wrong with my process, please let me know! I'm ready to order my fiberglass supplies and start the point of no return. Thanks for putting up with the rambling again and I appreciate any input.
-
With all due respect the movement of air over a slope will all have varying degrees of a still similar outcome. Be it sloped hood, windshield or the slope of a Sunrader overhead. Air doesn't care how big you are. This is hard to see but the first big rig has a wind deflector and the second doesn't. See the black space on the front of the roof of the first pic. That black space is where the wind isn't hitting. Negative air space because of the slope of the deflector. Linda S
-
Since I used my existing covers I couldn't go thicker than 5 inches and I got medium density. The Sunrader overhead bed narrows at the front so that I cut myself with an electric knife so the cover would fit. Foam like this 2" Thick Single Size Polyurethane Foam Bed Mattress | eBay The stores I'm talking about supply foam to professional upholsterers so totally not like a Joann fabrics place. Unfortunately looks like the best option near Springfield has gone out of business. Your plan sounds good anyway. Linda S
-
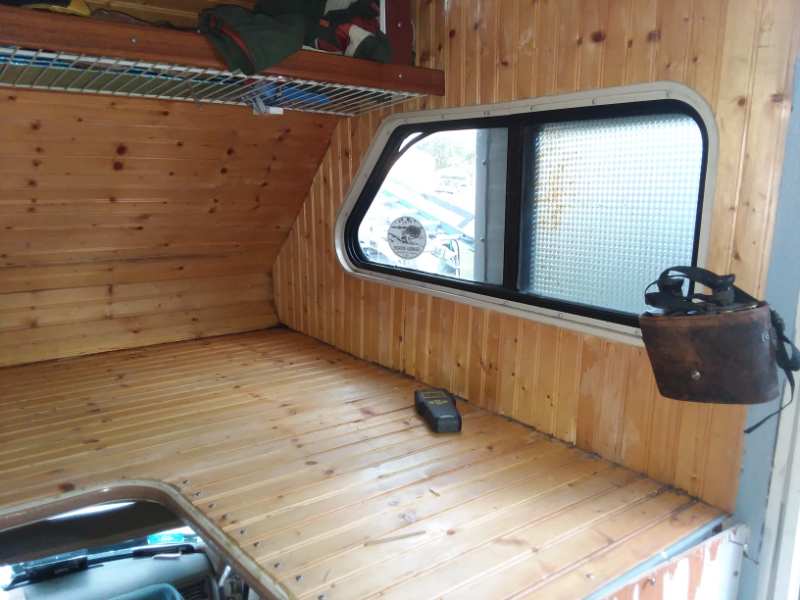
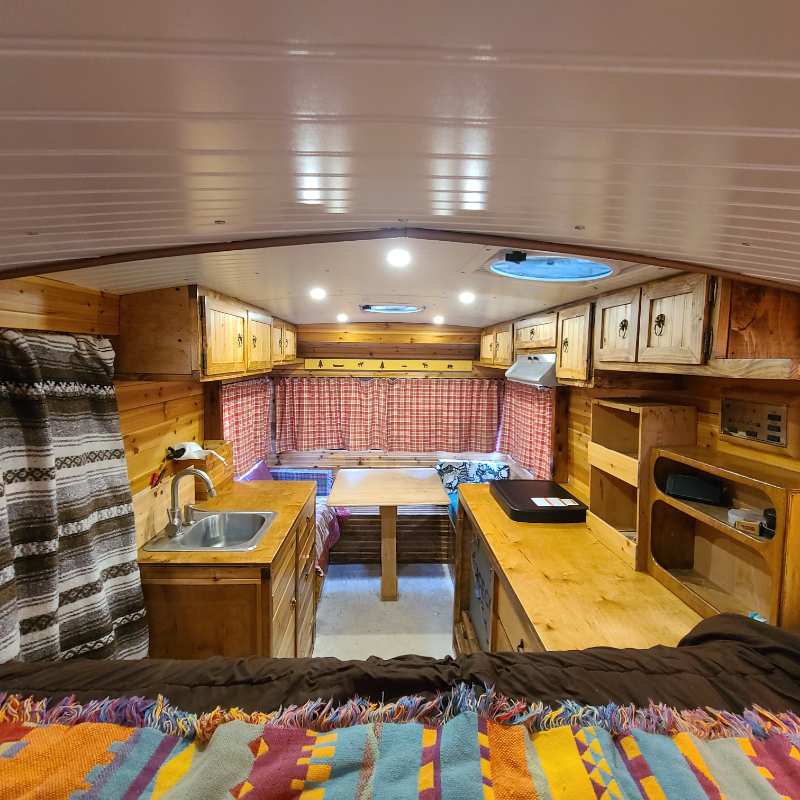
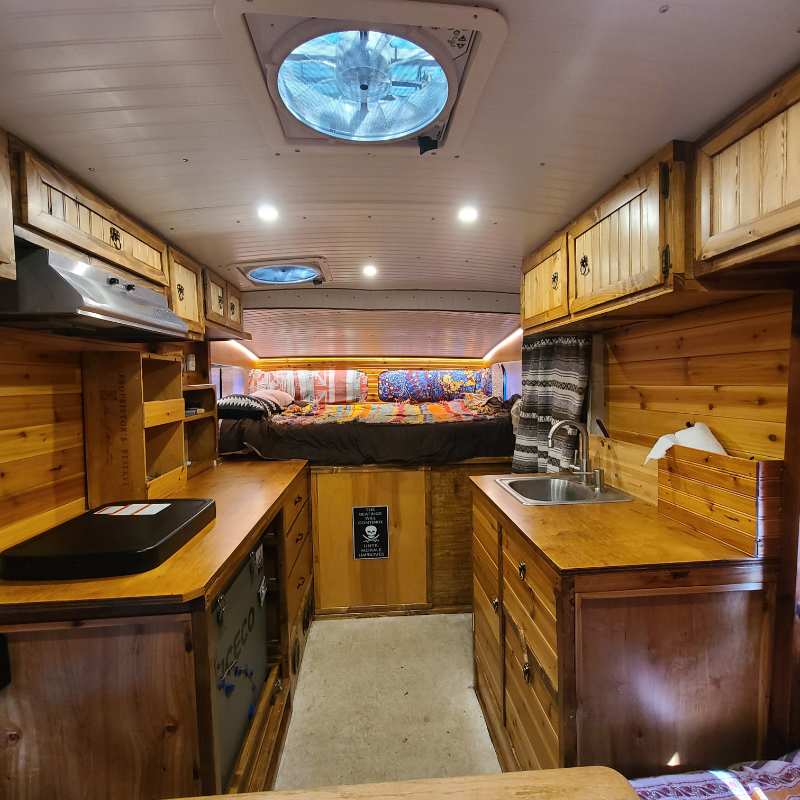
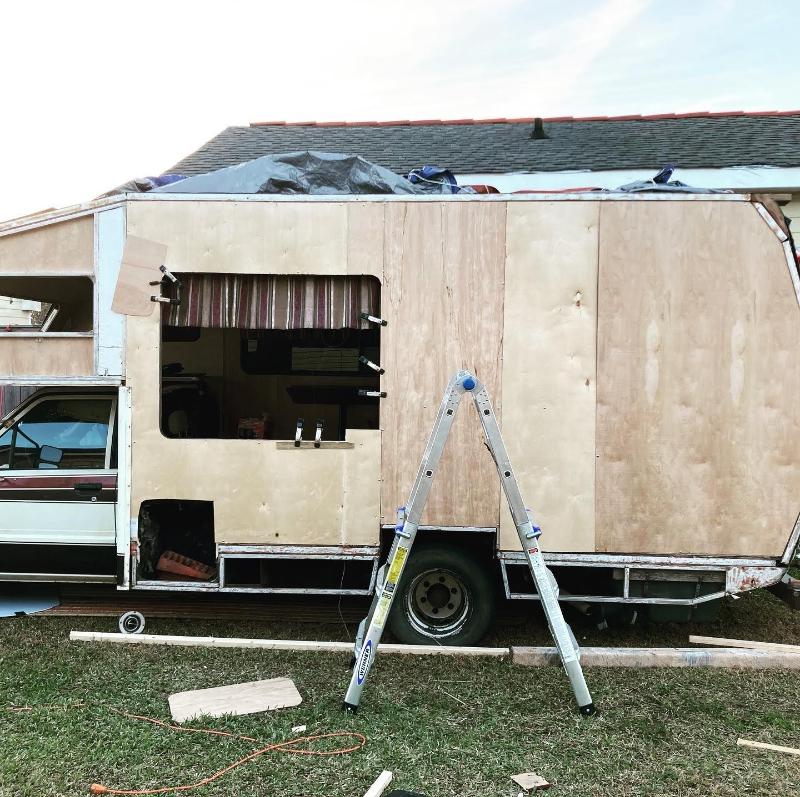
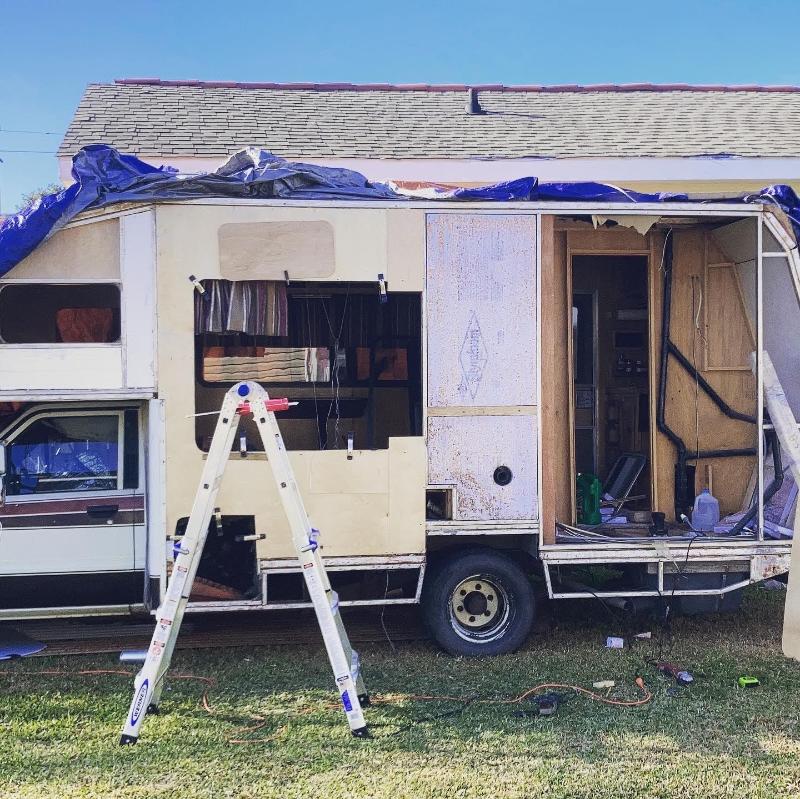
Hello Everyone! I have been searching and can't find a real answer to my dilemma of wood thickness in the overcab. Can I use 1/4" plywood (instead of the thinner 1/8" lauan plywood) to rebuild my overcab side walls and sleeping area? If I can, do I just glue and staple the roof area that has the curve leading up to the front overcab window? Is there some sort of preparation I need to do to the 1/4" plywood to help it bend and fit snuggly into the curved roof - front wall area? Could I use 1/2" plywood for the bottom bed area? I ultimately want to paint this whole area white (research shows that the lauan typically absorbs moister from the primer and paint, which in turn causes the lauan to delaminate and bubble). Any and all advice for me is very much appreciated. Thank you everyone that contributes to this amazing and informative forum.
-
Hey there BTB, Looks about like mine did, but you don't have a frame to trip over, I'm jealous. Soooo... on the other stuff. Yeah, I use(d) the same oscillating tool for some plunge-cuts, but I have some old carpal tunnel issues from using cast-cutters all day for years, that it aggravates, so I am limited that way. Also, I seem to go through the blades pretty fast on fiberglass cuts. Really nice to hear about the lack of dust though. I got to hate that stuff, I did so much glassing for my build. I knew I'd be coving the perimeter above and below the floor and road barrier, so it was nice for me to use the angle grinder to take care of the cutting-back of the old rotten stuff and do the 4" scuff-prep above and below the floor margins for good adhesion prep on the 23 yr old fiberglass. On floor height at the bottom of the door thought, ....the entry step-down in the stock setup (I had to rebuild mine entirely) actually has a drain hole most people don't know about for when it's raining sideways and you're getting in and out of the coach. Kinda nice to have one place on the floor to put really wet shoes/stuff that'll drain. Other thoughts on where the floor goes... like things you mentioned.... road clearance (sounds like you know what you want) , thickness of the floor top to bottom, ceiling thickness (insulation and any reinforcements at the ceiling) (don't forget to figure for light fixtures). I'm a shorter guy, and I think I ended up at 5' 10" of total ceiling height, but that would be unacceptable for lots of folks. Of course, good to consider overall height of the rig (any plans for racks on top?), In my opinion, the stock 'Rader is plenty exciting in a "robust" cross-wind. You're doing a trailer, and you gotta figure your tolerance for that and how much your "provisioned" weight/height will be. I have been known to fill the regular gas tank, fill an extra 5 gal Jerry can and top off the fresh water tank to get up CA 395 through Bishop in a stiff blow before Since you're almost starting with a kind of blank slate, I'd think a lot. (it's cheap), measure twice and ..... well, you know. There's a lot unsaid/unread about the plans for closing off the cab pass-through. (I'd better read through prior posts, I'm showing my age here) My rig is 9' 6" from the ground to the tops of the coach vents when they're closed, but... it's a 4x4 w/a 1" lift kit and stock 2wd are lower, I'm sure. (Maybe Linda can help?) "Inside door trim screws" you mean the aluminum trim that pulls the door frame into the port? IMHO gotta be able to get to those to tighten occasionally. Well heck, that's a lot said for not much said. It's looking great so far, BR, TG
-
Short update post on the build. ToyoGuy, I tried out a variation of sanding the edges of the remaining fiberglass from when I cut the floor out. I bought a $19 oscillating tool (HF), and shaved that extra ridge off in about 40 min. (Half round blade worked the best). I still have to clean up the corners a little, but it sure did the job! Almost zero dust although I did wear the respirator and gloves. Still trying to decide how far to drop the floor. Originally I was going level to the bottom of the door, but it won't be entirely smooth because of the transom anyway. It's 7 inches if I go below the floor level at the door, a bit too much for me, but if I only go 5 or 6 inches, I have to do something goofy to be able to get to the inside door trim screws. Suggestions? Trying to keep the overall height down as low as possible but my trailer floor will end up around 18 - 20 inches from the ground at the least. How tall is the roof off of the ground on a stock Sunrader? I measured mine before I started, but didn't write that down. The bottom of my overhead, (over the cab part), looks like it will be about 5'2" or so. Just curious.
-
Acar, I have many, many measurements. I will post a few now and we can work from there. I am not sure how they determine an 18 footer, etc. I don't know if they are measuring total length including chassis, or??? Any measurements I give unless otherwise stated are from bare walls inside. At floor level: Back wall to bulkhead @ center opening 148". Back wall to wheel well rear side L&R 57 3/4". Front wall to wheel well front side L 58 1/2", R58". Wheel well across front to back L&R 31 1/2". Wheel well from wall to inside L 18 1/2", R 19". Wall to wall across: along back wall 76 3/4", back of door opening 78 1/4", front of door opening 80 1/4", back of wheel wells 80 1/2", front of wheel wells 80", across top of wheel wells 81 1/4". across floor @ bulkhead opening 78 1/2", across the overhead opening @ upper level 79 1/4' @ the middle of the side windows in overhead 78". Floor to ceiling height (Inside of lower side ridges), @ rear 72", @ rear of wheel wells 71 1/2", @ front of wheel wells 71 1/2", @ center of coach side windows 71". I'll stop here until I get some feedback on what else you might want, (I have more). But don't want to confuse the issue. The overhead ridge that drops down in the ceiling at the back on either side and runs up to the overhead is 4-4 1/4" tall and 71" across inside @ the center of the large side windows. Ceiling height and ridges taper into each other at the pass-thru bulkhead.
-
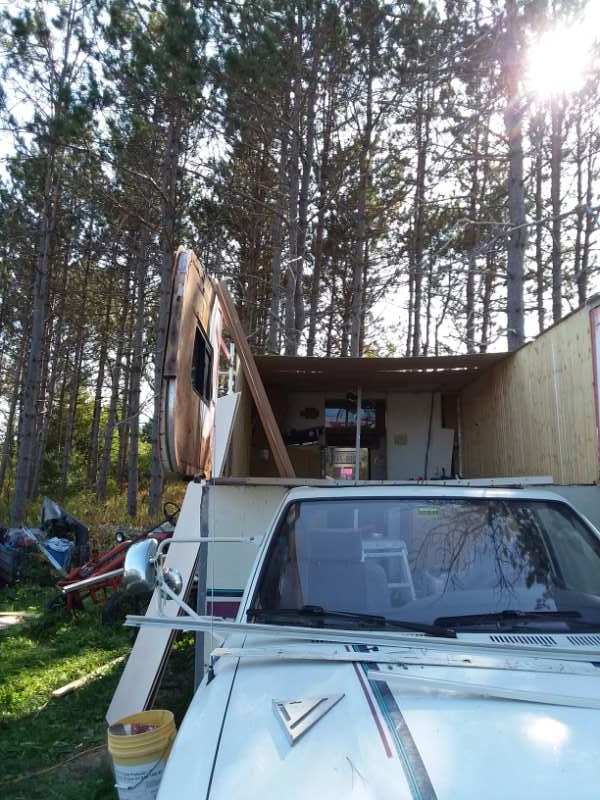
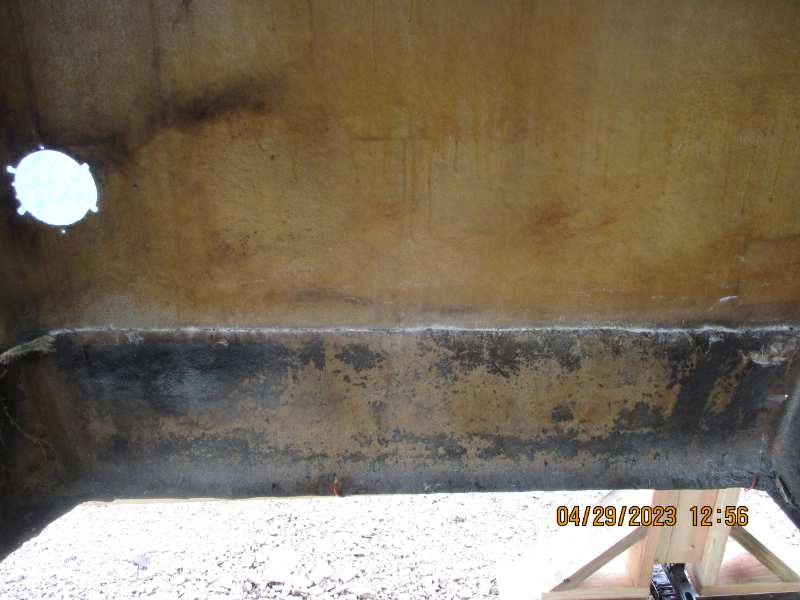
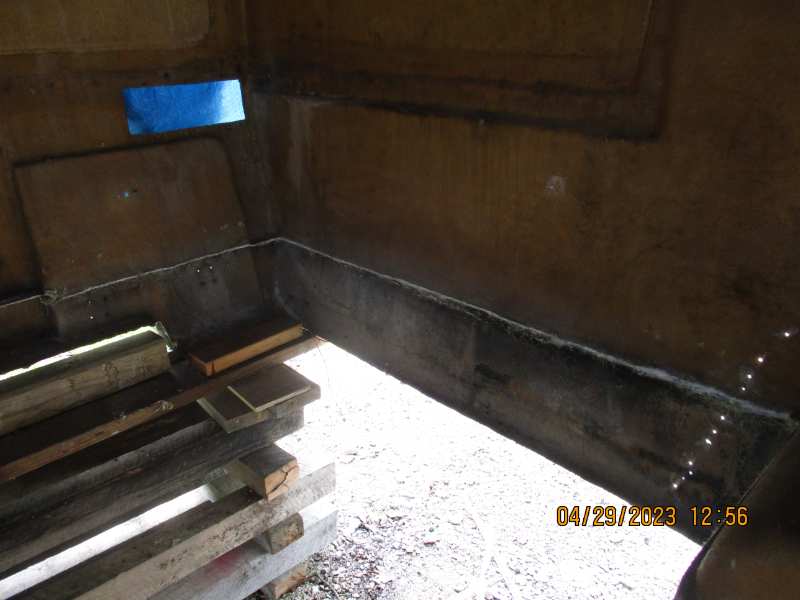
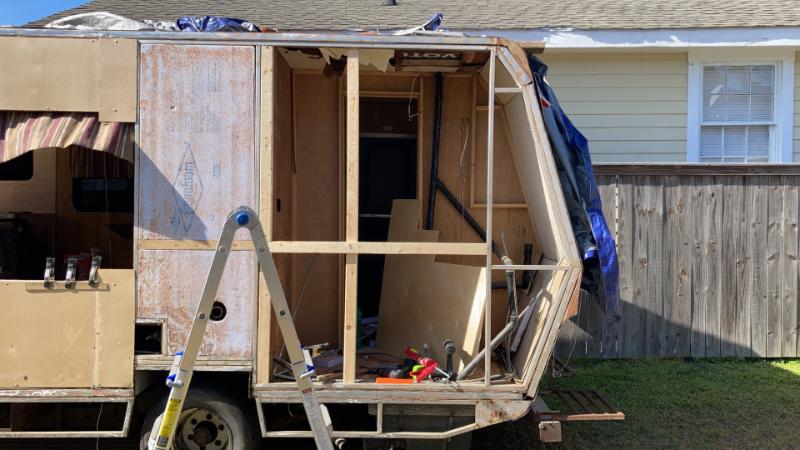
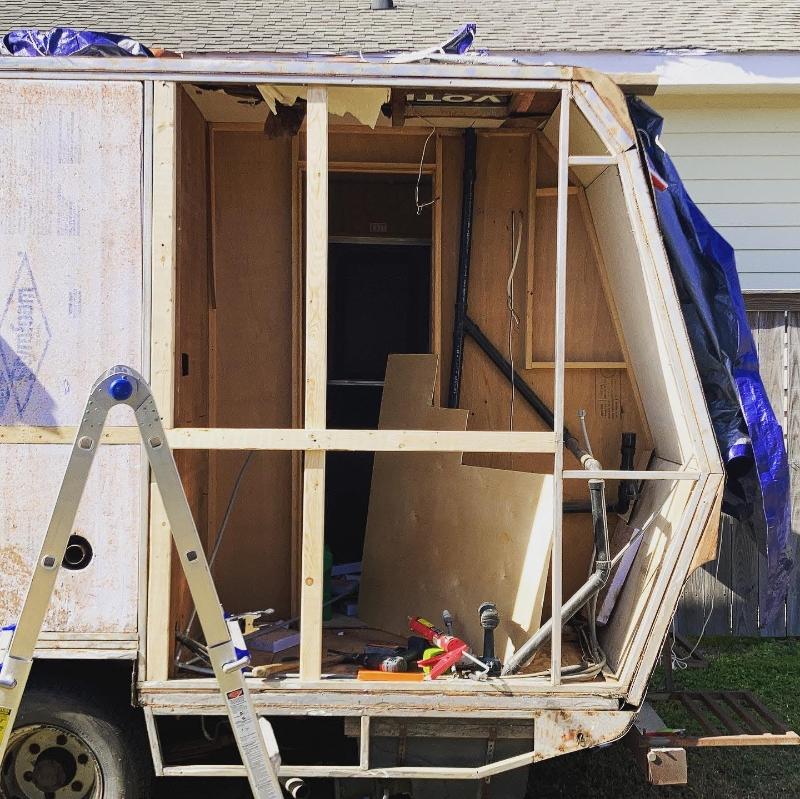
Ok, got a question. In addition to replacing cabover bed area I have the filon on both sides of cabover peeled back and need to rebuild those sidewalls. Original construction was (from exterior to interior)- filon, 1/8” luan, 1 and 3/8” rigid insulation, 1/8” luan. This wall is framed in tubular aluminum or steel (viewable in pics above). My idea is to use 1 and 1/2” of foil faced polyiso insulation and skip the outer (exterior only) layer of 1/8” luan. While the luan “sandwich” is designed to give the wall structure, I would think solid insulation and metal frame and an interior layer of plywood (or frp, pvc) would suffice. I’ve heard that some adhesives can eat away at foam insulation so I would need to use a friendly adhesive to join the insulation to the filon or maybe install the 1/2” outer layer of polyiso with it’s foil facing out. Any thoughts?
-

New Member W/New Project Using Sunrader
linda s replied to Bob the Builder's topic in General Discussion
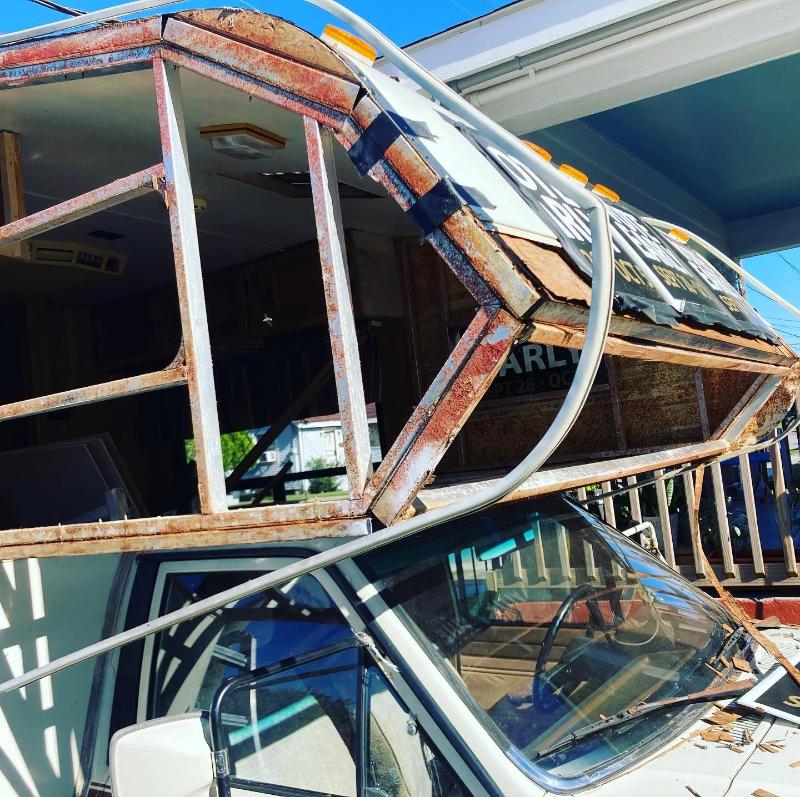
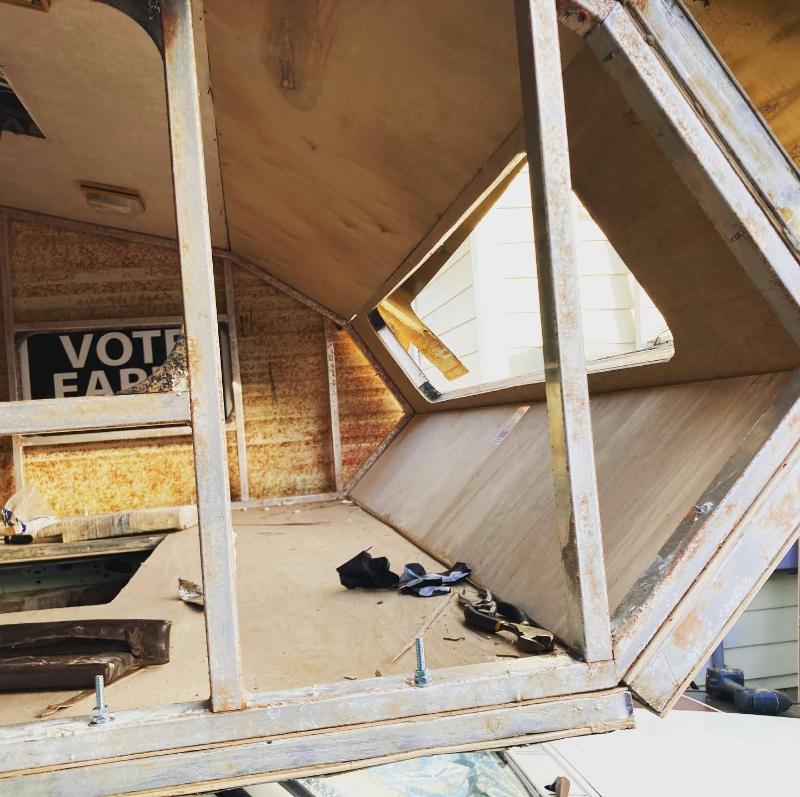
One hell of a project. Thank you for sharing it with us. I do think you should add some support to the overhead. They were not built to fly free. They were supported by the truck cab Linda S -
That would be awesome. I tried to find the pickup cab length online and somehow no one has posted those numbers. And no on the overhead section. Thank you.
-
Here's the overall length of both from the factory brochure Linda S Oh just realized you wanted the coach length not the overall length. I can measure the length of my front bumper to the back of the cab today and you can just subtract that. I'm assuming you don't need the overhead section included.
-

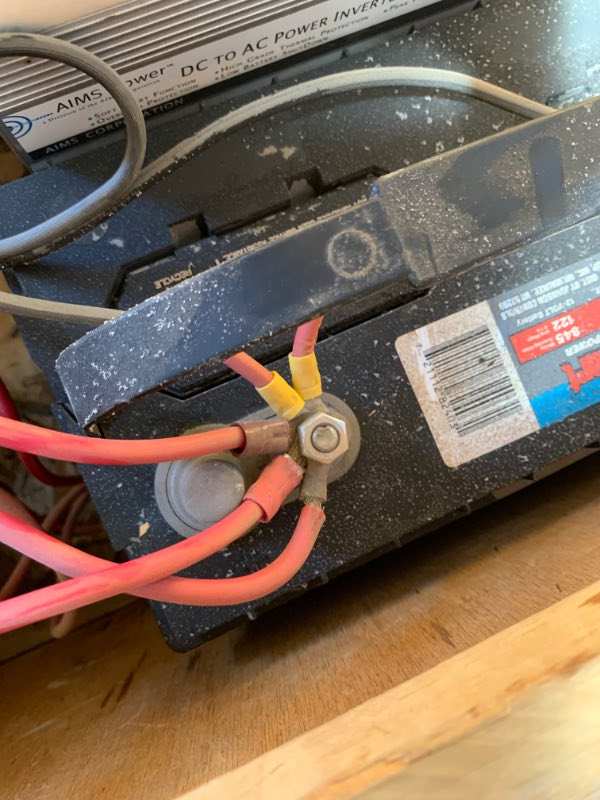
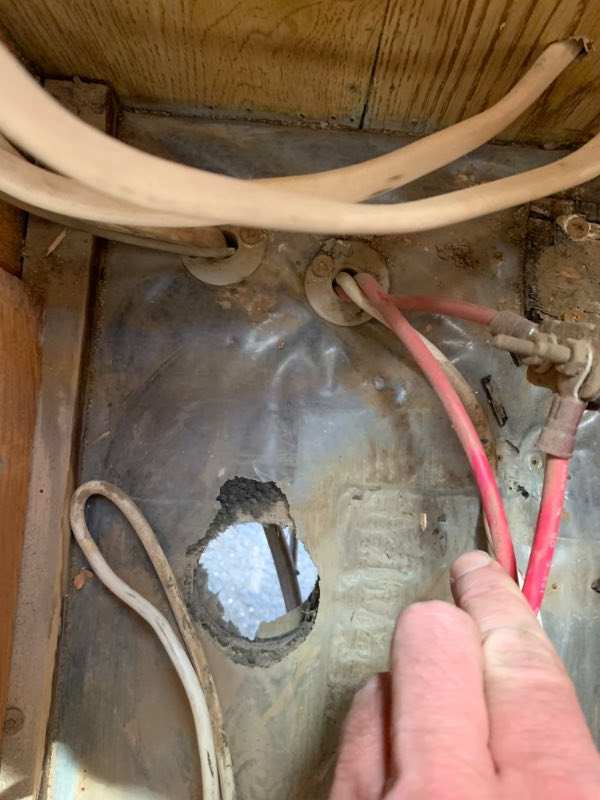
Converter Replacement for Underwriters Laboratory - Model 6345 UL
sdstrain replied to sdstrain's topic in Electrical
All your thoughts are great. Whether I've been logged in or not I've followed this board for a long time. All the main players are coming to my aid and I really appreciate it. I am going to go silent for a bit because I really can't do much until my engine is back where it should be living. I've done a lot of the tests you are all referring to. I've used the multimeter to track down a lot of information. How I Interpret that info is the problem because I am not very briefed on electricity as a whole. With that, I am feeling pretty certain that starting with a new Power Converter can't be a bad thing considering the cost isn't much when thinking about doing a whole interior rebuild. Those pictures were taken before I disconnected every single wire in my electrical setup, minus wires connected to the converter. I even disconnected my solar panels because I noticed a spark between the wires even after unwiring from the charge controller and the battery. So at this point, there isn't any electrical power source connected to anything. My plan is to hire an electrician. A friend. But a professional electrician and I will ask him to install my new converter and make sure all the DC wires going to any appliance, light, etc are working properly. Then my plan is to rebuild the interior. I have good money that I will get stuck along the way quite a few times and I will post about it as I go. Any input is welcome once that process is underway. I know it sucks to hire an electrician, but I am a Wildland Firefighter living in Arizona and my fire season is about to get underway. I live in my motorhome during the season and I rather just pay to get things right. I do as much as I can solo, but with electricity it Is probably worth it. I am through and through an enthusiast for these motorhomes and wish I had the time to learn it all myself. Thank you for such prompt attention. More to come... Thanks, Sam -
Converter Replacement for Underwriters Laboratory - Model 6345 UL
sdstrain replied to sdstrain's topic in Electrical
Hey all, Thanks for the feedback. I attached a few photos of my setup in case it inspires any comments. I have a Voltmeter and have done some checks on and off over time. I bought a brand new water pump, so I sure hope it's not that. Full transparency, I am revisiting this after a very long time. My engine had problems and I am currently undergoing a rebuild of the engine. I figure now that I can hopefully depend on the engine, it's worth it to do some interior work. I am starting with the converter since almost none of my appliances/lights work. I can hook up to my inverter and run anything off AC through my solar, but the DC side is all screwed up. As I start this rebuild, I'm sure you'll be seeing many more posts from me. Love this forum, been watching it for a long time. Thanks, Sam
-
 If your going to remove the transmission already. Then remove and inspect everything you can just unbolt and clean them. Pump, oil pan, OD solenoid and such like. Any crud you clean out can only extend its life. The Toyota transmission filter looks like it's made from a screen door A rebuild pump is $75-$100.
 -
 Ok well it's been quite awhile since I've posted any updates so here we go. Long story short I've now got a new motor, radiator and I swapped out the rear end to 4.88's. It drives like a completely different vehicle now, and by that I mean it almost drives like a regular truck. I can use all of my gears now including overdrive, and the motor seems to work much less and is much happier overall. I'm just getting past the first 500 miles on the motor so still have some time to break it in and everything but so far I'm really pleased with how it turned out. I weighed it a few weeks ago dry and it came in at 4670lbs. The door sticker says 5500 so if that was accurate I've managed to drop over 800lbs out of this thing. Of course the bathroom and other appliances were probably a good portion of that but I also worked hard to try to not overbuild inside and keep a mind towards weight which I think has paid off. I also relocated most of the weight from the rear of the camper to sit over the axle instead; the water tanks and fridge are located directly over the axle, the furnace moved in front of it and just the battery and propane tanks sit behind it. Moving a lot of the weight from the very back of the rig to sit directly over the axle has really improved the handling and drivability of the camper as well. Inside I've managed to get most of the major things done; I still need to finish off a few things and put the hardwood floor back down but I would say a good 80% of it is completed. I still have plans for new cubbies, shelves and cabinets for the sink area and on top of the counter next to the bed but the major stuff is built and installed. Overall I'm pretty pleased with how it has turned out and the rig I now have for some sweet adventures but it's certainly been a long road. When I purchased it back in 2019 my intention was to buy something I could just use and enjoy, I never intended to rebuild an RV from front to back top to bottom. But here I am a few years later and I'm glad I've stuck with the project and made it to the other side of it. Thank you to everyone on this site for the information, suggestions and tips for rebuilding these things and all the knowledge and expertise everyone has provided, it's been a huge help throughout this process and its hard to imagine trying to wade through the rebuild of one of these things without it. Thanks again to everyone who contributes and shares their knowledge and experience.
-
Linda- yeah, I got the bracket off intact. A few minor dents and bends but still in it’s original shape. There is a square metal tubular frame on the inside of the sidewall that runs along the bottom hopefully all the way to the rooftop. The floor of the bunk is sandwiched under it, between it and the exterior filon that lays over the roof of the truck. This is where I had to slide an oscillating tool in to cut some of the exterior bracket’s screws- they had been driven into this interior metal frame. The metal frame is a nice discovery. It’s got me wondering if I can rebuild the bunk floor with metal framing. Should probably stick with wood- no need to complicate things any further.
-
 Here is some of the progress:
-

Generator thoughts for boondocked air conditioner use
wadingthroughlife posted a topic in Electrical
Hi All! Generator question here for our 1987 Sunrader 18' 4x4: We're adding a rooftop AC (RecPro 9.5k) and looking for ways to power it and the rest of the rig when boondocked for hot & humid Southern springs and summers. It'll likely ride on the rear hitch basket when in route, sharing space with a box holding whatever outdoor gear we take along. I don't think I'll need to take it in the fall or winter. We'll likely do a minimal solar setup in the future for topping off the house battery on winter, fall, and early spring trips. I'd like something reliable, light weight, reasonable quiet, priced well, and with enough power to support the below uses + the AC. Thoughts on what we can get away with power wise running the other items are appreciated. I assume I should add up the watts or amps of any used items, but I'm hoping for help saving that research, honestly. Thanks kindly in advance for any help! Considering the Honda eu2200i (1800w running/2200w startup) and Generac GP3300i (2200w running/3300w startup) We dont run much else other than the below at any point in a trip: -water pump -maxxfan in 2nd overhead vent -led overhead lights -fridge on propane when boondocked -water heater (electric start) -phone charger(s) - NO microwave/coffee pot/TV/etc A/C Specs: Rated cooling capacity: 9500BTU/H Input needed for cooling: 1370 W Rated current for cooling: 12.6 A Maximum power input: 1590 W Maximum Amp Draw: 14.6Amps Startup Amp Draw: 14.6Amps https://www.recpro.com/rv-air-conditioner-low-profile-9.../ -
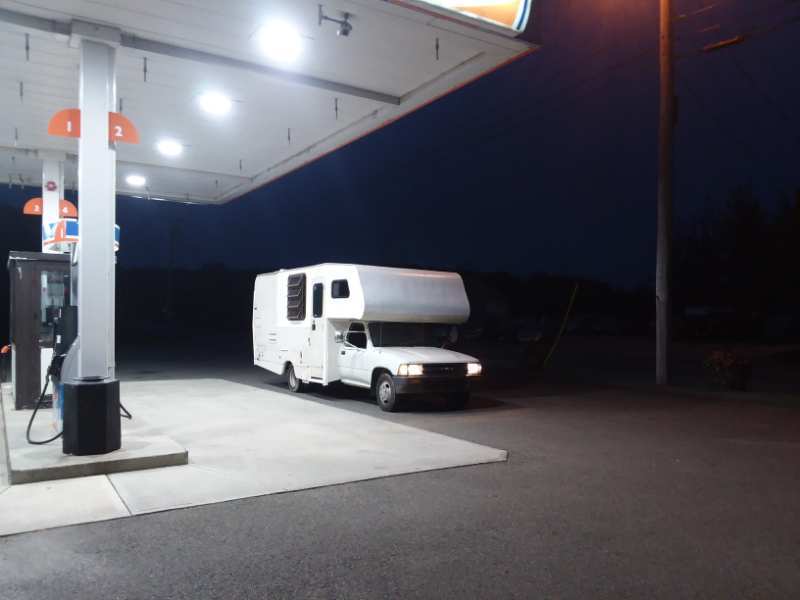
Thank you to all the active posters in this forum!!! I have been learning a ton from each of you, including what tires to buy the value of my 22RE engine, and how not to totally panic as I work to bring my 87 Seabreeze back from almost 2 years of neglect during Covid, and a ton of damage my RV suffered in a "secure" storage this year. It is now in a new lot, thankfully. (Pic below is before the 7 new Nexen tires I just put on, alignment, etc.) I could use help in locating any California Bay Area companies willing to repair dry rot or rebuild a wall on a Toyota motorhome. I have been trying since the Summer, but many companies seem not to want to work on this type of older motorhome because it takes "a lot of work to repair dry rot or do any amount of rebuilding of the structure". It is confusing to me because I'm not asking for the work to be done for free, and there seems to be a push from the vendors to get me to sell my RV. I'm not interested i selling it, currently, but I am interested in repairing the passenger section of wall from the door to the back (I may be over-estimating the scope of the repair, because I am adding 3ft in each direction from where I noticed some damage... I wish I had a place, the tools, enough time and level of skill to do the work myself for this phase of my renovation journey, alas... If anyone has a solid company for RV structural repairs, please advise. 💗Thanks so much and now that I've finally joined this forum instead of just reading and learning, and I'll also start posting a list of great resources, and products that I have been discovering on my renovation and improvements journey...💗