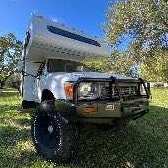
Odyssey 4x4 Posted July 18, 2019 Author Share Posted July 18, 2019 ARB deluxe front bumper installed. Quote Link to comment Share on other sites More sharing options...
Odyssey 4x4 Posted July 27, 2019 Author Share Posted July 27, 2019 (edited) We finally got a few minutes of dry weather today to get the truck out of the shop. This gave me a chance to snap some photos of the finished painted cab with bumper, as well as the near complete interior. Heated set buttons installed as well as marine grade 12v usb outlet. I also rebuilt and fixed up the shift console with new bushings and lubrication for smooth movement. I still have to wire the seats and USB as well as install a stereo head unit and speakers. The filon wall siding has been ordered and will be arriving within a few days which means the walls will soon be glossy and going back on the vehicle! Edited July 27, 2019 by Odyssey 4x4 Quote Link to comment Share on other sites More sharing options...
WME Posted July 27, 2019 Share Posted July 27, 2019 From the way it looks so far, when your done you should be able to swap straight across for an Earthroamer.😀 Quote Link to comment Share on other sites More sharing options...
Odyssey 4x4 Posted July 27, 2019 Author Share Posted July 27, 2019 8 hours ago, WME said: From the way it looks so far, when your done you should be able to swap straight across for an Earthroamer.😀 I think I’d rather have my yota! Quote Link to comment Share on other sites More sharing options...
Odyssey 4x4 Posted August 4, 2019 Author Share Posted August 4, 2019 Hey guys! I'm excited to announce that we are ready to apply the Filon siding to the walls, and then the walls to the truck! This thing is going to be shiny! Walls are prepped and filon is rolled out, I purchased 40'. Each wall is about 16 feet in total length. I have enough filon for both walls to be one solid piece of filon for the entire side, and enough leftover to do the rear wall as well as accessory doors and main entrance door. Tracing walls onto rolled out filon material for cutting. Trace Complete (double and triple check tracings are correct as well as orientation on filon since it has a good and a bad side)! Lots of careful cutting and then let it get some sun and soften up! It's really nice looking stuff and should really bring the Toyota a classy look. We will be gluing the filon to the walls early this week. Quote Link to comment Share on other sites More sharing options...
Ctgriffi Posted August 6, 2019 Share Posted August 6, 2019 This thread is a real blast; thanks for documenting the project! I look forward to hearing about the process you used for gluing the filon (and your adhesive of choice) and can't wait to see the walls up/mounted on the frame. Quote Link to comment Share on other sites More sharing options...
LAYTON1550 Posted September 21, 2019 Share Posted September 21, 2019 Been following your build on you tube. Pleasantly surprised to stumble across your build this morning here. Hows the filon application coming? Quote Link to comment Share on other sites More sharing options...
Odyssey 4x4 Posted December 3, 2019 Author Share Posted December 3, 2019 Haven’t posted here in a while but the walls are on the truck! We will be applying the filon soon. The first filon application failed as it showed way too many imperfections, more info in my YouTube video. To ensure getting the walls as smooth as possible we filled and sanded them several times with a marine fairing compound. Quote Link to comment Share on other sites More sharing options...
Derek up North Posted December 3, 2019 Share Posted December 3, 2019 2 hours ago, Odyssey 4x4 said: ... more info in my YouTube video. https://www.youtube.com/channel/UCfL6cO3DnVthezavoURM4sQ/videos Quote Link to comment Share on other sites More sharing options...
Odyssey 4x4 Posted December 3, 2019 Author Share Posted December 3, 2019 (edited) 1 hour ago, Derek up North said: https://www.youtube.com/channel/UCfL6cO3DnVthezavoURM4sQ/videos Ah Doing the good work, thank you! Even better, here's the filon install video... https://youtu.be/6PZkcn015k8 Edited December 3, 2019 by Odyssey 4x4 Quote Link to comment Share on other sites More sharing options...
linda s Posted December 4, 2019 Share Posted December 4, 2019 I may be almost as excited to see the little camper your building. What 3d printer do you have. Linda S Quote Link to comment Share on other sites More sharing options...
Odyssey 4x4 Posted December 4, 2019 Author Share Posted December 4, 2019 1 minute ago, linda s said: I may be almost as excited to see the little camper your building. What 3d printer do you have. Linda S I have a Maker Select V2 that I've modded a bit to get okay prints out of. For a cheap Chinese printer, it does well. For the more intricate parts of the build I am using a FormLabs Form 2 SLA printer which prints in ridiculously detailed quality! A few pics of the model build BEFORE the cat knocked it off my window seal and broke a bunch of parts off of it! Custom functional headlights! SLA printed replica ARB bumper and matching wagon wheel rims to the actual truck. Kinda close to the real thing! Mostly scale subfloor with entry step. First rough draft of custom designed cab-to-coach partition piece! Quote Link to comment Share on other sites More sharing options...
linda s Posted December 4, 2019 Share Posted December 4, 2019 Yup I could definitely afford the Maker Select. The Form Labs will cost almost as much as a new camper. I have a friend who works at the university though. Bet they have some nice ones. I'm thinking a little bigger though. Something like this would be fun https://www.youtube.com/watch?v=jVbovtKOIpQ Linda S Quote Link to comment Share on other sites More sharing options...
Odyssey 4x4 Posted December 17, 2019 Author Share Posted December 17, 2019 (edited) Some more progress! The walls are on and in place, front overcab section is built and mostly complete, front bunk roof partially built, interior layout rough drafting in place! We will be completing the roof build next week. Edited December 17, 2019 by Odyssey 4x4 Quote Link to comment Share on other sites More sharing options...
tstockma Posted December 17, 2019 Share Posted December 17, 2019 This is an amazing build you're doing & I'm gaining a lot of insight into what's "under the hood" on my '86. Thanks! Quote Link to comment Share on other sites More sharing options...
Derek up North Posted December 17, 2019 Share Posted December 17, 2019 A couple of questions:- What's your planned for inside height? I see you are supporting the bunk from the ground during construction. Does climbing aboard to work on the bunk from inside not throw things off? Or do you also have the truck frame supported to stop this happening? Quote Link to comment Share on other sites More sharing options...
Odyssey 4x4 Posted December 19, 2019 Author Share Posted December 19, 2019 On 12/17/2019 at 8:18 AM, Derek up North said: A couple of questions:- What's your planned for inside height? I see you are supporting the bunk from the ground during construction. Does climbing aboard to work on the bunk from inside not throw things off? Or do you also have the truck frame supported to stop this happening? The way we are doing the roof design brings the interior height to about 6'4", maybe the tallest interior height of all Toy homes now? I'm 6'1" and got tired of my head scraping the roof in toy homes. What you see supporting the bunk is actually just holding the fiberglass petition piece so it isn't hanging on its own free weight prior to permanent attachment. It's now properly attached to the wall structures via screws from the interior out and exterior in. The walls support a majority of the weight of the bunk area believe it or not. Kinda confusing to type out but I hope this helps Quote Link to comment Share on other sites More sharing options...
Odyssey 4x4 Posted December 30, 2019 Author Share Posted December 30, 2019 (edited) We got the majority of the roof finished up. We first framed it with the two outer main boards running parallel the length of the truck, followed by the front and rear main boards running perpendicular. We tied those together to keep it square to the true shape of the truck, followed by removing it from the vehicle and onto "flat" ground. We measured the locations for the bathroom vent, ac, rear dinette vent, and rear ladder supports, and then framed around that. A piece of aluminum L channel was added to the front and rear framing of the AC unit to assist with the weight and prevent sagging. Everything else was framed out from there, traced onto our interior ceiling luan board, holes pre-drilled and counter sank, and then wood glued and screwed together. The main roof plywood will go on once this roof is on the truck. We are also now ordering the flooring material, I really like the Marmoleum sound deadening flooring. It is all natural and the exact interior width of the truck (79") which means the entire floor can be put it in once piece. I am probably going with they neutral grey color. Edited December 30, 2019 by Odyssey 4x4 Quote Link to comment Share on other sites More sharing options...
WME Posted December 30, 2019 Share Posted December 30, 2019 Any arc to the outer roof? Rain run off. Quote Link to comment Share on other sites More sharing options...
Odyssey 4x4 Posted December 30, 2019 Author Share Posted December 30, 2019 (edited) 54 minutes ago, WME said: Any arc to the outer roof? Rain run off. The original design didn’t have an arch and I didn’t think to add one...maybe I should have! Edited December 30, 2019 by Odyssey 4x4 Quote Link to comment Share on other sites More sharing options...
WME Posted December 31, 2019 Share Posted December 31, 2019 Wouldn't take much 1" arch scabbed on the crossbraces would do it, actually even a 1/2" would do a lot. Quote Link to comment Share on other sites More sharing options...
Boundfornowhere Posted January 16, 2020 Share Posted January 16, 2020 Super stoked to see this project coming along the way it has. The last time I saw it you guys had just begun so it's great to see all this progress! Quote Link to comment Share on other sites More sharing options...
Odyssey 4x4 Posted January 16, 2020 Author Share Posted January 16, 2020 1 hour ago, Boundfornowhere said: Super stoked to see this project coming along the way it has. The last time I saw it you guys had just begun so it's great to see all this progress! Thanks guys! It’s been neat watching your adventures as well! Quote Link to comment Share on other sites More sharing options...
Odyssey 4x4 Posted January 16, 2020 Author Share Posted January 16, 2020 (edited) New roof build video here! The roof is about finished and on the truck. Rear wall is also near complete (with outdoor shower)... My daily craigslist searching has also again paid off and I grabbed this oven for $75.00 from a very nice couple. They had never used it in their new rig and replaced with an induction cooktop. They also gave me the matching vent hood with it, 2 large 30 amp cords, a wrap around front window and side window covers, and some other stuff. I'm super excited! Edited January 16, 2020 by Odyssey 4x4 Quote Link to comment Share on other sites More sharing options...
Odyssey 4x4 Posted February 24, 2020 Author Share Posted February 24, 2020 Completed Marmoleum one piece floor installation, it’s nice stuff! also near complete build of custom dual fuel tank filler compartment with tank switch assembly. soon to begin completing overcab exterior as well as interior initial layout framing. Quote Link to comment Share on other sites More sharing options...
Odyssey 4x4 Posted April 1, 2020 Author Share Posted April 1, 2020 (edited) Bathroom is near complete! There is still some trim work to do as well as a fan install but that requires the roof to be finished! Edited April 1, 2020 by Odyssey 4x4 Quote Link to comment Share on other sites More sharing options...
linda s Posted April 1, 2020 Share Posted April 1, 2020 Looks beautiful. I hate it when people get rid of bathrooms. The need for a bathroom when traveling is what got me started with motorhomes. Daughter has IBS and on the road and in campgrounds the bathrooms can be disgusting. Love the cassette toilet too. Linda S Quote Link to comment Share on other sites More sharing options...
Odyssey 4x4 Posted April 1, 2020 Author Share Posted April 1, 2020 1 hour ago, linda s said: Looks beautiful. I hate it when people get rid of bathrooms. The need for a bathroom when traveling is what got me started with motorhomes. Daughter has IBS and on the road and in campgrounds the bathrooms can be disgusting. Love the cassette toilet too. Linda S Agreed, bathroom is 100% necessary. Quote Link to comment Share on other sites More sharing options...
Odyssey 4x4 Posted April 12, 2020 Author Share Posted April 12, 2020 Happy easter to everyone and I hope everyone isn't going too crazy self isolating! I had time on my hands sitting at home to clean up the propane tank! It was looking pretty nasty, definitely too nasty to put back into the Toyota with how pretty the truck is gonna be! Many hours of sanding later, not to mention a 6 foot breaker bar to get the valve removed. Also cleaning the interior of the tank and purging residual gas out before I started grinding on it near the openings. It cleaned up pretty dang well considering! New decals and valves are on the way, hopefully it passes inspection after I take it in to get re-certified! Also starting work on the overcab bed platform. It seemed like a good opportunity to design some under bed storage compartments, something that has always seemed really useful. The one piece mattress will lift on a sheet of plywood with the assistance of some gas struts to do the lifting, giving access to storage compartments. We had also started getting lights installed in the rear. We will have the rear section lights on a switch with dimmer, the bathroom lights on a dimmer switch, under cabinet lights on a dimmer, and the bed area on a dimmer as well. They're obviously all LED! Also still trying to decide what I want to use for final ceiling panels. Quote Link to comment Share on other sites More sharing options...
Nam Posted May 5, 2020 Share Posted May 5, 2020 Wow...this is going to be great! beside sweat equity...any idea roughly how much real $ has gone in so far? Quote Link to comment Share on other sites More sharing options...
Odyssey 4x4 Posted May 8, 2020 Author Share Posted May 8, 2020 On 5/4/2020 at 8:14 PM, Nam said: Wow...this is going to be great! beside sweat equity...any idea roughly how much real $ has gone in so far? Oh boy I don't want to think about it! I haven't been keeping a tab on receipts but we haven't been cheeping out on parts along the way. When I get nearer the end of the build I am going to try to get a rough estimate together on investment! Quote Link to comment Share on other sites More sharing options...
Odyssey 4x4 Posted May 16, 2020 Author Share Posted May 16, 2020 (edited) Hey folks, hope everyone is well in these strange times. The work continues on the Odyssey camper. We've got the white ceiling panels installed minus the joint covers, lights and fan/ac openings are cut out. Lights installed with temporary wiring and dimmer switch. The rear dinette framing is mostly built out. We did a partition design to separate the dinette a bit from the rest of the camper, the partition pieces are also structural, providing support from floor to ceiling to give a lot of support to the roof, especially around the air conditioner weight to prevent sag. From the pics you can also see that we have knocked out a good amount of the upper cabinetry framing. We the elimination of the original refrigerator (which sat right next to the door from floor to ceiling when you walked into the camper), we gained a bunch of counter top space as well as overhead cabinet space. Tomorrow we will frame out the lower cabinetry. The driver side of the truck will be the sink location and counter top somewhere around 36" wide between the dinette and the closet we designed. The passenger side of the vehicle will have the longgg counter top. We should have enough room to incorporate not only the Atwood stove but also the dometic dual zone 12v cooler/refrigerator under the counter top. This thing is starting to come together! Edited May 16, 2020 by Odyssey 4x4 Quote Link to comment Share on other sites More sharing options...
Nam Posted May 19, 2020 Share Posted May 19, 2020 Looking great...please keep up the good work. What kind of LED dimmer are you using? Quote Link to comment Share on other sites More sharing options...
Damien Posted July 30, 2020 Share Posted July 30, 2020 I've loved reading through this post and all the pictures! This thing its awesome!! I can't wait to see the final product! You're gonna have so much fun in this thing! I'm big on taking your time and doing things the right way. I can tell you're passionate about this. You're going to have the most solid Toyhome on the road!! You've given me a lot of ideas for my own rebuild! I just bought a 91 V6 Dolphin and I've been working on taking it apart. The original plan was a complete rebuild so I could beef it up and have everything new, but the main reason I got it was to be able to take my grandma on a trip around the country to visit family. I decided to forego the rebuild for now and just fix it up good enough to make the trip this year with her while she's still able. I figured if I get good stuff for it now I can always use it again when I get to the rebuild. But anyways I'm getting off topic lol Looking forward to the next progress post on your rig! 😎 Also, as a fellow 90's baby, I love the Wild Thornberries reference 😂 Quote Link to comment Share on other sites More sharing options...
Odyssey 4x4 Posted August 6, 2020 Author Share Posted August 6, 2020 On 5/19/2020 at 7:23 PM, Nam said: Looking great...please keep up the good work. What kind of LED dimmer are you using? Thank you! I am using this expensive little booger. Four of them to be exact! Quote Link to comment Share on other sites More sharing options...

Recommended Posts
Join the conversation
You can post now and register later. If you have an account, sign in now to post with your account.