

powdrhound
-
Posts
120 -
Joined
-
Last visited
Content Type
Events
Profiles
Forums
Gallery
Everything posted by powdrhound
-
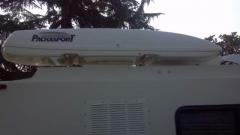 Packasport fiberglass ski/cargo box
 -
This question recently came up on the Yahoo forum. I copied my reply: Although my Nokian tires really need No assistance from chains, in California I have to use them when it goes from R1 to R2. I use the Z-chain's on the outer tires. They work great. Z-547. I carry two 8" long pieces of 2x6. Set one flat, one on top, angled down in between the 2x6 and the inner tire. The top 2x6 acts as a ramp, and pivots easily when I back onto it. This lifts the outer tire completely off the ground, and allows me to easily hang the z-chain on the outer tire. And allows me to make all of the final adjustments quite easily. With our limited clearances, I have to run the chains quite tight against the tire. Often I have to use a bungie cord to tighten the chains so they will not rub. You may need to pump more pressure in your air bags to increase your clearances. With new tires, I adjust the chains to one lug from full tight. With used tires, I run the z-547's at full tight, with the bungies as necessary. I am back on the road within 20 minutes. When properly adjusted, I can drive up to 40 mph with confidence, if the conditions allow. Usually, I do drive slower. My last trip, I had to drive for way too many miles of dry road, but they had R2 posted for a couple icy spots. One of the cross-members snapped. I was able to tie it off and continue, but I was pissed at CalTrans for the un-necessary R2requirement. Replacement cross-members are available thru special order. Let me again voice my recommendation of the Z-chain. Since there is always some portion of the Z cross-member between the tire and the road, you have NONE of the whump-whump-whump you get with regular perpendicular cables or chains. You get a much smoother ride. I have had several occasions where, after staying for the week at Kirkwood during the storm week, with the chains on for the week, the snow and slush has frozen into a do-nut between the tires. This traps the inner cable completely within the ice do-nut. I then spend 20-30 minutes per side chipping away at the inside ice pack. No fun. In summary, the Nokian Hakkapeliitta tires do not need chains for EXCELLENT traction and control, but when required while in California, the Z-chain is my best choice. I have driven thousands of miles on ice and snow covered roads in Oregon, Washington and Idaho with complete non-chained control. Enjoy your trip. John Let it Snow! R1: Chains required, except Autos & Pickups with M&S tires on all wheels. (We are heavily overloaded pickups) R2: Chains required, except 4WD with M&S on all wheels. R3: Chains required. (Usually closed before R3) You have to watch out for the sign, see which way it is turned. The phone line (800-427-SNOW) is usually pretty accurate, but there are times where rapidly changing chainlines are slow to be updated.
-
 Marithon day. Installed the new LH stud I have had in the toolbox for three years. Nowhere have I seen anything about having to grind down the staked portion of the stud. Not difficult with the Dremel, but not expected. The horizontal press made the swap easy. Should have gotten that tool years ago. My lady picked up the studs (1.74) and cones ($3.99), I had her get the axle gaskets, too ($1.74). The other gaskets have been with that stud, waiting. All the bearings look fine. Cylinders and brakes went on OK. Have not figured a good way to get the parking brake lever off of the cable. Was easier on the other side to leave it on the cables and do the lever swap right there. The leaf spring brackets are just in the wrong place. Can not see the slot, Tightened them by feel. Need just a bit shorter screwdriver... The only problem during the road test was my failure to reduce the air bags back to 45. They ride like a rock when they are are at full maintenance height pressure. Those couple inches make the jobs much easier. At last, I have seen my rear brakes. I feel better.
 -
This is probably a bad by-product of thousands of miles on snow/ice/salt/solution covered roads. Really well bonded. Successfully got all the other studs drilled and all cones out. Amazingly, with 103K miles on the brake shoes, they were worn less than one millimeter. Still had an even 4+ mm of shoe. So it was the cylinders leaking that was the source of the lower level in the tank, not worn shoes. Oil all over the plates and shoes. Back together tomorrow. Have to be ready to go to Dunderberg Peak for October patch skiing this weekend.
-
Success!!! I got three cone washers out! Failure !!!!!!!!! No way the other nine are coming out. Yes, the first one popping out was encouraging. Kind of like that one good golf shot - you learn that you Can do it. But it is not to be repeated often. By now, I have pretty well deformed the tops of the washers. Since I am doing this as the 103K mile rear brake job, and I have just started to hear a bit of brake noise, I have no choice but to get them out. I can not put this off any longer. Even SiliKroil has failed. Heat gun - no effect. Dig out the drill motor, 1/8" bit and 1/4" carbide tip bit. Amazing how easily the cone washer popped out after the stud was drilled through. A call to Toyota: A full set of cone washers and studs are arriving Friday. About $75. Drilling out the other eight tomorrow. Not expecting them to all go as well, but there is an exit path after all. I feel hopeful. I have been wanting to see these brakes for a long time. Should be fun.
-
https://360productsnorthamerica.com/site/ This the vent cap that you want. 360 Siphon. Works great for the black tank. Very low profile. Breeze from Any direction creates a vacuum on the vent. No moving parts.
-
Failed CA Smog test - EVAP air pressure (sealed fuel system)
powdrhound posted a topic in Fuel Tanks
The SkiBumMobile failed it's smog test. Emissions are fine. It failed the EVAP air test. They replace your gas cap with an adapter that allows them to pressurize the gas tank, then they look for a pressure drop that would indicate an atmospheric leak. (after clamping off the line coming from the cannister). We had a huge leak. Fail. A shop would use a machine that injects some 'smoke' into the system, giving a visual indicator of the leak location. Since my locking gas cap also failed the smog test (They sell a LOT of gas caps at the smog station. Just get a new one as part of your pre-test inspection.) I tore the old one apart and used a few brass fittings from the 'old brass box' and and old blow gun to create a simple test adapter. Sure enough, I had a Huge air leak. Closer inspection showed gasoline stains next to the fuel pump plate. So it turned out to be Re-work from the fuel pump saga. My fuel pump failed the day before an expected 36" snow storm, as I was taking the SkiBumMobile over to the propane station at Kirkwood. It had been a fine week, and the storm track was still rolling. Now I was stuck in the dirt RV lot without enough propane to survive the coming storm. Time to bail. At $10.50 per mile for the tow truck, towing it home to fix it myself was not an option. A** covered the first $200, leaving me with a $300 tow to Gardnerville. Another $500 later, Bella and I are back at Kirkwood, making it through Carson Pass maybe an hour before they Closed the road because of the storm. I do love driving in the snow. Great tires. While checking out the situation before the shop opened that morning, I noticed a small gasoline seepage on the tank where the support angles were welded to the tank (Optional 26 gal. tank). Very small seepage, but definately there. OK for now, though. Back home, I give the tank a tight inspection and find a hairline crack next to one of the welds. Must have bounced it on a rock on that jeep trail..... So I pull the tank to take it to my welder. First have to get it boiled out at the local radiator shop, get rid of all the gas fumes. Vern repairs the crack, completes the welding around the angle bracket vs. the 1" stitch welds, and welds the other end for good measure. He tells me it passes all of the pressure tests, and after painting the tank, I re-install the tank. All is good. Till the smog test. I Assumed that when he did his pressure test he had sealed the top plates. Turned out he had tested it with dry gaskets. I did not check them. After a year and a half and another 15,000 miles or so, the dry gaskets just were not doing their job. Sometimes I feel so stupid. A little Perm-a-tex 2, a couple washers to covered wallowed holes (air leaked past the tightened bolt), and some new hoses on the filler spout (the old ones just looked nasty) gave me a system that is holding pressure just fine. Moral of the story: Anytime you work on your gas tank, you have to pressure test the system. Never crossed my mind to do that, I have never seen it in the shop manuals, etc. An example of a time where the Smog Test actually did me a service. I would not have looked for the gas tank leak otherwise. -
Looks like I need to try the SeaFoam. I consistently add a quart of 10-40 nearly every fillup. It is not leaking anywhere. I had the head re-worked when I had one of the stripped exhaust studs helicoiled (Should have had a couple more coiled. Will do that when I pull the manifold to replace the stripped flange studs.). I have great compression. Engine only runs hot when pushing it on a Summer day while on the freeway, with the A/C on. I avoid freeways. I expected my next step to be the ring job. I will try the SeaFoam this week. ps. I just turned the 99,000 mile mark.
-
You can find PDF versions of the Toyota work manual, with a little searching. The gasket is not that hard of a job if you follow the book. For minimal additional cost over the "head gasket kit", the "engine gasket kit" will include the front cover gaskets, water pump gaskets, front and rear seals, etc. And will be cheaper than going back to get any of the other additional gasket kits. Do NOT get your gaskets from Toyota. They charge Seriously for Each Gasket.
-
I also need to replace a bit of paneling, around the fridge. For this application, and for a touch of structural strength, one of the birch or oak 1/4" plywoods at my local Lowe's will fit my needs. A couple layers of polyurethane should seal it well. Let it Snow!
-
Check off the bushings! And again proved that doing the job Right is so much easier than doing the job Quick. I finally installed the urethane bushings that I picked up right after getting the SkiBumMobile, but before I figured out that I would have to drop the gray and propane tanks. I was given this opportunity because I pulled the tanks to have the frame extensions reinforced and some side support added. After cracking the plywood panel under the fridge with the Big Bump on the far side of that cattle guard. (It did not look that deep, and I was going way too fast for it. I was surprised I had not cracked the frame. Big engineering mistake on Sunraders, using the floor as the main cross support. I almost have the stove cabinet leveled, and will work on the fridge panel next. I do wish I could have added many more cross supports.) Day One: Dove right into the shackle bushings. Combo of jacks, blocks, air bags, etc, allowed me to pull them. Worn, but not real bad. Lube up the bushings (nasty stick stuff they supplied) and ran into Greg's problem of the thicker flanges, so now the shackle is 1/4" too narrow. Prothane had no suggestions. Figured out that the belt sander could shave down the flanges real nicely. Perfect fit. Now to the front. Start on the side where I don't have to drop the gas tank. Jacks, blocks, drive the pin. More jack, and I can reach the bushings. A lot of tension. No fingers in the way while cleaning, just in case the jack slips and there goes a finger tip... Lube the bushing and sleeve, slide them in place... Oh Oh. Wrong bushing. So this 1986 chassis does use the same bushing for all 6 spots. My kit, from the now defunct Downey Off Road, gave me 8 smaller and 4 larger bushings. One would think that by now I would have seen this thread, and LOOKED before pulling the front pin. Nope. Too cold and windy to think clearly. And schedule pressure convinces me to just put back the old ones, to complete the job Later. Sort thru the old bushings to find the “best” two, back off the jack a bit, and the spring is now 1/2” back too far. Hmmm. Twenty minutes later, I give up prying everywhere and nowhere, and drop the spring totally. With my hand between it and the asphalt crumbles. Getting real grouchy by now. OK, now the front is pinned, the shackle is on, and no way to line the spring pin with the axle hole. Arrgh. More jacks, blocks, prying and cussing. Finally drop the drive line. Voila. Frozen to the bone. Torquing the U-bolts is good exercise while lying down! Day Two: Last night's research shows full kits at Kragen and AutoZone, but special order. NAPA has individual bushings, but only rubber ones. This morning's calls gives me a 1:30 delivery if I order at NAPA by 10:30, AutoZone by next week for the whole kit, and Kragen lost in the system transition to O'Riley – they can't locate in their store system what I see on their website... Off to NAPA. A mixed system is better than a worn system. Back home, I start doing what the book actually tells me to do. Just pull the springs off totally from the beginning. Drop the gas tank, drop the drive line, drop the springs. Pick up the new bushings and some marine grease. Decided to use the urethane bushings in front, and use the rubber ones on the lower shackle. Found that I had to trim 1/4” of length on the rubber bushings. This time, the springs slide back on, the axle lines up easily, the Sun is out, and birds are singing. Tomorrow, I will bounce the rig a bit and torque the bushing bolts to 67 ft lbs. And the bushing job will be done. Except for reinstalling the gas tank, the gray tank, the propane tank, the pantry, the stove, seal up the floor all over the place, and ??? I am almost back on the road! I need a few ski trips to recover, before I start on that fridge panel and supports.....
-
Now I feel real stupid for getting the bushing from Toyota.
-
Maineah, That is not nice to throw out the " custom made the housings and they are flush mounted" and then just drop it there... We need photo's & details! Links! I want to make some, too. Thanks John
-
In beautiful California, the right hand lane is so battered that I cannot drive there without beating the rig to death. I-80 through the Sierra's is Brutal. I have to drive fast enough not to be a hazard, but in the middle lane. Better yet to avoid the freeway as much as possible. Love those back roads!
-
Sunrader fiberglass body questions
powdrhound replied to Rocinante Sunrader 88's topic in Coach ApplianceTech Issues
When I added the power vent to the front, it was a good excuse to buy an electrical fish tape. Ran a wire down between the window the cab, and in the ceiling thru a gap in the insulation next to one of the wood stringers. I was figuring to to the same for the new back vent, but when the square dropped out, WOW, there was a capped off 12V wire built into the ceiling right nest to the new cutout. I replaced the caps with terminals, and I was good! No idea why they put the un-used, extra wire in the ceiling, but I was happy. -
Atwood Service and Training Manual
powdrhound replied to Derek up North's topic in Coach ApplianceTech Issues
Thank you. Unfortunately, the solution is a new control card. -
Paul, I recall clearly that first night in the snow, waking up to the freezing cold, the heater giving an occasional clunk as it tried to start. Good thing that the engine kicks out good heat. I find that I can get about 8 to 10 hours of COLD-night heater use before the battery gets weak. (Oh for room for golf cart batteries.....) I run my little generator until bedtime. I let Bella out for her final romp, and shut down the generator. All the windows are covered with foil/foam/foil sheets. In that way, we do fine. I find that the Wave 3 will not heat the whole cabin. Doesn't help that I have to leave a vent cracked open. I have found that placing the heater on the table in the middle of the coach will keep the bed area comfortable. I wish that I had not installed the dual-speed Atwood heater after the original's motor bearings had died. When the fan goes on high speed, it really sucks down the battery. It seemed a good idea at the time. (how many times have I had to say that?) Works great when you are plugged in, but not many ski areas are offering that option. Next time.... We do make some trade-offs by going with semi-antique rigs. I am sure that for $60K - $70K we would have dual windows, real insulation, etc. But what fun would that be? Best of luck.
-
HeyMy, You need the full set of seven. Without a doubt get the D load rating. And get the correct tire size. No, there are not a lot of choices in 185R14. We use the same tire size and rating as the VW camping vans. Lots of good info out on the net. There are many threads in this forum talking about tire size, age/code dates, brands, etc. Read them. Age and overloading are your concerns. Your tires fail the load test.
-
I found the invoice for the bushing. Toyota part # 90999-73139 BUSH,BIMET $46.33
-
My RX-7 can flood if I start it for a short period, than leave the ignition on after I have shut it off (I think that is why...) In any case, after the second time of having to pull the plugs, I figured out to unplug the fuel pump connector and spin the motor until it dries enough to start. It will run for a few seconds than die. Plug back the connector and re-start. Than after having to do this in the middle of a snow storm, having to dig out the connector from under the clothes and carpeting, I installed a switch for the pump in a handy spot back there. If I am quick enough I can flip the switch before the engine dies.
-
Alvin, I do not understand why you want to install the inverter off of the starting-type battery, and why it makes no sense to use your deep cycle battery. It seems your plan is never to use the inverter unless the engine is running. I don't want to be running the engine every time I use the computer or TV, and I definitely do not want to run down the chassis battery and not be able to start the engine... To me it makes no sense to use the chassis battery. Please help me. Thanks. John
-
Aug. 2010 Yellowstone to Costa Rica in 1984 Toy
powdrhound replied to Costa Rica Toy's topic in Trip Reports
Congratulations for such a monumental trip. Amazing vehicles. We do want to hear more details of your experiences on the trip - the hardest sections, etc. -
Wow, Bodybagger, Excellent answers. And ChairmanMeow7, fine questions. Thank you. In my experience, bad wheel bearings will make a rumbling sound while your are driving. If one is really bad, the rumbling will be louder during cornering. The increased sounds will drive you crazy long before they really fail. I am replacing the rear (non-relubeable) bearings in my Subaru (198K mi) tomorrow for that reason. They did the same thing at about 110K mi., and the front bearings also have had to be replaced. I may drive hard. You cannot miss the rumbling sound. Volume increases with speed. With my '78 Datsun P/U, by the time I finally had it fixed the bearing the roller's cage was mangled, so the rollers were loose and the races were chipped and cracked. It would do some good clunking too by this time. I wonder why the axle did not fall out. Probably needed the rollers to fall out first. They were close. My point is that I had long ignored the loud rumbling and the clunking. Young, stupid and broke. If I had fixed it when I first heard it, there would not have been any potential problem. But I ignored the loud rumbling coming from the back of the truck..... Thankfully it was an empty truck, not one that is permanently overloaded by a ton. John
-
If I weigh 170 lbs and stand 12" out on a breaker bar, I have torqued it 170 ft-lbs. Used this last week when I had to pull off the wheels to remove a 3" rock that had wedged itself between them. I must have stopped directly on the rock, as it happened at a stop on hiway 88 west of Carson Pass. Big clunk after turning around on the USFS road. Could not hammer it out, so had to pull the wheel. The lug wrench worked great. Put it on the nuts and stood on it. Popped off nicely. For the final tightening, with the lug wrench bar being about 12" long, I stepped up on the bar and let it settle with my weight. Checked out fine when I got home. This was not the first rock of the trip, but the only one I could not pull out. But I successfully skied this Patch.


