All Activity
- Past hour
-
Looks like it might be the VW Super Bugger grandfather.😁
- Yesterday
-
Can't tell what you put on there but don't see a big crack. Is it at the outflow? My black tank was destroyed by a truck in front of me that dumped wood in the road. Outflow and whole back wall were gone. I went back and picked up the nasty peices and glued it all back together with ABS glue. You need to make a slurry of ground up ABS, used grinder bit on my drill, and mix it with the ABS glue. I also used an open mesh fiberglass for more support. ABS glue and the shavings make new ABS. Important thing is that you have everything ready. Fiberglass cut to fit, disposable aluminum pans for mixing , ground up ABS, brushes and the glue. I buy all the pans and brushes at the Dollar store. It dries fast so you have to be ready. Brush on slurry, apply fiberglass over that then brush on several more layers of slurry. Kind of looks like it's really your outflow that is the issue. That actually makes it easier. Buy a connector and slurry glue the whole thing back together. Camco Coupler 1 pk - Ace Hardware I fixed my tank over 10 years ago and I've never had another problem with it. Trust me mine was way worse than yours. Linda S
-
Looks like it might of started out as some type of milk delivery vehicle.
-
Hello Linda! I'm interested in a possible fix for the black tank...thinking it is ABS. Thanks Linda! Also, I have found a replacement, very similar size from Plastic-Mart - so thanks for that also!! Attached is where I have 'fixed' it previously. The guy at my local Camping World said the tank as is could not be fixed.....

-
That's pretty cool, to be sure. And the virtually cube shaped interior gives a lot of options for building out what you want! The down side is you won't have any privacy. My wife and I currently adventure in a bright yellow Vanagon and know from years of experience that people love to come look at a cool vehicle. It's part of the fun to meet people that way, of course, but it is a definite down side. We expect the same to happen with our Sunrader when it's ready for use. Doug
-
Don't worry it will buff out. https://bringatrailer.com/listing/1950-chevrolet-4400-camper/
-
 I was able to get the system working. I still have a few things to finish up.
-
Floor is still solid and no issues.
-
 Got the rubber "thickening strips" installed but wow. That 3M stuff cures WAY too fast to spread 20 feet of it. 10 feet of opening, and 10 feet of rubber strip. That sucked. I did find a useful way to have 10 feet of rubber strip under control with curing glue on it, but you'll need a helper. I wrapped it around an empty jug, taped both ends, then brushed on the glue. My sweet wife helper then unrolled it as I needed it to stick it onto the window opening. Worked great. This evening I went back out to see how well it's glued, and it already feels extremely solid. Phew.
-

Need help converting old light fixtures to new LED puck lights
Caser Racer replied to Caser Racer's topic in Electrical
Very true, thanks for the light testing tip! I have pretty much tried every combination and have indeed been turning on the lights after connecting. I'm beginning to go kind of insane but I have to keep at it - Last week
-
I will echo what Linda said, I have a 93 Toyota diesel engine that came out of a Hilux and we swapped it into a 85 Toyota pickup, it’s been a nightmare with finding most anything for it.
-
Thanks, lads! OK, so the rotary cutter worked a treat. I have two lengths of perfectly straight 1/4" rubber that I'll glue along the perimeter of the fiberglas opening with 3M's best rubber adhesive. I'll even prep the surface with the recommended cleaner - 3M's Adhesive Remover. The rotary cutter literally cut the rubber effortlessly, following the edge of an aluminum straightedge, on my new cutting mat. I suspect it will similarly make short work of the leather when I get to that stage. And OF COURSE the forecast drops from tomorrow's 70s into the mid 50s right on cue. This is the umpteenth time the normally docile weather here has interrupted my work.
-
I want to replace my 4 gallon Atwood water heater with a tankless model. I would appreciate your comments and recommendations. Thank you.
-
I know that finding parts or a mechanic that will even work on them is a nightmare. Most parts will have to be shipped from Japan. Linda S
-
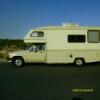
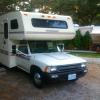
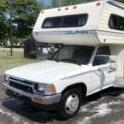
There is a glut of 1990’s Toyota Diesel RV Campers in my area being advertised. They look great with decent mileage. Does anyone know anything about these imported vehicle?
-
 Albie joined the community
 -

Need help converting old light fixtures to new LED puck lights
extech replied to Caser Racer's topic in Electrical
p.s. you can test the lights by connecting the wires to the battery its self. it's nice to know you are adding something that you know works -
Need help converting old light fixtures to new LED puck lights
extech replied to Caser Racer's topic in Electrical
no converter needed. led s use 12v dc. the top picture says indiscriminating polarity meaning connect the two wires to the ones coming out of the ceiling. maybe you are not turning the light on after connecting?. the other (lower pic) needs proper polarity to work. connect the wires. if it doesn't work, reverse them -
Hello and good tidings! I am in the process of updating my 1991 Micro Mini Toyota Itasca Spirit RV and would like to convert the old light fixtures it came with from these: To these two different kinds of LED puck lights I'd like to install in their place (I've included links to each specific product under their pictures): (Link to product: https://www.amazon.com/gp/product/B07B8B2XJ7/ref=ppx_yo_dt_b_asin_title_o01_s00?ie=UTF8&psc=1) (Link to product: https://www.amazon.com/gp/product/B00YWTDZWU/ref=ppx_yo_dt_b_asin_title_o02_s00?ie=UTF8&psc=1) I cut the original lights down to the purple and green wires. I'm running into problems because I have zero electrical experience and just connecting the wires isn't working (big surprise, it's not as simple as I thought)! I did disconnect all the batteries before doing any wiring—if that's what you can even call what I'm doing—and have been reconnecting the batteries before testing them. I've tried every wire combination to no avail. Is there maybe some kind of LED converter board or am I just approaching this completely wrong? I have been trying to do this based on YouTube videos and various electrical tutorials but I'm still unable to troubleshoot the problem. I'm sure it's my fault, so any advice will be appreciated. Here are some pictures of the fuse box, if at all helpful. Please let me know if I should include any other pictures or information. I appreciate any info anyone has to offer, thanks for reading!
-
Caser Racer joined the community
-
 Vandy joined the community
 -
 Poleclimber joined the community
 -
 nextchapter50 joined the community
 -
 Don’t give up, sir! And thanks for keeping us informed on your progress. Sorry these windows have been such a CHORE… if I were anywhere close to ID, I would try to jump in and lend a hand 🙂👍🏻
 -
Hi Linda, Yeah, you're right.....:) The RV is 19ft 6 inches.......it looks like it is a Toyota Dolphin 200.....(I've attached the floor layout.....except it does not have the swivel chair, just a chopping/surface area and a cupboard underneath it) The waste tank it says is 17.5 gallons. The Specifications says that the length of the rig is 20Ft 6 inches, but I literally just measured it and it is 19.6. Anyways, if you have any further advice, please let me know. I'd love to buy the right black tank for it! Cheers, BBC
-
Thanks Linda - I'll take a further look and report back....what is ABS....I am interested in a permanent fix. The guy I showed it to said he could not repair it and would replace the tank itself, but we have to find one. He won't replace with a used one. Many thanks for engaging with me on this!!
-
 Thank you for keeping us up with your latest updates. Your progress, although frustrating and time consuming for you, gives us a better idea of what to do when we face similar issues. Trial and error is the best teacher.
 -
 keysmedicalcentre changed their profile photo
 -
keysmedicalcentre joined the community
-
So, I've now tried twice to install a window as we finally got to 70 up here in N. Idaho. A bizarre cold spring - just my luck. Fortunately with water soluble Alex Plus silicone caulk as both ended in failure. The seal is the problem. When using needed force to push the window to get it started, the seal groove on the body is too large for the thin fiberglas and just rolls off. I was hoping to find the right combination of force, with my son helping and a willingness to try again. Once the attempts fail, the race is on to clean out the gasket, the opening on the coach body, and the window before the silicone dries and is not removable. Very sadly the silicone left a haze that would not come off the window despite hot water and soap - completely contrary to cleaning up this product in the past. At the last minute, I tried foaming window cleaner with ammonia. Zip - clear as a bell. Would have been pretty discouraging to make a window again. So now I've ordered 1/8" thick rubber strips WITHOUT the adhesive. The rubber was simply impossible to cut with the adhesive. Blades gummed up, etc. My plan is to use the plain rubber strips and 3M's best auto-rated rubber watherstripping adhesive to glue them on and make the coach body 1/4" thick. Then glue the seal to the coach, let it dry a few days, then insert the window into the seal. Hopefully the glued on seal will be stable enough for me to use the prying pressure needed to get it in place. This set in motion a whole slew of things. Went around town to various sign shops and such to see if they'd cut the plain rubber into 1/4" strips for me. No, can't do it. Nope, can't. No. Sure, for $100 and we won't guarantee they'll be straight edges. Finally ended up at a fabric shop where they sell a rotary cutter the lady insisted will NOT do what I need. But I think it will work like a charm bought the best titanium blades for spares, and I hop for success. One of us is right, so stay tuned. I will need the cutter anyhow for cutting the leather hides I bought for the dinette, and I also needed a quality cutting mat for same. I also need a pair of sharp scissors for the upholstery work. It was an expensive week for getting nowhere so far. Now I'm trying to figure out how to install the seal on the body such that it's fully seated the entire 10 foot perimeter. I guess taping it the full length until it cures is really my only option, so that's the plan. If it is not seated anywhere and shrinks the opening by a 16th of an inch here and there, the window won't fit. So the seal must be fully seated the entire perimeter. Down, but not out. Still at it.
-
Well Dolphin didn't make an 18 footer so you need to figure out what floor plan you really have. Your black tank is either 17.5 gallons or 19 gallons depending on the floor plan. These places have multiple options but shape and dimensions are very important RV Holding tanks | Fresh Water Tanks | Grey Water Tanks (tank-mart.com) RV Holding Tanks (plastic-mart.com) Ronco Tanks - Polyethylene Tanks by Ronco Plastics (ntotank.com) Ronco was the major supplier back when these RV's were first made. They might have something pretty close. By the way your tank is probably ABS. Very easy to fix permanently if you're interested. Linda S
-
Hello! I have a need to replace the black tank on my 1991 Toyota Dolphin 18ft. Does anyone know where to get a new one, used one, or replacement one? Thanks, BBC