Odyssey 4x4
-
Posts
850 -
Joined
-
Last visited
Content Type
Events
Profiles
Forums
Gallery
Everything posted by Odyssey 4x4
-
 All went pretty swell. The best feeling is hearing what the quotes are to have this labor done at a garage. The only problems were locating the correct compressor, and having to acquire those adapters to make it a flange connection. Also I installed the compressor and then realized I didn't check to see if it came pre-filled with oil and it was in an inaccessible location without removing everything again. I eventually got to the drain bolt and pulled it out to find that it did NOT come with oil from factory. Only a small amount of oil was in it. I drained it completely and then added the exact 5.9 ounces of oil. Everything was good from there. It was indeed a lot of work and my first complete vehicular a/c rebuild. In the past I had only done compressors and driers. It was well worth the work.
 -
Expansion valve and new drier in place. All lines are now connected. The system was then vacuumed down and tested for leaks. It had a few leaks that were only a result of the line connections needing more tightening. Vacuumed down. New belt put into place, filled with the required 5.9 ounces of oil, and then started and charged with r132. And just like that, we had nice, beautiful, wonderful cold air. A requirement in Florida. Notice the last pic was taken while it was dark out! This took about two days worth of work mostly due to taking a day to get the adapters required.
-
When I bought my Escaper the roof air worked great, but the cab air did not work. The ac compressor turned on but made a bad sound and there was no cold air. I'm about to go on a travel for a while and definitely wanted my cab air working! I started out by ordering a new compressor for an 87 Toyota truck. When the compressor arrived it was immediately apparent that the compressor was the wrong style mounting and everything. Here is the stock A/C compressor in place before any work. Here is the first compressor I ordered, which was the wrong style since it was for a factory installed A/C system. This is when I figured out that the truck had a dealer installed A/C system. Notice the mounting style is completely different. I returned that compressor and was able to locate the compressor I needed on Ebay. This was the only place I was able to locate the exact style of mine and I got it brand new in an auction for $117! Old vs. new Here is the engine bay with the ac compressor removed, also the air intake is removed as well. For those interested, here are the sensors used for the cold start injector. They are located directly underneath the air intake. I removed both and cleaned them due to my truck having a cold start issue. It ended up being a missing screw in the throttle positioning sensor and the idle was off. All lines were removed. The evaporation coil was also removed from under the dash. I have a feeling this may be one of the reasons the ac system did not work! Here is the coil after a good cleaning. Also is the chemical I used to flush all of the lines to get rid of old oil residue. Putting it back into the box. Removing the expansion valve from the line. Once I saw the compressor lines on the new compressor, I noticed it was a different style mount. It was an oring type of connection when what it needed to be was a flare style connection. A day later I had the adapters I needed, obtained from a local A/C shop. New compressor in place. The easiest way to get the evaporation coil in place was to put it in, put the expansion valve in place, and then put the top of the case on. Then the thermostat was slid into place from the top. This was kind of a pain in the butt. Lines connected.
-
I would definitely say the dynamat is the way to go for top quality. The kit I used for this with the cost of the mat, roller tool, and sealant tape ran me about $160. The carpet was another $120.
-
My mechanic burned my RV to the ground today
Odyssey 4x4 replied to gr8white's topic in General Discussion
I know my RV insurance covers everything in my vehicle including up to I believe $5,000 in personal belongings, I currently have Geico. Obviously it is the mechanics insurance company that will have to pay you, just make sure to let them know from the start that you intend to be repaid for the value of ALL of your vehicle and the belongings that were inside. If they give any hint of screwing you around I'd consider talking to a lawyer to have him give them a call, that will usually motivate them to settle with you. -
My mechanic burned my RV to the ground today
Odyssey 4x4 replied to gr8white's topic in General Discussion
That makes me want to cry just looking at. What was the first thing he said? -
Partially covered. I also used a contact cement to ensure it would stay attached. Finished up and put into place. Next was to finish the entrance. I used the snap together wood for the entrance since it was tough and I had nothing else to do with it. Put into place. Kick proof trim in place. And finished up with some trim in place. As of today, all that is left to do is the remainder of the trim pieces alone the floor, but I didn't feel like waiting to write this up. I had enough vinyl flooring left over to do something with. I found this old fold out picnic table at a thrift store for $10 bucks that is PERFECT for camping. Sorry this is the only pic I took before hand. and all finished up and perfectly matching the Toyota Here it is all folded up. Panoramic photo of the inside, excuse my feet, I was relaxing after a long day. Thanks for the read!
-
So when I bought my 1987 Escaper, the previous owner decided he did not like the two captain chairs in the coach and for some reason hacked them out, leaving a not so attractive base. This is how it looked when I bought it. Notice the missing chair mount located in the bottom left of the photo. Where better to start than ripping the entire floor out? One of the previous owners had done floor work before. They laid a sheet of 1/2" plywood over the existing floor and then put their vinyl floor on top of that. I removed the 1/2" plywood and was glad to see the entire floor underneath that was still in good shape, no rot or anything. Wanting to achieve as much head room as possible (I'm about 6'2"), I kept the original floor in for strength, and put down a new sheet of 3/8" plywood. Not only did I fill in the spots of the missing chairs, but I gained some headroom for myself. It's nice not hitting my head on the ac unit now! We put down the sheet of plywood, screwed it down mighty well, sanded down the screw heads and the floor to make it as smooth as possible, and caulked all the screw holes. This was also a good opportunity to remove all remainders of the ugly original carpet that were stuck in a few hidden places. Next we decided to rebuild the entrance step with some fresh wood and gave it a more open design since the older one had limited foot space with the way it was designed (sorry, forgot to take a pic of the original setup). Original aluminum pan. Sealed all of the holes and edges with what was left of my dynamat tape. played with some sparks. Laid down all new wood and screwed into place. And time to start laying down flooring. I picked a darker wood vinyl floor. I was going to use the snap together wood floor seen here. I then decided not to use this floor as it took up too much of my precious head space! So I went with a standard sticky vinyl floor. I picked a dark wood color again because I just enjoy the warmth and cabin feeling. I also covered the fender and gas tank fill tube cover. I then took my old piece of wood that covers the water tank and battery and everything and stripped it down. It was covered in an ugly fabric from some old ladies basement or something. Here it is naked.
-
Toyota Damon Escaper original manuals (LARGE file size)
Odyssey 4x4 replied to Odyssey 4x4's topic in General Discussion
Thanks to a fellow whom messaged me on my blog asking if I could upload the manual, he has compressed all of the files into one pdf document that will be easier to use. I would upload the file directly to here but cannot seem to find a way to do it so I uploaded it to Media fire and the down link link is here... http://www.mediafire.com/download/a276aw37wkuwqwn/1987_Damon_Escaper_Manual.pdf -
I've been wanting to get one of these on mine but was trying to figure out a way to do it without having to run a wire, yet I don't want to use one of the cheap wireless ones. Thanks for the post! I'm sure you love it.
-
What are the main differences between the various models?
Odyssey 4x4 replied to oboeterry's topic in General Discussion
Yup, on the "wrong" axle there will not be that center round section sticking out of the middle (that's the hub). -
For the cost I'd just replace the entire starter, pretty simple fix and wont have to worry about it again.
-
Toyota Damon Escaper original manuals (LARGE file size)
Odyssey 4x4 replied to Odyssey 4x4's topic in General Discussion
Here is a download link for manual in .jpeg format... http://www.mediafire.com/download/czarif5l1vrbcn1/Toyota_Damon_Escaper_micro_mini_motor_home_manual.zip Here is a download link for manual in .pdf format... http://www.mediafire.com/download/joi53l6t15y8rhx/(pdf)Toyota_Escaper_Damon_industries_Micro_mini_motorhome_manual.zip Enjoy! -
When I purchased my 1987 Toyota Escaper made by Damon industries I found it had most of the original documentation. I was contacted via my blog (link in my signature) from someone asking if I could provide the manual since they are quite hard to find. I was surprised I haven't thought of this sooner since I am sure there are plenty of people that would love to see the factory documentation that came with the Toyota Escaper Micro mini motor home. I have scanned the entire manual and compressed it into a zip but it seems the forum will not allow my to upload a zip. Here is a short front and back piece showing options and what not. And here is the entire manual page by page. If I am not aloud to upload this much stuff please let me know! I am only trying to provide to the community

-
 One of the original documents that was included with the Toyota Escaper motor home. (back)
© I<3myEscaper
-
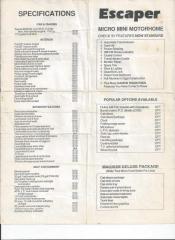 One of the original documents that was included with the Toyota Escaper motor home. (front)
 -
What are the main differences between the various models?
Odyssey 4x4 replied to oboeterry's topic in General Discussion
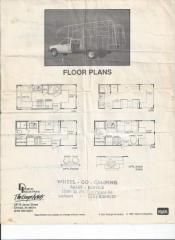
If you start looking around at all the different models made you'll start to get an idea at all the different commonly used floor layouts (bathroom in rear or front, kitchen location, table location, etc.) Like Linda said, the earlier models are the toyota 22r and 22re engine (I believe the 22r is carbed and the 22re is fuel injected). They're small enough to fit into pretty much any parking spot, yet obviously they are an RV so someone will know you're in it most likely. Most walmarts allow free overnight stays, same with a lot of truck stops and some casinos. National forests are also free to stay at for up to I believe 21 days? I shopped around for a couple months before I finally purchased mine. Something to keep in mind when looking, the older models had a bad axle setup from too much weight from factory, be sure to purchase only the ones with the newer 1 ton axle. This 1 ton full floater axle is the correct type to support the already overweight camper. This axle setup you want looks like this on the rear tire. The non 1 ton axles had catastrophic failure on the early models and there is a recall on them but some have still not been fixed! Also another thing to consider is the v6 models had a problem with the head gaskets from the factory and most have been fixed with a recall but some have not. So if you're considering a 3.0 model make sure it has had the head gasket issue taken care of. -
I've been considering getting a custom license plate reading, "GOAROUND".
-
Thanks for the info! I'm going to be heading West in my Escaper and was wondering how she would do on some of the steeper roads. Nice picture too!
-
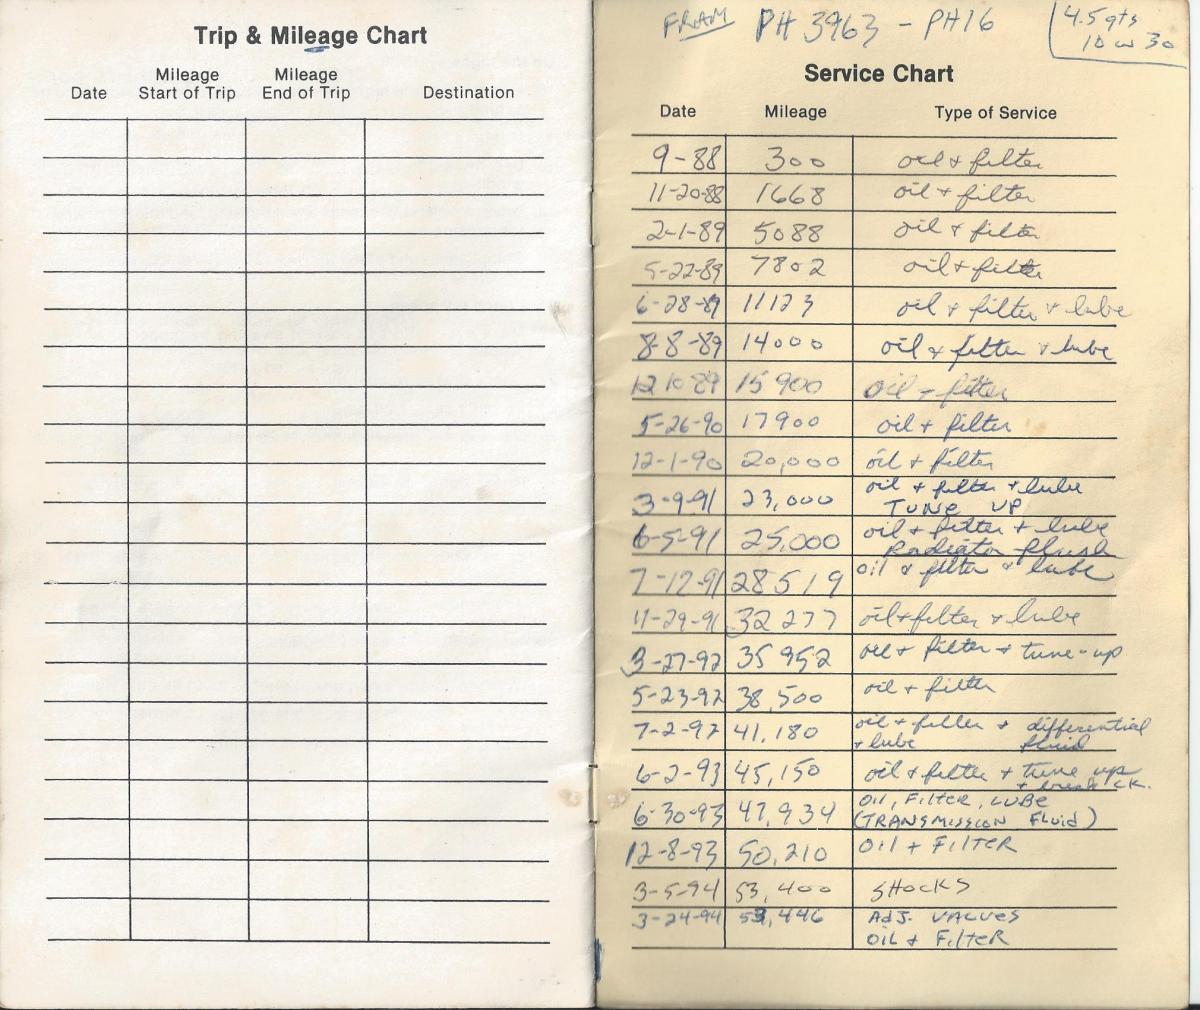
Ouch, that's a pretty penny! The good thing about doing this work is that the resale value of your rig skyrockets! Keep a copy of all receipts for if you ever decide to sell. One of the reasons I bought mine was that it had a huge pouch full of receipts for all maintenance from new all the way to the current oil changes.
-
Today I installed a new automatic water heater lp valve. The previous had failed and got stuck in the on position. One of the past owners installed a manual valve. I found the one I needed and ordered it! Here it is all finished up and working perfect.
-
what he said^
-
Looks like it's all just computer designed images, maybe the only one they've ever made is the show model. I wonder if they'll take my Toyota as a down payment
-
That looks similar to what I installed. The carpet I ordered was for my year truck and "pre-molded" but it still took a good amount of wrestling and trimming to get the fit right.
-
Sounds like a cool rig, post some pics!