IdahoDoug
-
Posts
317 -
Joined
-
Last visited
Content Type
Events
Profiles
Forums
Gallery
Everything posted by IdahoDoug
-
Hey Bob - do you still have your black water tank around? I'm stumped on how to pull the toilet pipe up into the coach out of the tank, and wondering if you removed your tank you might be able to help me with mine. There's a metal ring at the tank juncture that's riveted on and I'm hoping that's just a rubber seal, vs me needing to cut those off, etc. Thanks in advance!
-
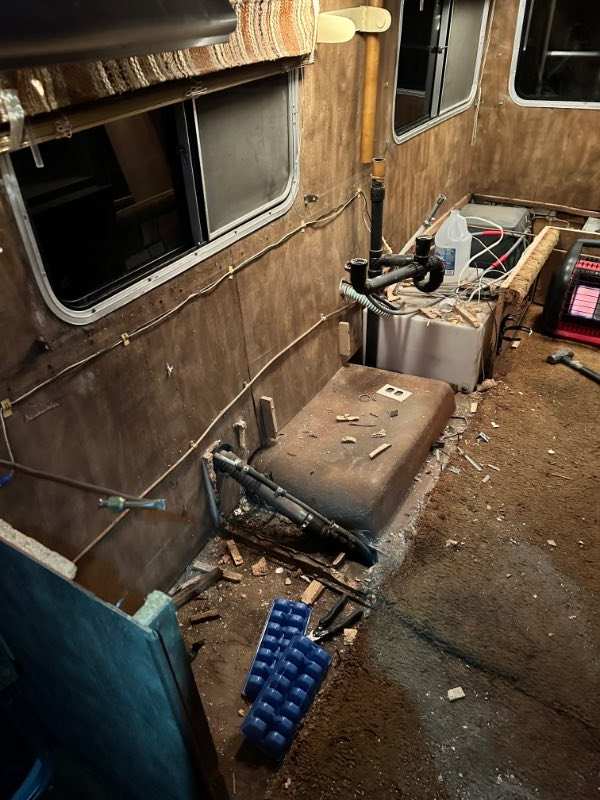
OK, still need some real-time help/advice on the bath unit removal. Now it's the toilet that is giving me fits. I removed the toilet, removed the rubber sealing ring, and now there's a heavy black plastic ring that was held into the fiberglas floor with 8 screws. I removed the screws and cut the silicone sealant slathered all around and under the heavy ring and it *should* be loose. However, serious prying is not moving it and I don't want to break anything. This heavy ring seems one piece with the large diameter black plastic pipe that goes directly into the black water tank. They move together when I pry, and I can wiggle the ring side to side versus the floor - indicating there is no locking ring underneath the bath floor holding it together. Takes some force to do that, but I guess I'm satisfied there is no ring under there because the large black pipe has to come up to allow the bath to be removed - which is the only way you'd get to the underside to access a locking ring. Unless you lowered the bath into the motorhome before installing the roof, which I'm REALLY hoping is not the case.... I crawled underneath and where the large black pipe enters the black water tank there is no locking ring - just a bit of caulking at the joint. So I'm kinda confident in prying more. What say the collective? ***** UPDATE. So there is a ring where the black pipe enters the black water tank. I brushed off the area with a toothbrush and discovered 4 bolts with a mirror upside down looking with a flashlight. 20 minutes of trying to figure the right size going blind with my arm up there and just feeling each socket, picking the one that fit snugly, spinning a wrench with 1/100 of a turn, etc (the usual tight spaces jiggy dance) got me zero movement. Great - stripped? Brighter flashlight, pull the jack out in the dark and lift the Sunrader for a better angle. Argh - rivet looking circle type fastener. Now I'm totally stumped. What's a rivet doing on this location and now do I have to drop the entire black water tank? Does this lock the pipe in somehow? Or does it mean I have to separate something up higher at the bathroom floor level? Help!
-
Ack! I was laying in bed last night thinking....thinking....thinking about this. Have had a busy day and just now ran out in the cold to see something. Yep, my bad. The window frame is holding the fiberglas assembly in place. Good advice, Linda - classic forgotten connection here. Hoping to get it loose tonight but unlikely as I have a commit. Thanks!
-
I would like to move mine so I can refloor 100%, versus leave the old floor under it. The wood is fine, just a preference and likely will get more strength with modern marine grade ply. At first, I was afraid it was attached to the ceiling which would have been a major bummer with my roof raising intention. But it's not - I can lift the roof above it. But if I could drag it to the rear to refloor the front, then put it back in place that would be the best. Hoping it was not fiberglassed to the floor, but really can't tell and I don't want to start prying and break a bond I can't reproduce. Thanks!
-
Well, I got everything else out of it except the bathroom, ceiling and wall paneling. The fridge indeed fit out the passenger door - thanks. Had to pull the driver's seat as well just to prevent snagging from the fridge's sharp edges, etc. Here's where she sits as of now: The floor is wavy and it looks like the wheel wells have majestically risen up into the floor a half inch or more, so I'll be looking at what's going on there, and what it will take to correct that. Won't be messing with the ceiling just yet. Need a flat and strong floor to use my roof jacking strategy.

-
Great news. I will part out the Dometic fridge. It's likely not been used much at 32k miles. Unfortunately, it kept catching fire when I started it on propane, so that alerted me to the many downsides of having 40 year old appliances. I'm not made of money but the camper remodel will include all new appliances to avoid problems and make using the Sunrader more pleasant. I think the heater will stay, but not sure until I pull it out and have a look. Worked flawlessly for many hours and would help satisfy my "something new and something old" penchant for restorations. Today, I am hoping to finish pulling the interior completely apart, including the ceiling to fiberglas. I'm really looking forward to that part as I need to physically see if my plan to bow it upward and reinforce it will work. Wish me luck today - big day.
-
Self welding wheel bearing!
IdahoDoug replied to Toycollector47's topic in Whoops, Mishaps and Murphy's Law
Nice work! I have the correct 3 pin tool for that locknut, but clearly you figured out a workaround. How'd you do it? Also where are you with the cold temps described? I'm in N Idaho and often out working in mine now and for the next few months against a spring finish date. -
Yeah, remove belts is a good call, and be advised you can only run it for a minute or so. If no noise, put belts back on one at a time and see which accessory belt driven item seems the culprit. An excellent old school way to hear the sound, is to use a section of garden hose with one end to your ear and the other end to the suspect area. I use a wooden dowel as well but don't recommend first timers use it as if you get it caught in a pulley or fan it can kill you. I also have a set of mechanic stethescopes which are about $15 at most auto parts stores like Harbor Freight. That's a great option as it's also safe vs a dowel. Keep us apprised and I'm sure we can lead you through it. The 22R/RE is a very easy engine to work on, so don't be intimidated.
-
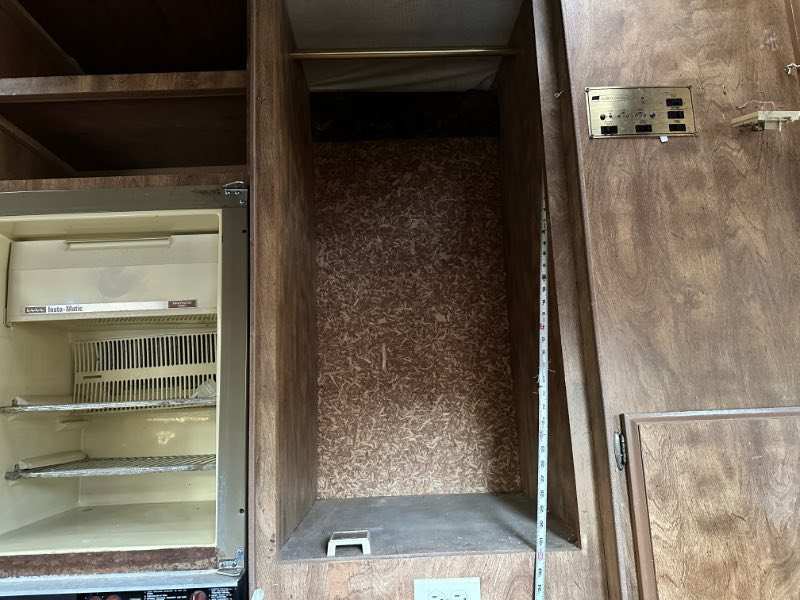
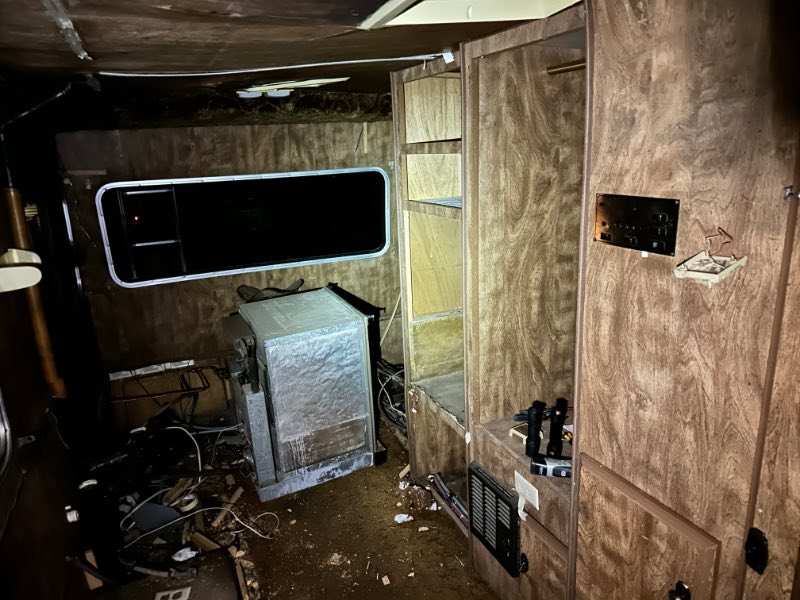
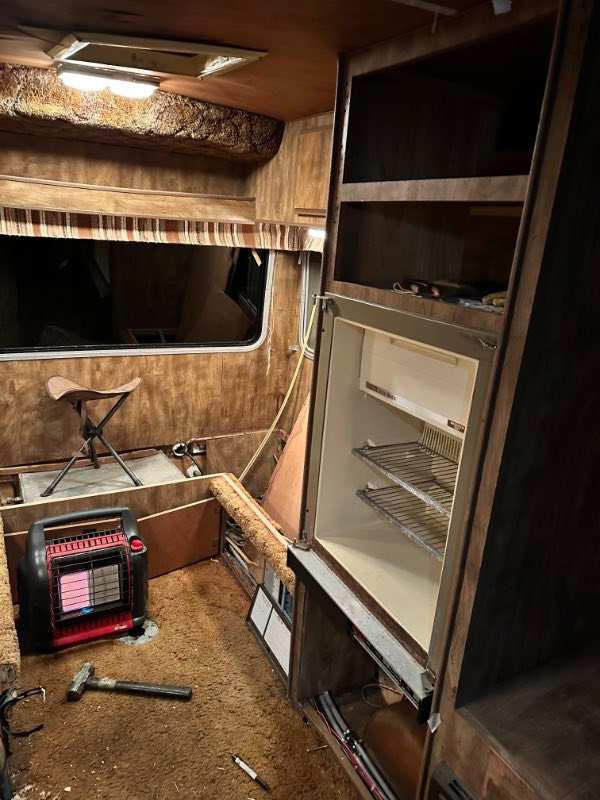
Bingo - 1984 non Turbo, 5 speed. Bought it from my father when he was about 85 and had to outbid my 5 car-loving siblings! He's 91 now and doing fine - still golfing! It's got 59k on it and I went through it to as new condition. One of the vehicles that will keep the Sunrader company in the herd. So tonight I only had about 90 minutes to mess with the Sunrader. Removed the upper cabinets all the way around, pulled the entire electrical panel/power supply/converter out (wow - surprisingly heavy - bet it's replacement will be 1/4 the weight!), pulled the fridge out of it's hole and tried to remove it. Nope - won't fit out the door. I've seen others cut it up, but um...I have to put a new slightly larger one in, so I'm going to try removing the passenger seat in the cab and getting it out the passenger door. This will give me a sense of how much bigger of a fridge I can put in it. Hoping for 4.3 cubic feet/45" tall - any suggestions? Looks like Norcold has abandoned this size segment but Dometic still makes them. In the photo below, you'll see I have been carefully preserving the copper LP lines because I was thinking I'd be reusing them. However, I just found a few minutes ago that time has passed copper by and now people are using black and yellow flex hose for LP. A great relief for me, so next pic all the copper will be out and headed to sell at the scrap yard. I'm over "feeling bad" I started getting destructive and just smashing things out as that's not my style. But I'm realizing there is nothing for me here that will be reused in terms of cabinetry, window blinds, shelving - nothing. When I get to the bathroom (tomorrow I expect) I will stop and be careful as I will be keeping that, though likely removing the cabinetry around it in favor of whatever I build in the rest of the living area. I'll also need to move the bathroom unit around as I want to check the floor under it. I really hope I'm correct that I can disconnect it and drag it around as I work on various floor sections, then drag it back into place and resecure it. I will be bummed if I cannot do that without breaking it or tearing it up. It's not that I'm afraid of tackling an all new bathroom, but in all my vehicle restorations, I like to have something from the past remain and I chose the bathroom enclosure. I am working by headlamp these days, and using a portable electric heater to take the edge off the 24 degree outside temps where I'm working on it among some trees on the side of the house. Was great using the original furnace, but now gas lines are disconnected and electrical as well, so that benefit is gone. So here it is this evening: Fridge and closet doors off. DInette history Upper shelves coming down. Another long term poster here was correct these do not provide any support to the roof. A newer member claimed they do and is wrong. These just hang off the roof and upper wall. Last shot for the night before I bailed to head to a dinner party with my wife. Had the fridge in the doorway jiggling it about, but had to drag it back there until I can do the passenger door trick. Wish me luck on that, as if I cannot get the fridge out the cab, I'm kinda hosed and will be hoping I don't have to cut a window opening bigger to get it out, or something else destructive to get the new one in.
-
So, I'm unfamiliar with the "rules" regarding tire choice for duallys. With an estimated rear axle load when I'm done and fully loaded of perhaps 4000lbs, dividing that load by 4 tires would require only a high load tire, but not a full on commercial load rating. That may yield softer ride qualities versus a heavy D rated tire that can handle 1800lbs or so (7200 total for the 4 tires). I'm sure that 4 D rated tires is a greater margin of safety, but that's 7200 lbs of tire capacity for a 4000lb load and would really crash and bang with a stiff ride. I'd think if I found 4 tires rated at perhaps 1200lbs for a total capacity of 5000lbs would be a normal margin of safety, but have not yet researched this. Anyone have guidance on that?
-
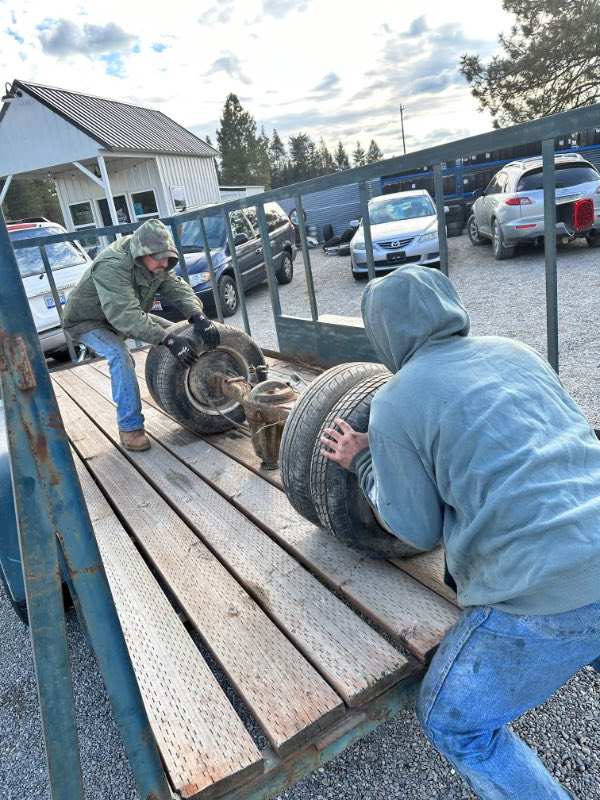
Daytona is a good call, as I see the resemblance, also!! But nope. Picked up my axle today. They completely forgot the deal was to include the spring U bolts, and lower mounts as well. Happily when I reminded them, I was able to walk back to the shop area and grab the bracketry and all the nuts, bolts and lock washers. I am relieved as I am pretty sure the new axle's housing is slightly larger than the old. So, sourcing new U bolts would have been a needless pain. They used a forklift to put it on my trailer, but I don't have that at home, so I positioned the axle where I wanted it on the ground, tied it to a tree, and drove the trailer out from under it after ensuring the diff flange can't hit the ground. Worked well. Here are the folks at the salvage yard sliding the axle forward a bit so I could wedge and strap it in place:
-
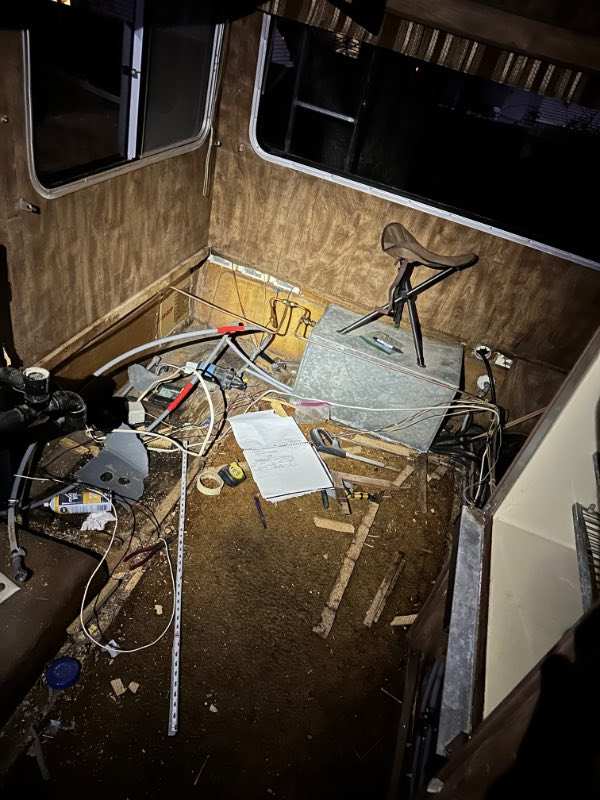
So this evening, I went out into the 28 degree night with a light snow falling to work on the Sunrader. Absolutely the first hours of working on it, and I was so excited! I took measurements of the existing layout, then set about removing the kitchen counter unit. Incredible. I had the stove out in 5 minutes laying in the snow, the sink out 30 minutes later. Then I started respectfully unscrewing bits with my impact screw gun. After about 10 minutes, I realized this was going to be inefficient on time so I brought in a medium sledge hammer. 15 minutes of hammer work and boot kicking got me this: Then I removed the door from the fridge, and some cabinet doors. I should literally have all the cabinetry out by the weekend, which is terrific. I can then pull the tanks out, pull up the carpet and see what I need to do for the floor.
-
Well, I'll just stick with the duallys, then. I've got plenty on my plate with the project and don't need to add to it. Not the end of the world to have only a spare for the front, which is what I'll also do. The donor axle vehicle does not have a rear sway bar, but mine does. So I'll be welding on the mount when the spring perches are moved. On dually ride quality, they essentially hit twice as many bumps as you're "plowing" two lanes and a single tire would miss exactly half the bumps. Additionally, whenever you add unsprung weight to an axle, ride deteriorates accordingly. So those are the main contributors to the challenge of ride quality and duallys. TIre pressures can make a massive difference in ride quality and I plan to play with it a bit to find the sweet spot. Sigh. All months away at this point....
-
Ah, got it. Was hoping to improve ride with singles on the I ton 6 lug when I install it. One day may also lift n 4wd it and singles are better for offroad trail use. Thanks for the correction.
-
Linda has mentioned a couple times going to single rear 15" wheel and tires and I'm looking into it. Anyone doing this now? Pics of the wheels people are using, or do you know the bolt pattern so I can take a look online? Extra points if the wheels are also available in the front 5 lug 15" so they match (ish...) Thanks in advance.
-
So, I guess this is the right time to introduce myself and my project. I'm 62, live in N. Idaho with my wife and kids, and we bought the Sunrader on almost a whim Memorial Day weekend 2023. I saw an ad, looked up what a Sunrader is and thought "so THAT's what those all fiberglas Toyota campers are called." We found it forlornly in the trees up on the side of a mountain with the ceiling wood hanging down, no cushions in the bed or dinette, and it clearly had simply been sitting for perhaps decades. My wife and I couldn't make up our minds, and sat on the bare wood of the dinette talking. Oddly, I am Mr. Car Project and I said no - it's much more work to tackle than I'd thought. My wife said maybe. So we took it for a spin figuring that would be the deciding factor. It drove great, but we told the owner we would pass. He mentioned $1500 would take it as he turned to walk back to his door, we looked at each other in surprise and the rest is history. I am a former product planner for GM, as well as Lexus. A big Toyota fan, we have 2 LandCruisers, just sold an 88 Supra I restored in 2022, and currently vacation all over British Columbia, Montana, Idaho, and Washington states in our restored 1988 Volkswagen Vanagon Wolfsburg Weekender. We love getting away in a self contained capsule - stopping when and where we feel like it. I was forbidden to touch the Sunrader until I completed a home renovation project, which took all summer. Finally, two weeks ago I finished that, and last week I turned to this project. It has an incredible 32,326 miles on it and mechanically seems excellent. The cab is pure time capsule - completely unmolested just as you'd expect from a vehicle owned by older folks. First order of business was to locate a proper 1 Ton axle, which I did last week. Hoping the salvage place calls me tomorrow as I've had the trailer hooked up for several days expecting to come pick it up. It came from a Dolphin with 45k on the clock, and I'll swap my third member into it to keep the proper diff flange, and of course to use a diff with only 32k on it (!). They let me go out in the yard to laboriously disconnect the parking brake cables as I was afraid they'd cut them, and as it's a manual tranny model (yay!), I will want stellar parking brakes. My Cruisers have full floater 1 ton axles, so I'm familiar with the seals and repack process though I understand there are a few differences I'll discover when I perform it. I don't yet have a welder in mind to properly move the spring perches, but hope to figure out the proper location and bring it to a friend in Priest Lake who's a talented fabricator. I believe this axle was a later recall installation as the black paint on the ends looks like new, so I suspect it got new recall axles and was parked soon after. The axle even has cool covers over the protruding flanges that are embossed with "National". I took those off it in the yard just in case whomever pulls the axles either accidentally breaks them, or leaves them behind. I suspect they're a bit of a "collector" item among Toyota motorhome types as I've never seen these in all the research I have done. What's the plan, you ask? Well, I am going to make it into quite the little luxo-cruiser actually. Many of our friends have bought larger RVs but we prefer to motor around and explore for our getaways where they prefer the set piece method of arriving at an RV camp and sitting in one place. We love that, like our VW, we can park the Sunrader in ordinary parking spots right in the little towns, trail heads, and hiking destinations we prefer. So with a little pride in my heart for those times we're with those luxo-barges, I'm going to use my product development background to make this a bit of a show off build. The kitchen will be either a composite or marble top, new appliances with a larger fridge, leather dinette, solar, huge electrical capacity, and a cool paint job all frame my intentions. I'm going to reinforce the roof so we can sit up there, pull kayaks up, and of course have solar. We are also boaters and I've been on some boating sites looking at the interior materials the marine industry uses. I plan to use some of that in the interior, such as the walls and ceiling in the over cab bed. Sequentially, I'll completely gut it leaving only the bathroom (love it!), replace the sagging floor, lift, reinforce and re-arch the ceiling/roof, then build out the cabinets, kitchen and such then install the new dinette and appliances. That should take most of the winter. Then in the spring, I will remove and reseal the windows, and paint the exterior. Somewhere in there, the 1 ton axle will be swapped and I'd like to go to single wheels if I can find the right wheels. Kinda bummed the fronts will then be 5 lug while the rears will be 6 lug. Oh well. I'm also a lighting fanatic, so it will receive high quality forward lighting as well as full perimeter lighting similar to the system I installed on the Vanagon. One touch full perimeter lighting is great for peace of mind when you boondock and hear a bump in the night. We all it the "Zombie switch" as instantly you have full visibility for 50 meters into the dark woods in all directions. I'm posting tonight because in the last few days I got to mess with her a bit, culminating in her first oil change. I weighed her on a scale as this is as light as she'll ever be with empty tanks, missing dinette upholstery, empty cabinets and a quarter tank of fuel. Scale says rear axle is 3120, front 1800 for an all up empty weight of 4920. Honestly, the 22R and 4 speed manual move her along better than our Vanagon, so I am surprised and impressed with the powertrain. Turns out our 22R is also the model they only made for 3 years with the double timing chain and all metal guides, so it's up to the task of our often mountainous journeys. I expect I'll add 250lbs with my remodel as there's no way I'm going to build an interior as light as this stuff. It's really a marvel how they built these cabinets to reduce weight. So that's it, I guess. I've read everything i can find on this site and met many of the excellent folks who provide the great advice that makes for a nice forum environment. Thanks for that nice welcome and advice so far - get ready for a ton of questions. I'll be documenting the project in the weeks to come with pictures. Here's one from the day we drove her home. It was not without drama as I stopped to fuel her up and dumped about 4 gallons onto the ground before discovering mice had chewed a hole in the rubber section of the fuel filler. That's replaced from Rock Auto. She's a rear dinette 21 foot model. Got lucky on that - didn't even know there were different floorplans until we got her home. Several other vehicles will be keeping her company - extra points if anyone can figure out the vehicle next to her.
-
Self welding wheel bearing!
IdahoDoug replied to Toycollector47's topic in Whoops, Mishaps and Murphy's Law
I've had great luck with non leather shoe laces, fine sandpaper, and WD40. The lubricant properties (it's NOT a lubricant...) seem to keep the paper clean and the bits in a suspension that results in a finer polish. A great trick to be sure. I used it a year ago to polish the crank on a Supra engine I rebuilt, and I got terrific oil pressure when I assembled it. Just be sure your new bearings have a nice fit onto the housing so they won't spin or rock. If you think it might, I'd be tempted to use that bearing epoxy that secures the race on a damaged situation from prior race spinning. Forget who makes it, but it can be later released with torch heat, so you don't trash the component - even if you live long enough to put enough miles on this to wear out a set of HiCap bearings. My original HiCap Toyota bearings on my LandCruiser (full floater rear) are still going strong at 256k with regular repacks. -
Like the color scheme and it turned out great. Seems like you know your way around auto painting? I'm thinking of doing a roll and tip technique on mine as I do not know how to paint.
-
So, do these new mirrors wiggle? My original mirrors seem in fine shape, and tight, but the entire structure constantly shudders and wiggles. Again - nothing's loose or damaged. The movement seems to come from the mounting locations as if the door sheetmetal is too flimsy. So I'm curious if these truck style ones are rock solid, or not?
-
Super helpful. I finished a large home improvement project last week and by agreement with my wife, I am now green lighted to start on the Sunrader.
-
Cheaper to buy a mint Sunrader 4x4. Wouldnt want to feed or insure that thing, plus normal parking is out the window!
-
Self welding wheel bearing!
IdahoDoug replied to Toycollector47's topic in Whoops, Mishaps and Murphy's Law
Hmm. Not sure what year they switched to stickers, but you are looking for a dull aluminum rectangular plate about 2"X 3" riveted onto the vertical surface of the right inner fender. Its visible from the engine bay and usually just a few inches below the hood seal. Perhaps with late 80s models they switched to the firewall behind the engine? -
Self welding wheel bearing!
IdahoDoug replied to Toycollector47's topic in Whoops, Mishaps and Murphy's Law
Great story! Sounds like you two will get along just fine with a trip home like that. I've had a few similar trips to get collector cars end with me limping in the driveway at 2am with baling wire and duct tape holding things together. Those stories all seem to end well, you know? Thanks for the p/n's! I have located an axle and will go through it before dealing with the fit issues of different spring spacing. I have a question - what axle do you have on the RV now? It's on the plate underhood on right inner fender. And what axle did you acquire? Not sure it that will have a tag or stamped info... -
Wow, fabulous work - what a transformation!
-
Just realized you have two threads going on your tranny. I found a diagram for you on the other thread. Good luck wrenching!