IdahoDoug
-
Posts
300 -
Joined
-
Last visited
Content Type
Events
Profiles
Forums
Gallery
Everything posted by IdahoDoug
-
Jason, would love to see your source/order when it pans out. I am renewing rear bushings as well and would just duplicate your order for convenience if you dont mind posting. Thanks in advance.
-
Well, I got one window ready to install - the pesky left window. Now, just need to prep the opening with some thin strips of rubber to thicken the edge to a quarter inch. Also needed to grind down the sharp curved area on the lower lip of the opening. It was abnormally thick right on the curve - over a quarter inch. So the seal simply would not sit there properly. Did the same on the right side while I had the Dremel out - but a very light touch. I got better at trimming and marking the window as I brought it smaller and smaller to the right size with a quarter inch gap all around. I stopped marking it by hand, and instead made a simple jig with a Sharpie and popsicle stick such that once it's smaller than the opening by a fraction if an inch (at least a popsicle stick), then I could slide the stick along the opening and it would draw the correct matching line on the still-too-large window. The line follows the slight wavers of these openings, which are crazily hand cut (vs using a template. That would have been so simple at the Sunrader factory). I've decided I am going to glue them in. I looked at old threads of people who reused the old windows and installed new seals and had leaks, and I don't want to be that guy. It's risky in that once the stuff is applied, it's gotta fit and I wont know if they're too tight until I'm half done with the install and then it will be a tremendous mess if I have to pull it apart before it fully cures. But if I'm successfull, these things probably will be water tight to 10 feet underwater, or something. This week, I'll get the right window also trimmed to size so that next weekend my son can help me. I'm definitely going to need an extra set of strong hands.
-
Thank you for the kind words. Sometimes when it's tough going, the lack of responses and help sting a bit, so that helps. So, would you consider cutting and bending new windows? I've suffered through the learning curve and reduced it to a "follow these steps" task now. I head to Dallas now for a short business trip. Hope to spend Sunday on the wraparounds - possibly installing both this weekend.
-
Well, I really, really hit a low point here. Every sizable project has these ups and downs. Thankfully the ups typically outnumber the downs by 100 to 1. No idea how I did this, but I cut the NEW window off by an inch, not paying attention to the angle it will be once bent. So, I have some happy news. Yes, you can do all THAT and still have enough plexiglas to cut a fourth wraparound window from a single sheet. Whew. And, BTW, still enough left to replace the door window. I bent the new left window today, and also fixed a wobble in the right window we left out of not knowing what to do with it since it was our first attempt at bending. So, I now have two rough cut, properly bent windows and will restart the "trim-trial fit-trim" cycle all over again but with a better technique I developed. Whew. I'm also going to sell a pattern and instructions for $25 for others who want to give this a go. Two hard-fought items in this will be the proper rough outline of the part, and the critical angle to bend the part. That angle is the franchise, as you'll notice your front portion leans backward, while the side portion is perfectly vertical. Onward and upward.
-
Ah, gotcha. Is there a zirc fitting on the bottom to squirt grease into the fitting? If yes, you might do the following. Clean the outside. Put the part at the middle of its travel (wheels straight ahead most likely). Wrap it with Rescue Tape, or the tape used to patch RV rubber roofs (incredibly tenacious n stretchy). Squirt a bunch of grease into it. I've also successfully used beads of silicone caulk around the boot to "seal" it against dust last for a long while. The grease is there to lubricate a ball and socket joint in the bottom drum shaped portion, and the boot is there just to allow for somewhere for the old grease to go after it's pushed through the joint, and of course to keep dirt out. If there is no zirc fitting to add grease, put it on your "to do list" to replace the ball joint/arm it's attached to. It's probably STILL going to last for 10 years of use though. You can periodically have someone move the steering wheel back and forth tiny amounts while you firmly grip it with a hand to feel if it's wearing some slack in there. Probably a $30 part on Rock Auto and an hour's work to replace if you have a ball joint tool.
-
You might slider under and find the actual part number stamped on the case. Toyota made a lot of stout automatics in the day and they'll have different filter strategies. Purely from my own curiosity, is yours an external filter?
-
Well, disaster again. Yesterday, I went out to finish one of the wraparound windows. It's turned out to be a process of cutting it "close" and bending it. Then trimming 1/6 off here, then there. Each trim actually causes the part to change orientation in the Sunrader opening if you think about it. One end rises, the other end drops, and so on. I'm using small chunks of the rubber seal to hold it in place and see where it's still too tight. Anyhow, I was just a bit of trimming away from a finished piece to try putting it in tomorrow when calamity struck. I moved my work table out next to the Sunrader for this fast cycle "trim/check fit" stage. Slightly irritated that it started sprinkling and I wasn't finished (lots of delays), I shoved a couple tools around my work surface and hurriedly moved the piece of foam I was cutting on to protect the table. Window laying on the ground for the adjustment. A screwdriver fell off, bounced once and landed in a perfect gymnastic "10" point down on the window and broke it. Man, this is really testing my patience. I soberly came inside, pulled the remainder of my 4X8 plexi sheet out and cut a new one. Will bend it tomorrow and as it's supposed to snow I will just do other things. Linda's rubber strips arrived and I think they're exactly what I needed, so I'll trim about 10 feet of each thickness into 1/4" strips to match the lips of the seal. Sadly, I also need to pull the trim back around the windows on the inside. I put it there when I first found the seal's gap was too wide, thinking it would help fill the gap. Should have thought that through - it's not firm enough to keep the seal oriented and just crushes. Now its just in the way and freshly glued in my way to boot. More as the story develops - film at 11.......
-
And therein lies my confusion. Several photos showing several items without showing a broken fastener or an empty hole, or two surfaces previously connected that now are not. And then the one above with a bracket askew and the bolt still in place. If it's just the bracket, it seems too obvious what to do for you to even ask "what should I do?". Clearly put a nut on and tighten it. Yet you seem distressed that something else is wrong. Honestly, I cannot figure out what the issue is. Happy to help when I can, though.
-
Fyi, I am a pretty good wrench but none of the pics the other day showed me the actual disconnected ends well enough to advise.
-
Linda, I feel the same about the potential sloppy looking caulking. My concern is manifold. The opening of the window is not straight and even, but wrought with high and low spots, as well as thick and thin spots. For instance, the sharp curve areas are thicker than 1/4 inch and in testing with spare chunks of the seal - the seal wants to roll off either into the coach or outward. Since the seal's design is that once you insert the "key" it achieves a seal by being squeezed against the fiberglass opening and the new plexiglas, all it will take is one tiny area where the seal is not squeezing to allow water through while driving in the rain at 60 with the air pressure wanting to force water through the seal. Just one area in the 20 feet of sealing length of both windows. If this were a molded opening that was uniform, or a metal opening without lumps, bumps, etc I'd be more confident of getting uniform seal pressure. So, the caulk will fill that ONE spot that would have leaked and broken my heart that after all my work, I have a leak right at the bed. I agree it is a bummer to do this. I plan to glue the seal to the body, let it dry, then work the new window in. I am worried about putting the window in with the caulk wet as it will act as a lubricant and may suddenly slip and bunch up - dunno. That's ideal with it wet as then the seal is held in the correct orientation by the glass, but I need to think it through as soapy water is needed, etc. Thanks for the taping suggestion! That may be super helpful here - appreciate it!!
-
Thanks, Linda. That's exactly what I fruitlessly searched for. Oddly I recall seeing this product, but noticed "neoprene" and moved on. In the deeper description it is actually a solid rubber product and I would never have noticed if you had not posted this here. I ordered both thicknesses as time is of the essence and I also may have areas I need slightly more or less added thickness. I also ordered some extremely tenacious Sika urethane windshield adhesive, which will be used to further fill gaps and variations and provide a powerful bond. I've heard it's murderous to work with and cleanup of excess squeezeout is nearly impossible, so I'm concerned it will not look so hot at the end of the process. Lumps of excess here and there. But I'm resolved to accept that, versus a leaking wraparound. If anyone's worked with this stuff, sing out with any tips. Really unfortunate it went this way as we had super rare temps in the upper 60s, which I was counting on as a gift to help me wrangle the thick seal. Now temps are dropping back into the 40s per our normal temps for the weekend - the only time lately I can get to the Sunrader. Argh... Also, I haven't done any sanding around the opening of the wraparounds at all. You might be recalling the ceiling sanding to remove the glue the factory used to hang their foam. I needed that removed for good adhesion of the pink Foamular I hung in the main living area and recently the sleeper as well. So it's just variations in the layup from the manufacturer. Perhaps mine was made thinner and is a rare "factory lightweight"? Heh..
-
Yes, thinking of thickening the opening edges, and looked last night, but it needs to be solid rubber - foams n softer materials will still allow the seal to simply roll off by compressing the material. Must also be a strip on one or both sides, vs a U shape which reduces the open size and forces me to trim the window again. Thanks. The core issue remains a proper seal like the factory one - with deep enough grooves to go around the 4 sharp curves and not slip off...
-
Complete and utter disaster! I got one window cut to size, and pulled the seal out I'd bought on recommendation here. It won't properly fit. The factory seal has deeper grooves that help the seal not roll off the fiberglass. Mine is a 1/4"/ and 1/8" size (plexi 1/8", coach wall 1/4"). Turns out my coach is more like 1/8 except for the corners which are 1/4 thick. So unlike a video I watched of a couple installing their Sunrader windows where they had to pound it onto the coach with a rubber mallet, mine simply falls off, rolls back and forth with all the slack, and generally will not provide a good seal. The less deep grooves worsen this. I tried silicone to "glue" the seal to the coach, but it was a disaster. I had to toss the seal in hot soapy water and remove the silicone after simply making a mess. I'm at a loss here. I scoured the world for a seal with deeper grooves. Nope. Ditto a 1/8" and 1/8" seal which is what I need, and the factory seal was also similar groove widths - not 1/4". No luck. So, I am looking for help if anyone has input. Really bummed.
-
How far forward did it go? There's a sloped section of fiberglas a few inches under the wraparound windows that the factory covered with foam and vinyl. I'd like to find something that goes all the way to the front wall, and I'll trim that edge of the mattress all the way across at a matching angle. So I'd like the bed to literally touch the front wall under the window. Is the full wide enough to touch the front wall? Thanks.
-
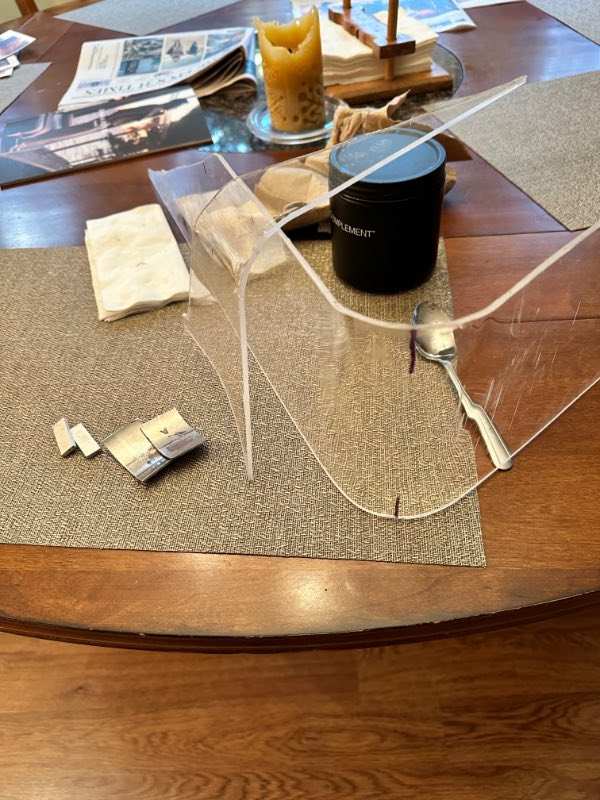
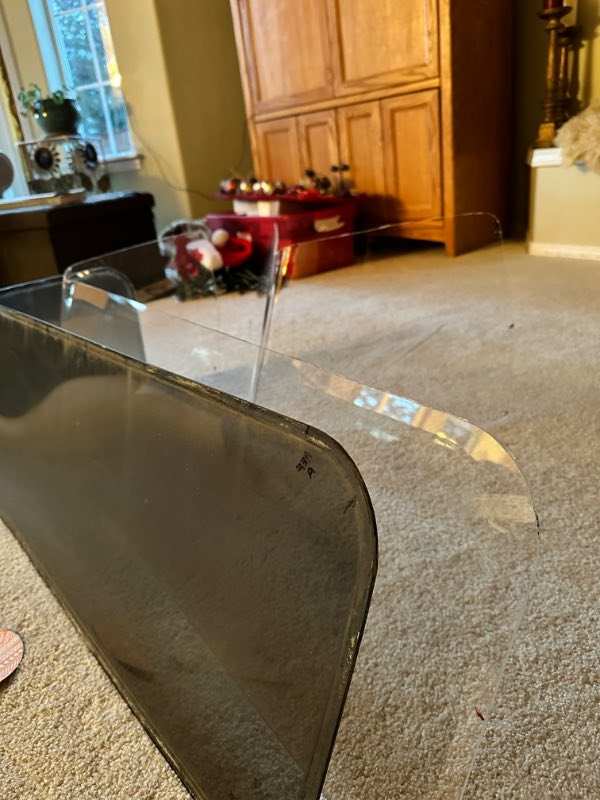
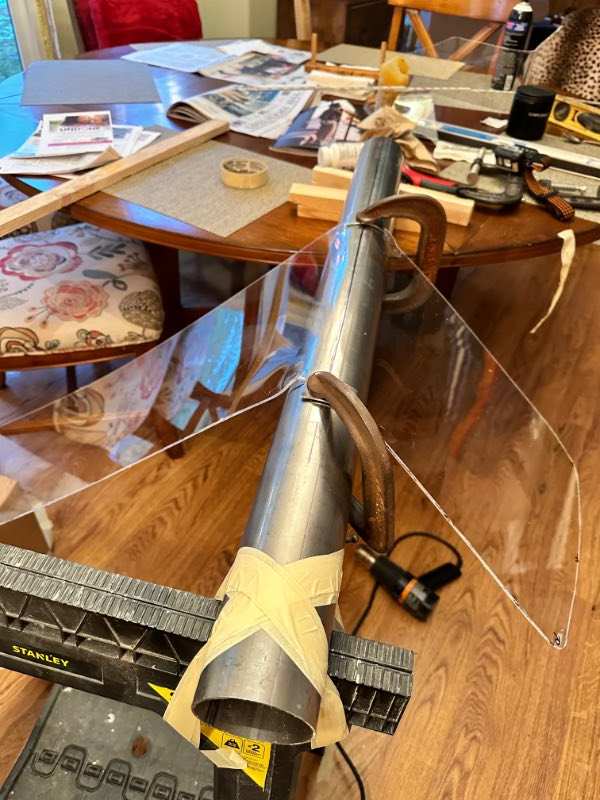
Well, I should admit at the outset that bending the windows intimidated me. So much can go wrong and the angles have to be VERY close. I spent several hours measuring things with some findings to pass along. FIrst, I thought "Just bend it to 90 degrees and trim off the rest. Um nope. It's a bit of finagling and finally I started all over once I realized the true challenge. The biggest challenge is defining the center of the bend as it relates to the coach. I ended up using a sharpie and making a few reference points on the old one, then transferring these to the flat cutout. The flat cutout was precise for the long section, but lots of extra material on the short end - like a lolly pop. Once my restart happened, I was confident I'd bend it to the right angle. Then we did some testing: As you can see, I chose clear for my windows. I'm big on seeing things and always have binoculars at hand, special order windshields without the tint band at top so I can see up and that sort of approach. For privacy, I've installed a chunk of wood above these windows so later I will build a single insulated blackout piece across the whole sleeper that flops down into place with magnets for privacy at night. If we later feel it needs a tint, I'll have a tint shop install the perfect tint/heat reflecting product. So I started these tests using those little aluminum nibs as a pressure point on the piece of metal tube I bought - that's what I clamped the still-flat piece to the metal tube we're bending it over. However, the bent section against the pipe went a bit wavy despite our best efforts, and my son came up with the idea of making those wide half moon pieces (chunks of the pipe we were using), to use as clamps on the pipe to force the waves to flatten before it cooled. Worked super well and best was to switch once the part had almost the 90 degree bend we were looking for and then let it cool clamped like that. Obviously we couldn't use the curved parts when the piece was flat, plus the tiny nibs purpose was to let me heat all the plastic, where the curved parts block it and shield the plastic from heat. Make sense? Ask if not. So then we switched to the actual windows. The key is to make a 3D "jig" that the long end will get pulled down to by gravity and rest/stop on something of known height on the floor. We simply used a cardboard box the right height. Then the short end you just push down until you're at about 90 degrees. halfway through this you have to switch from using the little aluminum nibs, to the curved "guides" my son suggested. You'll also see the center section along the metal pipe rise up as the edges are pinched down, and the the heating material wants to expand, so this switch halfway handily relieves that pressure and when you unclamp it to switch, the part settles back down - compression relieved as it can elongate now. In testing we kept hearing this popping sound which we discovered was the plastic wanting to expand against the spots it was clamped to the pipe. Here you can see us halfway through the process, with the heat gun on high: Above, we haven't yet switched from the nibs to the curved guides. Below, now you can see we have switched to the curved guides, finished bending, and the part is cooling. On the near end by the clamp you can see a significant wobble. this was our first full window and we learned how to avoid that on the second one (we're not sure how) but this is a part of the lolly pop end that will be trimmed and if that leaves a little wobble I'll try direct heat with a torch and two pieces of wood to straighten it enough to fit in the rubber seal. Here are the old piece, and the two new pieces. Hard to see the new ones, but trust me - they are there!!! Next step will be to bring them to the Sunrader and tape the long piece in correct position, then mark the lolly pop for final trim.

-
I like your sense of style and proportion with the curve next to the fridge, and the little shelf to the rear of the couch. What paint are you discovering works on the pink foamular panels? Any issues with it sticking to the fiberglas? On the a/c, you may know this, but be sure it's tilted such that condensation runs out of the vehicle, and also when towing any spray accumulated atop it doesn't sit against whatever sealing you're using on the outside for too long. Since it's near your wifey for sleeping, you'll also want to put an air deflector on it to push the cold torrent of air away from hitting her all night - perhaps even a bit of a snorkel affair to get that flow significantly away from her as a short diverter will simply create a whirl that will come back down on her. Be thinking where you'll store her bulky bedding as well - I've had to revise some thinking if we have guests sleeping on the dinette - that's several pillows, sheets, and a bulky set of blankets to store somewhere during the day. Not sure how you're routing wiring, but I bought a cheap hot knife with a thick blade that works great for creating shallow grooves I've used to run wires along the face of the foam. Then I used hot glue in the grooves to keep the wiring from moving/rattling behind the mahogany paneling that is covering all my foamular. Looking good. Based on what I'm using, your weight and strength are going to come in very nicely!
-
Shaun you should not rely on the 82 measurement as by the time yours was built, I believe it was a different shell. Best to measure your own as Bobs (and mine) have the bulky paneling removed. I'm adding a bit of width not replacing the paneling in favor of soft foam and marine hull liner, for instance. Bob is also doing something different, i believe?
-
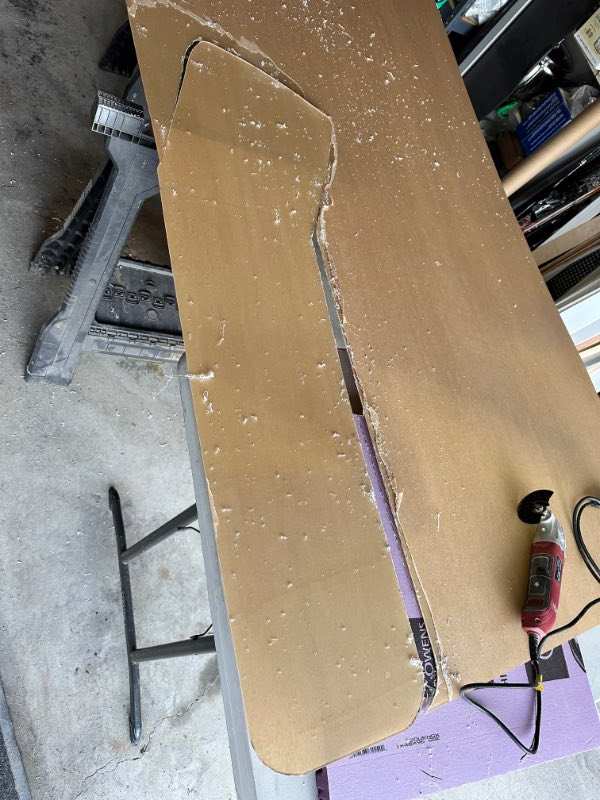
Today, I cut the plexiglas wraparound windows out. Used a multi tool with a drywall blade per folks on YouTube. Worked well. Now I need to bend them and trim to final shape. There is a protective kraft paper film on it, which I'll have to remove for the bending:
-
I did a bunch of research, listened to Linda, and there are 7 new Thunderers stacked in my garage awaiting spring....
-
Agree with Linda. Where are the old ones? Even if your old ones are bent a bit, or rusty - WAY better to repair them. Camping World will be zero help as these were custom made back in the day and the ONLY place you'll find them is on a camper like yours being parted out. Which is extremely rare. Online research may find them somewhere that ships?
-
Fantastic suggestions and information. Will start looking at the items you mention and make a decision. Thanks!!!!
-
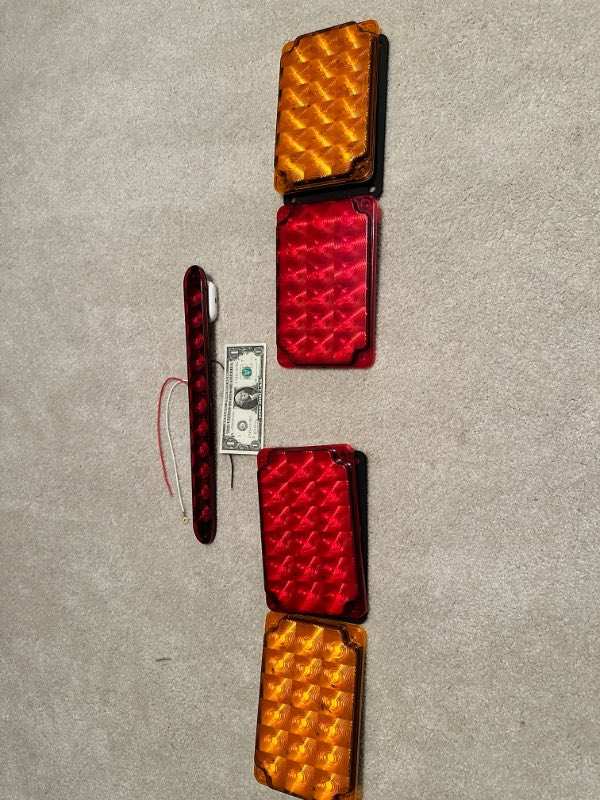
Ah, wonderful and a tip of the hat. You just saved me perhaps 6 hours of reading and noodling! Can i swap the underhood battery for lithium and avoid the dc to dc charger? I suspect no, but it needs that battery as well. I'd like to use the factory converter and fuse center also. Bad idea? If you haven't noticed, I'm slowly getting you to design my electrical system. So I guess I"ll come clean and ask what would you do on a budget for the rest of the gear? I prewired the roof for A/C and am installing a microwave/convection oven as well as a slightly larger Norcold fridge. We wont use the a/c or microwave boondocking - only on shore power. Feast your eyes on the Sunraders new "super-taillights". They are huge and fit perfectly vertically edge to edge matching the factory light white flange. Horizontally, they go to within 2" of the entire factory lamp width. The dollar is for scale, and the third stop lamp is a whopping 16" wide and will be above the rear window. Should be extremely vivid:
-
Yep, that's correct. Sweet! Great having such well informed folks on the forum. I honestly can't believe the price point for this - solar has come down significantly. That's great to know I can add up to two more before I'd need to upgrade hardware. I may have some questions for you later in the Spring when this gets installed and I start thinking batteries, etc if that's OK?
-
That's a good idea. How many watts can the 30W controller with this system handle? I bought an extra weather sealed port so I could do exactly what you describe. If I install this port down at ground level, I can easily plug in another solar panel and unroll an extension wire out into the sun. The other port will, of course, be up on the roof for the hard mounted solar panels.
-
Another exciting day. With the sleeper walls and ceiling about to be closed in with final trim, I realized the sleeper roof is where I had in mind for solar. So I climbed up and did some measuring to confirm there's not enough room over the main area for solar and kayaks. Meaning I have to drill holes and mount the solar right now. I ordered the Renogy 200w system which is plenty for our needs. We currently get by offgrid for 3 days using only 1 deep cycle battery and rarely deplete it just sitting isolated and not being charged the whole time. We just use a small fan at night, cell phone and laptop charging, and that's it. So with the Sunrader, we'll have some larger needs offgrid due to the fridge, powered ceiling vent and about 20 times as many lights, but will have two house batteries. That will be in Monday and I'm excited. Looked at flexible systems but my sleeper roof is arched now and not a uniform radius. So it will be a pair of hard panels on the sleeper with some kind of yet-to-be-fabricated branch protection. I also hope to make a quick disconnect for one, so I can move 100w out into the sun if we are parked in dark shade.