Bodybagger
-
Posts
123 -
Joined
-
Last visited
Content Type
Events
Profiles
Forums
Gallery
Everything posted by Bodybagger
-
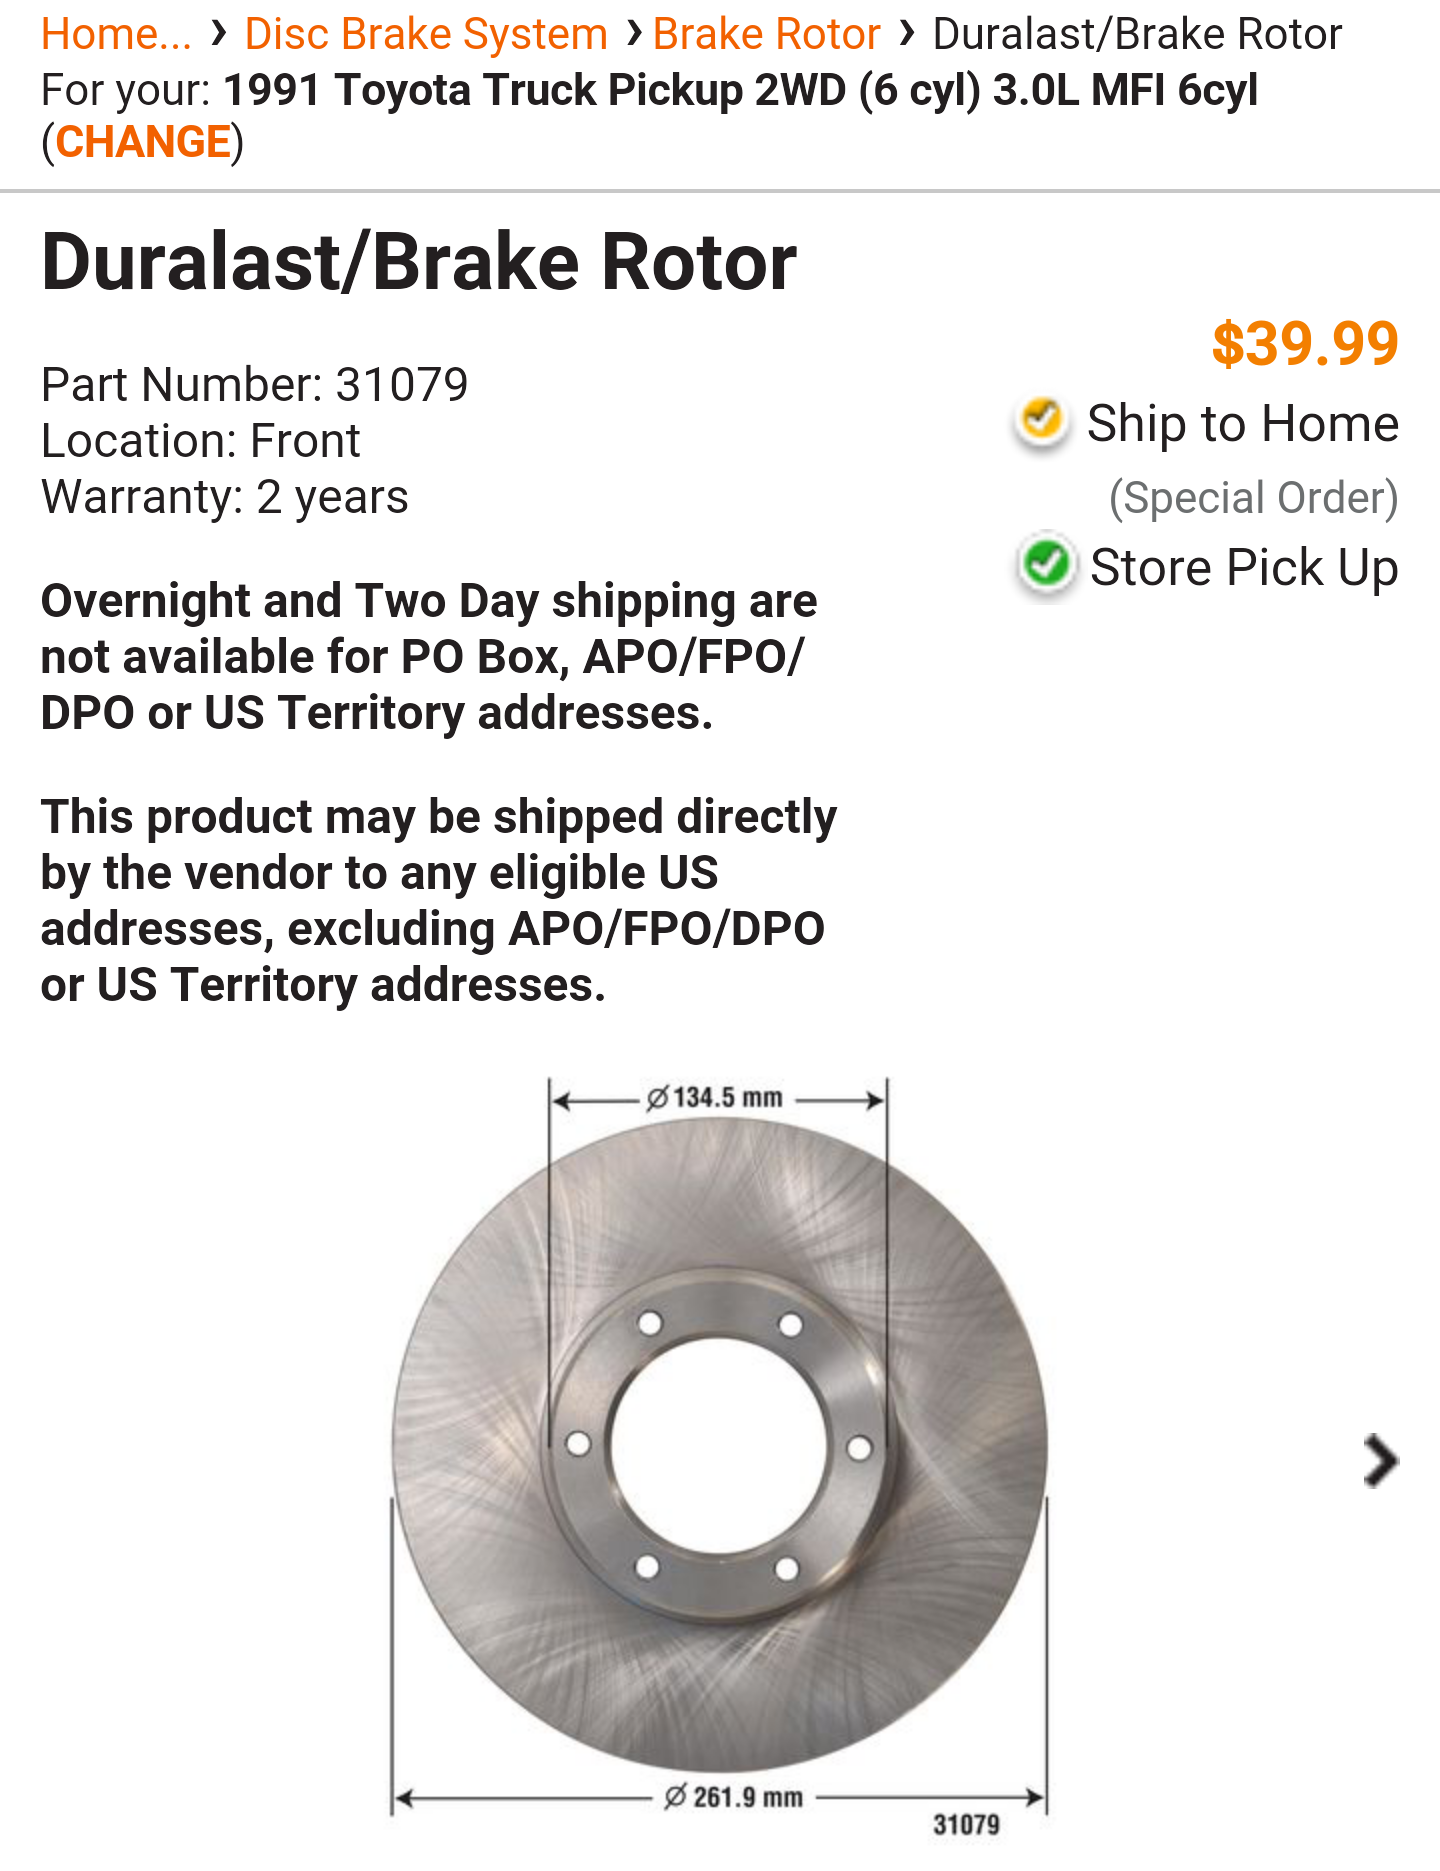
 Autozone part 31079. $40 each.
-
Sorry it's been so long, guys. Life gets in the way sometimes. Ben, as you've probably learned by now, you have the dangerous axle.
-
If you are changing the seals, you'll be taking the hub off anyway, so clean and re-pack the bearings while you're in there. As far as the service bolts go... The threads are generally so rusted up that you'll need to run a tap into them to clean them up beforehand. If I recall correctly, they are 6mm x 1mm pitch. You'll need 10.9 grade bolts and it might be a good idea to take a Dremel and a cutoff wheel and score a longitudinal line through the threads of the bolts to act as a cleanout so the rust doesn't develop a jam fit. Oh, if you can get the cone washers out, the only thing holding the axle in is the gasket. But it might adhere pretty tightly. The bolts are the best way to get it out if this is the case.
-
Wow! is that for the whole assembly?
-
Little piece of advice... The word "Escaper" throws people off. They have no idea what an escaper is because Toyota never made one. When getting parts, you'll need to remember that this is a Toyota RN pickup.
-
puzzling red lighted toggle switch next to instrument panel dimmer
Bodybagger replied to markg's topic in General Discussion
Hate to be the one to say this, but you should trace the wire from the switch to whatever it is connected to in order to be certain. -
Check for wobble at the extension housing of the transmission if it is an automatic. Also, check the fluid for a burnt condition. The mileage is right for tranny problems to begin showing up.
-
That tells me that if you set your new odometer to the setting of the old one, you are completely in the clear and no note is required. The key is that the indicated mileage of the vehicle is not being changed. You'll have to do the following: Lets say the new one says 136459 and the old one says 85041. Disengage the main drive gear. This is often accomplished by bending a small tab that holds the gear's axle in place, then removing the gear. Carefully turn all wheels simultaneously until the odometer reads 025348. If it doesn't click easily, stop. This means the wheels will have to be removed from their shaft and reassembled at the desired indicated mileage. Turn all wheels simultaneously EXCEPT the hundred thousands wheel until the unit reads 081904. Turn the thousands, hundreds, tens, and ones (and tenths if it has it) until it reads 084237. Turn the hundreds, tens, and ones until until you pass from 904 to 015, at which time the geneva gear will rotate the thousands wheel over to read 5, bringing the display to 085015. Anyway, you get the point. To do it without removing the wheels from their shaft, you have to disengage the drive gear and work it like a Rubik's cube. Just remember to reinstall the drive gear or it will be a dead odometer.
-
I seriously doubt you'll find a repair manual specific to your RV. However, you will find a repair manual specific to your truck chassis by looking for Haynes manual 92075 "Toyota Pickup, 4-Runner, SR5, 1979-1995" Or search torrents for the 1988 Toyota 4-runner service manual. Information regarding the systems on board an RV (such as absorption refrigerator, holding tanks, etc,) is actually very generic and applies to any RV. An RV systems repair manual will cover those.
-
Not sure exactly which transmission you have, but centrifugal governors are on the tailshaft and you only have to drop the driveshaft and remove the extension housing. You don't need to remove the tranny to get to them. But anything short of being completely stuck open, you might have a hard time diagnosing with your eyes anyway. Connect a pressure gauge to the line port and governor port of the transmission and watch them while someone drives. It will be clear if there is a problem with the governor circuit. If shifting is solenoid controlled through all the gears, that doesn't apply. What model transmission do you have.
-
The geneva drive between the tenths and ones is not turning due to a worn tooth on the left side of the tenths wheel. Makes sense that this one would wear out first because it gets 10 times more use than the tooth on the ones wheel. When the day came that it had to turn 5 digits at once, they were just too stiff to turn and the worn tooth grinds over the geneva (and grinds over it once every mile). Getting it out is the hard part. The wheel can have the tooth built back up with a hot jewler's screwdriver... you don't even need a new wheel. And if you're really ambitious, you can make it a low mileage rig while the odo is out.
-
Alternator replaced and now battery light stays on or flickers
Bodybagger replied to Lil Gypsy's topic in General Discussion
First thing's first. Checking the isolator with a diode test while sitting still doesn't mean the isolator is good. It might be getting hot and opening up the circuit. You'll need the following: 10mm socket battery charger battery hydrometer ($7.19 and you really should have one) http://www.carparts.com/OTC-PROFESSIONAL-BATTERY-HYDROMETER/GP_2010637_N__10618.car?zmam=73771597&zmas=17&zmac=100&zmap=10618-2010637 Digital multimeter. I recommend one with a clamp-on DC ammeter. Sears sells one for 50-60 bucks that will measure DC amps. Take the isolator and 2nd battery out of the equation. But before doing any of the following, disconnect your truck battery. You'll need to clean the connections anyway just to be sure. *Disconnect the large wire that is currently connected to the alternator and wrap the end with electrical tape and secure it in a safe location. *Then find the large wire that goes between main fuse buss (next to the battery) and the isolator. Disconnect the end that is currently connected to the isolator and re-connect it to the alternator. *Test for continuity between the charging post of the alternator and the positive battery cable connector. If no continuity, stop. You've found the problem. *If you have continuity, clean the battery terminals and connectors with a small wire brush or battery terminal cleaning tool. *Check the voltage of the battery. It should be 12.3 volts DC or greater. If low, charge it after you do the following maintenance. *Pop the caps and check the electrolyte gravity with a battery hydrometer. Should be 1.27 *Top off the electrolyte with distilled water if it is low. Should be just below the caps. Not filtered water, not drinking water, not Evian or Perrier, but distilled water and only distilled water. *If voltage or specific gravity was low, charge at this time. Probably overnight. *Reconnect battery leads. *Start the truck. If the battery light will not go out, check 15A engine fuse, 7.5A charge fuse, and fusible links AM1 and AM2. *Run the truck for while like this, if this fixes your problem, you have a bad isolator. One thing that you can count on though is it's probably not your alternator. If you know ohms law, and you have a DC clamp on meter, you can do this yourself. -
Alternator replaced and now battery light stays on or flickers
Bodybagger replied to Lil Gypsy's topic in General Discussion
Yes I have had that problem. And nothing was wrong with my alternator. Follow the thick wire from the alternator and you will find it does not go to the battery, but rather goes to a charging splitter called a battery isolator. There are leads on this isolator for the alternator, the truck battery, and the coach battery (some have a 4th lead for the ignition). The alternator will shut off when it does not see battery voltage! What is happening is the isolator is cutting out and the alternator's open circuit protection is kicking in. Find the wire that connects the isolator to the main fuse buss next to the battery. This wire originally went to the alternator. If you disconnect it from the isolator and connect it to the alternator, the alternator will once again see battery voltage and it will charge (if everything else is working). If not, check the 80 amp fuse on the main fuse buss under the hood. Also, check the 10 amp engine fuse. If everything works as it should when the alternator is connected to the original charging wire, it means you need a new battery isolator. Shame on your mechanic! Not only did he forgo a proper diagnosis and jump right to the "replace parts til it works" technique, but instead of starting by replacing the cheapest part in the charging system and working his way up, he started with the most expensive part in the charging system and is working his way down. -
It's easiest to just wire tie the lever in the fully loaded position to trick it into thinking you have a full load on the rear end. Well, actually, you're not tricking it... more like smacking it upside the head and telling it there's MH coach sitting on its back. But if there is no lever on it, I think it will sit in the low pressure proportion position which is not where you want it. Your stopping distance will be significantly increased if the rear brakes are not seeing much pressure. Is that dangerous? Well, it's better than no brakes... But keep in mind that if you go down long steep grades and your front brakes fade, you'll need downshifting and pulling your E-brake for any real braking power. Yeah, I guess that's dangerous. You either want to replace the arm and attach it in the loaded position, or *MAYBE* do away with the proportioning valve altogether. Here's the big question mark... I have had good results with the proportioning valve wire tied, but I don't think this position actually applies full pressure to the rear brakes. I think there is still some pressure reduction. You DONT WANT YOUR REAR BRAKES TO LOCK UP. I don't know if they will lock up or not when the proportioning valve is bypassed. If they do, well, imagine your rear end passing you up shortly before rolling over. Rear skids are very bad. I vote for tricking your proportioning valve. If you bypass it, be sure to thoroughly road test it under controlled conditions including wet pavement to be SURE you never get a rear-only lock up. And of course, if you bypass it, you will need a little bit of custom brakeline and bleeding both rear brakes.
-
Once it warms up, the needle should stay put. Your thermostat needs replaced. You need a 192 degree thermostat. Do not use a "fail-safe" type thermostat. The $4.99 thermostat is what you want. Have the cooling system flushed so the crud does not make the new thermostat stick. There could be other issues, but a $4.99 thermostat is a no-brainer to try first. You don't even want to think about the other issues until you try that thermostat.
-
The fluid passes through a series of plates in the bottom of the radiator, which is the cool end of the radiator. It leaves the radiator and enters a small (maybe 6"x6") transmission cooler in front of the AC condenser. The system is sized adequately for a small pickup truck, but hopelessly inadequate for a motorhome. I replaced the original pickup sized cooler with one about 75% of the area of the AC condenser. I think it's 12" by 17" or so. I have 175F-200F transmission fluid, and 175F is ideal. Before me, the tranny cooked it almost black. The fluid must flow through the radiator FIRST, then through the cooler. With all due respect to your friend/mechanic, I would think it's pretty obvious to a mechanic that the stock transmission cooling system for a compact pickup is way undersized for a motorhome. Thus, I'd be concerned that the aftermarket cooler is installed properly since it's being done by a person who doesn't understand why a motorhome needs a bigger cooler.
-
On one of the threads here, someone told about how their mechanic (that specialized in motorhomes) checked the stopping torque of the wheels with an expensive high tech device and adjusted the rear brake adjusters until they provided the right amount of stopping power... in fact they adjusted them so tight that they burnt the rear brakes and drums up. Real pros, huh? If only they knew about that simple little brake proportioning valve on Toyota trucks. Luckily, your mechanic thought it was due to a light front end and didn't go screwing things up. See this post: http://toyotamotorhome.org/forums/index.php?showtopic=1313&view=findpost&p=5783
-
Well I bought a sunrader and now come the questions
Bodybagger replied to pamz's topic in General Discussion
Sounds to me like someone sprayed it with 2 part automotive clear coat. What idiot would do that! I have had to remove that from boats. Looks great long enough to sell it and then it flakes off horribly every time. I don't know of any easy way to get it off. On anything else but fiberglass, I would use aircraft remover. It seems however, that they make a non-aerosol version specifically for fiberglass. might be worth a shot. http://www.wmbarr.com/product.aspx?catid=82&prodid=113 -
Guys... My wife and I wouldn't be able to take trips in this thing with a guitar, amp and speaker on board. Two people and provisions for a weekend pushes it. A week of provisions has it busting at the seams. Throw in 2 extra grown people, and instruments for all... you can't stuff it all in sitting in the driveway, much less stand that kind of crowding on the highway. These things have less room than it looks like. Don't even think about drums. Maybe bongos. One or two tops. And they'd have to be small ones. The only way it would work is if you all play harmonicas, for two reasons. It's the biggest instrument you can fit with 4 people on board, and two, you'll be playing a lot of blues. You will be EXTREMELY CRAMPED and dread every second you are stuffed in this thing. Kind of like a 1950's New Orleans jail cell. You can't tow anything with these. The reason folks don't want to help is because they can't help you with this. It won't work.
-
Option C gives a tongue weight (if properly balanced) of less than 50 lb, and this in turn results in an increased rear axle load of about 100lb. Best structurally, but would sure hamper travel down fire roads. Option A places the full load's center of mass about 3 additional feet behind the bumper (12 inches for hitch and 2 more feet to centerline of load on the rack), and will increase the rear axle load by approximately 700-750 lb. In addition to this, the 2' frame extension would see an increased static bending moment of 1500+ ft lb (300+ at 2+3 feet), and an increased dynamic bending moment of 3000-4500 ft lb (200-300% after impact factor). Bad idea for the frame and the rear axle. Option B is bad because the roof has a hard time taking any sustained load, and it's already pretty high anyway. Loading questions are always a toughy. They're pretty close to the limit as it is, and there is of course, no free lunch.
-
Aerodynamically, these things are all just a big parachute. Fuel economy will depend almost entirely on your powertrain. 20% difference between two identical models would not be unusual if one has engine and transmission in better condition.
-
Foreign automobiles is still a newfangled idea out in Kansas.
-
If it was bad, it would spin, wobble, and sound like a worn out roller skate. Definitely change your thermostat! Flush your cooling system with prestone or peak radiator flush. It contains citric acid and dissolves a bit of the gunk out of the radiator. But don't be surprised if it starts leaking afterward. It's old enough that it might just do that. The part where you said that using the heater brings down the temperature leads me to believe that the thermostat is not opening completely. Change it and report your results...
-
Be aware that the DC output on some generators make them BATTERY COOKERS. I went over one 2 days ago that had a no load voltage of 18.7 volts! Granted it was about 13 volts at 8 amps, but the voltage surged up as the load decreased. Be aware of your battery's fully charged voltage, your charger voltage, and your battery electrolyte specific gravity. The specific gravity is the only way you can be 100% sure of your battery's charge level. They are so cheap and tell you so much that it is just crazy that they aren't in every toolbox. Get one like this: http://www.carparts.com/OTC-PROFESSIONAL-BATTERY-HYDROMETER/GP_2010637_N__10618.car?zmam=73771597&zmas=17&zmac=100&zmap=10618-2010637
-
Anything will work. I used a high density foam insulation panel for flat rubber roofs because we install rubber roofs and I had a ton of that laying around. I cut an 18" square shape from a single sheet of insulation, then cut the 14" square shape out of the middle - it's one piece to maximize rigidity. The foam is just a spacer. The membrane you apply to it is what actually seals the water. So plywood would work. But I think a high density foam would work best because when the AC is screwed down, it will conform to bottom better. Maybe when I get enough free time on my hands to take the AC unit out of its hole, I can take some pictures of how I made the curb. But yeah, a 1" waterproof curb and you go from completely relying on a gasket to not really even needing one.