IdahoDoug
-
Posts
313 -
Joined
-
Last visited
Content Type
Events
Profiles
Forums
Gallery
Everything posted by IdahoDoug
-
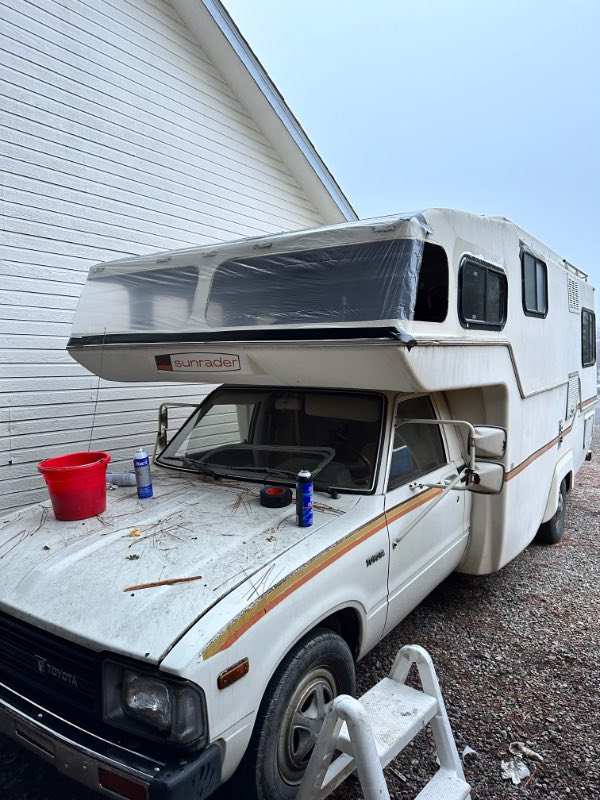
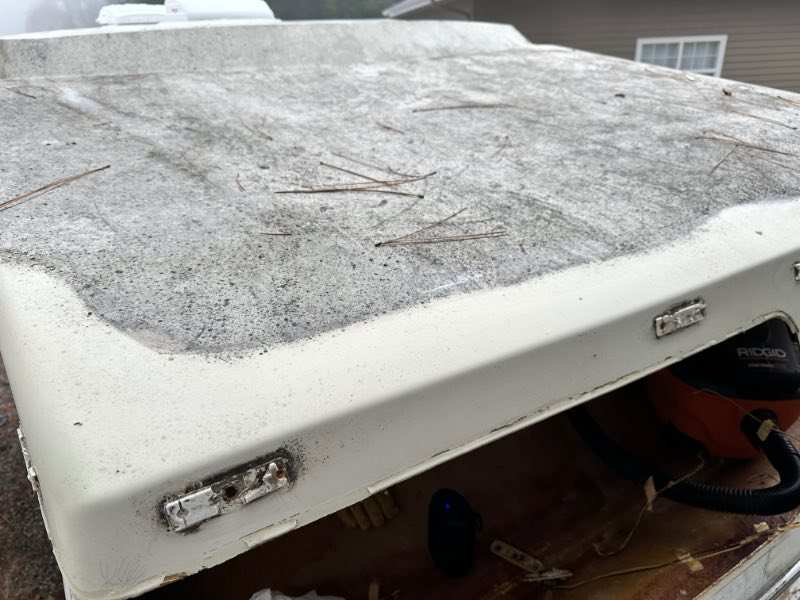
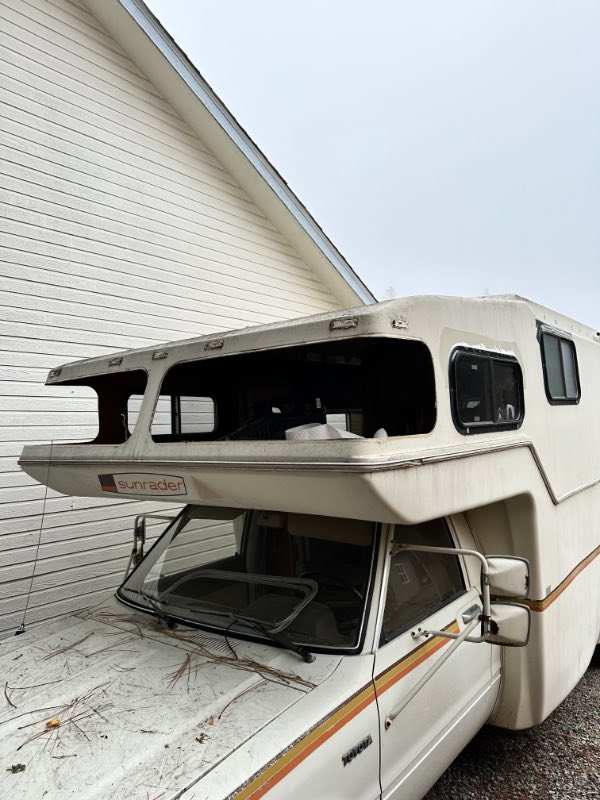
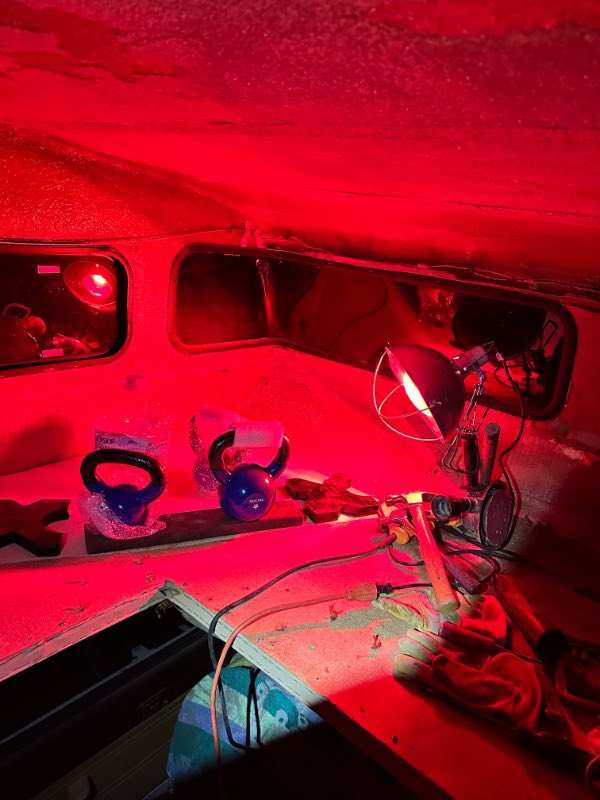
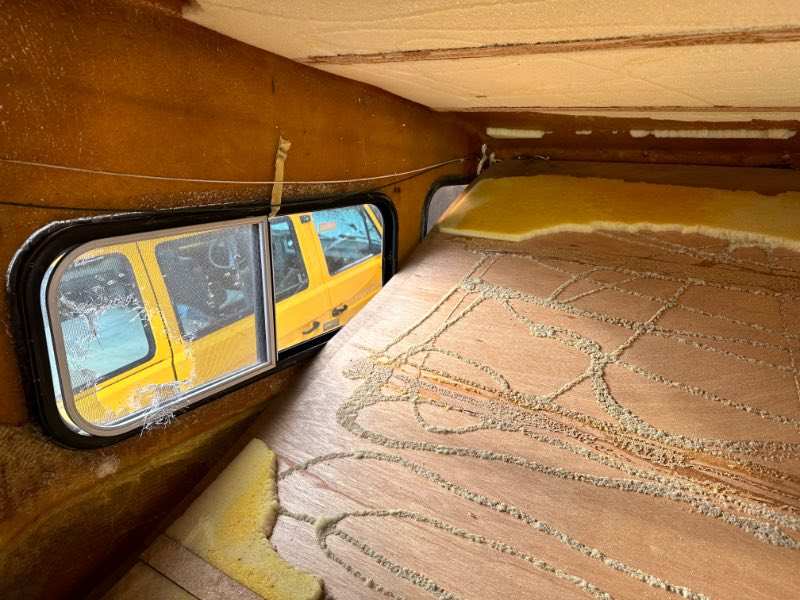
Glad to have that behind me. I pulled both sleeper wraparound windows, then sanded the sleeper ceiling. Wow. Used military desert dust goggles which worked great to keep it out of my eyes. So much stuff was falling on my face it nearly obscured my vision and when I shook me head to clear it, I could feel it running into my ears, etc. Miserable. In the course of this, I discovered a serious issue with the sleeper construction. The left and right edges of the floor are not caulked. This allows anything spilled in the sleeper (or window leaks) to get water past the floor panel and down into a large channel that will hold at least a gallon of fluid on each side. And there's no where for it to drain out. My plan is to caulk these gaps on both sides, and ensure that any substantial leak or spill will not cause long term water to sit down there. You'd never know about this unless you lift a piece of the sleeper floor up. So, I suggest others remove the mattress and caulk that floorboard against the side. The front edge is fiberglassed in, so that's fine. I ordered the EPDM 1 piece rubber window seal and will be sourcing plexiglas and making my own new wraparound windows - bending them over a pipe with a heat gun, then trimming to size by laying the old one on the bent piece to trace. Anyone see a problem if I bed the seal and window with a modern polyurethane auto windshield sealant? Some pics. Had to clean a few inches around the windows so I could tape plastic over them for winter. That's 30 years of accumulated grundge, I used window foaming cleaner with ammonia and a scrubby dish sponge. I know others have simply sealed these up, but I kind of like the trademark Sunrader look enough to work hard to preserve the appearance. I think the panoramic view while taking a nap will be worth it, though I've yet to experience ANY form of relaxation in my Sundrader!!!!

-
Wow. Completely underestimated the cost of these systems. Rethinking things and leaning toward much like stock setup, but microwave, electric heater and a/c will only be used on shore power. Likely to buy that new Westinghouse generator so I can lug it along if we feel like it, to power the microwave, electric heater and a/c. That saves me thousands of dollars. Insane how much those systems are. I watched a van life gal install a Victron system that cost her $11,000 just in parts without batting an eye. She put it in herself and was happy she saved money. I guess I'm just more of a traditionalist than I thought, if that's what it costs to do a "modern" electrical system. No thanks. We are pretty frugal with electric needs over the past 10 years camping out of our boat, and camping in our Vanagon. We make do with a dual battery system that handles charging devices, running a fan all night, reading lights the water system's pump, and that's it for 4 days boondocking. I'll just make room for a nice lithium battery with a dedicated charger whenever we're on shore power and that will suffice. Thanks for your thoughts!
-
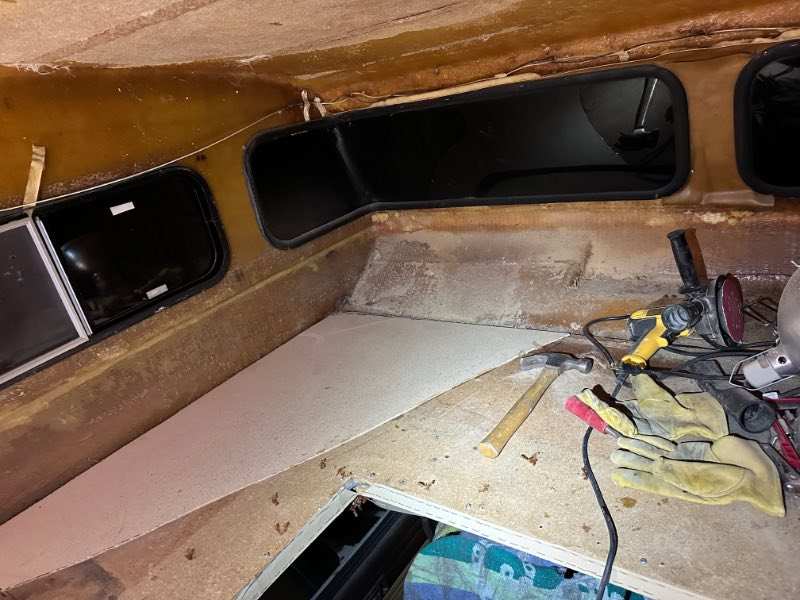
Mission creep. That's what I call it when I plan to do something and then another thing rears its head. Today, I planned on prepping the sleeper ceiling and hanging the foam board in there. I knew the front window leakage over the years had caused some swelling and issues in the left front corner, so I took a better look. Did some quick research to see how that floor base is secured and was delighted to find another person found it was just secured around the edges - fiberglassed in at front edge, and a bit of glue around the left and right edges. They criticized "Toyota" for securing it so poorly. Perfect, I'll just zip that damaged area out and butt in another piece but secure it with construction adhesive. Ran the grinder along the front edge - 60 seconds and it was free of the fiberglas. Drew a line to remove the damaged area and cut that to the fiberglas. Then the moment of truth. Aggghhhh! Mine is completely secured to the fiberglas with resin or a glue. 2 hours of chipping and grinding later, I got the piece completely out and down to the fiberglas. Put the new piece in and now it's drying overnight with a bunch of weight on it to keep the floor one aligned surface: Heat lamp on it and the weights: Not looking forward to the next steps. I need to lay on my back with a sander against the ceiling. Then, I need to remove the windows in order to lay the fabric and 1/2" foam rubber padding down properly so the rubber seals go atop the fabric. I'll just cover the open windows with plastic for winter and deal with it in the spring when temps are warmer. No way I'm going to successfully reinstall, plus I'm planning to make fresh windows by heating plexiglass and that's a spring activity. I'm getting excited as to how the sleeper will be when completed. The side walls robbed a half inch on each side by not being secured, plus they were poorly insulated. I'm going to make wood window surrounds for the aluminum frames to push against and securely seal. But the rest of the sides, top and forward face will be fabric over 1/2" foam rubber, over 1/2" foam insulation. Should be slightly larger, much softer, quieter, and warmer.
-
So, willing to deal with heavy wire - yes. As for space available, I'll literally design the build around the system, which is why I'm asking now. So, it's an opportunity to have a semi state of the art system from scratch (semi, because I'm not a "leading edge" guy) that takes advantage of the current oversupply of systems out there to power a van sized RV. Interesting news on the batteries!
-
All I'm looking for is someone who can tell me what converter, fuse panels, power center, etc I should buy. There are so many systems out there now due to the vanlife craze. Some of them are needlessly expensive due to the brand name, but I'm sure others offer durability and reliability without that added cost. First, an overall comment that I am not a tech junky, so I would prefer simple solutions, and I would hope I can do this without each component needing its own LCD screen on a wall in such a small vehicle as the Sunrader. I'd rather have a system that quietly does its job, vs one I have to use a touch screen (that will eventually break) to do everything. So, expressing a preference for minimum interaction needed. By way of example on the course of my complete Sunrader rebuild, there will be absolutely zero light switches that are the press and hold to your desired brightness. I have purchased compatible switches where you just click them on and rotate the knob until they're bright enough and walk on just like houses had for 50 years. Not a fan of the new press and hold, wups too bright, let go, double click to reverse direction and start dimming, wups too dim, etc things. Here's what I am doing with the build that will impact the electrical system. At least one lithium house battery, plus a normal underhood lead/acid battery. Prewire for future solar (though we live up North). Prewired for future roof A/C (we rarely need this and it may not get installed based on years of camping without A/C in our Vanagon). I have a 3 way fridge, a gas cooktop, gas water heater, will have a 1500w AC microwave, a 1500w AC electric house heater (edit: only for shore power use, as will also have the original gas furnace which works great), may add a roof mounted 12v electric winch to pull kayaks up onto the roof, and would like to avoid a generator. I'm happy to upgrade the alternator if needed. I'd like to have an onboard charger that activates whenever we're on shore power. If a second lithium house battery ($800?) solves something, would consider that to get a 2nd day of boondocking, etc. My Sunrader is completely empty right now and I will be building the interior from scratch, so no limitations on space as I'll design around the components. Here's my expected use case. We will be hooked to shore power only 10% of the time its in use. The rest of the time we will boondock, but rarely more than 2 days and nights in one place before driving off and having a recharge ability while underway. If anybody has either a prefabbed "system" I should look at, or knows enough to design a group of components for less money, I'd love to have a discussion about it and perhaps others in the future would benefit on the forum as they consider upgrading. Thanks in advance!
-
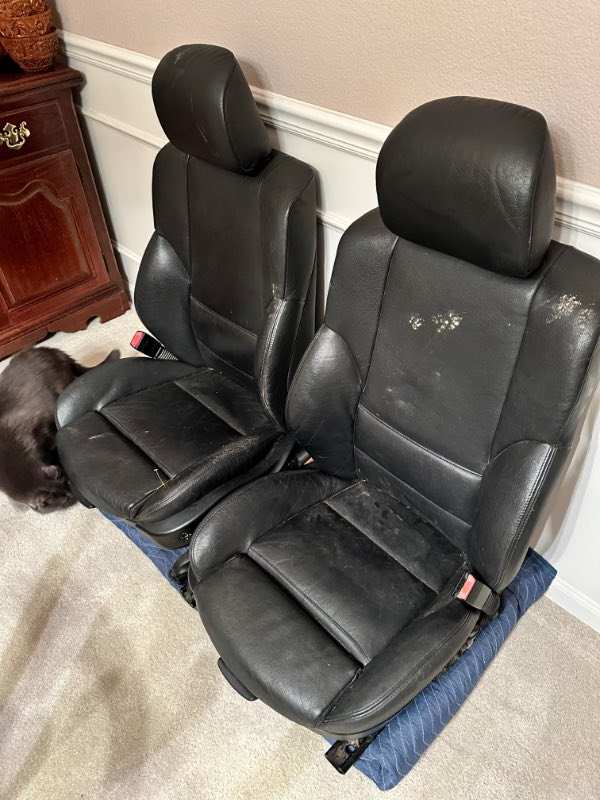
Hey, that's a great idea, WME. Thanks for the tip! So, not much happening on the Sunrader. I caught a bug and its cold outside so I left it alone for a few days. Today I ripped out the ceiling on the sleeper: I scraped all the remaining foam off the ceiling, and now have to hit it with the sander (yes, laying on my back - yippee) to prep it for fresh glue and fabric. I also had a major score in the seating department. Many years ago, I discovered what I believe to be the finest producton car seats in the world. Considering I am a former product developer for GM and Lexus, that's saying something. The E46 BMW M3 has the most supportive and adjustable seats I've ever found and they're in my E46. Once I bought the Sunrader back in May 2023, I knew I had to stuff a pair of these amazing thrones into it. Alas they are as rare as hens teeth in the scrapyards and people want $950 for these today on ebay (plus $300 shipping). But I kept dutifully making the 75 mile round trip to the nearest "You Pull It" scrapyard where you pay $32.50 for a pair of seats whether they're out of a 200k mile minivan or a Bentley. I can see from their website when they get a new BMW 3 Series, which prompts me to drive out there and take a look. Probably 30 have come in and all had just the normal leather seat. Today - score! I drove out and found this one had the optional sport seats. With electric seats it's no easy task, either as you can't move them to get at the floor bolts. And the scrapyard won't let you take a 12v battery out into the yard due to the danger of a fire from a smashed car with loose wires. However I learned on the BMW forum how to wire my electric screwdriver's 12v battery to the right terminal and how to make a little wiring harness. It worked like a charm and for a whopping $32.50 they're sitting in the dining room: I left the muddy cat prints on the one as a joke for my wife to see when she gets home. We're cat lovers, and the track is kinda cool to see for us. These are heated leather, have extendable thigh supports, excellent side bolsters, and power adjustable lumbar spine support. I'll let them warm up for a couple days, then clean, condition and store them for later. Super excited - was starting to think I would not find a pair as people are aware of these seats nowadays.
-
Thats got to be worth a small fortune. My brother was involved in helping someone restore a large vintage RV from the art deco era and the owner sunk an incredible sum into it.
-
Thanks - yes I was looking at those and engine block heaters. Unfortunately, I can't easily get that wood off the bottom of the shower. It's glued on and would be a nightmare to remove. Then the reverse would be a huge mistake if I reassemble and when its reinstalled I have a creaky flexing bathroom because the floor wood support isn't lined up to the Sunrader floor. So I gave it up. Also the tank heaters (which I may install on my tanks) have an automatic thermostat that shuts them off at various temps, the warmest I found was 74. So the floor would be barely heated and still cool to bare feet. There are a variety of floor heaters, those snow melting sidewalk pads all over the internet, etc. It was a cool idea, but nothing matched what I needed, which is a stick on pad that I could thermostatically control and heats up to perhaps 110 degrees. Most have no thermostat and shut off at 100C or 200C. Believe me, I was looking up the melting temps of fiberglas, etc. But at the end of the day, it's an issue with the shower floor structure and the possibility of a flexy and squeaky bathroom floor that stopped me.
-
Exciting package arrived today. I am upgrading the bathroom a bit and wanted to have a small radiant heater, or floor heater but have not been able to figure out how due to the wood panel fiberglassed to the bottom pan. The other plan is a heated and illuminated vanity mirror. Unsure it would fit (huge), I ordered one anyway. It fits! Super excited. 20" X 28", it will probably be the only light needed in that small and white space.
-
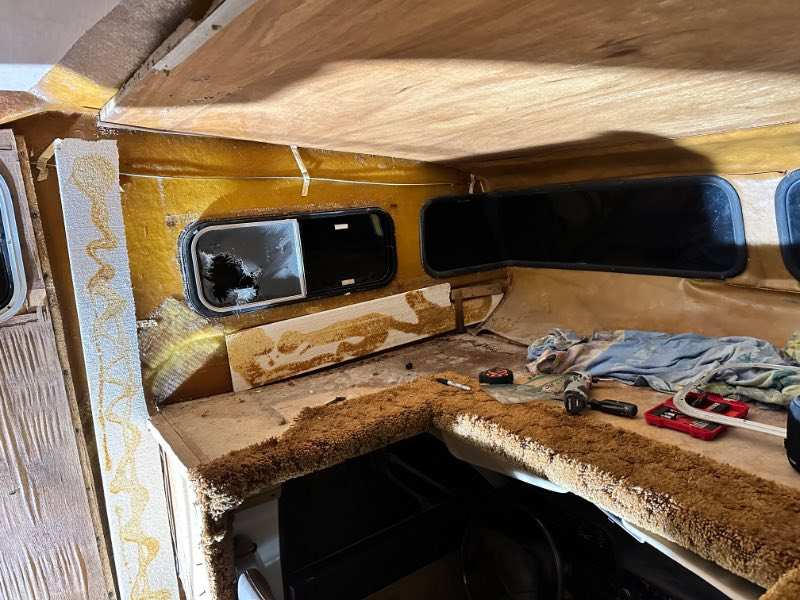
So, got the sleeper wall panels out without drama and in one piece. I laid them aside as I may use them as templates later. Ceiling will be white fabric over soft foam, over the hard insulation board. Sides will be white wall panels. Or, I may simply line the entire sleeper area with fabric - walls and ceiling - for a softer and quieter place to sleep. I ordered enough of the material, I think. Wow, the guy who installed the carpet in the sleeper must have gotten bored with the staple gun just to see how many he could use on his shift! My word that took a lot of prying and pulling to get it out. I also pulled the vinyl above the wraparound windows off the ceiling and was about to pull the ceiling down when dinner guests arrived. I'll look forward to that tomorrow, I guess. Here's what it looks like under the paneling and carpet: BEFORE: AFTER:
-
Keep 'er going, Bob! I find with projects if I maintain momentum my brain automatically dedicates some time to solving the myriad problems of a complex and long term nature. And that in turn keeps my head in the game and maintains my enthusiasm for a steady burn. So, I did some experimentation today with the 3M 08074 Trim Adhesive the engineering line recommended, and the 1/2" R-Tech styrofoam with the reflective foil on one side and the polypropylene on the other face. I wanted to confirm the glue would not attack the poly (the foil actually has a clear polyprobylene layer over the foil) at all, and that it would be a solid choice for the following tasks: 1/2" R-Tech to cabover sleeper roof R-Tech to 1/2" open cell foam 1/2" foam to Sail-Rite white hull liner fabric. Total success! The 3M did not attack the R-tech poly. It gripped it so tightly, pulling the hull cloth off tore the foil layer off the foam core. Same with the foam - tore the foil later. And the foam to fabric was and excellent bond also - tearing off foam when separated. So, I'm happy and the cabover ceiling will get 1/2" insulation, then 1/2" foam, then the white hull liner fabric. I also pulled down the braces holding up the last piece of mahogany ceiling panel and the edges are beautiful and it's solidly glued up there just like the others. I can push up against the ceiling with full strength and nothing budges - not an eighth inch of flex, nary a creak nor squeak. It's like a single monocoque structure behaving exactly as I'd hoped - deriving a lot of strength from the 11 aluminum beams and factory hand laid fiberglas 3/16" skin, and now obviously even more from the strong Owens foamboard and the mahogany. Totally tickled. I'm not even sure what I'm going to do next, but I'd like to paint the ceiling, then install the puck lights, fan and vent trims, and start using this upgraded lighting to continue working in there without the constant use of trouble lights, extension cords, etc in my way. Then tear out the sleeper wall and ceiling panels and make that fresh and nice. The front windows are leaking, so I feel like I need to fix them now. What's the best way to do that. Looks like the seal has shrunk away from the fiberglass near the center line tight curves. Do those go in with adhesive? Anyone had success removing and resealing these?
-
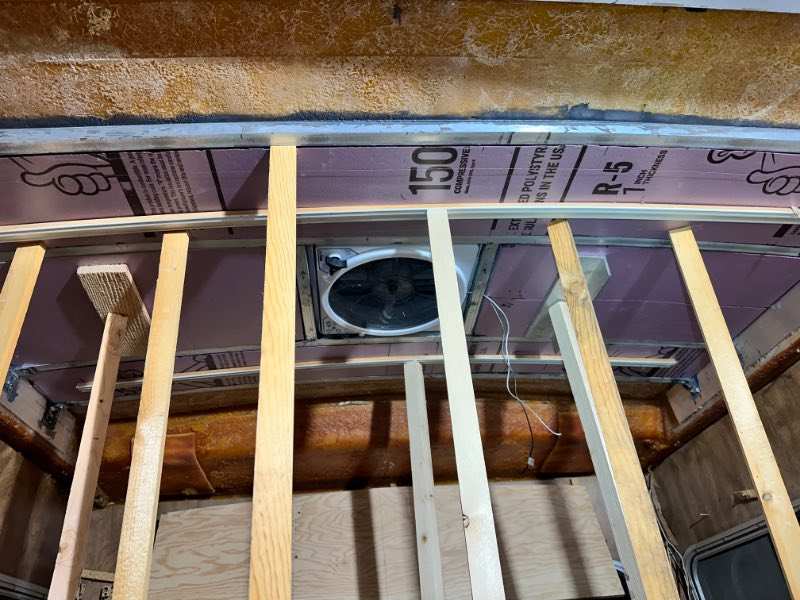
Got some 1/2" insulation board for the overcab sleeping area. I'm going to put that against the fiberglas, then lay 1/4" foam padding, followed by marine grade hull liner as a cloth surface we can bump elbows against harmlessly, with that low ceiling. It will also drop noise levels while sleeping compared to the hard panel the factory used, and also lower than padded vinyl - another thought I had. Samples of the cloth liner arrived today and we chose a color. I'll also use the samples to test the glue that arrived also today - 3M automotive trim adhesive which 3M said would be best for the cloth. They could not, however, confirm it will work on the foam insulation board, as it has a layer on it. I had to call the insulation factory to find out what the layer is, as it was not on their spec sheet. It's polypropylene and 3M says "nyet" as they've never tested that. So I'll be the guinea pig as is often the case with my projects. Tonight, I got the final mahogany panel up on the ceiling and its curing until Saturday evening. Can't wait to get all those boards, braces and such out of the Sunrader to start working on the next phase. This was a particularly vexing piece as it involved the square cutout for the powered vent, cutouts and wiring buried into the insulation board for 3 puck lights, and the front and back of the piece had to perfectly match the former piece and the rear edge of the roof. Which is decidedly not square. It's about a half inch arch with huge, gnarled chunks of fiberglas and resin from an overzealous day at the factory. Glad to have it done - took twice as much fiddling as the other 2 pieces. Today I also finalized the dimensions for the dinette, so I can complete a drawing to send to the upholstery shop for an estimate. Glad I redid this from my original sketch as I split the cushions a different way so when someone sets it up back there for sleeping, the back and side pieces can be stowed against the ceiling so the bed has 6'4" of length as I'm about to have a son in law who's 6'3". I also lowered the plywood base a bit vs factory, and am using much thicker cushions, and also lowered the height back cushions so they don't interfere with my plan for blackout blinds that are "one pull" to use instead of fiddly.
-
Tuesday, December 12: Got the 2nd piece up and somehow it also took over an hour of fiddling to get the part the right shape, the notches for the beams in the precise right spot, the puck light holes, the puck light wires laid into a melted slot in the insulation, etc. Quite the bummer the contact cement was not compatible, as I have to wait a full 24 hours for each panel to cure before moving to the next piece. I got 8 puck lights and hope that's enough. One right inside the door, three down the hallway, and a pair over the dinette. I think one over the bed and one in the bathroom will do it. I will have 4 dimmers for each of these 4 zones - the manual spinning knob type. I'm not a fan of any of the digital light controllers as I'm too impatient. I'd rather walk in, grasp a knob and turn it instantly to the desired brightness and walk on without breaking stride. When I see these YouTuber van builders stop, click through a menu, turn a light on, press and hold until their brightness is set, I chuckle to myself. I say the old form factor was better and I'm sticking to that. I will also have a couple hidden low LED strips under counter edges to have a red night light setting for those 3 a.m. bathroom trips. Getting old is not for the faint of heart! And wouldn't you know it, after working all summer on a home improvement project around 4 different types of saws, I nicked my finger with the jigsaw tonight. So, I've managed to contribute 2 of the "blood, sweat and tears" that a truly magnificent project often engenders. Hopefully no tears on this one. I also picked out the material for the dinette, and spoke with an upholsterer who will make the cushions for me. Glad I'm a bit of a planner, as they are booked out through March! So, I'll get a diagram to them, receive an estimate, and pay the 50% upfront fee as soon as I can. I'm a little nervous about the estimate, as I have never in my life paid for upholstery work and I've heard it's frightful now after the pandemic caused labor issues. I'm also on the hunt for ceiling fabric to put in the cabover sleeper. Brought home some high end white fleece to show my wife and we both agreed it looks cheesy. So I'll likely order a more traditional choice - marine hull liner.
-
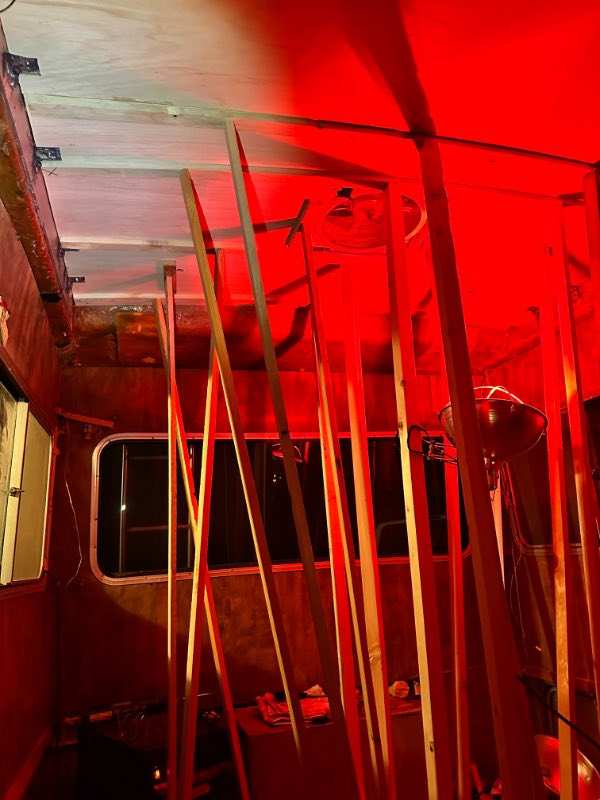
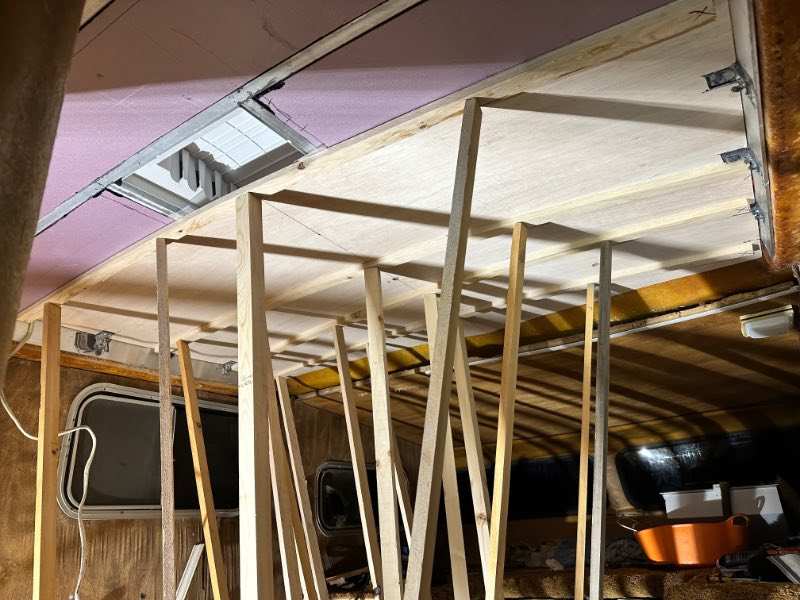
Sunday, December 10: Thanks, Bob! Yes, it makes a big difference in summer heat as well as winter, and frankly the former is more of an "realized benefit" as it's rare that we camp in very cold weather. Cool fall weather - sure. But when it's 40 or below you can barely sit around a camp fire as one side of you gets cold, and if there'a any wind, everyone's back in their vehicles. I insulated our Vanagon and a heater we used to use in it to stay warm we found after heating it for a while before bed time could be run only on the pilot light overnight and kept it comfortable. That included insulated winter covers I made, which frankly is probably equivalent in reducing heat loss to ALL the other insulation in that van. I'll do the same for the Sunrader as that's true for it as well. Heat loss through windows is horrendous! So tonight was an exciting night as it means the end of the work on the ceiling is in sight. I put up the first ceiling panel over the insulation, which is 1/8" mahogany plywood. It's the hardest of the 3 pieces that will go up as the front is pointed toward the bed (Sunrader wasted a BUNCH of space up there and my plan will get all of it back), and where each roof beam meets the side I had to painstakingly measure and cut out a square. I used two full tubes of glue on it. Here, I have a crazy number of wood pieces holding it up, and for clarity what look like cross beams are simply 1X3's spreading the load all the way across the ceiling. Regarding the space they wasted, you can tell there's a point to the piece at the front centerline if you look to the left of the third vertical brace from the right. The line on the piece's centerline runs forward right to the point of the V. If you look straight under that point, you'll see over 4 inches of headroom the overcab bed ceiling simply gives away. So far, my plan is to use padded marine grade ceiling fabric in the overcab ceiling, so it will simply wrap directly on the fiberglas to the point of the V, hugging the fiberglas and proving some nice headroom improvement there. I may use some insulation in the overcab roof - perhaps 1/2" board. Not sure yet. The next two pieces are roughly squares, so it won't take 2 hours of fiddly trimming like this part did...
-
Wow nice historical info, Toycollector - thanks for posting! Bryan - heads up that member has not logged on in 2.5 years.
-
Peening is a great option, as is using an epoxy. Look for a product designed to hold bearing shells in place, as it is released by heat (torch, etc). I would not be concerned at all in using JB Weld here. All the splines do is prevent the stud from rotating - they have nothing to do with the carrying the load from proper torqueing. I'd apply it, then put perhaps 30 ft-lbs on it to ensure it's pulled all the way seated. Cure for 24 hours and you're set for full torque. EDIT: Also, "right size bolts" "from the local hardware" and "the knurls slip". Are you saying you found automotive grade knurled lugs at the hardware store? Or are you saying you simply found some ordinary hardware store bolts that fit, but are not knurled or actual automotive lugs?
-
Tigger, that sounds like classic UNDERtorqued. Over torque would just break one, and the others are undisturbed. No reason any others would react and even with several missing a wheel will remain securely on and drivable. The tipoff is the unbroken studs - indicating they loosened and came off. The broken studs are simply what happens when an unsecured wheel slams around as it departs.
-
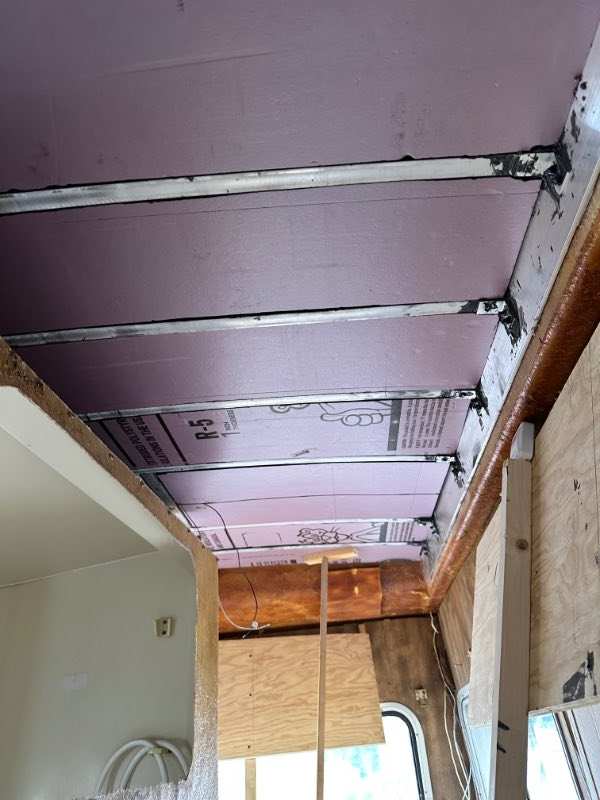
So, got the LAST piece of the Owens Corning XPS up today. By Sunday I hope to try glueing up the first piece of celling paneling. Need to figure out how to mark it for the puck lights, and get the wiring in place for that beforehand. I can already tell the benefit of the insulation as I've kept the interior as warm as possible with a 1500W electric heater for 3 weeks as I've been glueing and epoxying. For the first time, it's shutting down periodically at the medium setting now. it used to run 24/7. The roof is the highest heat loss and the best place to put good insulation, and it shows.
-
Nevermind - I thought there was an adjuster TOOL being discussed. This if for an actual part in the rear drums. Thank you - got it now.
-
I couldn't find anything on a couple searches, fyi. If you know the part or have a link, would be super handy!
-
What is level regarding your refer
IdahoDoug replied to Gulfstream Greg's topic in Coach ApplianceTech Issues
I'd like to have a bubble level up at the driver's seat, as that's when I want the information - as I'm moving back and forth to find a level spot. We camp 90% of the time on rough ground, or unimproved camp grounds that don't have level pavement parking spots. My plan is once it's built I will find level on the cooktop/counter top as nothing's more annoying than having a large frypan with oil all sitting pooled at one edge. Then I'll move to the driver's seat and mount a simple solid bracket with a bubble level attached where I can look straight down at it, adjust things until it also shows level. That will be my "level" from then on. From my research, the fridge has some allowed tolerance to perfectly level and when I install it, I'll shim it to the counter/cooktop's version of level so they also match. Don't want crooked ice cubes, dont'cha know!!? Heh. -
Thanks for the caution that mine may be different. Once I have the ceiling insulated, just a few days from now, I'll be pulling a wall panel off for the first time and confirming measurements. I can't believe how strong that foam lamination is. Pretty cool and the lightness factor is off the scale. Wiring will be a snap - just punch a hole where you need it. Looking forward to seeing what you're going to end up designing. I'm using Loctite PL Max which cures at temps as low as 19 degrees IIRC. I need that as I'm in N. Idaho working outside and I'm also looking for incredible strength to make the entire roof stronger yet. As to voids, I'm laying it down thick (nearly an entire tube per 8" wide piece!) to account for undulations. However the roof skin is quite uniform, having been pushed into the shape of the gently curved beams - which eliminated a lot of wobbling in the skin as I found it. So, confident I'm getting broad coverage up there. For the bottom of the insulation, I bought a serrated trowel and I'm planning to spread the Loctite on 100% of the 1/8" mahogany 4x8 sheets I'm glueing up. So, I should have some serious additional roof strength. Essentially compared to your foam laminate, I have a FAR stronger top laminate (3/16 glas mat), and the 1/8 mahogany panel is high quality and perhaps compare to your fiberglass in resisting flex. So, I'm hoping when I step on the roof between the beams, I'll hardly notice any deflection. Post up some pictures, Bob! Ciao!
-
Importantly, the polyisocanurate panels turn out to be a very poor choice against cold. As temps drop, that stuff oddly loses its R factor where the XPS does not. Seems almost criminal they do not disclose that - like they made the stuff to perform well at the govt standard's test temp (74 deg?) but saved money on the rest of the temp spectrum - the cold end where you MOST need it!
-
Today I got the first few insulation boards up on the ceiling. The fit is what I'd hoped in terms of the beams and insulation being the same level. Should make for a good process glueing up the interior wood paneling. Unfortunately my plan to use 3M HD 90 spray on contact adhesive did not work out. Even though it says OK for some foams it's not OK for this. Reverted to using the Loctite which unfortunately makes it a days long process of gluing, propping up and curing, then moving on. Versus a couple hours of slapping foam chunks up there - argh.
-
Agree that looks like a standard wheelbase. The height makes it visually shorter though. Interesting the coach entrance is on the curb side for Japan, but it would suck to have that facing traffic when parked at a USA curb, plus campgrounds are set up with amenities like green space and picnic tables on the opposite side when you back in. So with this rig, your awning and door would face your neighbor and the sewer and other hookups.