ToyoGuy
-
Posts
331 -
Joined
-
Last visited
Content Type
Events
Profiles
Forums
Gallery
Everything posted by ToyoGuy
-
Thanks guys I may have to start "loosening up" on any prohibitive virus-ware or Windows settings and see what happens. I may have inadvertently restricted some function. Interesting it only happens on this site. jjrbus, I am also running Firefox underneath it all, and I too have noticed of late it is getting pretty sleepy to get up and go (anywhere). 1-2 secs loading @ 3.4 Mbps sounds about like my previous experience prior to this latest issue Derek. I feel for you on the Win 10 issue, I have one stripped-down laptop with XP on it, just for email and movies in the RV and I am quite attached to it. It's SO quick compared to any other machine I have! Probably keep it on there as long as I can, or until they put a human on Mars. BR, TG
-
Anybody else having trouble parsing page-by-page through posts ? I can view the first page of any post, but when I try to use the "Next" or page number radio buttons at the bottom of the page, I get the circular loading arrow, followed by,......well, nothing. (below) I don't think Avast is choking anything off, and no other site/search seems affected but, I've only been wrong a million or two times before.... Running Win7(OS), Duck duck go (browser), 22R (processor). Thanks, TG

-
There's some really cool looking stuff in the new catalog on this site: http://www.tourfactory.de It's somehow less painful looking at the prices when I don't know the current exchange in euros / currencies. On the net positive, there are some good pictures that could help with design. Also, some pictures that prove, once again that, no matter what you paid for it, everyone get's stuck at one time or another. I asked via email years ago if they had a catalog in English, but no dice, and theirs is in a PDF format. Enjoy, TG
-
 My (late) 2 cents here.... I did a considerable amount of film-surfaced foam to upholstery gluing in my restoration and tried the foam caulking-gun adhesives and hot-melt glue. Neither worked worth a darn for me. IF the foam has a plastic film, there is a spray-on product I was told about made by 3M called High Strength 90 Contact Adhesive. It's heat and moisture resistant and quite strong when done right. Comes in an aerosol can with an adjustable High, Medium and Low spray head. It isn't cheap @ $13.00 a can at Home Depot, but after going through a can of this stuff, I tried the same work with a cheaper product of theirs called Super 77, (saved a whole $2 a can, I think) and found out just like the upholstery guy said: "use the good stuff, the other stuff will fail in the heat". I keep learning, for process-intensive work, buy the best and only cry once. One disclaimer here however, this stuff is solvent-based and If you try to use the stuff on a foam without a film on it, it'll likely melt the foam. Anyway,..it worked for me and it's been over a year now and still looks good. Whatever you go with, good luck. BR, TG
 -
Thanks, and yeah, sure enough, he's got the 1.5 watt model. Sounds like anything else, if it looks too good to be true, it usually is. Will take a look at the 13 watt unit this week at Harvard freight.
-
Got a neighbor who has been using a dashboard-size (read $20+ here) solar battery maintainer for about a year now on his Landcruiser and swears by it. Since I store the RV outside here in $unny Ca, it seems like a simple, easy way to maintain charge without the extension cords I need for my current cheap-o plug-ins. It'd be one for each battery, I guess. Any experience, thoughts or warnings? BR, TG
-
Yeah, that weep hole cover fabrication is on my list from your original post a long time ago.Thanks, I was trying to remember how you held them on. And I have wanted to try that "super-rubber glue",( my step-son absconded with my first bottle for a swim fin fix) Super glue accelerator is just the bomb, once you've tried it, there's no going back. TG
-
This could be the ticket: http://www.doorandwindowparts.com/r7150-sash-lock-l-h-sliding-window-1%C3%82%E2%80%9D-black-metal-p-4054.html These show the washer thingee included. In Black, even... TG
-
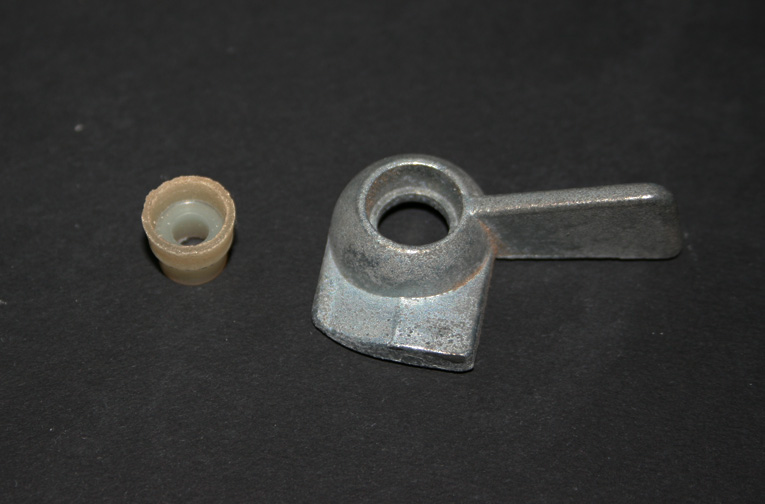
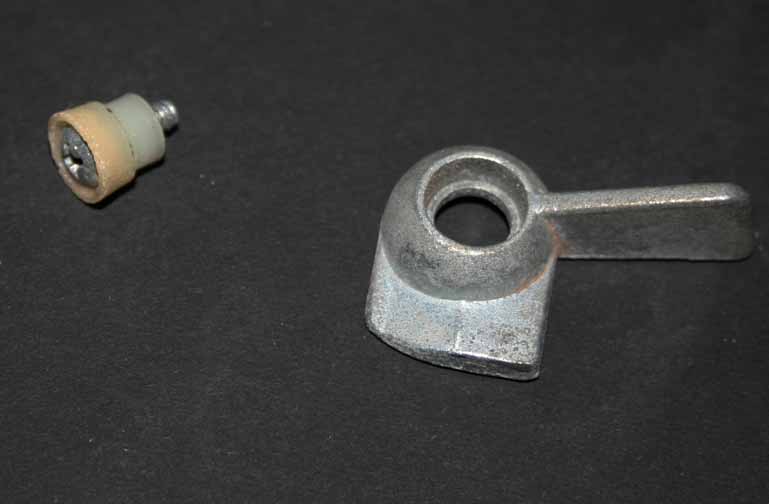
Yeah, I need to get access to a lathe, but I am currently w/o a connection for that tool . If anyone knows of a resource for these washers and (high-jack here) the little plastic bumpers that fit over the edge of the (Sunrader) screens shown in the other picture, I'd be appreciative. As you can see, I'm down to cutting the bumpers in half to get one for each side of the screen, but they don't stay put that way. Both have proved difficult for me to find and I'd buy a bunch of them for the future, if I could. As the plastic washers age and shrink, the latches vibrate and the windows get looser (and more annoying) too. Thanks, TG
-
Hey Linda, Thanks for the link. Have you ordered any of those sash locks? Do you know if they come with the little white "plastic-washers" that go inside the screw-hole?" That's what I can't find, and the cam-action on the lock is sloppy without them, (with just the screw) Mine have cracked and fragmented, likely from age and heat. Got a couple used from RV George years ago and they are on the way out now too. Thanks, TG
-
Anyone who can assemble and disassemble a differential 30 times and call it "just plain annoying" is a real sportsman in my book. I'm not quite sure what my response would be, but likely unprintable. That said, I'm really glad you put together the info for us, cause I've got some gear-work looming in my future. Thanks, TG
-
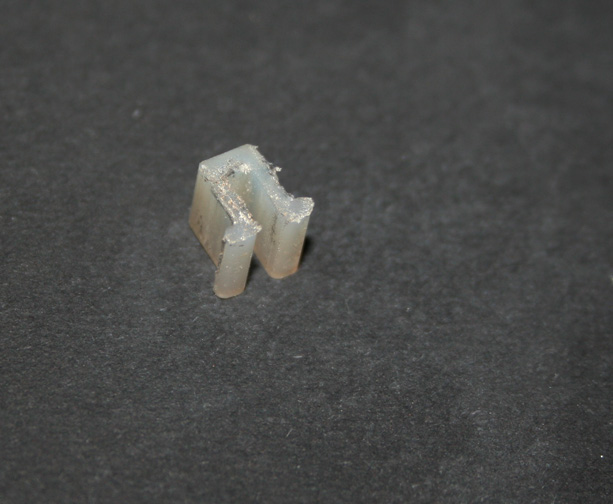
No, the window frame was black stock color on mine, thanks for the complement. Just noticed that since the ( front / door) picture, I seem to have lost another of those plastic covers for the rain-drip-ports. Guess I'm gonna have to make some or find a couple.
-
Thanks Linda, you've probably seen more Sunraders than anyone else I know...... Like a lot of other owners posting / reading here, I just try to give it my best effort every time. And, over the years, I've gotten a lot of great info from all of you guys. TG
-
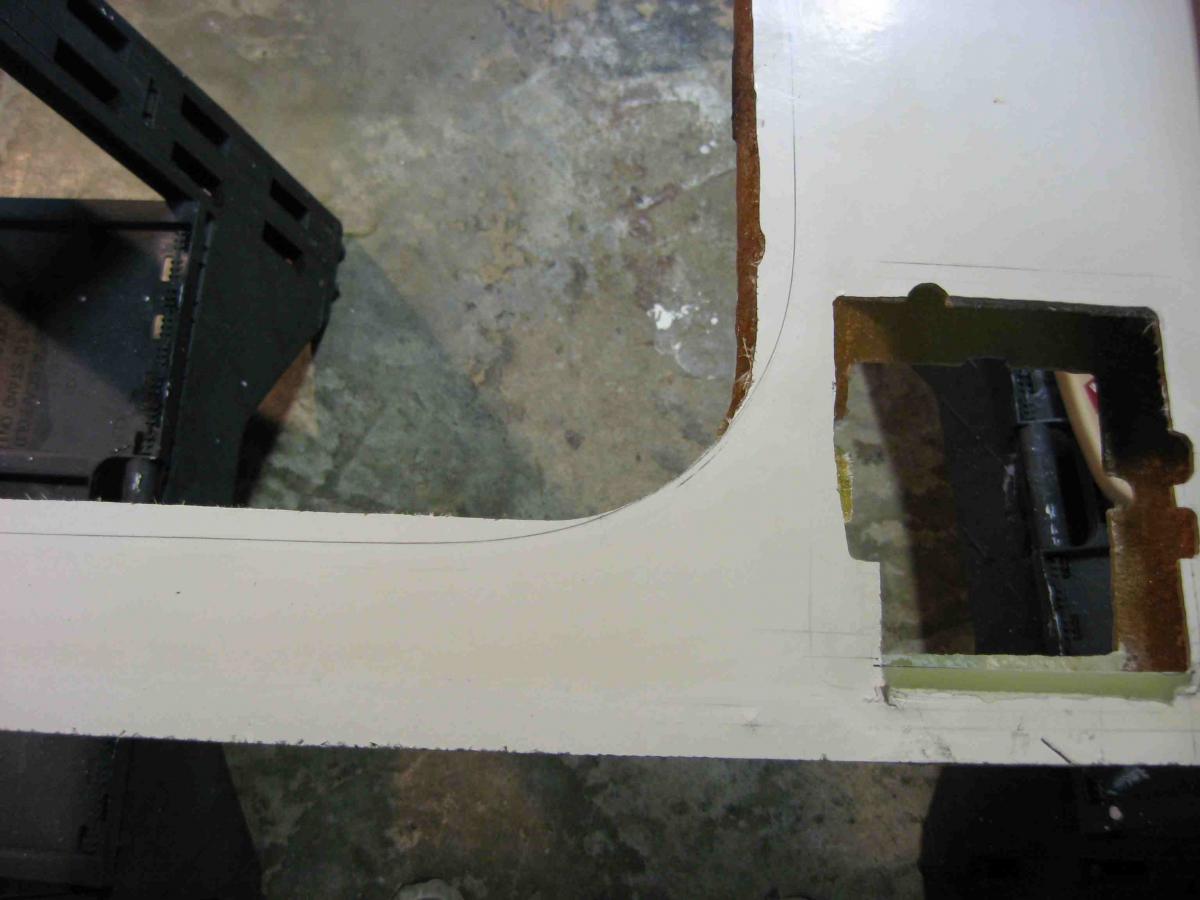
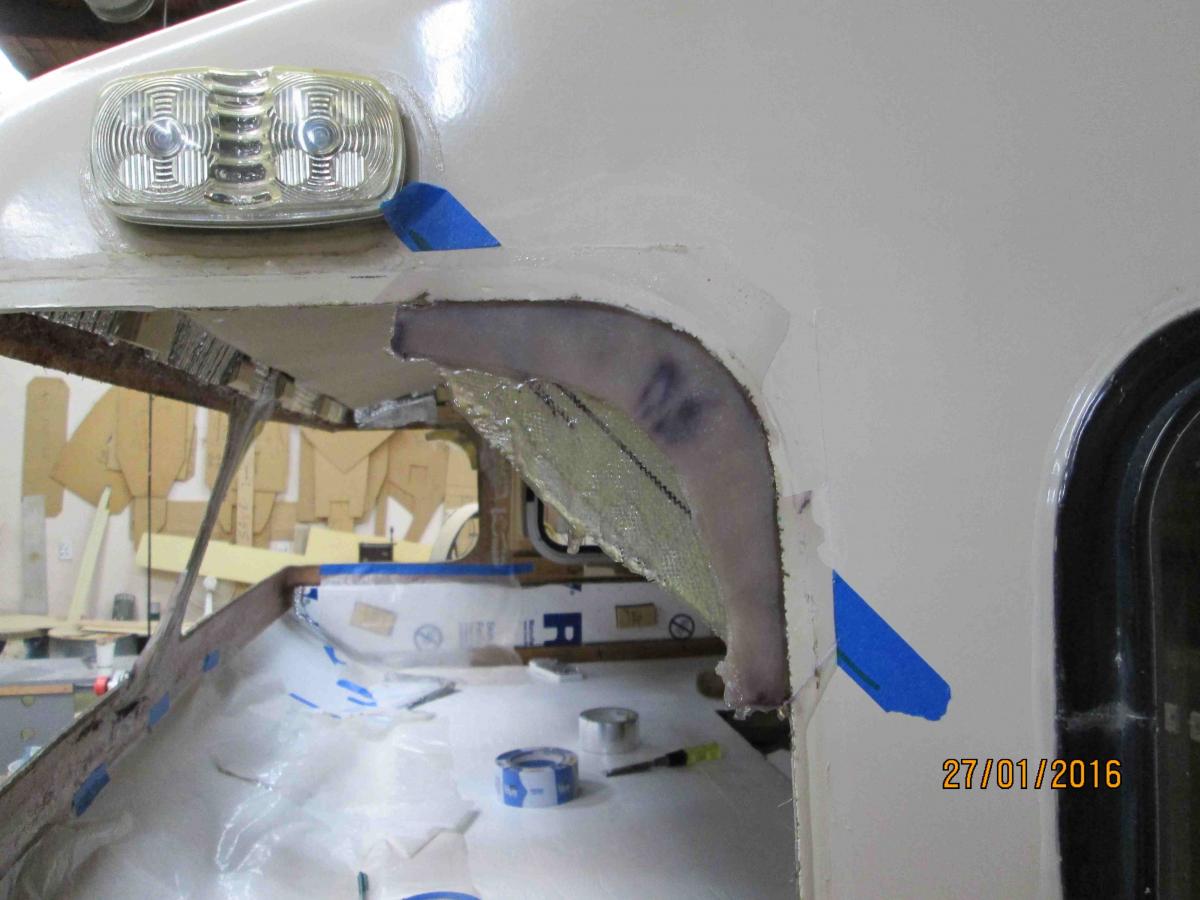
Hope everyone is staying warm and dry in this winter weather. Fair warning here,… looooong post. No, I mean like War and Peace long. …… Still there? OK so, …after inquiring about price and scheduling to remove and re-seal my front windows,(’85 Sunrader west-coast 18' model) I ended up doing the job myself with the help of a friend. (another post altogether) The window repair-guy couldn’t get to me for about a month to do the job, and I couldn’t wait, so I hired space indoors for a week. This gave me some additional time to tackle another related problem that has plagued my Sunrader‘s coach. Ragged / oversized window openings.( See 1st picture w /penciled outline of the outside of the window frame of my door.( (the 5th picture shows the fixed window.) I thought someone might be interested in how I dealt with the problem and so took some pictures etc. Disclaimer #1, probably not enough pictures..., (but I didn't get fiberglass on the camera) -Disclaimer #2- Please note, this is just “how I did it”, I am not saying everyone has the time to do these complex fixes, and there are many ways to stop leaks, but I present this information here, more in the spirit of “It worked for me”. I just got tired of dealing with the continuing fallout of someone else’s really bad work and I used to do some fiberglass work in another life. But,. I have now permanently corrected the opening sizes of all but my back window. It was the best of them, is not leaking and will probably get corrected this summer. Again, as seen in 1st picture, some of my window openings were so badly cut, that the openings almost over-reached the edge of the gasket or window frame. The factory just crammed putty in them to seal them and it eventually proved the demise of the paneling and floor due to leakage that escaped notice through the walls. The door pictured eventually soaked through, de-laminated and required structural fixing as well. To remedy the coach windows, I studied the openings with the window installed,* and then carefully marked the areas where the voids were located, on the inside of the coach bare walls with a sharpie. Since, on the aluminum framed windows, the extruded lip of the inside of the frame is the same distance from the outer caulked-perimeter all the way around, you can sometimes use the perimeter witness-lines left on the coach paint or gel-coat to figure out how much to fill and how to shape the curve. For the curved plastic overhead windows mounted in rubber, I had to l bend back the outside of the gasket after pulling the rubber locking strand out of it and measure the size of the gaps to make notes / drawings of the gaps. After that, I scuffed the inside of the window opening with coarse sandpaper for an overlap of approximately 2 ½”, laid out paper to catch drips, then stretched wet (with resin) fiberglass cloth across the offending corners ( 2nd picture) where all the over-cut problems seem to occur, not sure why) Another way I have used, is to lay out a piece of waxed formica and set wet cloth on it to make flat, thin sheets that you can cut with tin-shears after dry, (thanks to yostfmx post!) to make backing patches out of and then use those to fiberglass into corners on the prepped inside of the coach. Either way, to create any strength, one needs to use at least 2 layers of cloth (1 random strand + 1oriented strand together) Once the backing has dried on/ in the corner, it needs to be filled to make it level with the outside sealing surface of the coach. The fill is done with either saturated layers of felt clamped between non-stick plastic sheets,(3rd photo) or ground fiberglass fibers mixed very thick with resin ( 7th picture) troweled onto the backing, sometimes 2 coats thick. (too busy to shoot) With the felt, which I used this last time, you can sandwich it between two pieces of polypropylene plastic (TAP plastic) (again, see 3rd picture) and the sides come out with a smooth, even finish.(4th picture) It’s messy and drips when clamped, but the results are better and quicker. Felt 1/8” thick can be doubled and cut to shape of the corner, then soaked and installed.(sorry, no picture) With the other process of thick fiberglass gunk made out of fibers and resin,(7th picture) you have to mix it thick enough to defy gravity and use a putty knife and kind of trowel it on the side of your patch preferably within 24 hrs of the original work, for good adhesion, which later necessitates using a bodyman’s “cheese-grater” tool on the fill while still warm and soft, to rough-level it for sanding level and finishing to smooth on the outside. (it's much more time consuming, but do-able, as the finished fix on the window in the 6th finished window picture shows). I did 3 this way. To rough-size the inside curve after it's dry, over-estimate the size needed to fix the void and drill pilot holes to guide a dremel tool for rough-cutting. (5th picture) Finish sizing of the opening/curve is done with a 2”(+- ) sanding drum in a hand-held drill (air-tools tend to spin/cut too fast and you can easily over-cut, then you’re back to square one !) Again, ask me how I know !*&%*^$? Once correctly thicknessed inside to outside, I slightly round the edges of the new area so the windows or gasket don’t snag on them. It is my experience that after all this work, the windows are then MUCH easier to seal, with much more overlap and stay sealed. And they all lived happily ever after,... the end. *With solid windows in metal frames, you need to remove all the dried-up butyl tape or whatever, then put the window in the wall to see where the over-cuts are. BR, TG
-
Buyer Beware List For Member Home Areas?
ToyoGuy replied to ToyoGuy's topic in Whoops, Mishaps and Murphy's Law
Nope, the place before that.... The place you saw my rig at (Chuck's Wheel and Brake) are wizards and are my "go-to" guys now. Not cheap, but there you go, they figured it out, fixed two other guys mistakes and definitely got it right. The place I took it before them did an inspection and missed the PO's incorrect installation of the wrong master cylinder, missed bad/frozen piston in the right caliper, should have replaced rear wheel cyls,just on principle due to age, didn't flush the system (degrading rubber seals tend to darken and ruin brake fluid, even if it "tests" good) and told me drive it, you just need to bed in the pads and shoes. 500 miles later, the rig didn't stop worth spit and still pulled on the first pedal depression. In the final discussion, the first shop said that a Sunrader with a 1992 FF rear end installed was a "hybrid" type of vehicle and that regular tire and brake guys wouldn't know how to deal with it, since it wasn't stock. Hence my post... -
Don't know if this is the place to discuss it, (it's not a particularly funny topic, but Murphy definitely lives here) but could we have a place to list local service providers / repair facilities that we would advise Toyo motorhome people to stay away from? Or, at least proceed with extreme caution. Yeah, I just got back $400.00 for labor on a bad brake job from the biggest place in town. They had good ratings etc. and, in the end they admitted they blew it, but didn't give up any $ until I started alluding to the Bureau of automotive repairs!! Now I'm onto a similar motor issue w/similar circumstances including research prior to purchase. Hold on,... I know some of this is subjective, but some of it's just bad ethics or highway robbery, cut and dried. In the 5 yrs I have worked on my rig, I have dealt with some undeniably bad repair and parts providers that I would not hesitate to spare others the misfortune of being taken in by. Has this been discussed before?
-
Correct Sealer For Plastic Sunrader Windows?
ToyoGuy replied to ToyoGuy's topic in General Discussion
I will have to use the old gasket because I'm short on time, renting covered warehouse space by the hour. I'll research new gasket stuff "next time". Besides, I've never heard of anyone finding an exact replacement material yet. So, I'm looking at Marine grade UV resistant silicone-based stuff by 3M.(wow, that's a mouthful) West Marine Supply has some slightly over-priced offerings, but, because I'm under the gun for time, I'll pay the extra $4.00. Decided to use #08029 Marine Sealant and will trade longevity for being able to remove and restore material in the future. Something I have paid the price for on this rig from the PO. Ah well, lots of painters tape and rags and colorful expletives,..... just another day in RV / automotive paradise. Thanks to all for the input. BR, TG -
Spoke to Dean at Advantage RV in Napa,ca today to see if I could afford to have him re-seal my front wrap-arounds on my Sunrader. He said about 2 hrs apiece (best case scenario) @ $100 / hr. Don't currently have the spare $ weasel-hides $, so I have to take the plunge again,... ( been a good 3 years though) And no, he didn't volunteer info on what sealant.....etc. What is everybody currently using to seal the acrylic or Lexan or plexiglass or whatever the heck they (Rader front windows) are to the rubber gasket? Linda said her rig required no sealant at all. Holy-moly. I have some inquiry's out to various companies Sikaflex, ProFlex and EternaCaulk, because I now know that solvent-based sealers are supposedly not good for plastics. (dont ask how I know this) No word back yet. BTW, Dean says he actually "beds" the edges of the window and coach in the gasket grooves, which have been filled with sealant, then installs the locking compression bead and cleans it up all nice and pretty. Pretty tricky, but apparently quite leak-proof and long lasting. Would'a never have figured. TG
-
Hate to see a RFC unanswered, so will comment on the least, the rest will be a SWAG. The first time I pressurized the faucet/shower set in my Sunrader, I too was dismayed to see what appeared to be a serious leak from the Hot/Cold valve housing-cover. I later found out that it's some sort of air-relief valve that only "weeps" until the unit comes up to pressure at the shower head, then stops. Still not attractive, but there you go, it is a shower. The other question, as I understand it, having seen some other RVs that don't have the Sunraders fiberglass molded shower stall, is a matter of careful inspection and perhaps re-covering the panels and re-caulking, or opting for coating with some sort of high-tech brush-on waterproof sealant. (it depends on how attached you are to the wallpaper I guess ). The factory original assemblies I've seen on non-molded enclosures seemed to to be some sort of plasticized waterproof wallpaper with adhesive backing, over paneling, then (caulked) aluminum trim at the corners/seams. If everything is water-tight, theoretically, it should be ok for the abbreviated type of showers most RVers take. But..... water, heat and steam have a way of exploiting the smallest leak, so I would probably look for a better-than-original solution. I have seen shower stalls in older homes with Marlite panels that lasted a long time, so I guess you could replace the old panels with that, or FRP (fiberglass reinforced plastic) Check around on the web. Seems like whatever I want to do, someone's always done it before......... BR, TG
-
If you mean a transmission, Marlin Crawler builds a great product and can ship it to your guy for installation. You would ship yours back and get your core charge refunded after the installation. Just be sure you tell them it's for a 2WD, as they specialize in 4WD drive-train components. I am very happy with the 5 spd tranny they built for my 2WD 22RE pickup. If you mean only a single part, I would still email/call them, if they don't have it, they'll know where to get it.. https://www.marlincrawler.com/ BR, TG
-
For something the size of a Chinook, if I wanted nice, well-designed work and I had some dough, I'd think about talking to a boat guy. They would understand the weight to horsepower, quality of materials factors and cubic area...... Then I'd share a glass or two of wine with my wife and start thinking cubic money.
-
Couldn't live without it now. Mine is hard-wired, but I put it in during the interior gut and re-model, so it was pretty much no big deal. I'd go wireless too, if I wanted to install without a hassle. Mine is switched with a toggle-switch on the dash so I can leave it on and keep and eye on rear traffic. - Gotta keep an eye out for john law when I'm racing Sprinters and I hit the nitrous - I'd say go for it, it was definitely worth the hassle.
-
Thanks jd, that's useful info. I'll detail any useful data I get when the current issues are put to rest. TG
-
OK, WT chassis, thanks. I think there was some confusion at the shop as to correct brake shoes. It seems the previously installed ones were incorrect somehow? Maybe not heavy duty enough. Or maybe wrong lining on the shoe.... Anyway, I think, like you that there's only one style of dually brakes. Will check in with the shop tomorrow. Thanks, TG
-
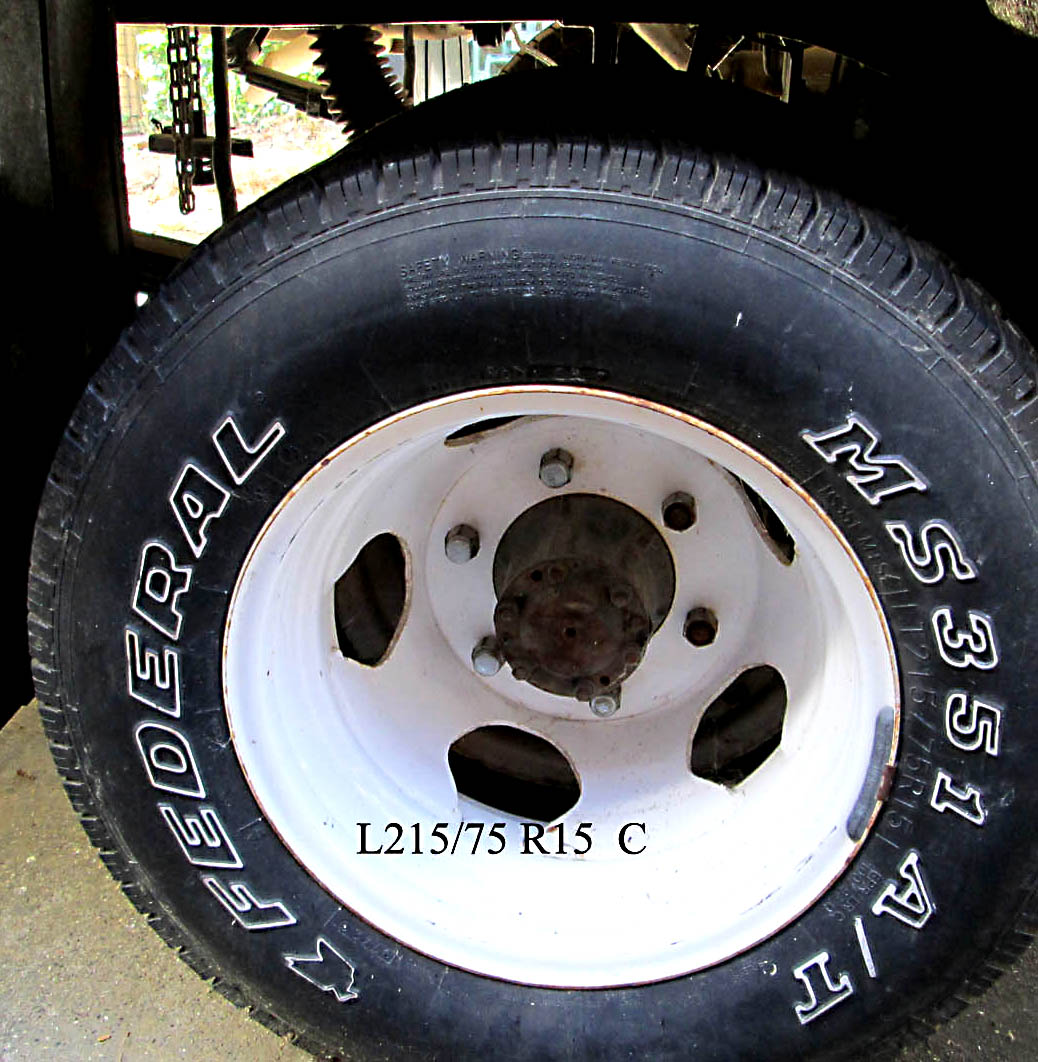
I believe prior owner might have said it was out of a '92 Linda, can't remember. Here's a shot of the hub: