thewanderlustking
-
Posts
520 -
Joined
-
Last visited
Content Type
Events
Profiles
Forums
Gallery
Everything posted by thewanderlustking
-
Mini Cruiser Roof Bracing Questions...
thewanderlustking replied to thewanderlustking's topic in General Discussion
WOW that is EXACTLY what I was after for some really good details!!! Thank you Linda! I am reading through it now!!! Humm I need to go grab a Kreg jig thing too... I like seeing how he tacked the framework inside. -
This is the final piece to the whole "roof puzzle" I am tackling. Is there any benefit from using US Energy Products Reflextix (or similar) between my aluminum roof skin and the foam insulation? I am probably going to utilize the blue or pink styrofoam underneath that. This is much easier to work with than the white styrofoam it came with from the factory... And then a layer of luan or corian (or some other plastic) for the ceiling. The Reflextix could also be used as a barrier between the aluminum skin and the steel or wood braces. I would also paint the steel framework for the AC unit with something like Por15. Give it every chance possible so it outlasts me. It seems like there are definite levels of quality to this stuff and that the US Energy Producs is probably upper tier there. It isn't cheap, but not too expensive either. Just enough so that if it ins't going to make a difference, then not worth the extra cost and effort. But if it makes even a little increase in my insulation, it is worth the other possible benefits of separating the aluminum from the steel. I also think as a moisture barrier, it could be useful. But it isn't going to be a perfect solution there as I am only going to put it in the areas I take down and fully redo. Eventually it might all end up redone, but not for now.
-
Mini Cruiser Roof Bracing Questions...
thewanderlustking replied to thewanderlustking's topic in General Discussion
So this goes hand in hand with repairing the roof, just on the opposite side of the skin... I have more leaks, this time one is above the inside steel cross braces. Those are rusted so badly, they HAVE to be removed. I still haven't figured out how they are actually attached on the sides, but more , Are these steel cross beams even really NEEDED??? Dissimilar metals and all that could be causing half of my issues or more. I want these repairs to last another 30+ years (with proper roof care/protection). I can easily replace them with wood, since I have the 3" aluminum beams on the topside to attach too. I could use aluminum, but realistically 3/4" tube probably isn't worth the money for the strength provided. Especially if I have to drill 3/8" holes for the securing bolts. I need a support frame for the AC unit. I can probably get aluminum welded up at work, but here I am kinda leaning towards risking dissimilar metals and using steel, I KNOW this is quickly doable at my shop. And in fact I have a welder (just broken at the moment) that I could probably do this myself too. My boss is an awesome welder though, and I am not so I will probably just take it in ready to weld up. Google provides some simple enough answers for solving the aluminum against steel issue. Whatever, I am rambling. Aluminum might still be the better choice for this. It should be strong enough to support the AC unit. And it will be easier to attach safely on the sides too. But I defiantly need some advice and direction. Steel vs aluminum vs an easy wood solution for the interior braces. Wood I can sandwich and attach to the upper support beams easily. And next would be the support bracing for an AC unit. Again steel vs aluminum framework, or even a simpler wood option again? I could easily use 3/4 multilayer plywood (probably have the good stuff on hand too). -
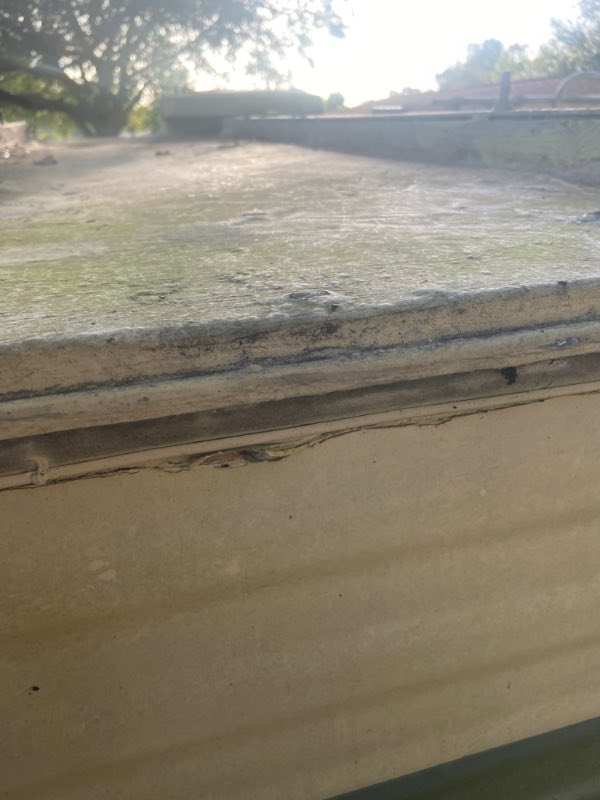
$4!+ my roof is leaking from two new spots now!!! Three if I count the half @$$ quick patch for the 14" hole left by removing the AC unit... That is a given and not one I expected to hold up for long. We had an UGLY ugly storm last night and there probably is a few gallons of water trapped up there dripping down now. Anyways I need to address this before really moving forward. I am going to start a new uncluttered thread and grab some information from my Roof HELP! Other than setting this on fire, any other more realistic options? thread. Check out this specific post for more pictures of the roof But here is an interesting one. I can't tell for sure, but I suspect this may have had a rubber membrane put down on it at some point??? It looks like they draped/stretched it and then used these side rails to screw it down, then cut underneath the rails. I have steered away from doing this as it isn't really a DIY kinda thing. Although saying anything isn't DIY=able on here might get me ridiculed/banned LOL! Wow some of the things I have seen tackled here... Comfort zones though. Some of us will rebuild the whole rear half, but not want to touch a simple head gasket job. Doing that in a Walmart or Autozone parking lot wouldn't even phase me. But I digress lol... By the time I buy the supplies needed I could potentially just pay to have it done professionally, with one caveat. My additional support beams on top of the roof membrane/skin. Meh maybe not. A very quick and dirty search puts about a $4k price tag on having it done professionally, so yeah that motivates me a lot more to do it myself. Especially as this isn't factoring in any additional repairs needed AKA, the roof brace beams... If I could reasonably have it done for $1k-1500, I would HAPPILY pay to have somebody else do it. But it is super hard to justify more than 2k for this. I need to call around a little and see if I can get a reasonable quote to have it done locally. What would be the best approach? 1) A paint on roof membrane kit, like Dicor perhaps. 2) A rubber membrane, remembering that my roof isn't even remotely a simple flat surface. The Decor paint on kit is roughly $500. I found a RecPro Extreme duty membrane kit for $400. From my standpoint, spending $500-700 on something I just paint on without needing to remove all the support beams, wins. But if removing those to put down a membrane, then putting them back on top of that membrane (with the securing bolts going through it) is a superior repair, I am down for the extra work. I don't really see a scenario where I don't use those support beams though. I kinda have a decent plan for tackling the interior ceiling, but using those is (currently) key to that. I have been fighting this roof for almost 3yrs now though, it is time to finally get it knocked out of the park. It is stopping any further progress inside, and keeping the RV from actually being usable. I can manage without AC and with the rest of the issues. But I need the roof sealed so I can clean up the ceiling and actually put the effort into the interior. I just finished a major reorganization of the workshop. So I am ready to start on the inside of this!!!

-
You're very welcome on the FSM! "Somewhere" there was, and hopefully still is, a repository of a lot of those documents. I have spent a little time hunting for them, but not long enough yet lol. Derek Up North has collected a bunch it seems... Check out this thread: All Manuals for a 1986 Toyota Dolphin There is other stuff in there too, not just 1986 Dolphin. I need to go through that and see how many of the links are still working, and then figure out the best way to put them here directly. My google drive solution probably isn't the best long term idea. Somebody on here sent me a nice zipped file folder that had a bunch of goodies in it. I am also trying to find that lol...
-
Get out the biggest Phillips screwdriver you have. Go to NB the other door and use it as a latch/catch without actually closing the door. You will have to pull it back when you pull the release. Not sure I’m describing this well…. But see how it works. Most likely the other door has the latch actually CLOSED. I see this happen on a kinda regular basis in the shop. Spray a bit of PB Blaster in the stuck latch then use the Phillips in place of the catch to pull the latch back open.
-
That thing is super ugly, I think I likes it!!!
-
Ideally you want it correctly sized, but some solid, slightly thick washers will do fine. Transfer over your boot/sleeve too. The slightly bigger concern I would have is the body lengths. Looks like the new KYB has a longer body. While again it should fit, it may be for a slightly different application so just double and tripe check it is the right part. I can’t perfectly tell from the picture as it is partially covered up. Gently tug both shafts all the way out and see if they stop at the same length.
-
Also a lot of our dually rears have reverse thread on the left side. I believe I found these ones on Rock Auto a little time back.
-
Without pictures, you have to look at it to determine if it is fixable or needs a replacement….
-
Super interesting! I saw a couple of very simular looking options for the ac unit and had thought about going that route, but there wasn’t a lot of information on them. I’m going to look this over closer on my laptop later!
-
Good tip on the Renogy inverters WME! I have a LOT more study to do, but yeah that's the basic plan outline I am going to use. For now it means one important thing, I need to build a new bracing framework to support the AC unit... I can be cheap and just put a vent in for now. I won't be spending the big chunks until we can see the light at the end of the tunnel. I need a usable interior first! Yeah no kidding Maineah!!! But hey I got it off the roof! I am heading out there in a few minutes to work some more on the cleanup. I used a combination of brute force with a long bit of rebar, a torch, a cable saw, a Dremel vibratory saw, and plenty of cursing to get it off.... Unfortunately the worst part is the repairs I made using the flex seal tape, on top of the older repairs. That stuff sure doesn't cut easily! Well I just heard thunder, I am at least going to go get a little clean up done and then chill out inside it when the sky opens up and look for leaks. It smelled humid/damp in there this morning so I probably still have a couple more to chase down.
-
Help me with License Plates n BMV Please
thewanderlustking replied to Usafammo's topic in General Discussion
And Googling "New World Toyota motorhome" does bring up a bunch of random hits. Only took a minutes to quickly skim through, but you might find something going down those rabbit holes. -
Help me with License Plates n BMV Please
thewanderlustking replied to Usafammo's topic in General Discussion
This. Go to another branch and ask for a manager. Do not say you built it. Say you "just cleaned it up" and you will get around a LOT of the scrutiny. Minimize what you did to it. -
With these being 30+ years old, they can leak anywhere and everywhere... The AC is the most common spot. It is a cheap $14-30 Camco gasket and it isn't hard to do, if the P.O. idiots didn't screw down, use liquid nails, expanding foam, Flex Seal. Eternal bond tape, roofing tar, Silicone, and $100 plus in various other incorrect bodge repairs to seal up the leak... It is literally an hour repair tops, if your unit isn't bodged on. The most common spot for bunk bed leaks is through the marker lights, or the front window gasket. The rest of the window seals are suspect and frequently leakers. Some are easy to get, some are hard. Some are super easy to do, some a nightmare. If the floor is compromised, a 'proper" repair would require "unbuilding" the whole RV. They put the floor on first, then build everything on top of that. Most either consider it extra "shock absorption" or reinforce the floor from below if possible. On a Dolphin I don't know where the fresh water tank and 12v pump are. On most of these vintage RVs, it is underneath the fold out couch. The area in there will almost certainly be compromised. This is a repair that can be made with a patch on top. And then fix the leaks... The 12v pumps are common for leaking at the fittings. Check over the rest of the water supply system too. Post up pictures for us. Look for any sags in the ceiling. Feel around for soft spots. Look underneath the couch. Look in the cupboards. Look underneath the sink and in the drawers. Except for the floor, many/most of these issues can be seen in pictures. Realize that even some of the nicest ones to be posted up on here, find leaks and ugliness when looked at closer. But if you are handy, the repairs are defiantly doable. Some are easy, some are EXTENSIVE. Cost of the buy in vs your time and money to make the repairs is what the balance is. If you don't feel you can do them, or are not willing to learn or try, and need to pay a shop to do it, you need to have VERY VERY deep pockets. Good news in most of us on here shop on Amazon and Rock Auto and will try and repair just about anything including most of those that should have been set on fire for the insurance claim... Get the absolute best you can afford. Good news is these Toys are SILLY simple to work on, except for the 3.0 V6. That one is on a moderate difficulty level. But the engines are easy to get to and your average handy person can do a tune up, valve cover, radiator, etc on them without any real issue. This isn't a Ford based RV where everything is buried under a short hood an doghouse where even seasoned mechanics curse at you for making them work on it... I have been wrenching for 25yrs, I wouldn't own one of those unless somebody gave it to me. And that's probably exactly the one I wouldn't WANT to own... The Toyota though, I could do a head gasket on one in the Autozone parking lot. While the wife makes dinner in the back LOL! When looking at a potential purchase, put more importance on the things you don't want to fix. Almost anybody can do a tune up, but repairing a saggy roof is WAY harder. "New" tires? Look at the DOT date code. Google DOT Date code if you don't know what, where, or how to read them. I have "new tires" on my RV, but they are already 2-3yrs old! New doesn't necessarily mean "good." But tires are a maintenance deal anyways and no matter what if you keep it a while you will be putting new ones on eventually. Basically EVERY shyster out there tells you "The tires are new!" and all this usually means is they might still have tread on them. After 6-8 years the tires are usually needing to be replaced. The industry standard is 6yrs. Most tire shops will tell you this is a "federal law." This is BS. There are no such laws, but almost every tire shop has these policies in place and won't repair any tire order than 6yrs. It is a liability for the shop. The litigation potential is there for sure though.
-
Haha great minds think alike!!! I already have the framework up there and that thought had crossed my mind. As a side note I am obsessed with tech, especially of the oddball remote controlled sort. I have a small collection of underwater ROVs and random supplies to go with them. Including some 624/650 6lb density Polyurethane Buoyancy foam. This is what the Coast Guard utilizes to cast marker buoys. It is extremely hard and very chemical resistant. Gas doesn’t even soften it. Filling the inside of an ROV body with this stuff makes it crazy tough, and also waterproof. At least wherever the foam is. IInteresting thought. But the stuff would probably not be cost effective for the roof…. I am not sure on the battery input for the EcoFlow Wave. I couldn’t actually see that plug. There is another power input that takes an XT60 or XT90 plug. It is a standard plug you would find on a LiPo battery used for RC stuff. I think this is where the Solar input goes. Apparently it can take a direct solar input up to 35v and 200watt. I have the same thought. And how that plug can be utilized would be the game changer. At $1100 sale price without their special battery, it is tempting. But at $1700 with their battery it becomes a little less so. They have a whole power system with solar generators and all those goodies. The AC unit is an add on accessory to their system. I couldn’t figure out the answer to that. That is definitely something to dig into further and email or call them before pulling the trigger. One customer comment I saw said you couldn’t charge it and run it at the same time….
-
Space shouldn’t be a problem…. I have room for three battery boxes underneath the couch with only minor reconfiguration needed. I think my current box is a group 31. Then I could possibly fit 3 more under the front dining seat. And 2 more under the rear. Obviously weight and balance are a concern. And I also use the space under the dining seats for tools and jack. Due to weight/balance I would be leery to put three under the couch. And at that point, buying lithium probably becomes a better option. But I can also get AGM deep cycles at cost…
-
I just don’t want to carry a generator. No space, and the noise is obnoxious. I actually have two, but couldn’t tell anyone what their outputs are without looking…. One I have never even started! Those are fine though for emergency power during an extended outage from a hurricane/storm. At some point I will hook one up to the rv, but again it is emergency use if the house is comprised. Instead of normal camping scenarios. Then there is the environmental impact. Solar is a winner there too. With the price of gas these days, that is another consideration. The numbers on that Coleman Power Saver look decent. It could be a consideration for a roof mounted unit capable of running off solar and battery bank. But still obsessing over the EcoFlow Wave as it is super smart with a variable output compressor. I just suspect that even running 24/7 it is going to have a hard time making it comfortable inside there…. I think the moving forward plan still has to be to build the reinforcement framework for putting a unit back on the roof. I can then decide later and try out other options in the meantime. Take some extra insulating precautions when I redo the ceiling. I have a thermal camera. I should make use of it and explore ideas for sealing the rest up as well as possible. The EcoFlow Wave is still high up on my want list and it would still be good to have for auxiliary use (our bedroom gets hot if the door is closed) or emergency use in a power outage. Well the next step is going to be improving on the overall insulation in there, repairing the ceiling, and building that framework.
-
My experience with the old Coleman was it took about 3-4 hours to cool it down. After some hunting, I found my thread on the tests here: That EcoFlow Wave I really like is 4000 BTU. The inexpensive modern Coleman Mini Mach is 13500 BTU! At 80 lbs though, it isn’t exactly lightweight. (Looking up a few other units and that seems to be the norm.) The Coleman is priced right with the main unit being $600-700. The interior control panel is separate, $150-250 or so (I will likely get the Bluetooth version). So for about $1k I can have almost 14k worth of BTUs on the roof. Back to my older thread jrbus made this comment (I cut out the second part as I am interested in the first bit): Humidity is a HUGE problem here in Florida. I would actually plug in the Coleman every other month or so (when it was still on the roof/working) just to combat the humidity and "freshen up" the interior. But the Coleman obviously isn’t going to run off grid on battery or solar without SERIOUSLY upgrading my setup. And if I believe that article, it probably won't run on my 2000 watt generator. I think it is 2000w, but it don't really want to take it, or have space for it. And if I am loading up to actually go somewhere, the rear hitch is going to be used for our electric bikes instead. My question is, would the 4000 BTU EcoFlow Wave Portable Air Conditioner potentially be just as effective if run for longer periods of time? I think I just might have enough solar to keep it running through the day and recharge it. And almost enough battery to run that through the night. Off grid. I will need to crunch some power numbers and actually see what my panels are putting out. But I suspect it wouldn't take too much effort to get it there. I am poking a bear that doesn't really need to be awake yet. But I want a good "escape plan" going into my ceiling repairs. If there is any real chance an AC unit will end up back on my roof, I need to sort out the bracing and reinforce the cutout beforehand. I also have been giving a lot of thought to "Is this just a cool gimmick, or would I actually utilize off grid AC enough to make it worth the expense?" Well my work doesn't have a break room with AC. Most lunchtimes find me sitting out in my car kinda uncomfortably eating lunch. The EcoWave can be programed for kicking on at certain times, and for also running at lower output for longer. It has a variable compressor output. Walmart Parking lot camping. Long term humidity control. In my second driveway where I prefer to park it, I don't have as easy access to plugging into shore power. I should be able to leave this operating at some diminished output for much longer periods of time. Being able to have the AC on while driving would be super cool. And more ideas keep surfacing. If the EcoWave were to be my only solution, I am sure it will need some more help. I can explore some options for better insulating the roof while I am already in there. Perhaps a reflextix layer above the foam. A MaxxAir temperature controlled fan would be a smart option. I am seriously considering this anyways to keep airflow and vent heat out. Enough solar and battery, but this shouldn't be anywhere nears as big of a leap as other options would require. And there is always the option to go with both... The (modern) Coleman unit isn't too horribly expensive, but at 13500 BTUs it should QUICKLY get the temperature down. The EcoWave then could serve as more directional AC output, like having an ice cold fan blowing on you. Or it could even just be supplementary. Anyways there is a lot more exploring, research, and numbers crunching to do. I just need to figure out the best option before I start putting the roof and ceiling back together!
-
According to this article, RV AC needs about 60 to 80 BTUs per square foot. I need to crunch the math a little better, but measuring just the length of living space I am at 16’ if I include the cab and space above it. Extrapolating backwards from that chart would put me at 7000 BTU. The rest of the article sorta contradicts that by saying that 15K is ideal for the 16-24' range, then saying that the 13500 BTU (like the modern Coleman Mini Mach) is perfect for the 20-24' length. So yeah that 7000 BTU follows the convention set in the article. Okay cool still digging and thinking!
-
Anyone know what BTUs our old Coleman Mini Machs are? I seem to remember they are 6000 BTU? I am trying to get a feel for how many BTUs a 21’ Mini Cruiser needs to effectively cool it down. Or if this even really matters much except in the speed it cools it down? I watched a handful of videos on the EcoFlow Wave last night and was fairly impressed by it. But there were some LONG cooldown times so I decided to do a bit more research....
-
Mini Cruiser Roof Bracing Questions...
thewanderlustking replied to thewanderlustking's topic in General Discussion
Maybe, if what was there was still intact…. Or original. And pretty sure that won’t tell me if the top and sides were welded together or not. I have wanted an excuse to get one of those though! It is pretty impressive tech. -
Mine isn’t fully installed yet, but looked like everything was going to bolt right up. The instructions actually stated that it fit all Toyota pickup wheelbases. I will try to get some pictures or make a scan of the directions. I probably will finish the install this weekend. Head over and have a read, comment there. I will keep it updated.
-
x100. This was a failure that has to be taken up with the shop that did the work. Take lots of pictures and do not do any work to it until. Talk to your insurance too. Was any damage done to the side of the vehicle when it came out?
-
DAMN those are expensive WME, you sure weren't kidding there! WAY WAY out of the budget I want to spend. A VERY good read though thank you! Now I have stumbled across some 12v ac roof units on Amazon a little ways back in the $1400-1600 range. A quick search again now shows some options as low as $1200. And some interesting agriculture type "parking coolers" as low as $600. These are essentially mini-split systems and are shipped without freon. Not a big deal for me (I have my 609 certificate and access to the equipment). Still I don't really want to have to mess with finding space for one of these. A roof mounted system is much simpler. There is a lot more research needed though for any of the above 12v options. I don't think my current battery setup would be sufficient to run any of them throughout the night. Realistically, I probably need a lithium battery bank. Time to do some number crunching... I also wonder how much offset my solar panels can take up during the day. As I am writing this, I ironically get a Goal Zero email notification! These new portable mini systems are SUPER interesting! The EcoFlow Wave Portable Air Conditioner is my favorite so far. Their main focus is emergency use and tent camping. But they probably would cool off our small Toyota RVs pretty well too! They are a lot smarter than normal DC or AC only units. The EcoFlow Wave (for instance) adjusts the way it functions on DC vs AC. And it runs on both too. It is only 4000 BTUs but supposedly can cool off a "small to medium space in only 8 minutes flat!" Hummmm... While defiantly not the cheapest option, or even the most effective one, the EcoFlow Wave Portable Air Conditioner is a very very interesting middle ground possibility that gives me the off grid capability I want, but can also run on grid plugged into my AC shore power. It also gives me the additional emergency use capabilities. And does all of the above for about $2k (with the battery pack). As another bonus, I don't need it installed on the roof, and can use that space for a nice vent fan. Bonus, it will give me back some fuel economy too. I am pretty much sold on this option. It is an awesome compromise for everything I am after.