twoblocked
-
Posts
86 -
Joined
-
Last visited
Content Type
Events
Profiles
Forums
Gallery
Everything posted by twoblocked
-
 Yes, this can be. As one increases rear braking pressures, there is additional wear on the rear brake shoes. This causes them to wear prematurely. You could be experiencing rear brake shoe wear. Or simply out of adjustment brake shoes. Anecdotal evidence from one gear head poster on another blog was that after he increased rear braking bias he wore out rear brake shoes at a rate of 2:1 (two pairs of rear shoes for every one set of front pads). Before he increased rear bias he was wearing out front disc pads at the rate of 2:1. (Two pair of front pads for every pair of rear shoes) Makes sense. It's the price of admission for jacking up rear bias.
 -
I don't see any problem with increasing rear wheel bias in our rigs due to the constant loading. The issue is when the LSPV is eliminated entirely from the braking circuit. Disc brakes by their design require higher fluid pressure to operate as compared to a drum brake. The reason being the pads in the calipers clamp the rotor, more stopping power requires higher and higher pressures. A drum brake is "self energising". This means that when the brake shoe is pushed into the drum, the rotational force actually pulls the shoes more tightly against the drum. I've read references that stated a caliper/disc brake requires two to three times the fluid pressure of a comparable drum. So what this means is by eliminating the LSPV you have equalized the front/rear braking pressures in the system and the rear drums are exerting a larger braking force than the front discs. I personally feel you have just negated a substantial portion of your braking power by doing this. I have nothing but empirical evidence to back me up here (my own) so if I am off base, I'm listening. WME's point is spot on. When you change the pressure in your air springs, the LSPV is also re-adjusted automagically. In your case of light and heavy loads I think the coolest solution would be an adjustable proportional valve to change the rear brake bias when needed. The gear heads do it all the time. Most eliminate the LSVP (be sure to cap the front brake sensing circuit also, it's the second line coming from forward into the LSPV) and put a knob operated adjustable proportional valve up under the hood, near the Master Cylinder. You could fine tune for both scenarios.
-
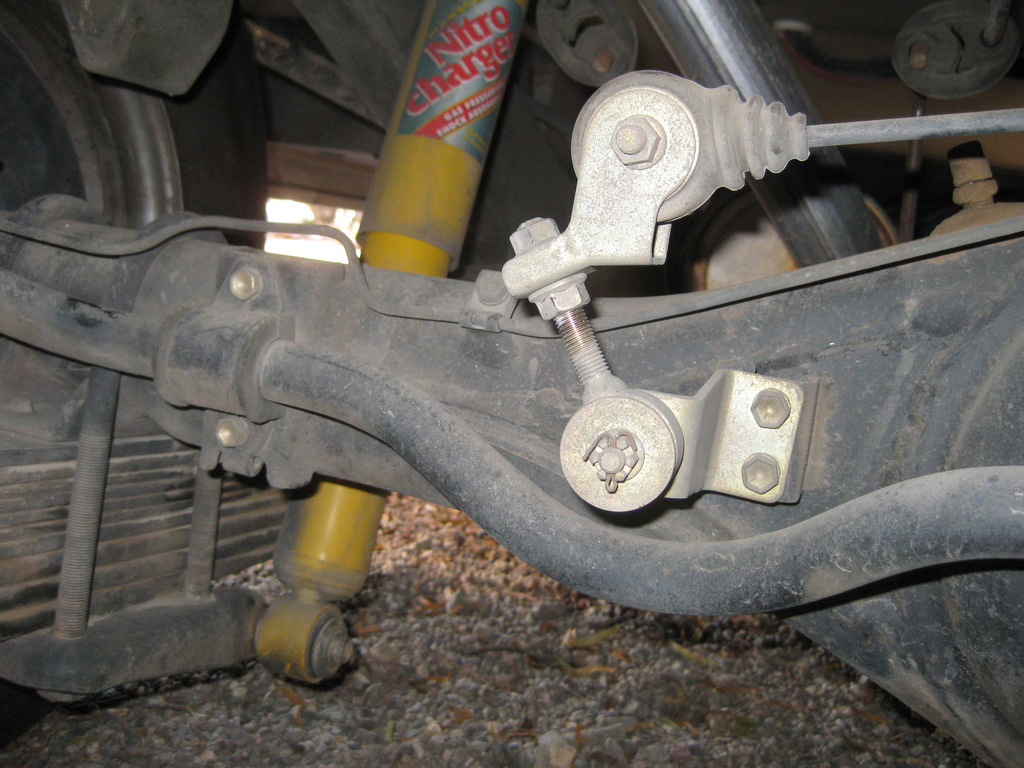
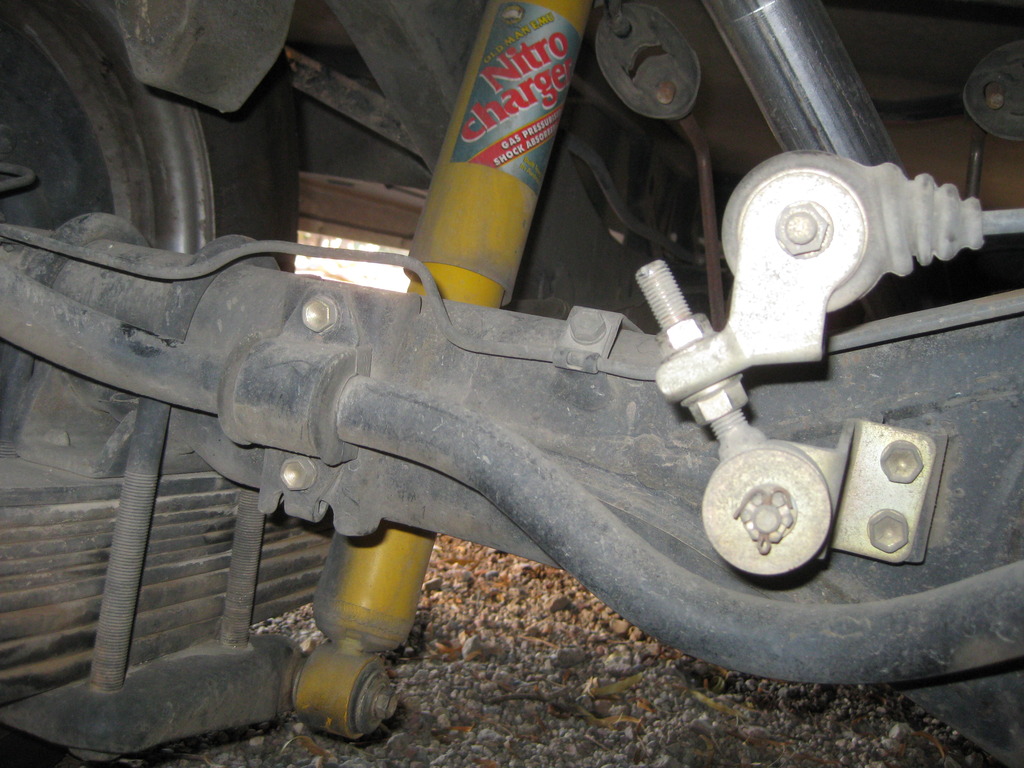
>>The MH is all ways at max load.... Agreed. My Itasca has 2,000# on the front and 4,000# on the rear. Front disc brakes, rear drums. >>I'm going to say that the chance of locking the rear wheels is all most nill Again agreed. (icy conditions exempted) >> ... the MH will not lift at the back because of the weight so there is a lot more breaking going on in the back of a loaded truck.... I'm having difficulty getting my head around this statement. Any vehicle in heavy braking conditions moves weight forward due to inertia. Just because our MH have more weight in the back does not mean this is where the majority of the braking power should be. I believe DRAGGING (rear wheel bias) the duals is a less efficient way to stop than the judicious use of HIGHER braking pressure in front (front wheel bias) and LOWER braking pressure in the rear. A properly adjusted LSPV assures this. This is what adjusting the shackle on the LSVP spring does for my braking; Pics show the adjustment changes. "Maximum Rear Braking" adjustment feels like most of the braking is being done by the rear wheels. There is no diving of the front end under any conditions. "Balanced Frt-Rear" adjustment was the original position when I got the MH. The front of the MH dives under hard braking. It feel like a normal vehicle, both front and rear are working. "Minimum Rear Braking" adjustment causes the front to severely dive under hard braking. I don't think the rear drums are doing much at all.

-
Yes, the complete Training Manual is available online at Kevin Sullivan's Autoshop 101 web site. http://www.autoshop101.com/autoshop15.html Fascinating bedtime reading......
-
I've been following a lot of threads on this subject. There is much misinformation out there. Maybe we could start with the following PDF attachments: the Toyota FSM and the Toyota Lexus Training Manual. (it refers to our Trucks also) Granted, this is for the technically minded.... Toyota FSM-LSP&BV.pdf Toyota Training Manual-LSPV.pdf
-
Help! Shower ptrap came loose from drain on 94 Warrior
twoblocked replied to Lias's topic in Coach ApplianceTech Issues
I have a '92 Itasca 321RB. I pulled my shower pan last spring to reinforce the pan floor. It appears bracing was left out at the factory and the pan floor had a lot of movement. You will have to remove the entire one piece pan in order to re-tighten the gasket on the shower drain. It can not be tightened from above. If it is just the p-trap leaking, you will have to fiddle around and re-align the p-trap on the metal tail piece of the shower drain or maybe slip it higher on the tail piece and re-tighten it. A pair of large Channel Lock pliers can be manoeuvred around enough to grip the fitting if your fingers aren't strong enough for the job. The p-trap fitting has wings on it to facilitate tightening. Standard household plumbing. It's a bear working one handed in these confined quarters. I had to carefully re-align my p-trap so I could drop the pan and metal drain pipe assembly directly down into the p-trap. It took a few tries. -
Yeah, I thought of that. But I think there might be an issue with sealing against a diminished area. Here's a few shots to explain. Notice Toyota already had to dimple the wheel to make the 9.7mm stem fit properly inside. Do you think a 7/16" would fit?
-
maineah, NAPA does indeed sell a METRIC brass valve stem for the 9.7mm (3/8") bore hole in our wheels. They are made by Haltec. American light truck wheel bore holes start at 7/16" and go to 5/8" with a 13/16" bore for the "18 wheelers" Thanks
-
vanman, I checked the Toyota online parts catalog but they didn't show the bent brass stem. I'll head down to the local dealer. Thanks
-
The tire shops I have been to stock a "universal" type stem. This type of stem is too large to fit the stem hole in the Toyota wheel. Also the seal is different. Toyota uses an o-ring seal. Recently I had new tires mounted. While I was in the shop, I pulled an original stems and tried to fit several types that the tire shop had in stock. Nothing fit. Did you really get stems at an auto parts store when you changed out your stems?
-
Anyone know of a source for the bent brass valve stem and o-ring found on the 1 ton 6 lug wheel? I just had one break off at the cap end.
-
There's a great little search function on this board. http://toyotamotorhome.org/forums/index.php?app=core&module=search&do=search&fromMainBar=1 Try entering helper leaf springs.
-
What is this generator kit you speak of? Is there an auxiliary gas tank fitting that comes with it? Who supplies it? Thanks
-
After Toyotas are gone, what's the newer choice?
twoblocked replied to BobBeery's topic in General Discussion
You're working 32 hours a week until you're 72 and you think you'll be able to afford a Sprinter or Vanagon or whatever the flavor of the week will be? Be serious, if the cost of an occasional timing belt, valve adjust and brake job is beyond your finances, how do you expect to ever afford a "new" RV? Hint: Maintain what you have. It will serve you well. As for dreaming...that's fun. -
I'm just finishing up this work on my '92 Itasca (V6 '91 chassis, 75,000 miles) Retail parts prices for belt, thermostat, pump, tensioner and idler from Toyota are approx $520. Tensioner and idler are $275 by themselves. Amazon, for comparison is about $300 for a complete kit and eBay with Aisin pump (OEM) and kit, $160. If you are getting all new Toyota parts (including tensioner and idler) $680 sounds reasonable with parts running $520. The valve inspect and adjust seems a little high. However it is a slow tedious job, has to be done on a cold engine and can tie up a dealers work bay for a day or two if shims have to be ordered from Toyota Los Angeles. I used all Toyota gaskets and shims ($12.50 each, I needed 6) All together ran about $150 for parts on the valve adjust. So you can see there is a lot of blue sky in the dealers estimate here. How many miles on your rig? What is the dealers hourly shop rate? It's unfortunate that the valve maintenance costs are so high on this particular engine. But if you put it off, there is a good probability of burning exhaust valves at some point in the future. All my exhaust valves were too tight, and WELL beyond specifications. Next up for me would have been burnt #1 and #6 exhaust valves.
-
baja, That's pretty funny....toyota underwear.... Let us now read from the Toyota 3VZE Field Service Manual, Chapter Two, Verse 12: "...the piston head is concaved to prevent interference with the valves." http://www.ncttora.com/fsm/1993/engine/61operatio.pdf The FSM is your friend. Google, maybe not so much.
-
The Toyota V6 3.0l 3VZE is a non-interference engine. For an impartial opinion try the Gates belt site. You'll have to fill out the form for your particulars. The Gates app will show if the engine is interference or non-interference. http://www.gates.com/part_locator/index.cfm?location_id=3598 My favorite Toyota technical site is YodaTech. Big time gear heads. Here's what the Co-Founder and Administrator has to say: (30,000 posts) http://www.yotatech.com/f2/3-4-interference-motor-10826/#post90071 The only places I have seen the 3ZVE called interference were sites that it was obvious the posters did not know what they were talking about. I just replaced the timing belt in my rig at 75,000 miles (3VZE). While I was rotating the crank to verify correct cam timing (with the cam shaft pulley knock pins removed) a cam bolt tightened slightly and I accidentally rotated the right cam an entire revolution before I caught it. Result, no damage. Just had to re-time the cam shaft. If the engine was interference I would have jammed a piston into a valve. Whew! My 1991 Owners Manual recommends replacing the timing belt at 60,000 miles.
-
The reason your nose no longer dives is you have now equalised the front and rear brake pressures. One of the reasons manufacturers' put proportioning valves in their systems is to exert more pressure on the front calipers than on rear drums. Calipers require two to three times more pressure to equal the braking power of drums. The empirical evidence I have read suggests this solution works on quite a number of Toyota Motor Homes because of the constant highly loaded rear ends. I'll be curious as to how fast you go thru rear drums. Please keep us posted.
-
I don't know what the torque curve is for the 3RZ. My '95 Tacoma has one, but alas, it really puts out 150HP with 177 ft/lb of torque. Still a great engine though. http://en.wikipedia.org/wiki/Toyota_RZ_engine
-
My Airbags Have Exploded & I Can't Get Up
twoblocked replied to bestbowl's topic in General Discussion
Derek is most certainly correct here. The problem is not with your air springs, the problem is with your leaf springs. They are shot. Also your coach could be very overloaded. I had the same problem on my '92 Itaska. I got a couple quotes to add additional springs but decided for what they wanted ($750-$1,200) I would do it my self. I'm glad I did. (not for the faint of heart) The ride height is now where is was with the air springs pumped to 90PSI. (+4") Plus I have the added benefits of NO SWAY and no maintenance of air bags. If you stop and think about it, riding on air springs is the equivalent of jacking your rear end up on balloons. The rear end can sway about and the constant attention required to correct this behavior is very tiring for the driver. JMHO -
I have an Atwood 3 gallon hot water heater in a '92 Itaska. Mine has a drain valve on the aluminum tank accessible from the outside of the camper. The plug is located near the bottom of the tank. Removing the plug allows most of the water to drain out.
-
Perhaps a vacuum hose wasn't reconnected or the new timing belt is a notch off?
-
should a 20 plus year old water tank be replaced?
twoblocked replied to xtioga's topic in General Discussion
Chlorine is one of earth's most abundant chemicals and a wonderful disinfectant. It is used in the majority of water treatment systems here in the US. But a CUP of chlorine for an 18 gallon tank ( a previous poster) is grossly overkill. I would imagine you would taste chlorine all season. Yech! -
should a 20 plus year old water tank be replaced?
twoblocked replied to xtioga's topic in General Discussion
I installed a 10" carbon block water filter with it's own separate faucet at the sink. It cleans up bad taste and will even remove most heavy metals. Also removes chlorine. Tastes as good or better than bottled water. -
My favorite testing method is to use a frothy mixture of liquid dishwashing soap and water. "Paint " around each fitting, starting at the tank with the soapy mixture. A leak shows up as a growing bubble.