Skydancer2992
-
Posts
380 -
Joined
-
Last visited
Content Type
Events
Profiles
Forums
Gallery
Everything posted by Skydancer2992
-
The Bottomdollarsurplus ebay seller has them every few weeks. Usually cheap, like $30. They have also sold AC units rather inexpensively, like $250.
-
The cause is probably many cycles of thermal expansion and contraction. After awhile, a small leak develops and then the corrosive elements in the exhaust continue the process. The Uhaul ebay site was my source for a new exhaust manifold, about $55.
-
XLhybrids systems are being installed on some of our company service vans. This is an aftermarket installation which is advertised to take less than six hours to complete. Braking recharges the battery for later use. The cost is supposed to be less than 10K US dollars. Currently available for Ford and Chevy vans. When I have excess cash, I'd like to be the first on my block with a hybrid Toyhome.
-
What Happened To The Forum?
Skydancer2992 replied to Gary_M's topic in News - Forum Help & Discussion
All this talk of Avatars gives me flashbacks to the movie Officespace: the guy with the Swingline stapler Milton Waddams: "But then, they switched from the Swingline to the Boston stapler, but I kept my Swingline stapler because it didn't bind up as much, and I kept the staples for the Swingline stapler and it's not okay because if they take my stapler then I'll, I'll, I'll set the building on fire..." -
1985 Toyota Huntsman - Modernized - Like Or Dislike?
Skydancer2992 replied to DiannaHunts's topic in General Discussion
Dianna, the rear bumper looks great. Did you make that or is it from a car? The outside skin, is it a new layer of fiberglass? Thanks, Marc -
I cancelled PayTV years ago. No more reality TV. No more Storage Wars and its colorful characters. Now I tune in to Here. Derek, pass the popcorn.
-
Did Anyone Have Trouble Logging In This Morning?
Skydancer2992 replied to Derek up North's topic in General Discussion
I was going through withdrawals. Always nice to tune into the banter about Toyhomes. Quite the cast of characters as well. The members would be the material for a good reality show if we ever teamed up for a convoy. -
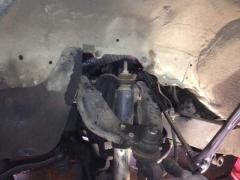
Installed Bilstein shock absorbers on the rear axle of the Warrior. The passenger side shock was an easy job, maybe 30 minutes to undo the two bolts, knock the shock off the pins with a 2X4 and hammer and install the new Bilstein. The driver side job was much harder due to the muffler assembly and some poorly placed air bag hoses. Trying to mount the new shock was really difficult due to the confined location, reaching up and around the muffler to try to push the Bilstein onto the mount. The key to success was a five inch C clamp with 2X4. The pressure of the C clamp "convinced" the shock to move onto the mount - first top and then bottom. One of the old rear shocks was getting weak. It had about 50% of the resistance to contraction that the Bilstein or even its mate had. My speed on the last trip was limited to 60 mph due to vibration. The tire on the passenger side front was showing uneven wear on the inner edge. Coincidentally, this was the same location as the completely useless front shock, a Toyota, which may have been the original factory part. I'm hoping the new shocks will resolve the vibration problem.
-
Sailfritz, you can lose braking on a downhill even if your brakes are in brand new condition. If the brakes are used so much that they overheat, the brake fluid begins to bubble and that causes the loss of incompressibility (and resulting loss of braking). Your drums and rotors do not need to be replaced unless they are out of spec or warped. The way they get out of spec is usually by resurfacing them too many times at brake shops. Resurfacing has usually caused more problems for me than not resurfacing due to the skills of the technician or the calibration of the machine. I change my brake pads when the material becomes too thin. I almost never have to change brake shoes. Use a flash light to check brake pads, usually when rotating tires or other maintenance (shocks, etc.). Shoes are a bit harder but follow the factory shop manual.
-
JDE, I enjoy reading your posts and regretted when they disappeared off the Yahoo site. I've picked up quite a bit of useful knowledge as well as interesting trivia from your posts on both sites. Please continue to post on the toyotamotorhome site. Thanks, Marc
-
What worked for me was to disconnect the upper radiator hose from the radiator and then hold the open end up vertically while pouring more coolant directly into the block.
-
Today I installed Bilstein shocks on the front axle. The passenger side shock was an old Toyota one that was completely gone. No resistance. The nut on top of the shock was welded and would not budge. A multi-tool cut the nut in half and then it backed off fairly easily. The driver side shock was still OK, but why change only one shock? The Toyota wheel jack is handy for convincing the new shocks to retract in order to insert and tighten the two bolts that hold the base of the shock in place. A 17 mm ratcheting wrench is handy for tightening the top nut down. Bilstein put a cavity for a hex key in the top of the shock. With a 1/4 inch hex, the rod does not turn while tightening. Next, I'm going to order the rear Bilstein shocks, most likely from Amazon, $75 a piece, free shipping.
-
You need a volt meter to check the potential between the hot wire to ground, neutral to ground, and hot to neutral. (Neutral is wide blade/hole and hot is the narrow blade/hole in a correctly wired outlet). Correct readings should be approx 120, 0, 120. If you get 120, 120, 0, then you have a short between neutral and hot somewhere. If so, start isolating. Open all breakers. Test each circuit by opening a breaker and testing the corresponding circuit. Isolate your power cords/extension cords and do a resistance check with the ohm meter. Should be infinite resistance between the conductors. Normally, your home circuit breaker should have opened. If the short is a small amperage, then the home breaker may not have opened. Any short to ground should have activated the GCFI outlet. The GCFI will need to be reset to restore power to the outlet.
-
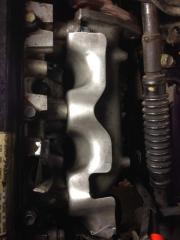
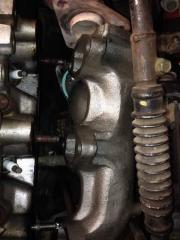
None of the bolts snapped on me nor did they seem likely to do so. The head is aluminum and the threads in the bolt holes are more likely to strip. I was about to use a helicoil kit but I found the threads go much deeper than the stripped area. About half the studs backed out as they were melded to the nuts. Concerned at first, I found this to be blessing in disguise as the removal of the manifold from the downpipe and crossover pipe was much easier. Your job is likely to be easier than mine because the downpipe was a pain to gain access.
-
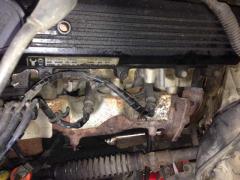
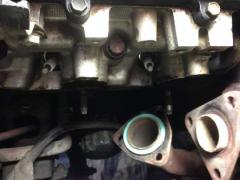
Original leaky driver side gasket and manifold.
Skydancer2992 posted a gallery image in Technical Albums
-
-
-
-
Well, I'm not a mechanic (just an electrical engineer and retired Navy officer) and have never done a manifold job before this one but I was able to get through it with satisfactory results. Some things that may have helped were to start spraying penetrating oil on all the nuts and studs for a couple of days, work an hour or two every day (to avoid frustration and keep the job fun), dry fit the parts (the new heat shield/gasket has to be cut and folded on one end to clear the dip stick - for the driver side version), have plenty of light. My mistake was not to order studs and nuts in advance, thinking that Toyota dealers would have them in stock. They do have a nice computer system that shows all the states where the other dealers do not have the parts in stock.
-
The studs on the manifold go through the gasket. The manifold has to come out to get the gasket out. There are six studs on the manifold/gasket and three on the crossover pipe. The three nuts on the driver side of the crossover pipe will need to be loosened to allow the pipe to move off the end of the passenger side manifold.
-
I replaced my driver side gasket last December. Long and cumbersome job but nothing to be intimidated by. There are some pictures of the job on the yahoo site under Skydancer's Warrior folder. The key to doing the replacement is to jack up the vehicle by the frame and remove the wheel. One third of the work is done through the fender wall gap to access the bottom row of studs. I used really long socket extensions. Another third is underneath for the down pipe (not necessary for the passenger side). The remaining third is working above through the open hood. For the passenger side, you will have to disconnect the crossover pipe. Pull the carbon cannister out. Use self-ratcheting wrenches, three nuts. I put in a new manifold because Uhaul on ebay had them cheaply priced, $55. The new one looked so pretty in comparison to the old one. I bought a pair of exhaust gaskets for $40 from an online store. Several of my studs were melded to the nut but the entire stud came out. The studs coming out is a blessing because it makes removal and installation much easier. Toyota dealerships are unlikely to stock these studs and I had to special order them. (I tried four different dealerships and found a couple in stock). Order the crossover pipe gasket as well. The studs from Autozone do not look nearly as well-made as the Toyota. Toyota studs are about $1 a piece and the nuts were $.60. The block thread is easy to strip out. Don't tighten too tightly or better yet, use a torque wrench. Fortunately, the thread goes deep into the block and some of the studs are long enough to go deeper. The heat shield has smaller studs and you may need to order a few as well. These seem to be the same studs as the center wheel studs. Lots of light helps. I put a shoplight over the area I worked as most of the time, it was during the evening in winter.
-
Just received a Hankook RA08 at Walmart ($91). Walmart mounted it no charge but could not balance it. Date code was mid 2014. Another of my Goodyear's blew out on the way up to Chicago from Memphis. The local tire shop near Great Lakes Navy base, Waukegan Tire was able to locate a Hankook RA 08 and mount it the same day ($137 total for mounting, balancing, and tax). Despite looking brand new, three of five Goodyears have now had the tread separate from the air chamber. I still have four Continental Vanco's, which I will put on the rear axle. The Hankook's will go up front.
-
According to http://www.toyotapartszone.com/ and my VIN number (1991 Warrior, 90 chassis), the second number - 68 fits but not the first. Price $2.64 each.
-
My experience is that during a turn, the weight aft of the rear wheels tends to make the Toyota want to continue turning. She is a little more resistant to resuming a straight run.