ToyoGuy
-
Posts
331 -
Joined
-
Last visited
Content Type
Events
Profiles
Forums
Gallery
Everything posted by ToyoGuy
-
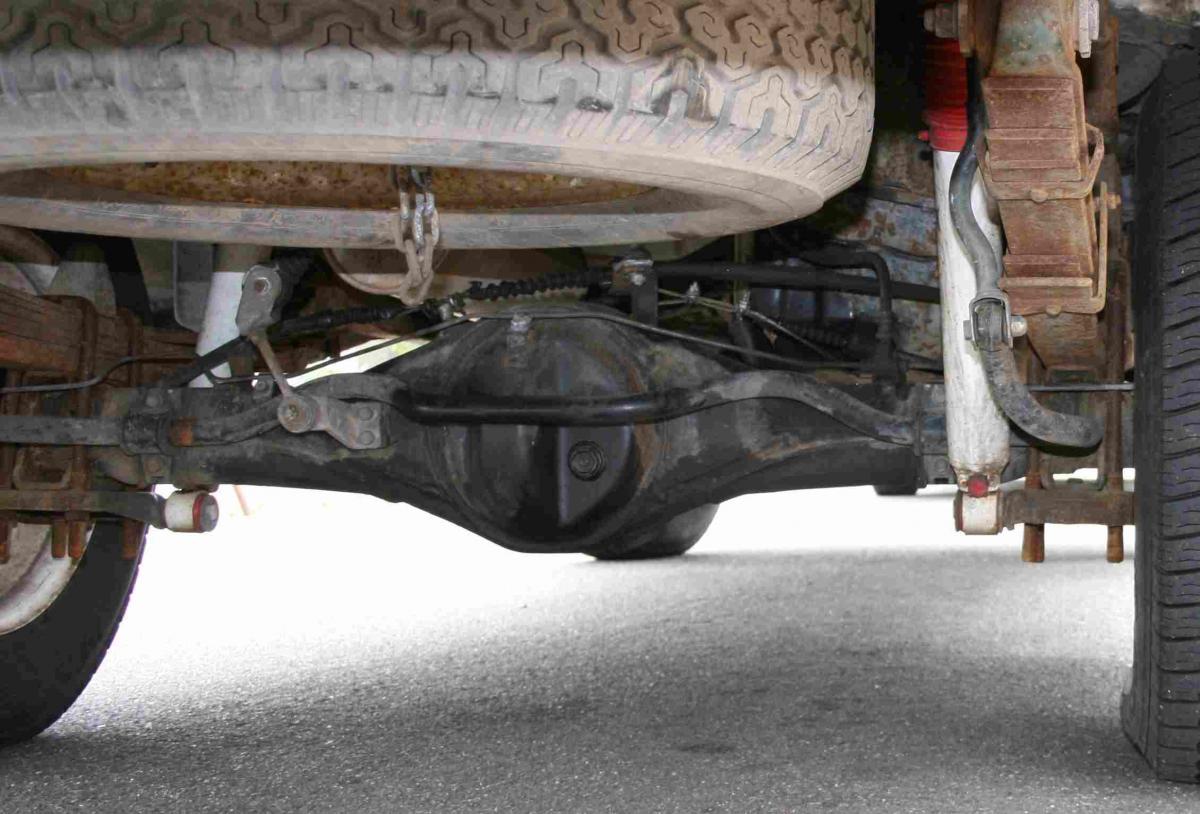
 Hello All, Because of a series of unanswered inquires by mechanics and subsequently, incorrect parts ordered by the same, I am trying to determine the year of manufacture and possible model # , or any other identifying features on my full-floater. (Below)The previous owner is not available to tell me what he pulled it out of, and it will hopefully expedite part searches in the future. Thanks, TG
-
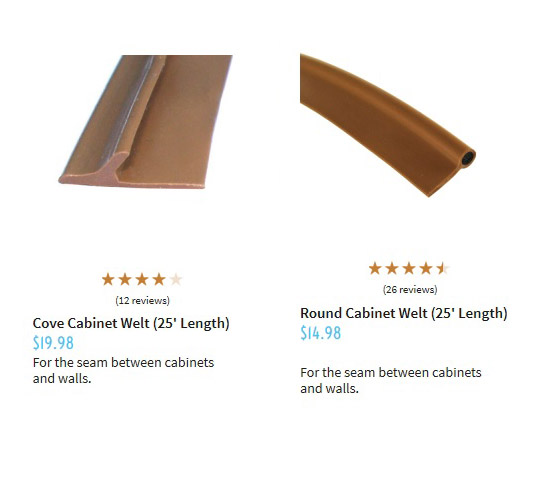
Got mine at vintagetrailersupply.com. http://www.vintagetrailersupply.com/category-s/389.htm The "welt" comes in 2 colors brown and sand. They will send you a sample if you ask. I actually went for the cove cabinet welt to avoid the dated look of the round welting and am happy with the results.The size of the tab that you staple down is a bit thin, but manageable. Cheers, TG
-
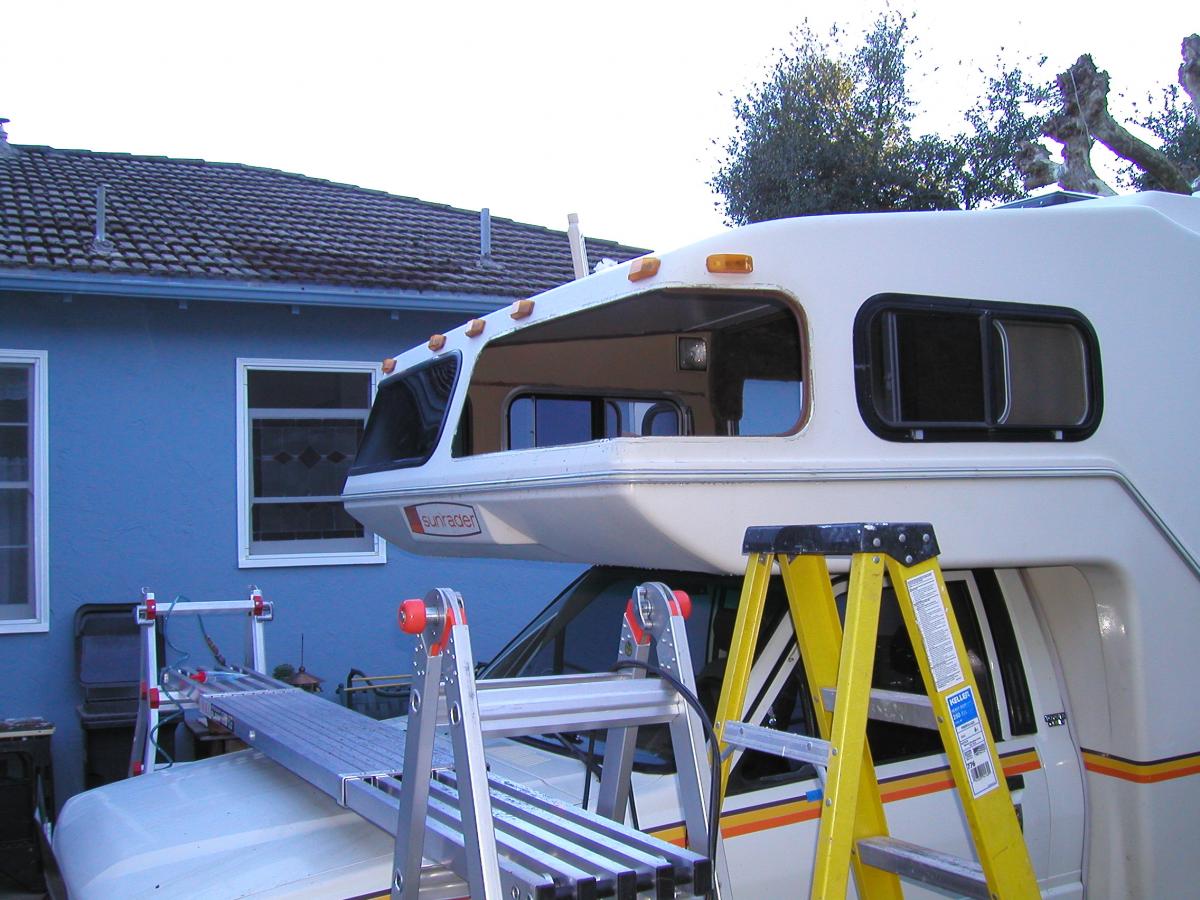
I think you're ready for a 2nd-rig / project to use all that hard-earned knowledge and money you saved by doing this one yourself ! BTW, really like your obscured-light spatter guard for the stove. Looks a lot like the plastic material used in offices to protect carpets from chair casters? The scenery in the cab-over is nice too. All in all just a really nice and very clean re-do, congrats. TG
-
Well, fuel and operating costs are an issue for sure, but also you can't usually just park a 30+ footer out in front of the house for very long in most neighborhoods. For you folks with a nice piece of property and acreage it's a non-issue, but here in the city in N. Ca, it costs a fortune to store those big beasts and we're not talking covered storage either. Storage yard security here is kind of a myth too. Getting back to the fuel thing, that reminds me, I gotta get around to fixing my trip-odometer so I can quit stopping for fuel so soon. I've owned five '84-'85 'Yotas now and not one of them had a gas guage that was worth spit after it got down to about 2/3rds-to-1/2 of a tank of gas.They all have seemed to get exponentially more inaccurate as the tank gets emptier. Easier to count miles...
-
Yeah, it included everything but one bracket. The seller had sold lots of used parts to my mechanic, so I took him on his word as to condition. I had been watching prices online for a while and his was in line with what I was seeing here in N. Cal.
-
Did an '84 Rader, 4 cyl. 18'er about 3 years ago. If memory serves me: $200 for the used pump, canister and lines on CL. Had to get some bracket, ($20+/-?) I believe. $200 to have it all installed in N. Kali. Cannot overstate how much better the driving experience is, especially in parking lots. Would do it again, in a heartbeat. BR, TG
-
Thanks for the explanation, actually that helps a lot. Come to think about it, I have a daily driver w/a 22R EFI that used to pre-detonate and crackle a lot even with premium fuel. I put some very small diameter tires on it for another reason and bingo, more low-end torque and no pre-detonation. Just gotta watch my ground-clearance now. On the re-gear, Yeah, Linda, my guy said about $1,500 to do the switch front and back. Going to have to wait and save up some more dough as there is some other driveline work on the horizon as well. BR, TG
-
I did the molded-vinyl kit because I figured I could clean up mud easier, and put woven carpet on top if I wanted. (I looked for the receipt to get name, but I timed out @ 30min.) Mine did not have enough extra to fold up at the cab-to-coach and trim at coach floor height. It was about $120 (3 yrs ago). It had enough extra on all other borders to reach up under the dash and everywhere else it needed to. It is very thick (3/16"+?)and required laying it out in the sun for an hour or so to get it pliable enough to get it to lay right after being shipped folded up. A heat gun and a hot day were a must for me, otherwise I couldn't have made it go where it needed to. Strong hands are required. I backed it with some 1/4" sound deadening material and it is SO much quieter in the cab now than before. I would get some help from a capable person with this. My prior experience as an upholsterer stood me in good stead, but even then I went slowly and over-cut initially, then trimmed with a utility knife.For some cuts, I used a steel straight edge. A sharp punch and a wood backing-block under the mat helps for the seat-belt holes. I have to admit, the finished product looks very nice and original, but it's a bear to install and it's vinyl, not carpeting. TG
-
Well,...... with an 18' rig, on flat highway (with dry compression readings of 135 to 145 in 4 cyls, hence long block swap) and, Kumho AT51's - 215/75 R15 s, I can use 5th, but in a stiff head wind, I'm kinda SOL. My new wrench guy and I talked about doing the gearing switch and he mentioned both ratios you listed, but for the money, we thought I might wait and see what the new motor pulls like. Anyway, likely there is room for improvement down the road. Also, the mechanic / builder said essentially the same about clutches so I'll be going with stock stuff. Thanks for the data guys, those gearing - tire size calculations give me a headache! TG
-
Thanks for replies. fredheath - Yeah, I got the hydralic slave and might replace that too. Maineah - Thanks, I am not a crawler-guy and have no first hand experience with this stuff, so I value this input. jdemaris, thanks, you nailed one issue for sure, I have the higher-geared rearend you spoke of. Great I guess, if you live in a plains state. Here in Kali, I have a "down-hill" driveway and I use 4WD Low to get up and out. (no turning) Once up on the street, I switch the hubs and everything back. In the interim, seems like I should start parking "nose-in" to use lower-geared reverse to back out instead until I can deal with the gearing issue. Hmmmm, guess with gearing down, I'll lose some of that "famous Toyota RV top end speed" huh? Thanks again, TG
-
Howdy All, Am swapping-out a long block on a carburated 22R in an '84 Sunrader 4x4. Thought I'd put out a RFC on what clutch components others have used in their repairs and how they fared over time. Am thinking of laying out the extra weasel-hides (about $100 + more) for heavy duty / crawler stuff. Any opinions? Thanks for any takers.... BR, TG
-
Help Fixing Top Bunk Window Leak Sunrader
ToyoGuy replied to AbleThought's topic in General Discussion
For fine scratches, Novus 2 plastic polish. From Tap Plastics, about $5, as I remember for the 2 oz bottle. For more deep scratches, they will likely have a recommendation. I think I might have used Meguiars on the deeper stuff. Had to remind myself, don't get greedy, some stuff is just too deep to get out. Generally, even a light polish, done correctly makes the funkiest windows look lots better. I don't use buffing wheels, I just go slow and careful and enjoy the process. BR, TG -
Help Fixing Top Bunk Window Leak Sunrader
ToyoGuy replied to AbleThought's topic in General Discussion
Oh yeah,...... and my window channels in the lower part of the gasket were just loaded with dirt and grungy stuff. The windows fit back in way better after cleaning them out with an old toothbrush and hot water. A laundry tub was a great help. Good luck! -
Help Fixing Top Bunk Window Leak Sunrader
ToyoGuy replied to AbleThought's topic in General Discussion
Here are some photos, hopefully helpful. There is a round-shaped rubber retaining strip that pulls out of a middle channel on the outside. Hopefully, it is still in one piece and re-usable. I highly recommend borrowing scaffolding, or setting up two step ladders and a plank to spare your back, your hood, and your window(s)! Sometimes a little soapy water helps to lubricate any plastic body tools you may use to push or pull gasket parts. Once the locking strip is out, get someone to carefully push from the inside (next to the edge) and be outside to catch them and carefully bring them, one at a time over to a bench etc. Mine easily came out this way. Be very careful, of course, they are expensive to replace. Consider during your re-sealing process, that you might polish them while you can do so on a clean bench covered with cloth. BR, TG
-
Truely awesome! Wonder if he got the plans from Popular Mechanics?
-
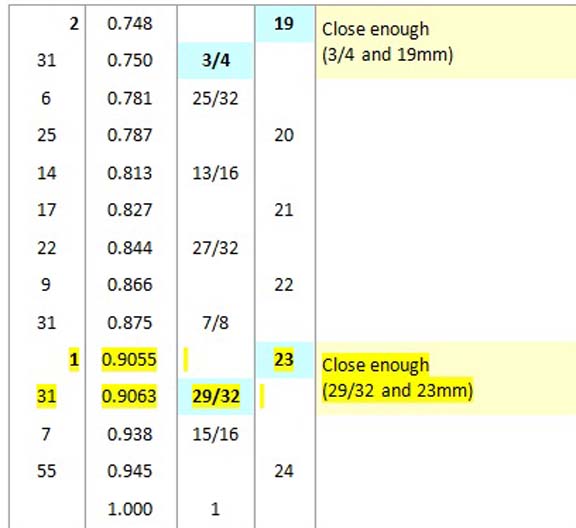
Thank you all for checking this stuff. There's one Rader guy in my neck-o-the woods, but he ain't real schmoozy. These replies confirmed some thoughts about some folks having 7/8" and others having a larger "undetermined" size. For me using a 15/16" as recommended by the tire store just don't make it, although I understand some folks are fine with that. I can see what that's done to the corners on the nuts already. Believe I'll go with the hardened 1/2"x 10" long impact drive at "Harvard Freight" and grab a 23mm socket. With the tire-thumper/offset breaker bar that the last guy thoughtfully left me, I'll be able to put together a stowable kit with two nice tight fitting sockets. Thanks for the stock-spec. Linda, BR, TG
-
Hello All, I looked at previous posts that queried the same issue and was not clear as to what others felt/did about sloppy fit of 15/16” wrench on upgraded rear end lugs, So here it is for another go around… My ’84 / 18 foot Sunrader front end has lug-nuts that take a 13/16” socket w/a nice, snug, solid fit. But,.. my 6-bolt rear end (Supposedly a ’92 according to previous owner) has a sloppy, not secure-feeling fit w /15/16”on the lugs and won’t take a 7/8” either. Too small. The corners of the nuts look like Les Schwab used a 15/16”,which drive a nut, however, it just doesn’t seem right.. It seems like there must be another size between those two. Or something? Another forum (below) listed a Dodge (full-size?) lug-nut size was available at 23mm, but most Auto supply houses I called list a 23mm wrench as a 7/8” standard-equivalent, (which, as I said, don’t fit mine) Re: Common Lug Nut Sizes 17mm euro 22mm chevy fullsize/new honda/Ford van 23mm Dodge fullsize 27mm land rover The chart below shows it, (23mm) as truly equivalent to 29/32” standard. Any thoughts? Also, if 15/16” is the only alternative (Arrgh!), star wrenches do not come with 13/16” and 15/16” on one wrench, so I’m guessing others have opted for breaker bar and 10” extension w/ 2 sockets? Any input here? Thanks, TG
-
Nothing yet, shopping off-road driving lights now. Considered some after-market bumpers, but they're pricey and way-heavy to boot. May consider welding up something myself. (When I hit the spare time jackpot)
-
Was puzzling over how to get old water-based paint off a set of backup spares for the front of my Sunrader. Soaking did no good and I didn't want to scratch them any worse than they are (these were abused and have lots of scratches and spiderwebbing from sun exposure). Finally hit on an engineer's site who suggested brake fluid for an aeronautical problem. Who would have thought? Anyway, it works well and thought I'd post it here. I just laid them out level and brushed it on with a cheap brush. Waited about 20 minutes and used the brush to loosen the paint so as not to scratch. Some areas needed 2 treatments. I then cleaned off the residual with 409-type cleaner and paper towels. Worked great for me. Be aware though, if you are not an auto-type of person, brake fluid is toxic and wear rubber gloves and eye protection in case of any splashes. Hope this helps somebody. BR, T.G.
-
Here's who built my kit: http://www.4crawler.com/4x4/ForSale/BodyLiftKit.shtml#PolyBushings Roger was a great info resource and excellent fabricator. I'd read up (same site) on collateral modifications that escalate with height of lift (and don't forget about high-winds and low bridges Good Luck. TG
-
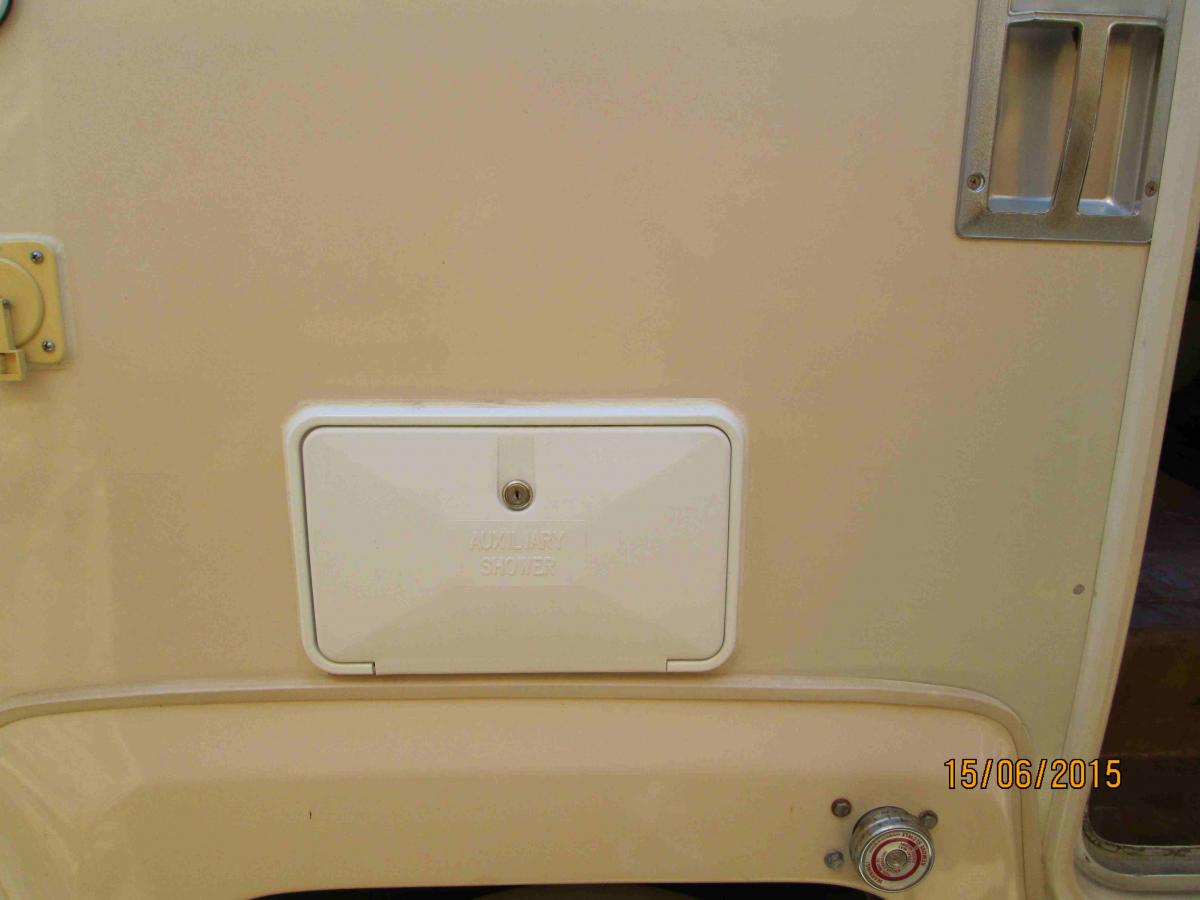
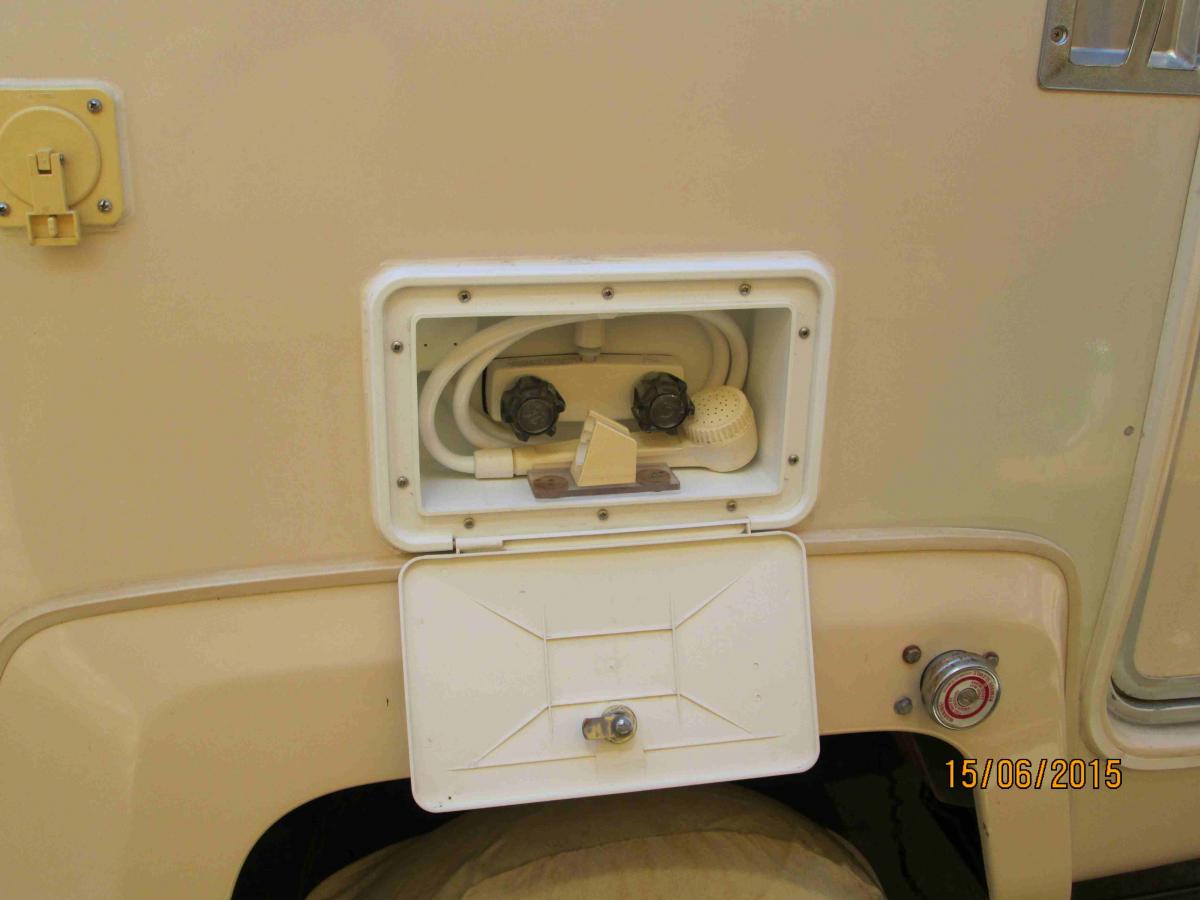
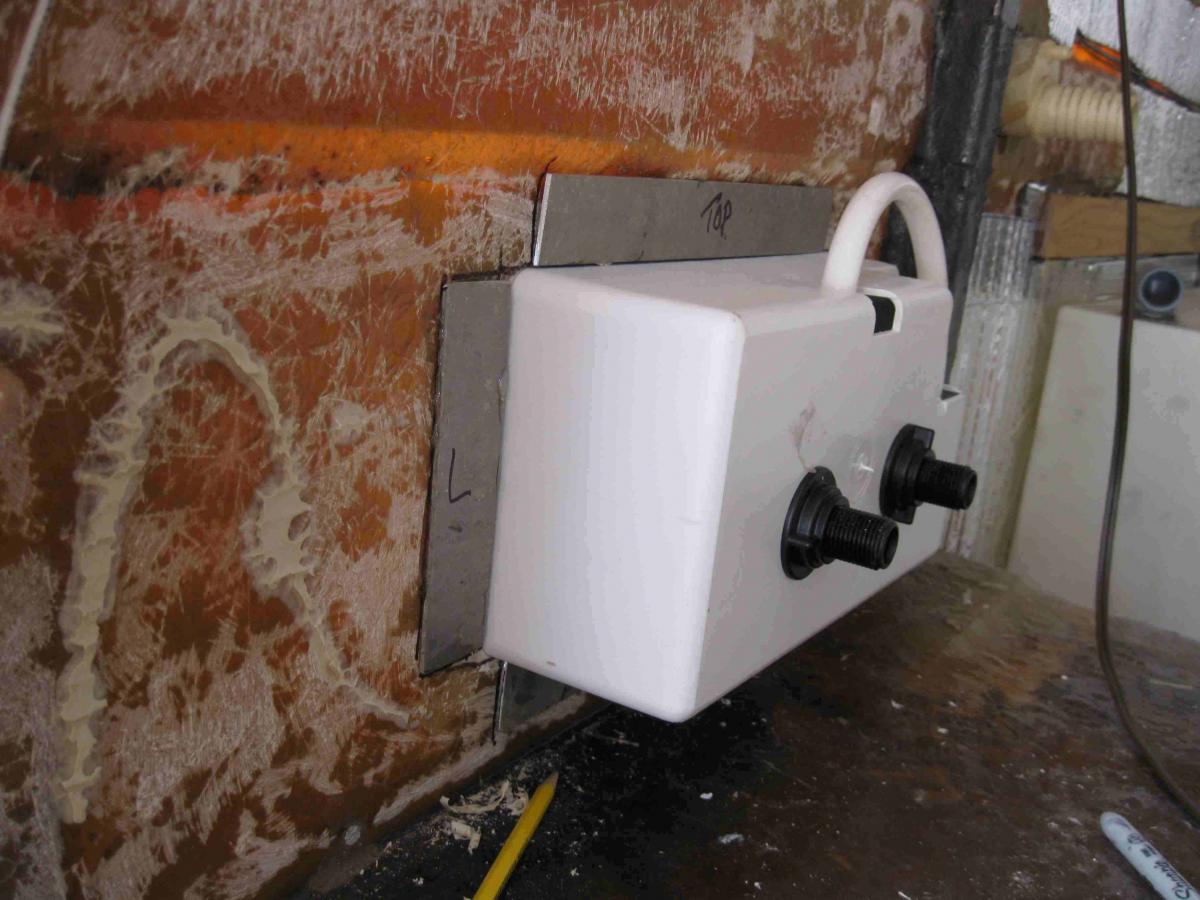
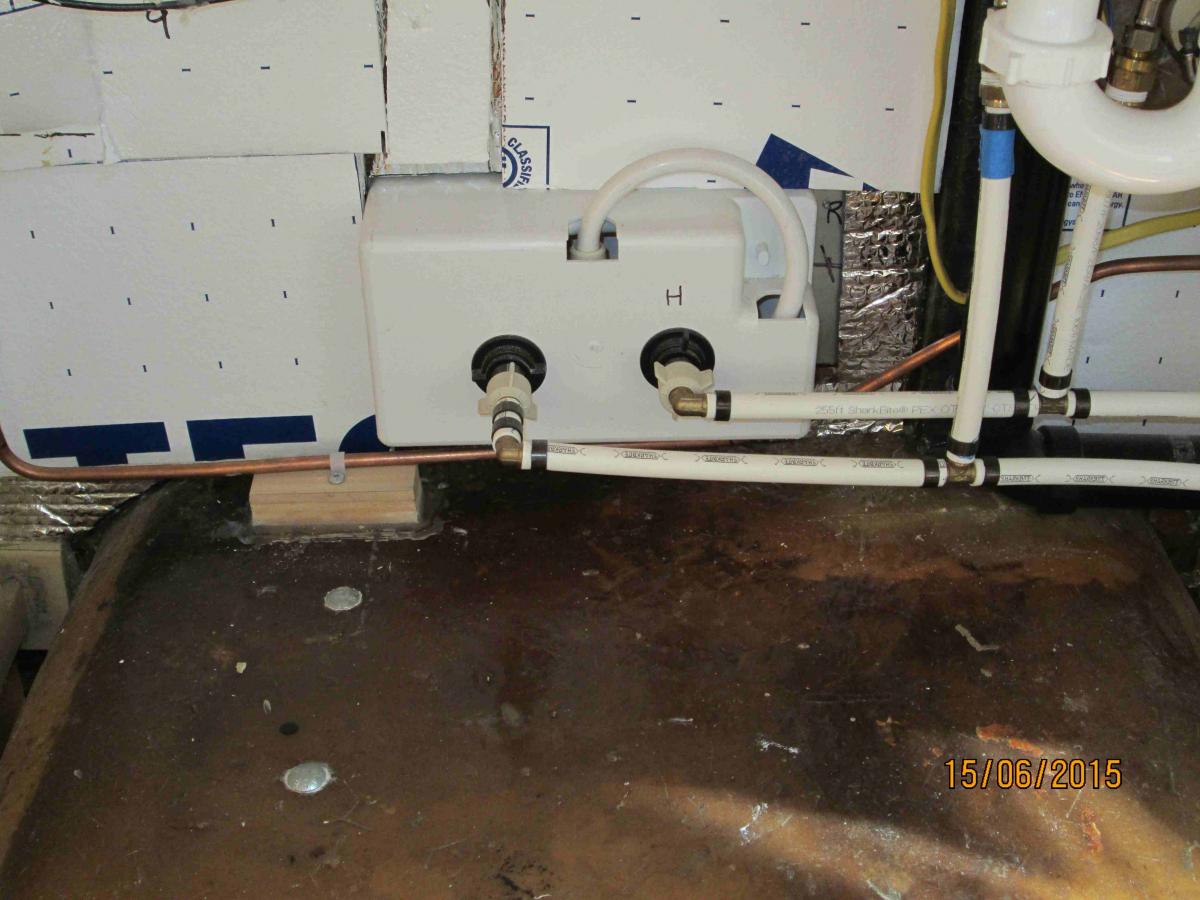
Anyone Installed An Outside Shower
ToyoGuy replied to kayakthecoast's topic in Coach ApplianceTech Issues
Nice looking install! -
Anyone Installed An Outside Shower
ToyoGuy replied to kayakthecoast's topic in Coach ApplianceTech Issues
Yeah, the oven/range weighed about 48 lbs, if I recall correctly, and I replaced it w/a 2-burner stainless cooktop to get more storage. As for measurements -the unit on mine extends 3 3/8" to the back end of the box from the interior F/G wall, but because of the nipples projecting out the back, you need at least another 2 1/4" for a 90 deg makeup like the hot side in my picture. So. 5 5/8" total projection at least. I plan on putting some ledger blocks and 1/4" paneling to cover it and the back wall under there, but one of my goals w/ the re-do was to maintain good accessability to all h2o and electrical. I may even set the paneling in w/ some sort of industrial velcro stuff. BR, TG -
Anyone Installed An Outside Shower
ToyoGuy replied to kayakthecoast's topic in Coach ApplianceTech Issues
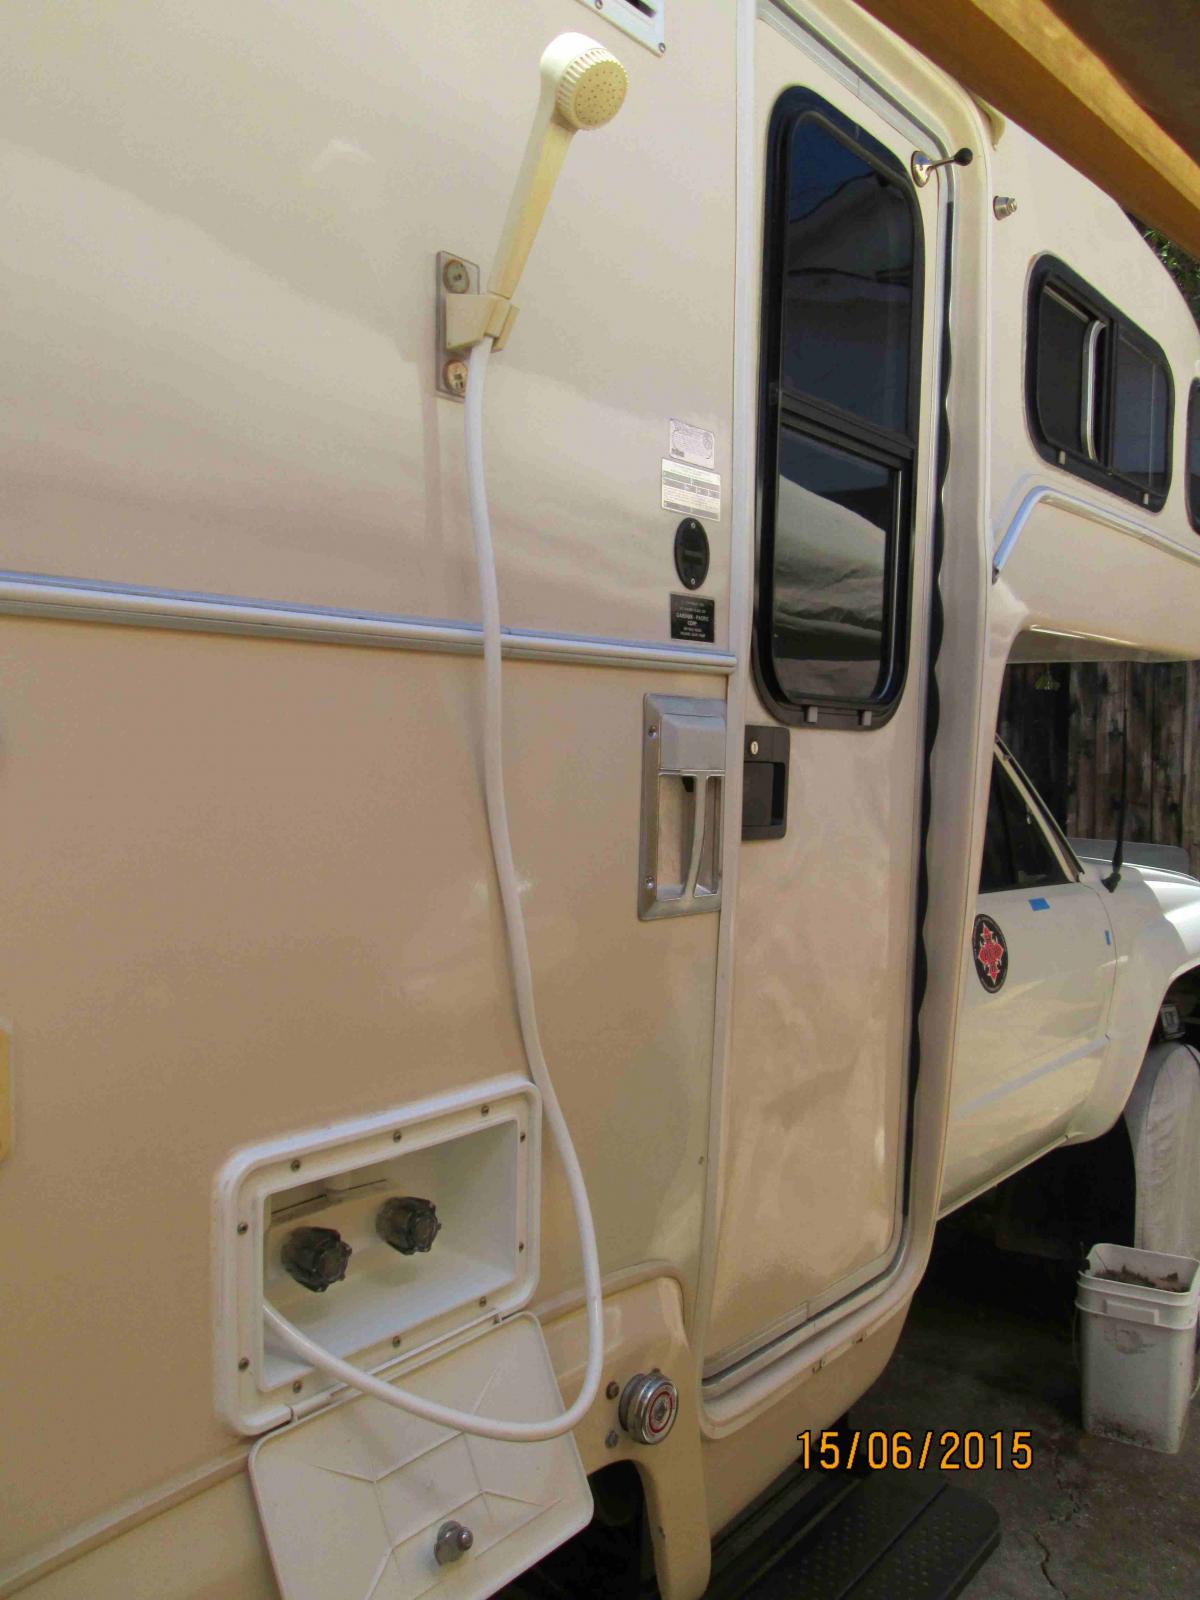
Like you, I was mostly thinking beach and I hate sandy floors and sleeping bags . Some great workarounds have been mentioned here, but I do not regret installing mine, which, to be fair, was done during a total re-do. In fact. I used it last time the wtr-htr in the house was on the fritz.. .. I just wash with a plastic tub to catch the sand etc. On mine the shower-head bracket is held in place with 2 "super-magnets" epoxied to the inside of the coach wall. It stores in the same box. The install was pretty straight forward and I do plan to insulate the box from the interior of the coach. Also,.. just me, but I always back any flange screwed to the outside of my coach with 1/8" aluminum on the inside, so it can be tapped and I can use stainless machine screws. Not everyone's cup of tea, I know, but pretty much EVERY wood-screw on the outside of my rig was stripped when I got it and I just roll that way now. Cheers, TG
-
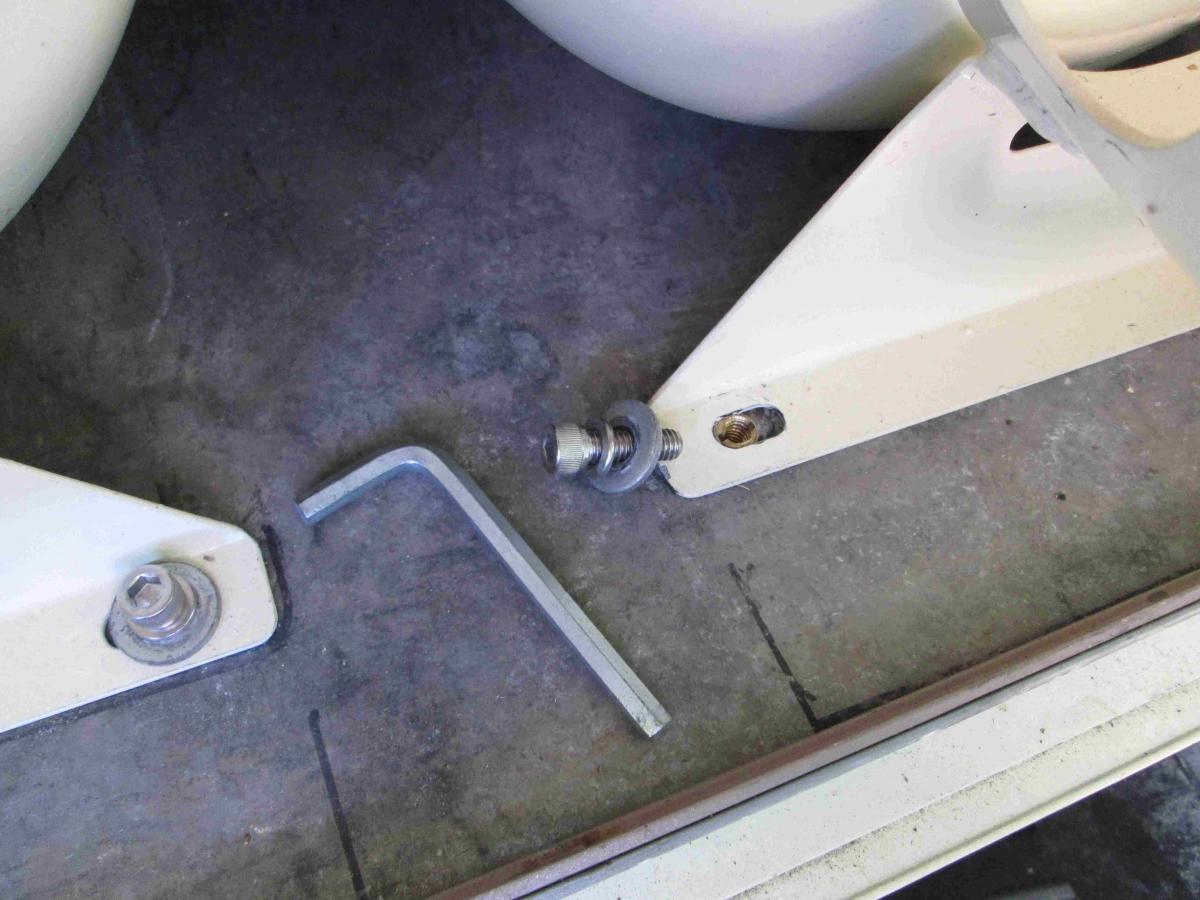
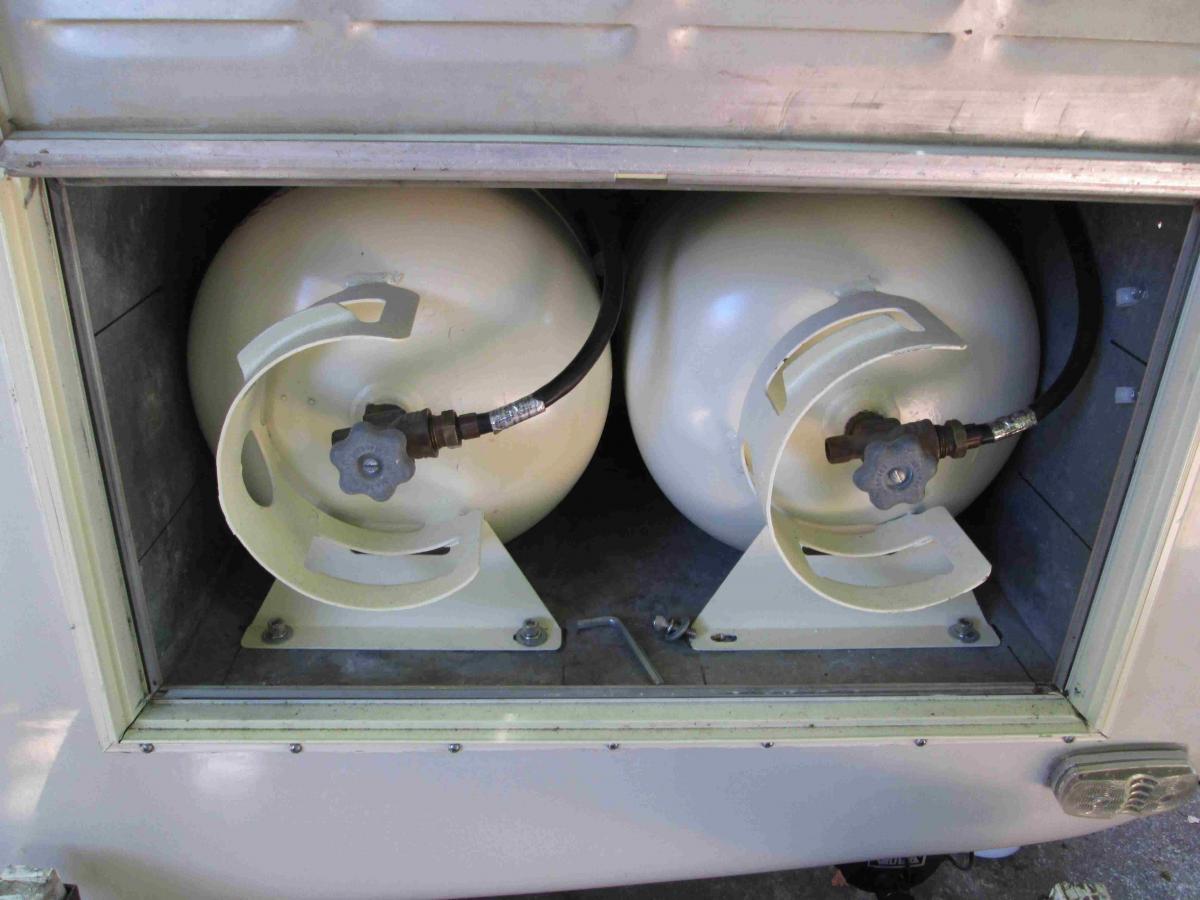
When I replaced the regulator in my rig, I decided to address the problem of the gas bottles vibrating. Scary fact is,the left one was rubbing through the primary copper gas line that ran behind it. The original owners toured the states with 2 small kids and a non-functioning gas detector that way. The original screws only went through the front "feet" plates and probably tore out in the first 2 weeks. (85' Sunrader=3/8" plywood floor). I decided to go for it and tie them down front and back. I welded up a couple of metal tabs for the back of the compartment, slotted both backhold down plates to fit under them and installed brass inserts in the front of the compartment floor. I was going to use wing-nuts to tighten it down, but decided on socket-head bolts to slow down any thieves. They are really solid now. I finished the whole thing off by insulating the outside with Reflectix I had left over from another job. Another punch-list item was a drop-bar for the back port under the seat. Some Sunraders don't have this cut-out with a door installed, but I do and it constituted a security concern as the door is less than formidable. BR, TG
-
Well, this isn't my first experience in the 'Rader with Murphy's Law, but I believe if it saves someone else $80 -$150 weasel-hides, it's worth sharing..... Here's what happened: In the course of my rebuild, I purchased a used-good condition Hydro flame furnace from the good RV Doctor George, here in Sacramento Ca. (Passed last July, bless his heart). When I got around to installing it, I used the original '85 thermostat (also Hydro flame) from the rig. It seemed in good condition and a new one was about $30, so I cleaned it up and installed it. Wish I had a picture of the old unit, but it was hauled away in the trash this morning. Here's why: the stat's lowest temp setting on the sweep-arm was labeled 50 degrees. Fair enough. There was a small amount of additional adjustment to the left of that (in the direction of declining temp). I "figured", (ho-ho-ho,figured, that's rich), like most stats that I have ever used, that this was the "Off" position !! Nope. As a result, after installing it and testing it, and after I left, every time the temp went below 50, the thermostat turned on the fan and attempted to initiate the lighting cycle. With the LPG turned off, the fan just kept running until the exterior temp went above 50 and warmed up the coach. This, of course, eventually dried out the fan bearing/bushing from overuse. The motor now has the familiar "irritating-squeal-of-death" and (even if lubed) now needs a rebuild or replacement. So,.. I got that new thermostat (WITH an On/Off switch!) and looking for a place to replace the bushing, or I'll buy a new motor. When that is done, next winter I'll be able to just turn off the LPG and set the new stat to Off instead of pulling the fuse to the furnace. Puzzling why the old unit was designed that way, but mine is not to reason why, ... just get out the check book and wrenches. Truth here is, I guess I could have tested the old stat with some canned Freon to below 50Deg, with the unit turned all the way down, but now I can be in the Murphy's Hall O' Fame. Cheers, TG