thewanderlustking
-
Posts
520 -
Joined
-
Last visited
Content Type
Events
Profiles
Forums
Gallery
Everything posted by thewanderlustking
-
Thank you Maineah! Heh, you remember those god-awful bright neons split looms from the late 80's early 90's? Lol I probably have permanent mental scarring from that stuff... A whole lot of modern cars make use of the normal black stuff these days. I will use it in the engine bay whenever it matches the OE stuff. Progress in the 'squirting department has been slow... As of tonight though, I "SHOULD" be finished with the other projects that were getting in the way. -=knock on wood=- Wheels are back on, it is ready to air up the tires, take it off the stands and ramps, and go for another shakedown drive. Instead of patching the exhaust, I went with a new one with long tube headers. That will be the next project to undertake, but I want to get a baseline with the old one first. I don't have a whole lot left to do before initial power up testing. Unfortunately, what I have left is mostly heavy brain work. I need to hunt down some maps for the 22RE, and then probably go through and completely rebuild them. Also I am not really sure what changes I need to make for a big heavy RV. Or if that changes my approach to tuning, and how.
-
In the first response to you, Linda suggested testing the gears. Go ahead and do that and let us know if that is hitting all of your gears correctly when you force shift it like that. Let’s just verify that the transmission is working correctly first. If messing with that cable made it down shift better, then either you need to soak some PB Blaster into that cable and Keep working it, or possibly replace the cable. The cable causing the problem is called the kickdown cable. It is $50 at Advanced Auto Parts. But seriously, if you don’t have PB Blaster Get some and put it in your emergency first aid kit. Not only are your cables probably 30+ years old, but so are all the little levers and joints on your throttle body. Try working all of those loose with PB Blaster, and work on your kick down cable. You are probably going to want to do this by disconnecting it at the throttlebody, so that somebody in the truck can work the accelerator pedal while you gently pull/hold on the cable. if you have a shot manual for your truck, look in it and figure out what the adjustment procedure is for your kick cable. I have found in past experiences with automatic transmission kick down cables that frequently tightening them up a little more then what the factory suggestion is, will make them kick down and shift a little bit quicker if you do. This will make the truck feel like a whole different beast but do this a little bit at a time and wait until after you have gotten the cable freed up. This really sounds like a cable problem. It really sounds like you can salvage it too, but $50 for a new one might be worth it if you verify for sure working it back and forth makes an improvement.
-
I didn’t see this mentioned, but there is one possible gotcha on these old Toyotas. Make sure when you are testing the battery and alternator right after you’ve started the vehicle, that you rev it up a little bit to make the battery light and brake light go out. I would assume that you know this, because you’ve been out on the road with it, but just in case… I didn’t know this and I potentially replaced a perfectly good alternator when I first got mine.
-
The high one is probably worth every penny he is asking. WOW!
-
FINALLY!!! I am wrapping up all the "sitting on ramps/jackstands" projects that I have been slowly picking any at. The 4.88 rear is in, axles are in, and differential case is filled up ready to go. I need to take off the outer right rear wheel and clock it one hand. I was staring at the geometry on my equalizers, and it should work better flipped on that side to match the rotation direction of the other side. I think the centrifugal force was causing one side to loosen up. So if I am right either both sides will stay tight now, or both will loosen up. LOL! Good times! I ran late and didn't want to annoy my neighbors by running my impact after 10pm or I would have sorted that out tonight. So it is still sitting on the jack stands. There is a break in procedure for the rear end too. I may let it run for 20 miles unloaded on the stands, and then go drive it for another 20. I went into details about the brake issues and rear end rebuild in my thread here The Shakedown Drive, I think I actually conned Murphy!!! Or did he pull one over on me??? and some further brake musings in my thread The brake saga continues… While I was underneath the truck tonight finishing the trans temp sensor install (see the Installing a Temp sensor on an A43D, hot/pressure line? thread) I did notice a curiosity that could contribute to or even completely cause the odd brake issues I have been hunting down. The levers for the emergency brake end in a short balance bar with the cables attached to either side of this. It is a little stiff and doesn't seem to "balance" out or turn equally in both directions. It could cause more pressure to be applied on one side than the other. I will see if this can be freed up some more tomorrow with PB Blaster and then silicone spray or something. From the rear it didn't look like this could cause a problem, but when I got right up underneath it and was tugging on things... Whatever the case, I should have it back on the ground in the next night or so. I "think" I have headers and a new exhaust on the way. I ordered them anyways. But eBay's tracking system claims the order was canceled by the seller and is returning to them... It is supposed to arrive wherever it is going Tuesday, so we shall see if it shows up. Hopefully it was a legit sale and not one of the scam jobs. The seller account is well established and in good standing though, no red flags there. I thought I was going to have to weld in new oxygen sensor bungs to the exhaust for my wideband. The Toyota OEM oxygen sensors have a weird mounting flange and don't screw in like modern sensors do. And the exhaust has a forward location and a second back location. I went looking for a block off plate, and then looked up the sensor itself. And was pleasantly surprised with the replacement oxegen sensors solving the flange issue with an adapter plate, instead of a Toyota only specific sensor. I might still decide to weld in a bung as the location for the front sensor is not even halfway down the cylinder 2 tube. Not ideal. I can run dual sensors with MegaSquirt. But I have never gone down that rabbit hole further to see if I can do an upstream and downstream comparison algorithm and utilize a narrowband for the downstream sensor. I will have to look into this one!
-
Oh and Walmart saying they can't do our tires is defiantly a corporate level policy issue. It is too much of a liability risk for them. They don't seem to attract the old experienced technicians either. One of the green general service techs I taught and worked with for a couple years went there at like 23 and within 6 months was the shop foreman/manager. Don't get me wrong, he was super smart and capable of doing so! But he had never seen a Humvee CTIS system or put tires on a Toyota "foolie" wheel... Or seen a widow maker wheel come apart. Or a semi tire explode and disintegrate a tire cage. Or heck for that matter even knew what a tire cage actually was! My old shop has a folding tire cage sitting in the back room. Our manager didn't even know what it was for. Nobody felt the need to enlighten him either hahah!!!
-
You are completely missing my point.... Please read what I am saying carefully. I am not disagreeing with you and trying to be negative. I am trying to give some insider insight, and actually going further to say that ANY shop that does tires, can do ours. PERIOD. Any that say otherwise, are looking for excuses NOT too. I spoke up as I saw malarky catchphrases like "We need a special pin adapter plate to balance these "special" wheels." This isn't true and it actually means: "We don't want to deal with your headache." There is NOTHING special about our dually wheels, other than some having the odd sized valve stems. Lifting them is another story. Most of out little Toyota RVs are a PAIN to lift. The low sides and VERY rear heavy means they do not balance properly on many "modern" lifts. The lifts that can balance them easily are usually the older in ground ones, that many states no longer allow to be installed new without special provisions that GREATLY increase the cost of doing so. Translating to shops replace them with above ground lifts. Lets use your example of an F-250... Better yet lets say somebody comes in with an E-250 or a high top Sprinter work van loaded up with tools and for extra measure a big water tank (like the carpet cleaning vans). Any experienced tech will look in the back and see what is back there. But if they see that tank is full or you are overloaded with tools they are going to, a) tell you they can't lift it, b) tell you it needs to be unloaded, or c) lift it on a jack. But c) will only happen if you have a motivated shop or technician. In general, automotive shops out here don't WANT to take on the liability of working on an RV. Especially so on a 6-7 tire job on a dually RV when the customer sourced the tires themselves online and it is just labor. Corporate shops ESPECIALLY so because many won't be able to adjust the labor time accordingly, and are stuck with whatever they normally charge for doing 4+2 tires. Amazon tire sales with installation included, are the WORST offender on this too. As I said above, there is ALMOST ALWAYS a way around the problem. If a shop can't lift it, it can be done in the parking lot with a jack. When you go to a shop and they say "We can't do this because we can't lift it." or "We can't balance the rears." it really means... "Your RV is a pain in the butt to do, we don't want the liability because our young general service techs are stupid -=cough=- I mean inexperienced, and you bought your tires online so we can't even make any money dealing with this headache." So if any of you get any static about installing tires on our rigs, understand that what it really means the shop doesn't WANT to do the tires. I personally do not want to take my Mini Cruiser to a shop that doesn't want to do it since, it simply won't be done well. In summary: Mounting and balancing our tires is EASY. Lifting our trucks on a lift, is a headache at best, and not anywhere near as easy as a Ford F-250. If a shop is willing/motivated enough, they will resolve this by doing it on jacks in a "flat bay" or out in the parking lot. Although some corporate shops genuinely will not allow parking lot jobs. Pep Boys recently adopted this policy claiming it was due to "liability" issues. But who knows, it could also have been local management making up crap too to get out of doing it... So yeah I am not saying it can't be done, the opposite. I am saying any excuse saying so, is JUST AN EXCUSE! If anyone gets this BS static, you now have an idea as to why. And some ideas to potentially get around these objections.
-
Yes, any shop that works on trucks, like box trucks, can lift it. Most automotive tire shops can't and won't lift box trucks. Most people go to automotive tire shops with their RV's, and are surprised when places, like Walmart, turn them away. Les Schaub is a West Coast shop (Midwest too I think) and yes they do tend to be setup to work on smaller to mid sized trucks. I have worked at three shops on the west coat, only one would have been able to lift it up easily. And they could even lift Semi tractors. Thats a whole other story though... I have worked at something like a dozen shops on the East Coast, and maybe two of them could "easily" lift a smaller RV like my Mini Cruiser. A smaller 18' Sunrader, no problem. But my whole point her isn't if a shop can or can't lift these up, it is that most automotive tire shops simply DO NOT WANT TO. Our rigs are a liability to them. Most automotive shops have 10,000lb rated lifts and maybe one heavier lift. This is frequently a 4 post where they do their alignments. Yes our rigs, especially unloaded, easily fall well under that 10k mark. But loaded or unloaded, they are not well balanced on a normal 10k automotive lift. And nope you DO NOT need one of these. Every modern balancer comes with a set of cones. Even the most basic balancers come with a selection of cones with one that will fit our wheels. You use a dually ring spacer and then cone it from the outside. It is actually kinda rare to see adjustable pin plates these days, because they aren't NEEDED on any wheel that has a hub centric center. Yes, correctly setup a pin plate does balance slightly better than a cone will, but any experienced tire tech can easily get 100% with a cone setup. And most tire techs these days have ZERO experience using a pin plate anyways. In 25yrs, I have maybe used them half a dozen times. Again, what this really translates to is 'We don't WANT to work on your RV." And that is the point of my comments to give an insider viewpoint as to why a lot of us have had issues getting out rigs serviced at your local automotive shop. It isn't to say they can't, but that they don't want to and how to get around some of those objections. If you live out West, simply go to Less Schaub! The industry had drastically changed the past few years too, especially since the pandemic. Shops are MUCH MORE likely to tell you they can't do something, than they used to be. Any older experienced techs tend to be overwhelmed and overworked. And can't keep the younger inexperienced techs that you really don't want working on these anyways. Again, I am not trying to be contrary or negative here. I am just offering my experience from having worked in automotive shops for 25 years. I am saying that "We can't do it" usually means "We don't WANT to do it" and offering a couple ways to get around those objections. And most of us on here go through a good bit of trouble to save $20-30 on a tire, or even less and go buy them online. I know I sure did myself! It is a lot to buy 7 tires!!! If you buy your tires online, any tire shop you go into is suddenly making a LOT less money on that sale and is also a LOT LESS willing to go through the extra trouble and liability of dealing with lifting up an RV, even if they can do so kinda easily. Especially so if it is difficult or needs to be done on the ground. They will find some BS excuse why they can't do it. Like "You need a special pin plate for this rare bolt pattern..." I struggled and lifted mine up in my driveway, took my tires/wheels in and did them myself. Because it wasn't worth the headache to try and lift it on any of the lifts at the shop. And because I simply wanted it done right without any static. Oh one more observation. East coast (automotive) shops, in my own experience, seem to have much lower ceilings inside than most West cost shops. Especially the older shops. There are plenty where lifting a high top Sprinter to normal waist working height is not safe or possible. And sure there are work arounds, like doing the vehicle with a jack in the parking lot. Or lifting it just enough to get it off the ground. I could go on into more details and scenarios, but it comes down to understanding that most of the objections are due to "Don't want to" as opposed to "Can't" for whatever XXX reason stated. There are a lot of reasons why full on "truck shops" charge way more than "automotive shops" do.
-
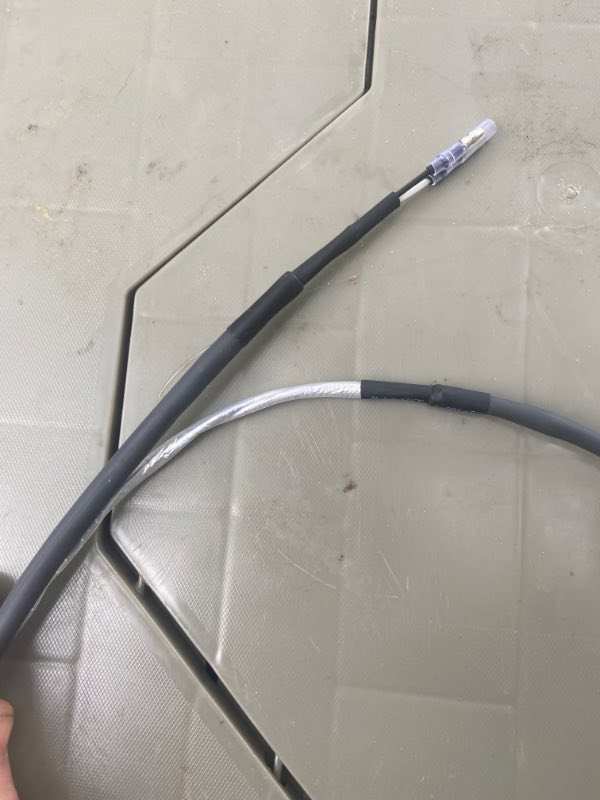
Alright, harness is made up for the sensor! Its kinda hard to make out the orientation on this, but the transmission is on the left and the front is the bottom of the picture. I tried to peel pff the old tape so I could slide the wire underneath, but in the end the rubber just disintegrated. I almost had it too. I don't have it hooked up inside the cab yet, as it will be going to my Perfect Tuning Gauge for the MegaSquirt. I am not sure it matters as I think I can send it directly to the gauge if I want. But I am uncertain if I do this if it will also be logged in my datalogs. If I send it to the MS first, I know it will be logged. Tackling this part now while it is still up on ramps. I can sort that out later. I have a couple more things to do tonight, and then I will fire it up and leak test.

-
What's your rig and where's it at?
thewanderlustking replied to desertrat's topic in General Discussion
Samm, if you want responses, you must bribe us with pictures! 😜 Linda probably has manuals for any of your appliances, if you can't find them readily online. The motorhome portion itself is going to be generic though, no real need for a manual there just a lot of exploration and research. The Toyota chassis is going to be well covered by any decent manual. An awesome resource is yotatech.com for anything specific to the Toyota itself, defiantly get an account over there too. Our little Toyotas have an obsessed cult like following, be they used as rock crawlers, overlanders, or motorhomes. There is information out there in DROVES for just about anything you could want to know. What I spent most of my first year of ownership doing, was I subscribed to a bunch of youtube channels on rv-ing and devoured videos. Good luck on your inspection, start a thread and let us know how it goes! Lots of people here willing to help you through the growing pains, and there will be some. But these guys are awesome! -
I was reading through this thread and saw these comments and thought I would tell you guys what the "REAL TRUTH" of this is. These excuses are a complete crock of crap. There is nothing horribly special about our dually rv wheels. (This is not true of the "foolie wheels, those absolutely SUCK and are impossible to mount or balance.) Anyways, our wheels are super easy to mount, and relatively easy to balance. ANY TIRE SHOP CAN DO THEM. Any tire shop that says otherwise, really means that they don't WANT to do them. Any shop with a balancer, should have the right stuff to balance it. Dually trucks of any sort are a pain to put tires onto, due to actually lifting them up. A truck, like ours, where you can't put it on a lift, means that it has to be done by hand out in the parking lot. There is the off chance some shops actualy won't allow this due to insurance purposes. There is also a small small chance some shops won't have a jack that can lift our trucks up. (My normal daily use jack, can't do it. The large shop jack, is too big. I actually had to go buy a jack specifically for lifting mine up. Nothing horribly special about it, but it is a 3 ton lower profile "racing" jack. If you get ANY static about "Let me ask if we can do them" and the counter person is about to walk into the back, suggest that you can bring the wheels in if they can't lift the vehicle. This will suddenly open doors. Anyways "We don't have the tools" or "we can't balance them" really means "We don't want to." And it is a liability and a pain. If you go buy your tires online and then show up at any tire shop to have them done, they are most likely going to come up with a reason why they can't do them. The amount of time it takes, even for a more normal set of tires, isn't very profitable. Our little RV/trucks are a nightmare. Walking in with outsourced tires to save $100-200, with a nightmare job, and techs that don't want to do this job.... You won't get a good job done if they do get forced by the front counter to do it. What also goes a LONG way towards getting these done, is offer to tip the technician $100. Especially if you are having them take the wheels off and put them back on. (Side note, remember to tell them about the reverse threads on the drivers side where applicable.) Yes, it sounds like a lot, and it is. But it will get you a MUCH better attitude and much better job when stated up front. They might even fight over who does it, instead of suddenly all being at lunch... Also another hang up, valve stems. If a shop says they don't have your valve stems, then in this case they probably don't. Some of our wheels take smaller diameter screw in stems. It is an odd little stem that most regular tire shops won't have, and I found out is actually very difficult to find even for an industry insider like myself. Ideally, you want to go in there with the correct stems in hand. Because I wanted my tires done RIGHT, and see every day what goes on back in the shop, I did my tires myself. When I have to do them again (my new shop doesn't do tires), I will take mine off and take them to a shop where I know whoever will actually be doing them. And I will also go in with a nice $100 tip for them too. It is well worth it.
-
Somebody will want that as complete as possible. And while $1500 is high, I would consider it myself were that close to me or delivered. It would be an awesome way to fix a damaged house. And no rotten wood frame…
-
What exactly is “blown”? These are damn near bulletproof. The only kinda weak point is headgaskets. I could be wrong, but I swear I have seen head gasket replacement recommend as an actual service item! In these heavy rv’s, the 22re really get abused. And well we are talking 30+ years old too. Full rebuild kits aren’t that bad if the old motor isn’t badly hurt and in need of lots of machine shop work. I would keep it and go through it. Beef it up, flow the head and intake (if the intake is the same that is). If it needs machine shop work, punch it out!!! Anyways, just super curios as to what went wrong.
-
I think it is in Sprungo’s thread. But I won’t swear on that. wo
-
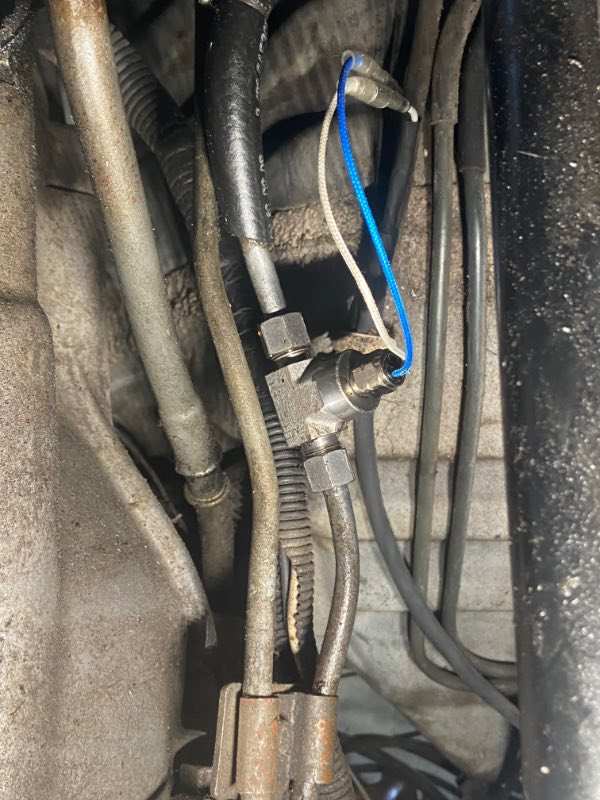
Yep, it is the forward line closer to the bell housing. I verified by pulling the rear line off and stuffing it into a glove, it is the return and filled it up with fluid.
-
I am going to generalize here and not going into specific to this exact combination, but coming from 30+ years of being in the automotive industry that started from stuffing the wrong engines into cars and expanded into a career specifically specializing in tuning and high performance modifications. (Translation, I am not heading down the rabbit hole and reading that link at this moment until I grasp the goals you actually have in doing this.) So let's start there, why are you doing an engine swap to begin with? What are your end goals? 1) If it is simply replacement of a bad engine, unbolt the old one, set on the ground next to the new, and swap over any sensors or other parts that differ. Put the new engine in, plug in, done. 2) If you are swapping an engine to fix engine management running issues the old engine had, well those problems will likely still be there with the new motor. In other words make sure the swap was due to bad internal engine issues, not external management problems. 3) If you are doing this swap to upgrade and get more performance from the newer 22re, you are picking the hardest path and will need EVERYTHING. There is going to be a whole lot of work for what will probably only be a very small performance gain. I won't expand any further on this, unless it is the reason for the swap... More information is needed! What did the 1992 swap motor come out of? Off the top, I'm pretty sure there are no Toyota RV's still made in 1992 coming with the 22RE. Linda will know that one for sure! A quick look at your pictures above and I already see the one problem I figured you would have, the distributer plug is different. The distributer in the newer motor won't work either, you will need the original one. The signals it puts out to the ignition module and ecu are different. Do you still have the old motor???
-
Bill most of these parts are fairly "RV Generic" items. So is there something specific you are after?
-
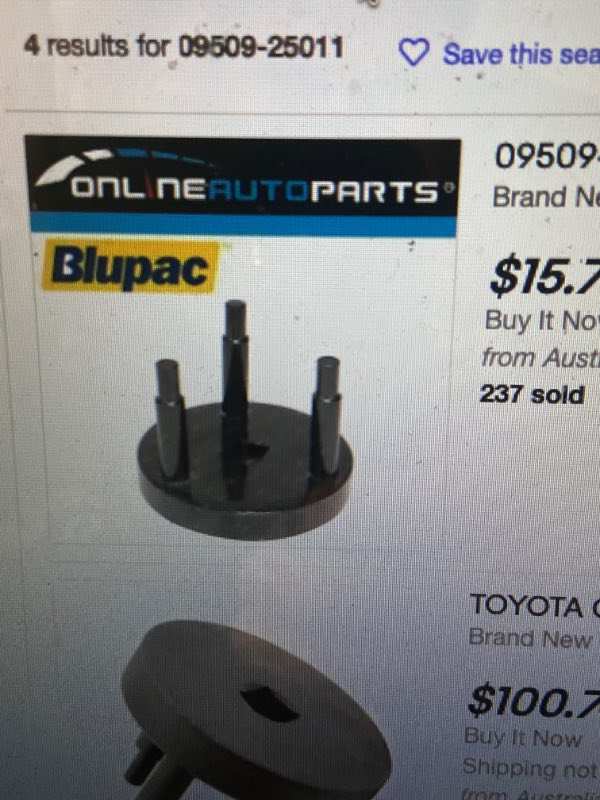
They were a PAIN to get lined up with the holes in the locating washer/plate. I pulled the spinning weird nut thing off and lined up the holes with the pins on the hub for reference and then was able to get it all lined up. Not sure I trust the geometry of using set screws for that application, but I ordered some (proper replacements), so I don't have to think about that too deeply haha! It probably doesn't matter.
-
Like basic Oatey Pipe glue? I actually have a hairline cracks/leak in my grey tank. I could easily fix, AND reinforce the area with fiberglass weave this way.
-
Linda can you explain this ABS slurry I have seen you mention before? What is used to make it? It sounds like a much better solution than replacing the tank, or using random repair products. I had grabbed some marine tank epoxy, this slurry sounds better.
-
Well my plan for today was to button up the brakes and pop the axles back in, refill the rear end, and install the transmission temp sensor. And instead I spent 4hrs looking for the stupid wheel bearing lock screws... Then another half hour looking for replacements online. I have 4 new ones ordered, I will put two in my emergency spares. I probably could just put one back in on each side. Maybe I will for now, but I like the redundancy having two gives. Pulling the parking brake repeatedly didn't accomplish anything. I did this about 30 times then pulled the drum back off and it hadn't moved the adjuster at all. And it is new(ish). I had taken it apart and coated in anti seize lube too. But when I tug on the cable inside the rear shoe assembly, it does grab and adjust the star. Normally I would use a screwdriver, brake spoon, or pliers to adjust the star. I usually pull the drum on and off to do this though, not practical in this case. And doing it with the drums installed, it ALREADY feels like just the right amount of drag, and the adjusters are all the way in. I know the brakes are working, and the parking brake is too. So perhaps leaving the adjusters out and a couple stops in reverse will get it more even than messing with it. And this job just needs to get buttoned up for now. I will be back in there anyways soon enough... I posted up a cool tool I found here in my 1986 Mini Cruiser, a Comedy! thread. I haven't found a "procedure" for utilizing it. The job can easily be done without it, BUT utilizing it with specific torque specs and perhaps an angle gauge when you back it off would give for nice and even/repeatable bearing preload. I will probably grab it as I love collecting dorky specialized tools I will only use once... 😄
-
Murphy strikes again… I went to finish up the rear brakes and put the axles in. The two bearing lock screws for the right side are missing. Spent almost 4 hours looking for them. No luck… Years of wrenching has instilled good habits and I was super careful to stage parts. But these are nowhere to be found. Maybe they ended up at the shop when I cleaned up the bearings and drums. Coming into rainy season again. I need to figure out what model Coleman AC Unit I have, and post that info in the other thread for Linda. I put one of those moisture trap deals under the table. Bottom blew out and it leaked everywhere. Figures. I HAVE to get the roof/ac leak sorted asap!
-
Well even .5mm seems to be too much. I did this from an online picture grab and not an actual flat scan of a gasket. I could see a few inconsistencies in the hole spacing. With some effort I could get it better, but it isn't worth it. As mpanzar mentioned, a gasket isn't that expensive anyways, just long lead times. My initial run is good enough for what it is! I will likely order a couple gaskets, and scan them. LOL! It would be fun to do the same with any of the engine gaskets that lend themselves to being made this way. i probably will at least scan those. But... As cheap as a full set is, I will likely order a set to have on hand anyways. The axle flange gaskets would only take a few minutes to replace. Rapidly diminishing returns on most of the engine ones.
-
I mean it works, it is free and pretty darn amusing! The parts store probably has the plastic impregnated cardboard gasket material. Or I can make these up and smear a thin coat of silicone on each side. But these are in theory just holding the grease in and water out. Honestly, I didn’t clean the flanges on the axles really well, so I needed a bit of smoosh to compensate. Been in the process of moving my tools to a new shop. Axles aren’t in yet so they may still get cleaned up some more. If I don’t put it together tonight or tomorrow…. Probably a part I should order and have on hand though. Add it to the list! I want a full engine gasket set too. This is amusing though and I will probably find something else in the recycling bin tonight and try adjusting the size a touch bigger. I’m almost there!
-
Well 1.4mm bigger was WAY too much. I probably only needed .5mm. And I am out of cereal box material (for now haha)! I could get actual gasket material from the parts store, but that's not much fun. It is amusing utilizing what is on hand and thinking about other materials to try. I have an inner tube... I will stick to the first batch I made for now though.