

Giant in a Shoebox
-
Posts
31 -
Joined
-
Last visited
Content Type
Events
Profiles
Forums
Gallery
Everything posted by Giant in a Shoebox
-

Getting the best MPG on Interstate
Giant in a Shoebox replied to centralman's topic in General Discussion
It's a three step process to do it right. 1. Pull into a truck stop. 2. Wait for a truck that says "Swift" to get on the interstate. 3. Follow that truck. Swift governs their entire fleet at 63mph. That's my rig's sweet spot for staying in OD without downshifting. Drafting the big rig helps quite a bit. I've heard the same from others. -
Of the more than half dozen rigs I looked at, I only recall seeing one with seatbelts in the coach seating. They were just screwed to either the bench framing, or the wall... I think it was the wall. I saw no evidence on any of those rigs of any anchoring system that tied into the truck frame. I'm guessing most owners decided they were useless and removed them sometime in the last 25 years. I guess what I'm saying is that for less than 20 bucks you can set your rig up with seatbelts, assuming you are capable of finding a couple of wall studs. They'd probably be ok in a fender bender, or for the purpose of satisfying an inquiring policeman, but would likely be very unsafe in the event of a serious accident. The couch style ones totem described might be ok though.
-
Buying a Dolphin, would love to hear your thoughts.
Giant in a Shoebox replied to dropknee's topic in General Discussion
That water damage looks pretty significant to me. That ceiling is going to be full of mold. Some people don't mind the musty mold smell, but I can't deal with it. If I were you I'd come up with another $500-1000 and wait for a newer model with a 22r/re motor, upgraded axle, and less water damage. That said, if your heart is set on that rig, it's probably worth 2k if everything works, fridge, hot water, furnace, AC, stove, lights, everything. Figure on shelling out a 500 dollar bill for any one of the first 4 things on that list. FYI: I looked at 6 or 8 rigs before I found one with all systems working that was only half-full of mold. Good luck. -
I found the details for the Indian riding the snail. It's from a 1911 Fiat. Sadly, eBay didn't have one for me. While looking around, I kept an eye open for Stamar's dolphin. No luck, but I did find a trout and a marlin that sort of looked like a dolphin.
-
That's friggin' awesome, Gary. Got a source?
-
So I have a hole in my hood that's going to need something super awesome bolted through it. I'm leaning toward something like a bowling trophy topper, or maybe something like this: Of course I'd get someone cooler than Barbie to ride the gator, but I'm open to other suggestions. Anyone got any sweet hood ornaments to share? No bull horns, please. I'm not a Texan. ------- The image went away for some reason. Trust me, it was sweet.
-
1995 3.4L 5sp 4x4 Bajarader (Put the sawzall down)
Giant in a Shoebox replied to bajadulce's topic in General Discussion
I hadn't checked in on this project in a while, it's looking great. I dig it. Are you planning on using any under-slung storage boxes, baja? Or are clearance and weight issues more important now? -
Thanks again, John. You've saved me (more) hours of fruitless searching, as well as a sizeable pile of cash by writing this thread. It's much apreciated.
-
Should I run from this deal? '84 New Horizon $2900
Giant in a Shoebox replied to runfromturtles's topic in General Discussion
My '85 is all aluminum siding and steel framing, as was another '84-'86 or something N.H. that I didn't buy. What vintage was the fiberglass model? I only saw one of those, and it was some off brand that I don't recall. -
'85 New Horizon renovation
Giant in a Shoebox replied to Giant in a Shoebox's topic in General Discussion
Thanks, Davidadro. Now if I can just get my shop time down to under a year per rig, maybe I can go pro at this... -
Light Fixtures - where and what to get?
Giant in a Shoebox replied to Scottybuck's topic in General Discussion
I was in the same boat, with dirty looking yellow fixtures, and opted to just replace all of them. At Camping World (not known for low prices) modern looking replacements were 6 bucks apiece for single bulb, and 13 bucks for double bulb. The LEDs were all $35 and above. On the advice of my local RV repair guy I went with a fluorescent fixture for the middle of the coach. That was a $60 light, and it illuminates the whole RV, and only uses 2/3 of the juice that a standard light would pull. -
I just found this thread from you linking to it John. Thank you for posting it. I need to do airbags too. When you decided on the 3-T kit, did you find any other options out there? Was 3-T the best for some reason, or just the only kit out there? Apparently Firestone told my tire shop that they don't have a product to replace the original; the one they manufactured. It's good to know there's an alternative short of installing an entire brand new aftermarket system.
-
'85 New Horizon renovation
Giant in a Shoebox replied to Giant in a Shoebox's topic in General Discussion
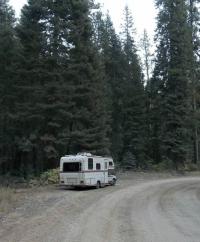
Thanks for the kind words. Sorry for the delay with pics, sometimes when I say "pics tomorrow" what I mean is "pics in a month or so." Here's the plywood floor installed: Like everything with this job, the cut sheet looked like detailed instructions for replicating a specific jigsaw puzzle piece. Straight lines and 90 degree angles were rare, pretty much every cut tapered off on one end if not both. New vinyl installed: Ceiling painted: Overhang finished, with the exception of the other two new curtains which have been installed since taking this photo: Here's a look at the previous bathroom wall covering. The whole thing looked this bad: New bathroom walls, and repaired shower pan. The shower's edge, and the plumbing behind the toilet will be boxed in with some nicely grained hickory I've got in the shop. Thankfuly my co-pilot approved the repairs in time for Labor Day: One more camping pic, this one from last weekend: Final update to this thread will be a finished bathroom complete with a mirror, medicine cabinet, and custom wood trim. Thank you all for reading, responding, and sharing your experience. It's been good. I'd encourage all of you to post threads about any similar repairs you make, as I couldn't really find any usefull posts anywhere on the webs about tackling this type of project. The best I found was one text-only account about the right way to re-build from the outside in. I found little to nothing about just making things work an easier way. That is the reason this thread is here. Hopefully people will find it useful. -
Parking in exchange for house work/repairs
Giant in a Shoebox replied to gosagitt7's topic in General Discussion
So your Buddhist nature has prompted you to be liberal enough with your piece of earth so as to allow another human to park there, provided they work for free? Sign me up! I haven't seen this good of an offer for indentured servitude in quite a while! Screw groceries, I'll work for the right to exist on a 7'x21' piece of the planet! -
Add one more endorsement. I'm in the West, and I want one. Once my AC dies it will be replaced with a 12v evaporative unit.
-
Bubble Window Replacement on Mirage
Giant in a Shoebox replied to o*Live's topic in General Discussion
If I understand correctly, this rig is going to be set up to be used like a cargo van, not a camper. Considering it's gutted condition, and intended use, I'd take out the existing window frame, frame it in just like the wall around it, and then patch the exterior skin right over it. Quick and dirty is the way to go here. There's no sense restoring the rig to original condition if you don't need it to be a nice camper when you're done. -
'85 New Horizon renovation
Giant in a Shoebox replied to Giant in a Shoebox's topic in General Discussion
Update time: I took the forum's advice and glued almond colored FRP, and the appropriate FRP trim pieces to the existing bathroom walls after bleaching them for mold control. It looks good. For the flooring I glued 1/2" AC grade exterior plywood over the fiberglass floor with trowel-on Liquid Nails adhesive, and drilled, countersunk, and screwed it to the steel framing while the adhesive was still wet. The floor is rock solid now, and I've got a guy coming to lay vinyl flooring this week. The last repair that I was sweating was my shower pan. I couldn't get a replacement, and sending it out for a re-build was way too expensive, so I had to play with fiberglass. I'd never used the stuff before, and it was just as messy and frustrating as I'd feared. Thankfully you can grind and sand the stuff, then paint over it. The shower will definitely be the most amateurish looking repair on the whole rig, but it's better than a cracked shower pan. Now I've reached the fun stage of the project where the painting is done, and stuff starts going back together instead of coming apart. It feels good. I'll be on the road for Labor Day. Pics tomorrow. -
Looks like fun. On the bright side, you've gotten the cabinets out and are working with a wood floor, ie: you can easily replace what's there with good wood. As for a wiring diagram, I don't have one, but if your dolphin is like my New Horizon, the 12 v. wiring was run in two circuits down the ceiling, with all of the lights wired in two separate series on each side of the rig. The water pump and tank gauge wires ran up from behind the breaker box , then parallel to the driver's side circuit in the roof, then back down to the water tank. The clearance lights ran off of the truck battery under the coach with the brake lights, then up the wall to the rear passenger side clearance light, and from there they were wired in a series from that back corner over to driver's side rear, then forward, again parallel to that side's 12v circuit up to the driver's side front clearance light, and in a series over to the passenger side front light. The 110 ran from the plug into the back of the circuit breaker, then up the wall, and across the ceiling to the AC, then down into the cabinet for a plug-in on one side, then the other side ran from the breaker back to another plug-in. Once you tear into the ceiling you'll know if you're working with a similar system. Good luck.
-
Thanks for the link, Linda. Sadly, that's the same catalog that CW had. There's nothing in there that fits. My pan is odd shaped, with a notch cut out of the corner for the sink plumbing to come up through a little walled-in box. It looks like this: I'm thinking repairing the existing pan is probably my only option.
-
I just went to Camping World today looking for a new pan. No luck. They've got them for Dolphins and Winnies, but not my model. Now I'm looking at using John's method, but I'm kind of stuck. I've got a crack in the bottom of the pan, and an old "repair" that needs to be cut out and re-done. I could just lay a new layer of cloth and resin or cloth and epoxy over the existing pan, right where it sits in the RV. I would glass up to the edge of the drain, but probably not mess with the existing drain connection. I'd also add spray-foam under the pan to give more support than the blocks holding it up currently provide. My other option is to remove the pan, make the repair, or have the pan restored for many dollars, then install it with proper support across the whole base. If option #1 is best, there is no problem. If option #2 is best, how the heck do you disconnect the drain? There's only about an inch of space under this thing where the PVC screws onto the metal drain. I can disconnect it, but have no idea how I would ever get it put back together. Below the floor the joints are all glued up until the tank side of the trap. Do these things get installed from the underside? Is the gooped-in drain supposed to spin or something? I'm at a loss here. So, toyhouse aficionados; which option is best? Got any more tips and tricks to shower pan sourcing, re-furbishing, and installation?
-
What Combo provides best gas mileage (on flat land)?
Giant in a Shoebox replied to bigtiki's topic in General Discussion
When shopping, I too saw claims of mileage between 15 and 22 mpg. These were all 20 and 22 r's. The claims didn't seem to depend on auto vs. manual transmissions at all. I've only taken one trip, but kept my foot out of it, driving with mileage testing in mind. The vehicle is a 21ft New Horizon, stick construction, not fiberglass body, 22re, auto trans w/OD. Driving a hilly course both directions with quite a bit of wind, much more head and side wind than tailwinds, 45-55 mph, full water tank one way only, it got 16.6mpg. That was about what I'd hoped it could do. I suspect that on an ideal trip over flat ground with no wind it could get near 19mpg, maybe 20 on it's best day. Having driven an older model with the 20r, the power difference is very noticeable, so much so that I doubt the smaller motor would gain anything in mileage as it's just working harder. I doubt a manual transmission would boost the numbers much either, unless you drove like a hyper-miler nursing the gas pedal to match gears and avoiding shifting as much as possible. I suspect that to exceed 20mpg you'd need a rig like bajadulce described, short and ultra light. -
'85 New Horizon renovation
Giant in a Shoebox replied to Giant in a Shoebox's topic in General Discussion
The gap almost everywhere is about 1/8 inch in the spaces between the steel supports where the fiberglass sags. There is one small area next to the bathroom wall, which sits on unsupported fiberglass, where the gap is almost 3/8. Marine products are out. I don't have a supplier, and don't want to wait for materials. I'm limited to lumberyard and big-box store products. Buying a case of tubes doesn't seem unreasonably prohibitive. We're only talking about bedding a sheet and a half of plywood here. Foam is a good suggestion, but thickness rules it out, because I want whatever I lay down to sit low enough to allow sliding the fridge out if it needs replaced someday. I've got room for 1/2 inch of plywood, and a sheet of vinyl, and that's pushing it. I'd like an adhesive between the FG and plywood to add strength, and eliminate movement, thus wear points. I could probably live with fasteners alone, but as I said, thickness alone pretty much rules out any additional layers of non-glue/caulk stuff. -
'85 New Horizon renovation
Giant in a Shoebox replied to Giant in a Shoebox's topic in General Discussion
Thanks for the advice, Gents. I'm sold on FRP now. The only other material I could think of was formica, so I'll be more than happy to save a hundred bucks and have a more flexible material. As for flooring, I've hit a minor snag. After pulling up the carpet and pad I found nothing more than a fiberglass sheet/pan/whatever screwed to steel framing under my feet. I was expecting to find something more substantial that could be replaced. I'm pretty sure plywood will be solid enough over the existing framing, but it will be laying on top of a very uneven surface. I can screw the plywood to the framing, and maybe screw the fiberglass up into the plywood as well, but when it comes to a bedding/adhesive, I'm clueless here. What I don't want is a gap between the fiberglass and the subfloor. I'm not quite sure why, but it just sounds bad. If it weren't for the foamy mess I'd use Gorilla glue, if it weren't for the cost, the mess, and the hassle I'd use epoxy. Will liquid nails, or PL Premium be up to the task? Is there another product I should consider? -
'85 New Horizon renovation
Giant in a Shoebox replied to Giant in a Shoebox's topic in General Discussion
Next up is flooring and bathroom walls. The floor is spongy in places, but seems to have solid framing. I'm thinking that I can remove whatever sub-flooring I find, add to and re-enforce framing when necessary, and top with new sub-flooring. Is OSB an acceptable material, guys? Do I need a layer of plywood under that for additional structural support? I'd like to keep the thickness to a minimum as headroom is a precious commodity. For bathroom wall covering, I'm leaning strongly towards FRP http://www.lowes.com/pd_6891-293-FTSTF.12_0__?productId=3152519&Ntt=frp&pl=1¤tURL=%2Fpl__0__s%3FNtt%3Dfrp&facetInfo= Does anyone have experience with this stuff? Any alternative suggestions? Any advice would be appreciated. -
'85 New Horizon renovation
Giant in a Shoebox replied to Giant in a Shoebox's topic in General Discussion
Well, it's time for an update. Progress has been slow, but I've got the new paneling pre-primed and hung, old wallpaper removed, trim installed, caulking done, moldy areas sanded and bleached, and it's now ready to primer and paint. While I had things torn apart I added a 12v outlet above the driver's seat in the overshot. Now I've got a 12v outlet at both ends of the coach running off of the house battery system. The level of fit and finish isn't as nice as I'd like. However I find that constantly reminding myself that I'm fixing a 25yr old RV, not building a piano helps me ignore the flaws. Here's the trim I used, it's all composite material of some sort: It's a small crown moulding called "bed trim" "bed bead" or something like that. I ripped it down so it would sit high enough to give the cabinet doors enough clearance to close, while still leaving just enough space behind the moulding to accommodate the 1/2" steel re-enforcement that was installed. To get around the curves in the front overshot area I used 4 thin strips of moulding which looked kind of like this, except the flat pieces were ripped to about 2/3 of this width: It blends in OK when finished off with a bead of caulking. That's it for now. Time to go paint.