Bodybagger
-
Posts
123 -
Joined
-
Last visited
Content Type
Events
Profiles
Forums
Gallery
Everything posted by Bodybagger
-
 It's wood framing with occasional aluminum panels such as the roof. Unless it's been stored inside, or in the high desert, there will be evidence of moisture behind the fiberglass and aluminum skin. There's just no way around this. As the bumper sticker says, it happens. If it has an automatic transmission, check the yoke (output shaft) at the extension housing (rear cone shaped part of the transmission) for ANY side to side play. Look for the telltale slinging pattern of transmission leaking from the yoke seal. Grasp the driveshaft and the U-joint clasest to the transmission firmly and shake it with all your might. If you feel it click and move around, it needs an extension housing bushing NOW. You can have one put in - takes about 1 hour and should cost about $100 and they DO NOT need to remove the transmission. Or you can drive it like I did and pay $1500 to get it rebuilt when you get home. The choice is, of course, yours. This small problem is VERY common and seems to happen between 50k and 70k miles. And this small problem will ruin a transmission in a fast hurry.Check the fluids. Engine oil. Coolant. Power steering fluid. Brake fluid. Rear differential fluid. But most importantly, check the transmission fluid PROPERLY. This means start the engine-run it for 5 to 10 minutes, cycle slowly through P-R-D-2-1-2-D-R-P then check the level on the dipstick while the engine is runing and the vehicle is level. Do not overfill. Beware if it's low as this may indicate a leak. Beware if it's grossly overfilled as this indicates somebody knows it's leaking! Have the charging system tested. If the charging isolator is bad (the splitter that directs the charging current to the front and rear batteries), the alternator will NOT CHARGE and will appear to be bad. DO NOT LEAVE TOWN ON A BATTERY THAT HAD TO BE JUMPSTARTED!!!!!!!! You will be sorry! Tell the seller to make sure the battery is fully charged and that means put a 6 or 10 amp battery charger on it for 24 hours. Bring a set of 2 new 17 inch windshield wipers with you. On seasonal vehicles they tend to be so weathered and bad that you cannot see if it rains. Bring a set of jumper cables. Buy a 25 dollar 1/2" drive click set torque wrench at walmart in the automotive department to torque your lugnuts to 100-120 ft-lb and stop every 50 miles to re-torque them until they hold. On your first trip, they will loosen! I think you want a 24mm socket but I don't remember. Check to see that the air bags are inflated or it will feel like it's about to fall apart. After you purchase your MH, go to a hotel! Don't start a long journey at 5pm. And it will be a journey. There will be bugs you have to work out. And you need to go slow. Plan on averaging 50 MPH. Only use overdrive on level ground. Any hint of a hill and you'd better get out of overdrive. So get a good nights rest and leave at first light the NEXT DAY. Take your time and enjoy your maiden voyage.
 -
If your battery isolator is shot, your alternator will not put anything out! It will "see" a disconnected lead and will shut down voltage to the field. See http://bluesea.com/viewresource/91 for a pretty good generic description of the system. This is called overvoltage protection, or open circuit protection, or various other names. On some alternators, particularly older ones, if the alternator's charging post is disconnected from the electrical system, it will have no load and the voltage will surge wildly out of control and it will instantly fry the rectification diodes. Think of ohm's law. If the alternator idles at 10 amps and the resistance of the load is changed to infinity (open circuit), then what is the voltage? V=IR or 10 times infinity. If your isolator is preventing the alternator from seeing battery voltage, it will not operate correctly. Now whether it fries the diodes or shuts down, or simply puts out less power depends on the alternator and what voltage it is seeing. With the engine running, and the black lead of a DVM connected to the chassis ground of the vehicle, measure the following voltages... They should all be 14V give or take. Voltage of alternator output (measure at the lug on the alternator being careful not to short it). Make sure this corresponds to the voltage at the charging input lug of the isolator. Voltage at the engine battery lug of the charging isolator. Make sure this corresponds to the voltage at the engine battery. Voltage at the coach battery lug of the charging isolator. Make sure this corresponds to the voltage between the + and - terminals at the coach battery. Measure those and let us know what you find out.
-
Fab a new one on the truck frame. Mod the truck, not the axle. A very good, qualified welder should modify this as it is going to be subject to cyclic loading and metal fatigue. This is no sweat if it's done right.
-
A fully charged battery would cause this. If the charging system were constantly pushing a hundred amps into your battery, it would cook it and boil out the electrolyte. The rating of an alternator is the maximum amperage it can supply under essentially a dead short. It only puts out a large amount of amps if the battery is low or there is a huge demand on the electrical system, such as a large inverter drawing a big load.The question is this: Does it maintain the ballpark of 14 volts on your electrical system while it's running? Now does it do so under load? Now, if it doesn't, the problem may not be your alternator. It could be the charging isolator (splitter) that takes the input from your alternator and routes it to the two different batteries. It looks like this: http://www.pplmotorhomes.com/parts/rv-conv...ry-isolator.htm .95A @120V is 114W which is what its using when it is running. So it is assumed to run at a 52% duty cycle to maintain temperature, thus having an average consumption of 60W.Now an inverter putting out 120 volts with 85% efficiency will require an average of 5.88 amps at 12 volts. Each 24 hour period, you will consume 141 ampere-hours of charge. A good starting point would be to use 2 parallel group 27 deep cycle batteries in your coach. This will provide you with 24 hours of reliable fridge use, with a little reserve and not overly discharging the batteries. Now recharging them should (in theory) only take 2 1/2 hours of driving with your 60 amp alternator. Of course some of its output will be diverted to running the ignition, instruments, headlights, etc. If that's the case, I'd recommend getting a 100W solar battery charging panel and mounting it to the roof. My recommendation is to go stock, but insure that the charging isolator (splitter) is functioning properly.
-
SKF has been making world class bearing for a long time. They ran a great deal of the bearings manufacturing at Schweinfurt, Germany when it was bombed in WWII (though Allied intelligence used the name of the local subsidiary to make the target sound more German than Swedish. The two raids were historic and resulted in the worst losses in the history of US air power. In aviation, "Black Thursday" refers unmistakably to Oct 14, 1943.See http://www.thirdreichruins.com/schweinfurt.htm http://en.wikipedia.org/wiki/Schweinfurt%E...ensburg_mission http://en.wikipedia.org/wiki/Second_Raid_on_Schweinfurt It would be nice to have a torque wrench and a special socket. You can make a socket that works by purchasing a cheap, large socket (maybe 15 bucks at Harbor Freight or Autozone... such as a large axle socket) with an outside diameter approximately the same as the OD of the axle nut. Using a right angle grinder, you must grind 3 equally spaced slots in the socket to accept the 3 studs on the axle nut. Spacing them 120 degrees is simple... The socket has six sides. Use the hexagon as a guide.You really should have a 1/2" drive torque wrench for this baby. It's the best way to ensure your lug nuts are equally tight, among other things. The one with an adjustable handle that clicks to let you know you've reached the set torque can be had at many Wal-Marts in the tire/trailer/automotive section for 25-30 bucks. Or you can get one at Habor Freight http://www.harborfreight.com/cpi/ctaf/disp...?Itemnumber=239 If you don't have that, you can use a screwdriver or punch and a hammer to turn the nut. But I recommend the torque wrench method. Other than that, you will need the following: Heavy duty hydraulic jack. Jackstand Brass drift punch, 1/2" diameter by 6" long will do. Hammer Sharp cold chisel, 1/2" wide will do. 12mm socket and ratchet Lug wrench. Crow bar works well for removing the big seal 2 cans of Valvoline SynPower synthetic wheel bearing grease. 60cc syringe (a "flavor injector" from the cooking aisle at Wal-Mart will work)-fill with grease and inject into the bearing. Takes a lot of the work out of packing them. Or you can buy a conical bearing packer for 6 bucks, but you'll need a grease gun and you'll need a tube of the aforementioned grease in order to use it. But man does it work well! One special tool you will need is a bearing race driver, such as http://www.harborfreight.com/cpi/ctaf/disp...temnumber=95853 You could try to seat the races with a brass drift, but sometimes this can ruin them. But you only need that if you are replacing the bearings and races. I will say that there is a 90% chance your bearings are OK and just need to be repacked, but you won't know until you get them out and thoroughly clean them in kerosene. I'll gladly give advice. But if you run into serious problems, beware that there is only so much fixing I can do from a keyboard. I visually inspected for cracks. I have never seen a full floating axle break and the only times I've ever seen them bend is when people install spools for rock climbing. I've never seen a full floating hub break, ever, even in off road construction vehicles. This is not an aircraft so I didn't feel compelled to do a dye penetrant test or magnaflux the parts. I looked down the axles and they looked straight. A trained eye can spot that runout easy. And the runout of .079, though seemingly large, is on a part of the shaft that doesn't t touch anything. It's a non-critical dimension. Excessive runout simply indicates bending due to overload.Also, I DID NOT push out the studs. Again, this is not an aircraft and there is no TBO time on the parts! When one stud breaks, I will replace them all. I use a $5 fish scale from the fishing section at Wal-Mart. Just hook it to the stud. Drag should be about .5-1 lb. Be sure to note reading after it starts moving. You want to measure the dynamic coefficient of friction, not the static coefficient of friction. I'll check daily, but personally, I wouldn't worry about them until after your trip. The thing I would do before your trip is get under it and yank side to side on the yoke coming out of the transmission and check for a worn extension housing bushing! If it wiggles side to side even a little bit, DO NOT go on your trip until you get the simple fix. Your rear wheel bearings are probably fine and just need cleaned thoroughly in a parts washer and re-packed. It's the extension housing bushing I would worry about. Problems with full floating 1-ton axles are down the list with Ext housing bushing probably being at the very top. Be sure to look for signs of slinging ATF.Check your messages!
-
1986 is the first year dual wheels show up as an option on the Autozone catalog. Go to Autozone.com Enter vehicle as 1986+ Toyota RN(4cyl)Truck 2WD Engine irrelevant Go to DRIVETRAIN Go to WHEEL BEARING - REAR NARROW SEARCH in upper right corner to "Full-floating (Has a hub sticking out of center of the rim)" The options that come up are: *Part# SET47 Timken Wheel Bearing - Rear Application: With dual rear wheels/Full-floating (Has a hub sticking out of center of the rim) Notes: Outer set $17.99 *Part# JLM104948 Timken Wheel Bearing - Rear Application: With dual rear wheels/Full-floating (Has a hub sticking out of center of the rim) Notes: Inner Bearing $14.99 *Part# JLM104910 Timken Wheel Bearing - Rear Application: With dual rear wheels/Full-floating (Has a hub sticking out of center of the rim) Notes: Inner Race $4.99 You will also want to look under related parts for a wheel seal. Narrow search again to dual rear wheel application. *Part# 710076 Timken Wheel Seal - Rear Application: With dual rear wheels Notes: Outer $13.99 *Part# 226285 Timken Wheel Seal - Rear Application: With dual rear wheels Notes: Inner $5.99
-
They've got to search under Toyota Pickup at Advance and 2WD RN Truck at Autozone, then you can specify dual rear wheels. About right if you got 2 large bearings, 2 small bearings, 2 small races, 2 large races, and 2 axle seals for doing driver and passenger side. Very expensive if you just got the stuff for doing one side. Are they Timken name brand? Yes. You lucky dog (or should i say cat?), you have the heavy duty axle. Because they are used to working on cars. You DO NOT HAVE TO PULL THE MEATBALL OUT. Full floating axles are not held in with c-clips. They just pull right out once you get the cone washers out! Servicing the wheel bearings on this particular axle is almost EXACTLY like doing it to a Ford F-250/F-350 truck or E-250/E-350 van. The only difference really is the Toyota has cone washers and the Ford just has bolts/lockwashers. Take it to a Ford Truck mechanic and show them the PDF file and tell them it's exactly like the Ford axle. They'll know what to do.
-
I would take a cold chisel and hammer a cross hatch pattern into both sides of the holding bracket. The aluminum body of the alternator is soft and it would serve little purpose to put a pattern into it. It should absorb the ridges from the pattern you put on the holding bracket. You want raised ridges in the hard steel of the bracket. Not cut valleys.
-
See if you can wiggle the propeller shaft where it exits the transmission extension housing. I fear you have a worn extension housing bushing and this will rapidly destroy your transmission. Carefully read http://toyotamotorhome.org/forums/index.php?showtopic=268 and http://toyotamotorhome.org/forums/index.php?showtopic=1793.
-
If you have the full floating rear axle, the outer bearing set is 17.99 from autozone and the inner bearing set is 14.99 from autozone. You'll want a new axle seal which is about 6 dollars. It should take no more than 2 hours time for even the slowest, laziest mechanic, including problems with the dreaded cone washers. I've re-packed mine (which takes more time than replacing them since you have the extra step of meticulously cleaning the old ones) and the whole process took me 1 hour per wheel, and 30 minutes to get the stuff from the auto parts store. Assuming $60 per hour, you are looking at $140-$200 tops after they mark up the parts. You do not need any special tools despite what the manual says. You can remove the bearing nut with a hammer and a screwdriver. I strongly recommend the new ones be packed with Valvoline SynPower synthetic wheel bearing grease. Also, beware of inexperienced mechanics screwing up the cone washers. A little WD-40 and a GENTLE hammering from an air chisel gets them right out. Better spray the WD-40 on ASAP so it can soak. See the attached PDF. Now, if the axle is not the full floater, you probably have a damaged axle and you are in serious trouble. If that's the case, fix it, jettison all unnecessary weight, and limp home slowly on smooth roads. Then look for a full floater. 1ton_bearings.pdf toyota_front_hub_and_bearings.pdf
-
First, I love the attention to detail and the patience of the Swiss. Anyone that has used a Wild-Heerbrugg T-2 can attest to this. It is typical for a battery to have a capacity of 100 ampere*hours. So for a "completely discharged" battery (which occurs around 11.9 volts), you would need to charge at 10A for 10 hours... or 5A for 20 hours. But the safest way is to charge at 2A for 50 hours. The faster you charge, the more heat builds in the batter, and the shorter its life will be. But batteries rarely last more than 5 years. The best way of measuring the charge level of a battery is with a hygrometer. You simply draw electrolyte from each of the 6 cells and the device shows the density of the fluid. A density of 1.265g/ml is fully charged. A density of 1.120g/ml is completely discharged. See http://www.schumacherproducts.com/applications/?id=0007 You will need a rubber padded 5/8" spark plug socket. Examine the plugs and compare them to this chart: http://www.ngksparkplugs.com/tech_support/...aqs/faqread.aspWhen you install new plugs, be sure to set them to the proper gap of 0.8mm (.030"). Before installing them, coat the threads with a graphite or copper anti-seize compound. It is like silver or gold grease. http://www.buyhardwaresupplies.com/?t=5&am...mNumber=8058257 It can be found in any auto parts shop. But you should probably remove the distributor cap and rotor button and carefully polish the contamination from the electrodes. Also, check each spark plug wire - measure the resistance from end to end. It should be 1kOhm-20kOhms.
-
Yes. Remove the adjustment bolt and clean the holding bracket and alternator with acetone. Place Locktite 242 on the mating surface between the alternator body and the holding bracket, and on the threads of the adjustment bolt. You could also try placing a neoprene washer between the alternator and holding bracket. If this doesn't hold it, maybe you should remove the holding bracket and grind a series of small notches in it. Or sand it shiny smooth and place it next to some dirty metal getting welded and the weld spatter that gets all over it will bite into the alternator and provide friction. Be sure to apply Locktite 242 (or permatex blue thread locker) to the bolt threads.
-
Yes. Read http://www.toyotamotorhomes.com/files/Axle_FAQ.pdf then look at the rear wheels. Forget about the number of lugs... look for the LARGE HUB that extends through the wheels by 6 inches or so. If there is no hub you have a bad axle.
-
See http://home.4x4wire.com/erik/diffs/ It sounds like the axle you got has a 2 pinion differential and the axle you are replacing has a 4 pinion differential. I am not sure that swapping the two differentials is as simple as removing one and bolting the other one in. Above all, make sure you are not getting a higher gear with a ratio lower than 4.10:1. See if you can read the axle identification. See http://www.toysport.com/Technical%20Inform...tifications.htm for decoding it.
-
When you say it leaks where the regulator goes into the tank, do you mean it leaks where the regulator connects to the valve? or do you mean the valve leaks where it threads into the tank? Which valve is on the tank... or The top one takes a CGA 510 connector which may or may not have a rubber o-ring on it. Some do for added sealing ability, but most of them are just smooth brass. But the inside of the valve also may or may not have a rubber sealing surface. Depends on what valve you have. If your valve looks like the one on the top and lets gas out when you open it, it probably doesn't have a gasket in the valve. If no gas flows until you screw on the CGA-510 connector, it does have a gasket. If deteriorated, it may need a new valve. Silicone dielectric grease works wonders on gas connections. If you have a valve like the lower one, it is a 45 degree flare fitting. You may have a nick in the flare of your tubing. It may need to be deburred with a 45 degree deburring tool. Regardless of what type of fitting you have, never apply thread seal tape or pipe dope to the threads! The sealing surface is NOT the threads and adding tape will only decrease the sealing pressure on the connector face. If it's leaking around the threads of the tank valve where the valve meets the tank, you should take this opportunity to replace the valve - you'll have to remove it anyway to install new thread sealant (the tank valve sealing surface IS the thread interface between the valve and the tank - it's not a connector).
-
Do you have 50-70k miles on the tranny? Have you checked for play at extension housing bushing? Very simple. Get under it and wiggle the driveshaft at the transmission. If it wiggles, you have a worn ext. housing bushing. Have a tranny shop measure the governor circuit pressure throughout the driving range. I think you will find it is low due to damage to the transmission case from the output shaft wobbling too much. I just rebuilt mine from this very common problem following almost exactly the same symptoms.
-
I took all of those off mine because they are notorious for leaking. If you have to pump up your tires constantly, you have a leak - address the problem and fix the leak. Then when you need to add a little air, do it at a truck stop where every air chuck is a dually head.
-
If it's just a leaky rear seal, it can be changed without removing the transmission. But that rear seal is so well designed that the only way it leaks is when the extension housing bushing is worn WAY out. That bushing can be replaced without removing the transmission as well, but unfortunately, if it has worn enough to cause a leak, it has allowed the output shaft to vibrate enough to wear out the rear case bushing. Fixing that bushing will require a complete transmission teardown. Check for a worn extension housing bushing by getting under it and jerking the driveshaft right at the yoke from the transmission. If it moves side to side enough to be detectable by touch, you've got a worn extension housing bushing and likely a worn case bushing. You can confirm a worn case bushing by doing the following: Remove driveshaft. Looking into the extension housing, Wiggle the splined output shaft with a little phillips screwdriver inserted into the center hole. It should wiggle about 1/8" (tight) to 1/4" (loose) as measured at the end of the shaft. If you can wiggle it enough to touch the extension housing bushing, it's probably already cutting rings in your case bore. I'm almost finished rebuilding mine at 58k miles due to the "leaky rear seal." See http://toyotamotorhome.org/forums/index.php?showtopic=1793 and http://toyotamotorhome.org/forums/index.php?showtopic=268
-
There is an electrical solenoid that controls the overdrive range. But it won't shift into OD unless the governor pressure is high enough, even if the solenoid is working. Having a tranny rebuild by an AAMCO franchise doesn't carry a lot of weight in my book. I started typing in "aamco" in the Google toolbar and one of the autocomplete options was "aamco complaints." As spungo said in his thread, these franchise tranny shops fire people who take time to properly clean parts. If you are seeing transmission fluid 3,000 miles after a rebuild under normal driving, there is something really wrong. If you are seeing fluid, see if it's slinging out of the rear of the transmission. Feel the yoke at the extension housing. Does it wobble when you jerk it back and forth? Or is it solid. When the typical failure happens, it starts with OD. Then, you can't get into 3rd. Then, you can't even get out of first. This is due to a progressive loss of pressure in the governor circuit. The first test you should have done is a hydraulic pressure test. The governor pressure (as measured at the governor test port on the rear drivers side of the transmission) should be 13-21psi at 17-21MPH, 23-31psi at 30-37MPH, and 58-75psi at 57-71MPH. If the pressure plateus out, suspect a problem with the governor circuit... The line pressure (as measure at the line pressure test port) should be 65-77psi in drive, 100-117psi in reverse. If you have a wollowed out extension housing bushing, passing these tests won't really matter because you likely have a worn output shaft bushing as well, requiring a teardown to replace. I'm rebuilding mine at the moment.
-
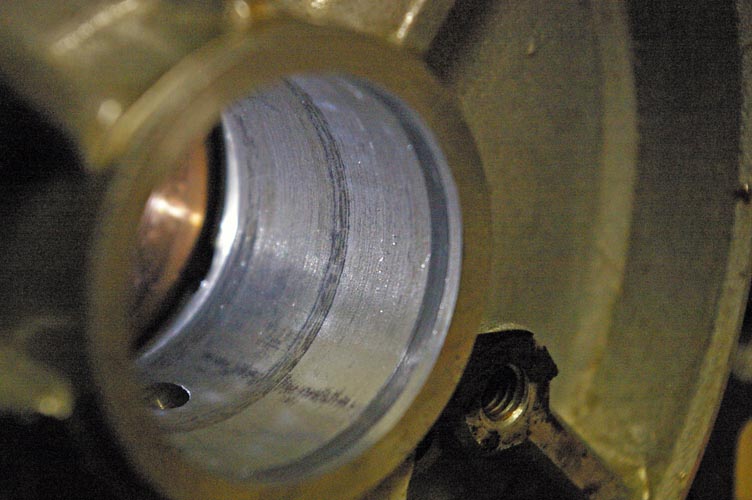
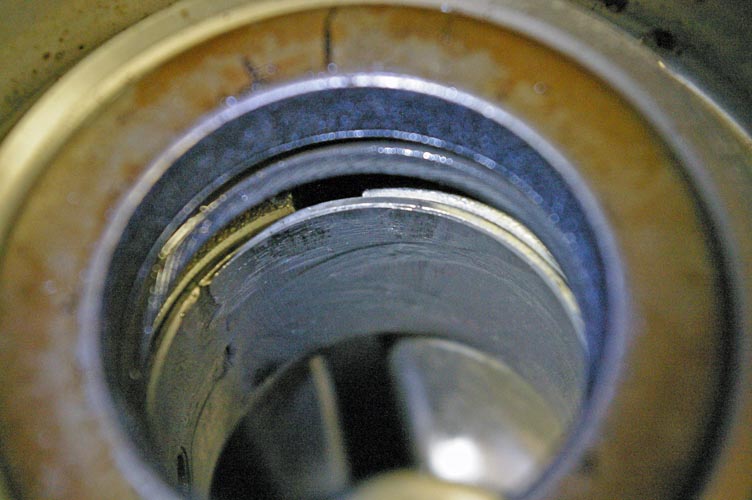
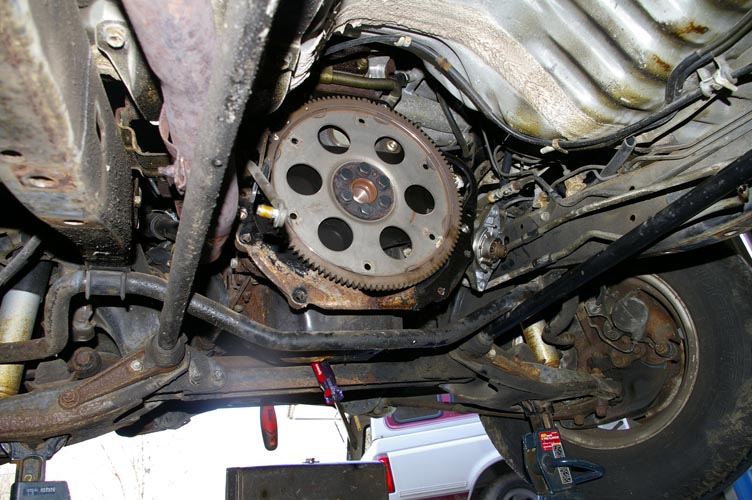
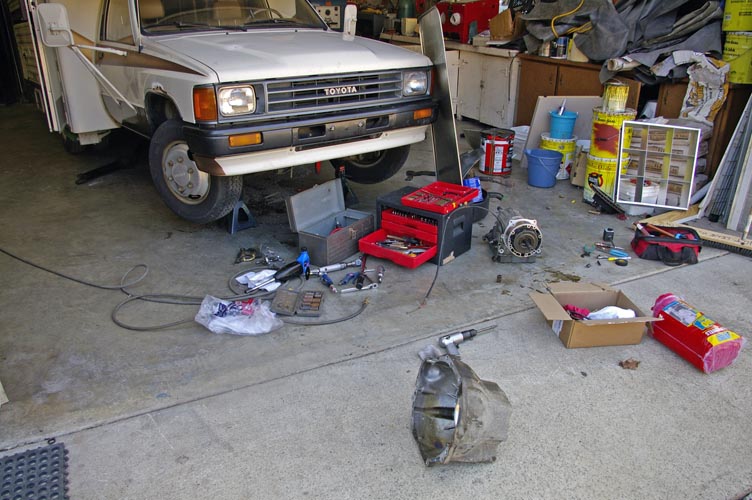
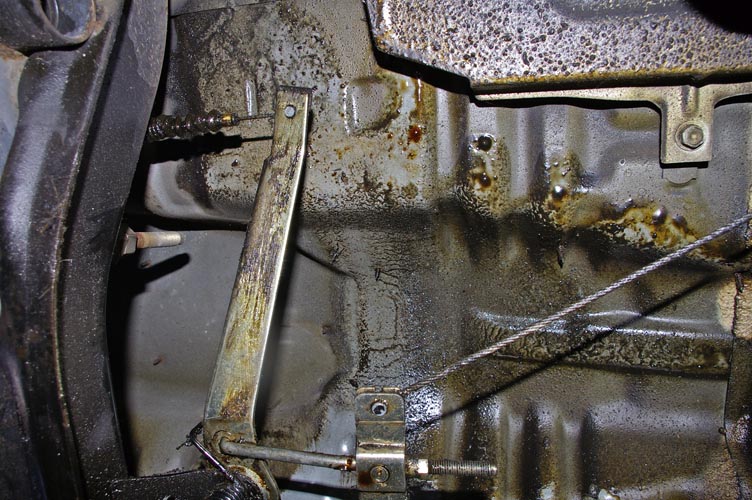
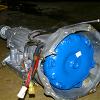
I read spungo's thread about the 4 speed automatic (A43D) and limping home when researching the Toyota Motorhome. Not long ago, I had a little hint that something could be wrong... It didn't really want to go into 3rd. Then one day, it didn't want to get out of first. I decided to change the really dark fluid and filter and look for other signs of trouble while under there, rather than risk getting stranded in another part of the country. While I was under it, I noticed a sling pattern of automatic transmission fluid in the plane of the extension housing seal. So grabbed hold of the U joint and gave it a shove. My heart sank when it wiggled considerably. I removed the extension housing and measured about .042" of clearance in the bushing. I also noted excessive wiggle in the output shaft. I decided to bite the bullet and pull the tranny. I have a very nice large place to work. Unfortunately, it was colder than a walk in refrigerator. Temps have been in the single digits at night and the garage never really warms up since it's on the north face of a hill. Anyway, it looked something like this: With the tranny off, I set out to find out if the 3 oil sealing rings were the culprit. Unfortunately, the transmission has to be completely disassembled to get to those rings. After getting to them, I found a worn bushing for the output shaft (about .008" clearance). But the bore that the oil rings sit in was in good condition and I found that the rearmost ring was JUST starting to polish into the case. There was only about .001" of wear there. The rings were still in very good condition. These rings spring outward and are supposed to hold themselves stationary inside the bore of that tranny. There is a hole for fluid going in and for fluid going out(which gets directed through the shaft to and from the governor, which controls shifting!) So now that it's apart, it's getting new bushings, seals, clutches, o-rings, and oil sealing rings. I think the culprit could be the fact that the fluid is getting so hot in this application that it can no longer effectively lubricate the bushings. To make a long story short, I was lucky I caught this before it ruined the tranny case. I'm REALLY lucky that I addressed it now instead of finding out the hard way this spring. You may not avoid the extension housing bushing failure and the trouble it bring, but you can fix it without removing the transmission IF you catch it before it wears the case bushing. I've been hearing good things about synthetic ATF and I can't help but wonder if it would have provided better lubrication under the high temperatures involved. Also, I believe a larger tranny cooler is in order. I'm going to weld a fitting on transmission pan to install a temperature sensor. Per Toyota, ATF will last 100,000 miles if it never gets hotter than 175 degrees Fahrenheit. Every 20 degrees above that cuts its lifespan another half. I have no doubt some of these rigs are seeing 300 degrees. BTW, huge thanks goes out to spungo for his help and his original post.

-
Ham radio operators in Toyota MH land
Bodybagger replied to Maineah's topic in Communications and Electronics
I'm an extra class ham and my wife is a tech class. But I don't throw out my call on forums due to privacy issues. Sorry. -
That is a fatigue failure. Make sure you stiffen the other side as well, particularly if it has a similar punchout. That's a definite stress concentrator.
-
There is a big weight difference between the U-haul box and the little fiberglass house. I pulled my 1987 mini-cruiser over the truck scales and weighed just under 4,000lb rear and about 1,250lb front - completely empty. No water, provisions, luggage, or anything. I don't remember the exact weight, but it will vary from model to model anyway. I would not load the rear axle very far above 4,000lb. I suggest you top off the fuel tank and drive it to a truck stop and pull across the scales. It might cost 5 bucks if you're not buying a hundred gallons of diesel fuel. Make sure they give you axle weights, not gross vehicle weight. And if you have the 6 lug 1 ton axle, try to keep it under 2 tons. If you intentionally overload it, try to keep the weight forward and drive slower to decrease impact loading on the axle. Note that adding 1 lb in the extreme rear adds 2 lb to the rear axle load and subtracts 1 lb from the front axle... (rule of thumb). 1 lb centered over the rear axle adds 1 lb to rear axle load only. 1 lb added halfway between rear and front axles increases the load on each by 0.5 lb.