ToyoGuy
-
Posts
331 -
Joined
-
Last visited
Content Type
Events
Profiles
Forums
Gallery
Everything posted by ToyoGuy
-
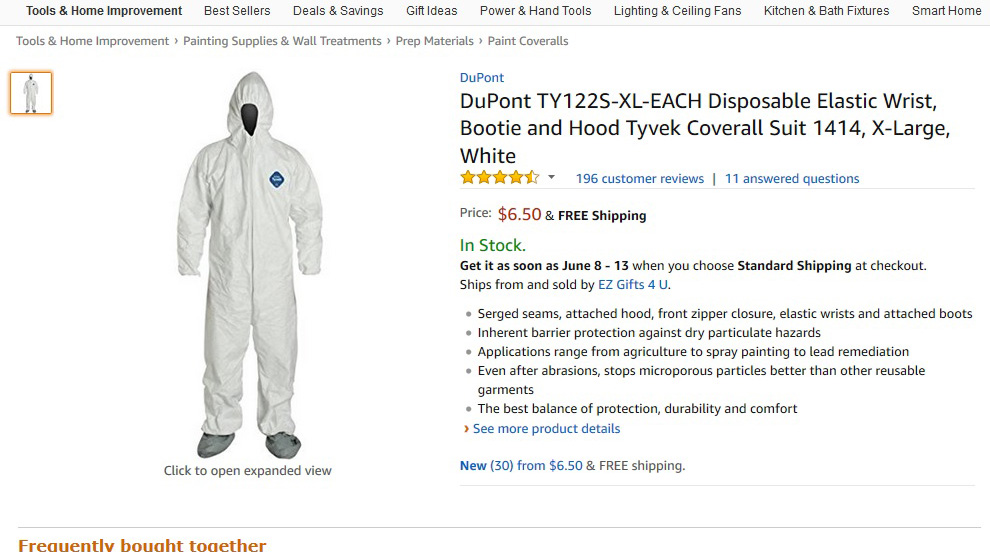
 I have recently been seeing some newbies taking the plunge into some pretty extensive projects with lot's of demo and fiberglass tearout work. As a veteran of the total-tearout wars, I make a simple suggestion that immensely helped me to keep itch-free, keep the clothes-washer from getting fiberglass-particle pollution and let me walk in the house after taking off gloves, un-suiting, and kicking off my shoes. Tyvek coveralls can be bought at most safety stores where other commercial safety equipment is sold, or on line for cheaper. If I was careful, I could get from 4-8 uses of several hours out of them, depending on the type of work and successfully keep the paint/resin/dust off my clothes and out of my hair etc. I recommend safety glasses and particle masks, or respirators of course. The suits can get quite warm in the direct sun/hotter temps, but overall......... , I found them a very worthwhile investment for $6-$8 per pair. I just got tired of itching from the fiberglass and ruining clothes with resin. Hope someone finds this useful. BR, TG
-
Hi Sciama, The part I used was purchased at the local Toyota dealer by special order. Total cost new was about $27.00. Be advised a recent online search with that Toyota part number (88690-89116 aka - Valve Assy Magnet) turned up several other sources for supposedly genuine parts at about $10.00 lower. ex https://www.toyotapartsdeal.com/oem/toyota~valve~magnet~for~idle~up~device~88690-89116.html Strange that my parts diagrams from various books show it as a #88691, which puts the retail price considerably higher. Anyway, the 88690 is what the 'Yoda parts guy referred me to. I had it installed and it's working well. Unfortunately, my mechanic additionally found a bad A/C amplifier, and some wiring the PO did had to be corrected to get power and ground. ($$) However, life is better with A/C. Hopefully, you just need the part(s). Good luck, BR, TG
-
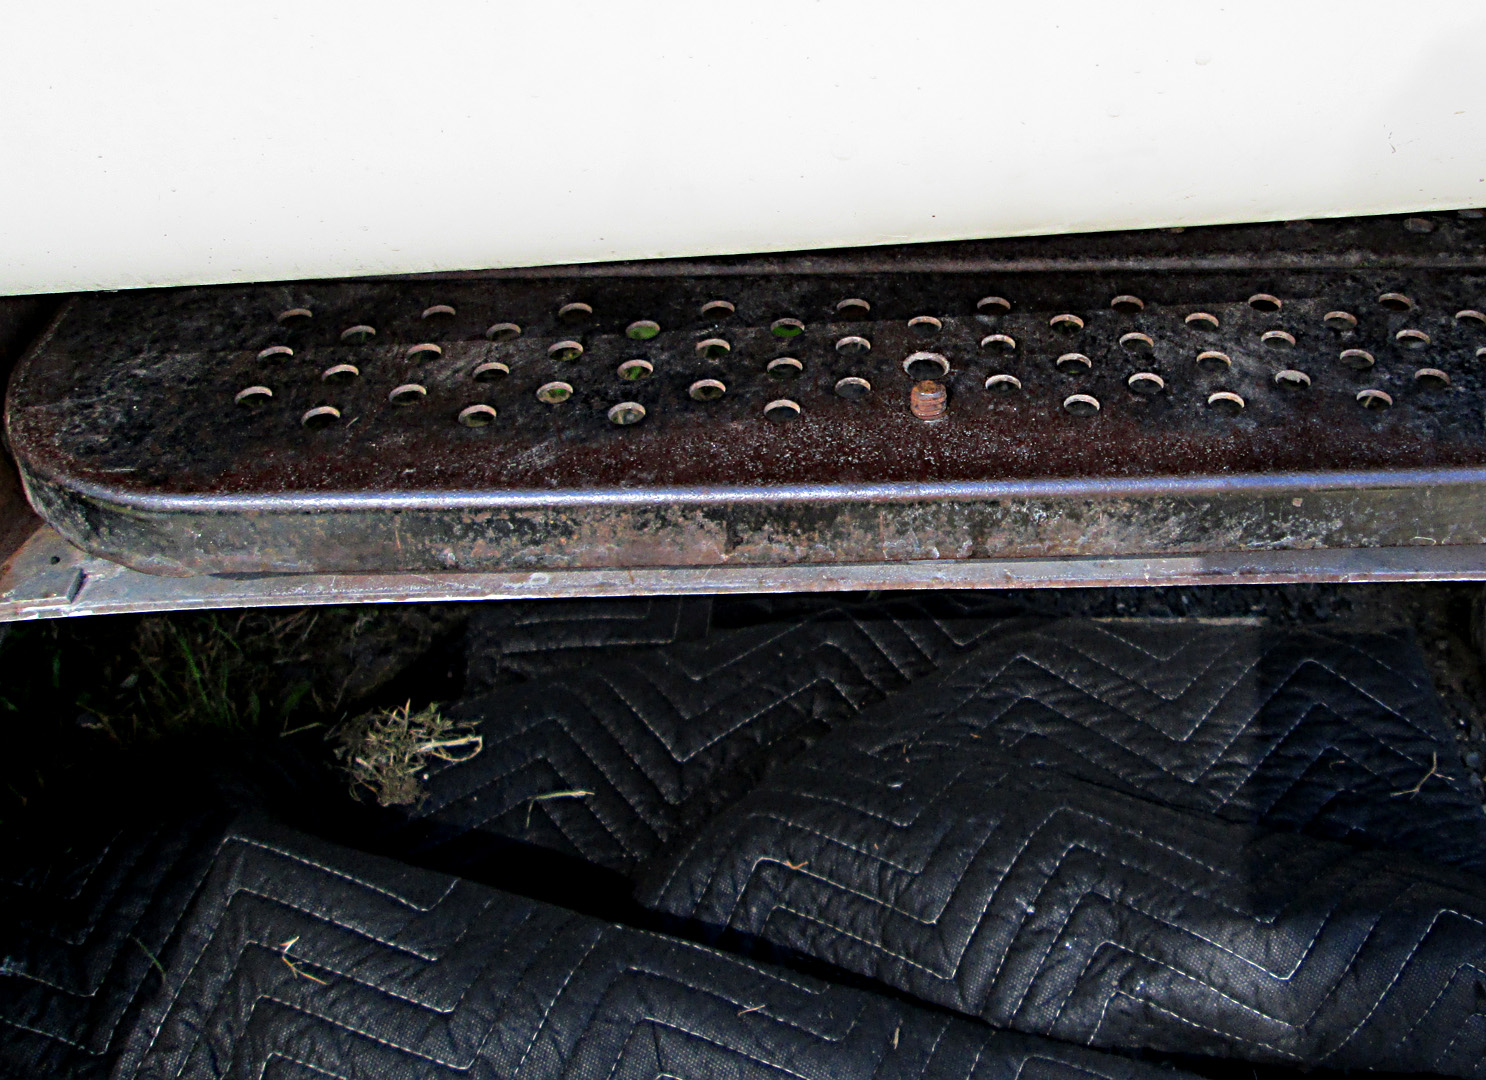
I saw this very simple answer to an issue I have been thinking about for quite some time. (pix below) It's probably not new to all, but I thought it was pretty ingenious. Here's why: I am constantly chasing rattles and noise in my SunRader and have made considerable headway over the miles, (considering it's a house on wheels!) In the course of all this, I was very surprised one day at the amount of noise I muted by putting a simple spring-clamp outside on the folded up entry-step to immobilize it's rattles before heading out on the road. Wow! instant relief. Been using it ever since but, it looks kinda "kluge". When I saw this system, I was impressed, but am still not sure if anyone out there knows of a better mod than this with a spring-latch or something like it. (First picture = open, second = closed) Any other ideas out there? BR, TG
-
Hey LMBC, Just a couple of other things on the window stuff, I've pulled all the windows on my rig at one time or another and I have found a handy tool to have to hold windows while lifting / installing / carrying ( whether with one person, like Linda, or a helpful partner) are these cheapo locking suction cups from Harvard Freight. The windows and the cups have to be clean, but you can really get a secure grip to pull while installing the retaining flange screws from inside, or holding from outside. I would check the grip by tugging on it before using the tool. (Consider the source, and look through the stack as always, with HF stuff). Also, when I have installed the butyl tape on hot days, I wait overnight before trimming the squeeze-out from around the outside flange. Twice now I did it immediately after the final tightening on the retainer screws, only to have to re-trim again a day or two later as the force of the screws later squeeze out more. Not a big deal if you don't "overseal" with something else, but a pain if you do. Just my experience, everybody's got their favorite tools and ways, and that's what's so cool about this little club. BR, TG
-
Yeah, the FRP (fiberglass reinforced plastic) panels at the big-box stores are only very slightly thicker, .090, but also, that thickness measurement is including the texture-bumps on it. It's probably about .075 at the thinnest points. http://www.homedepot.com/p/4-ft-x-8-ft-White-090-FRP-Wall-Board-MFTF12IXA480009600/100389836 You can't beat the price though, and bajadulce did a lot of his fabrication on his rig with it. He's kinda a master at this stuff. Fiberglass RV's tremble at the sound of his name. Great to see all your progress. TG
-
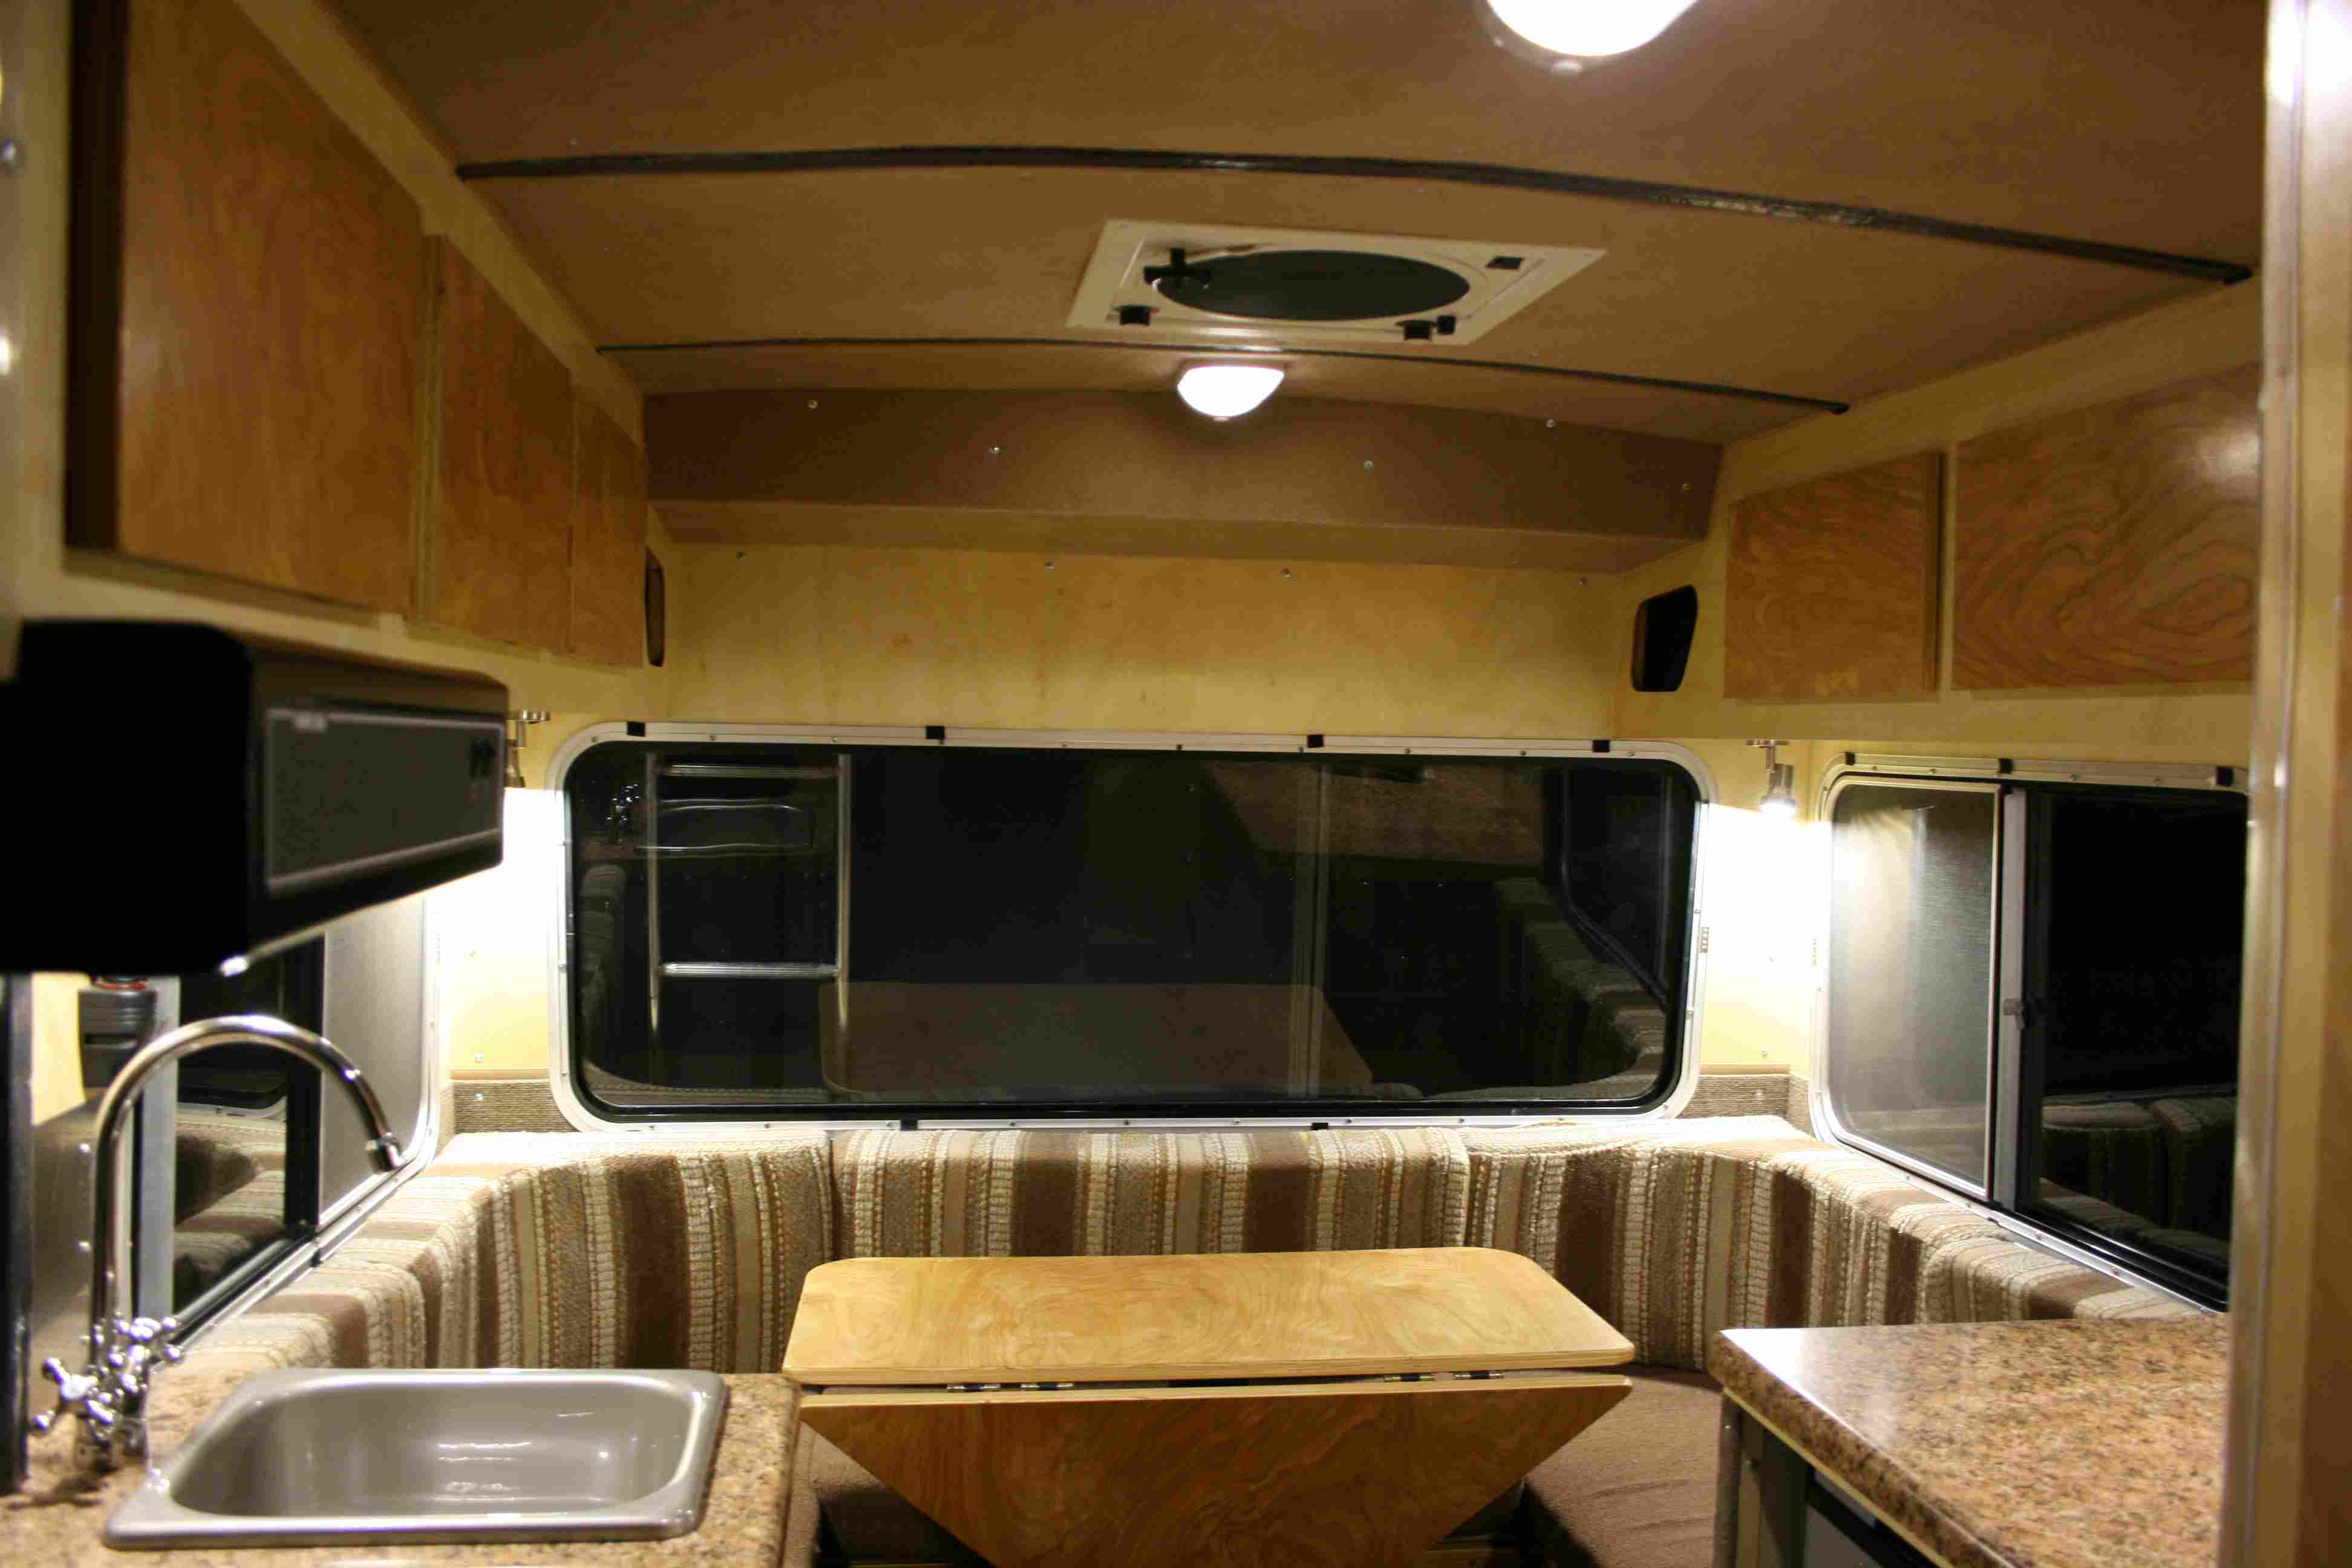
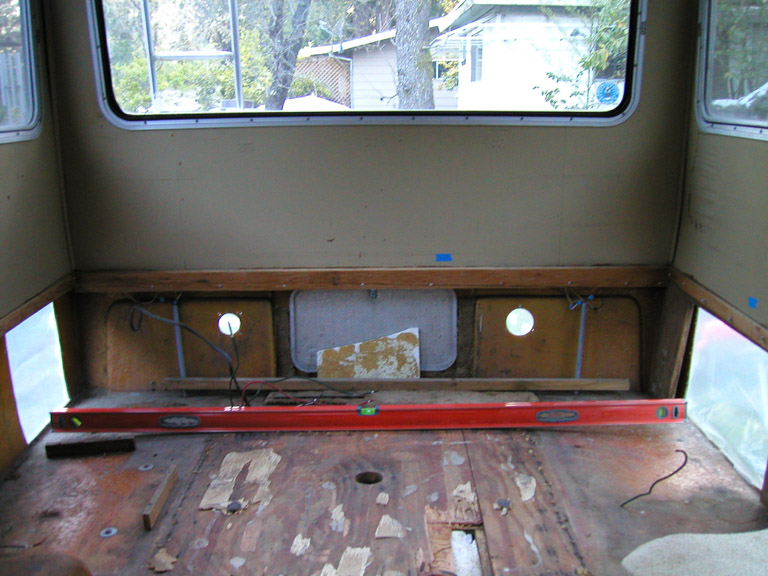
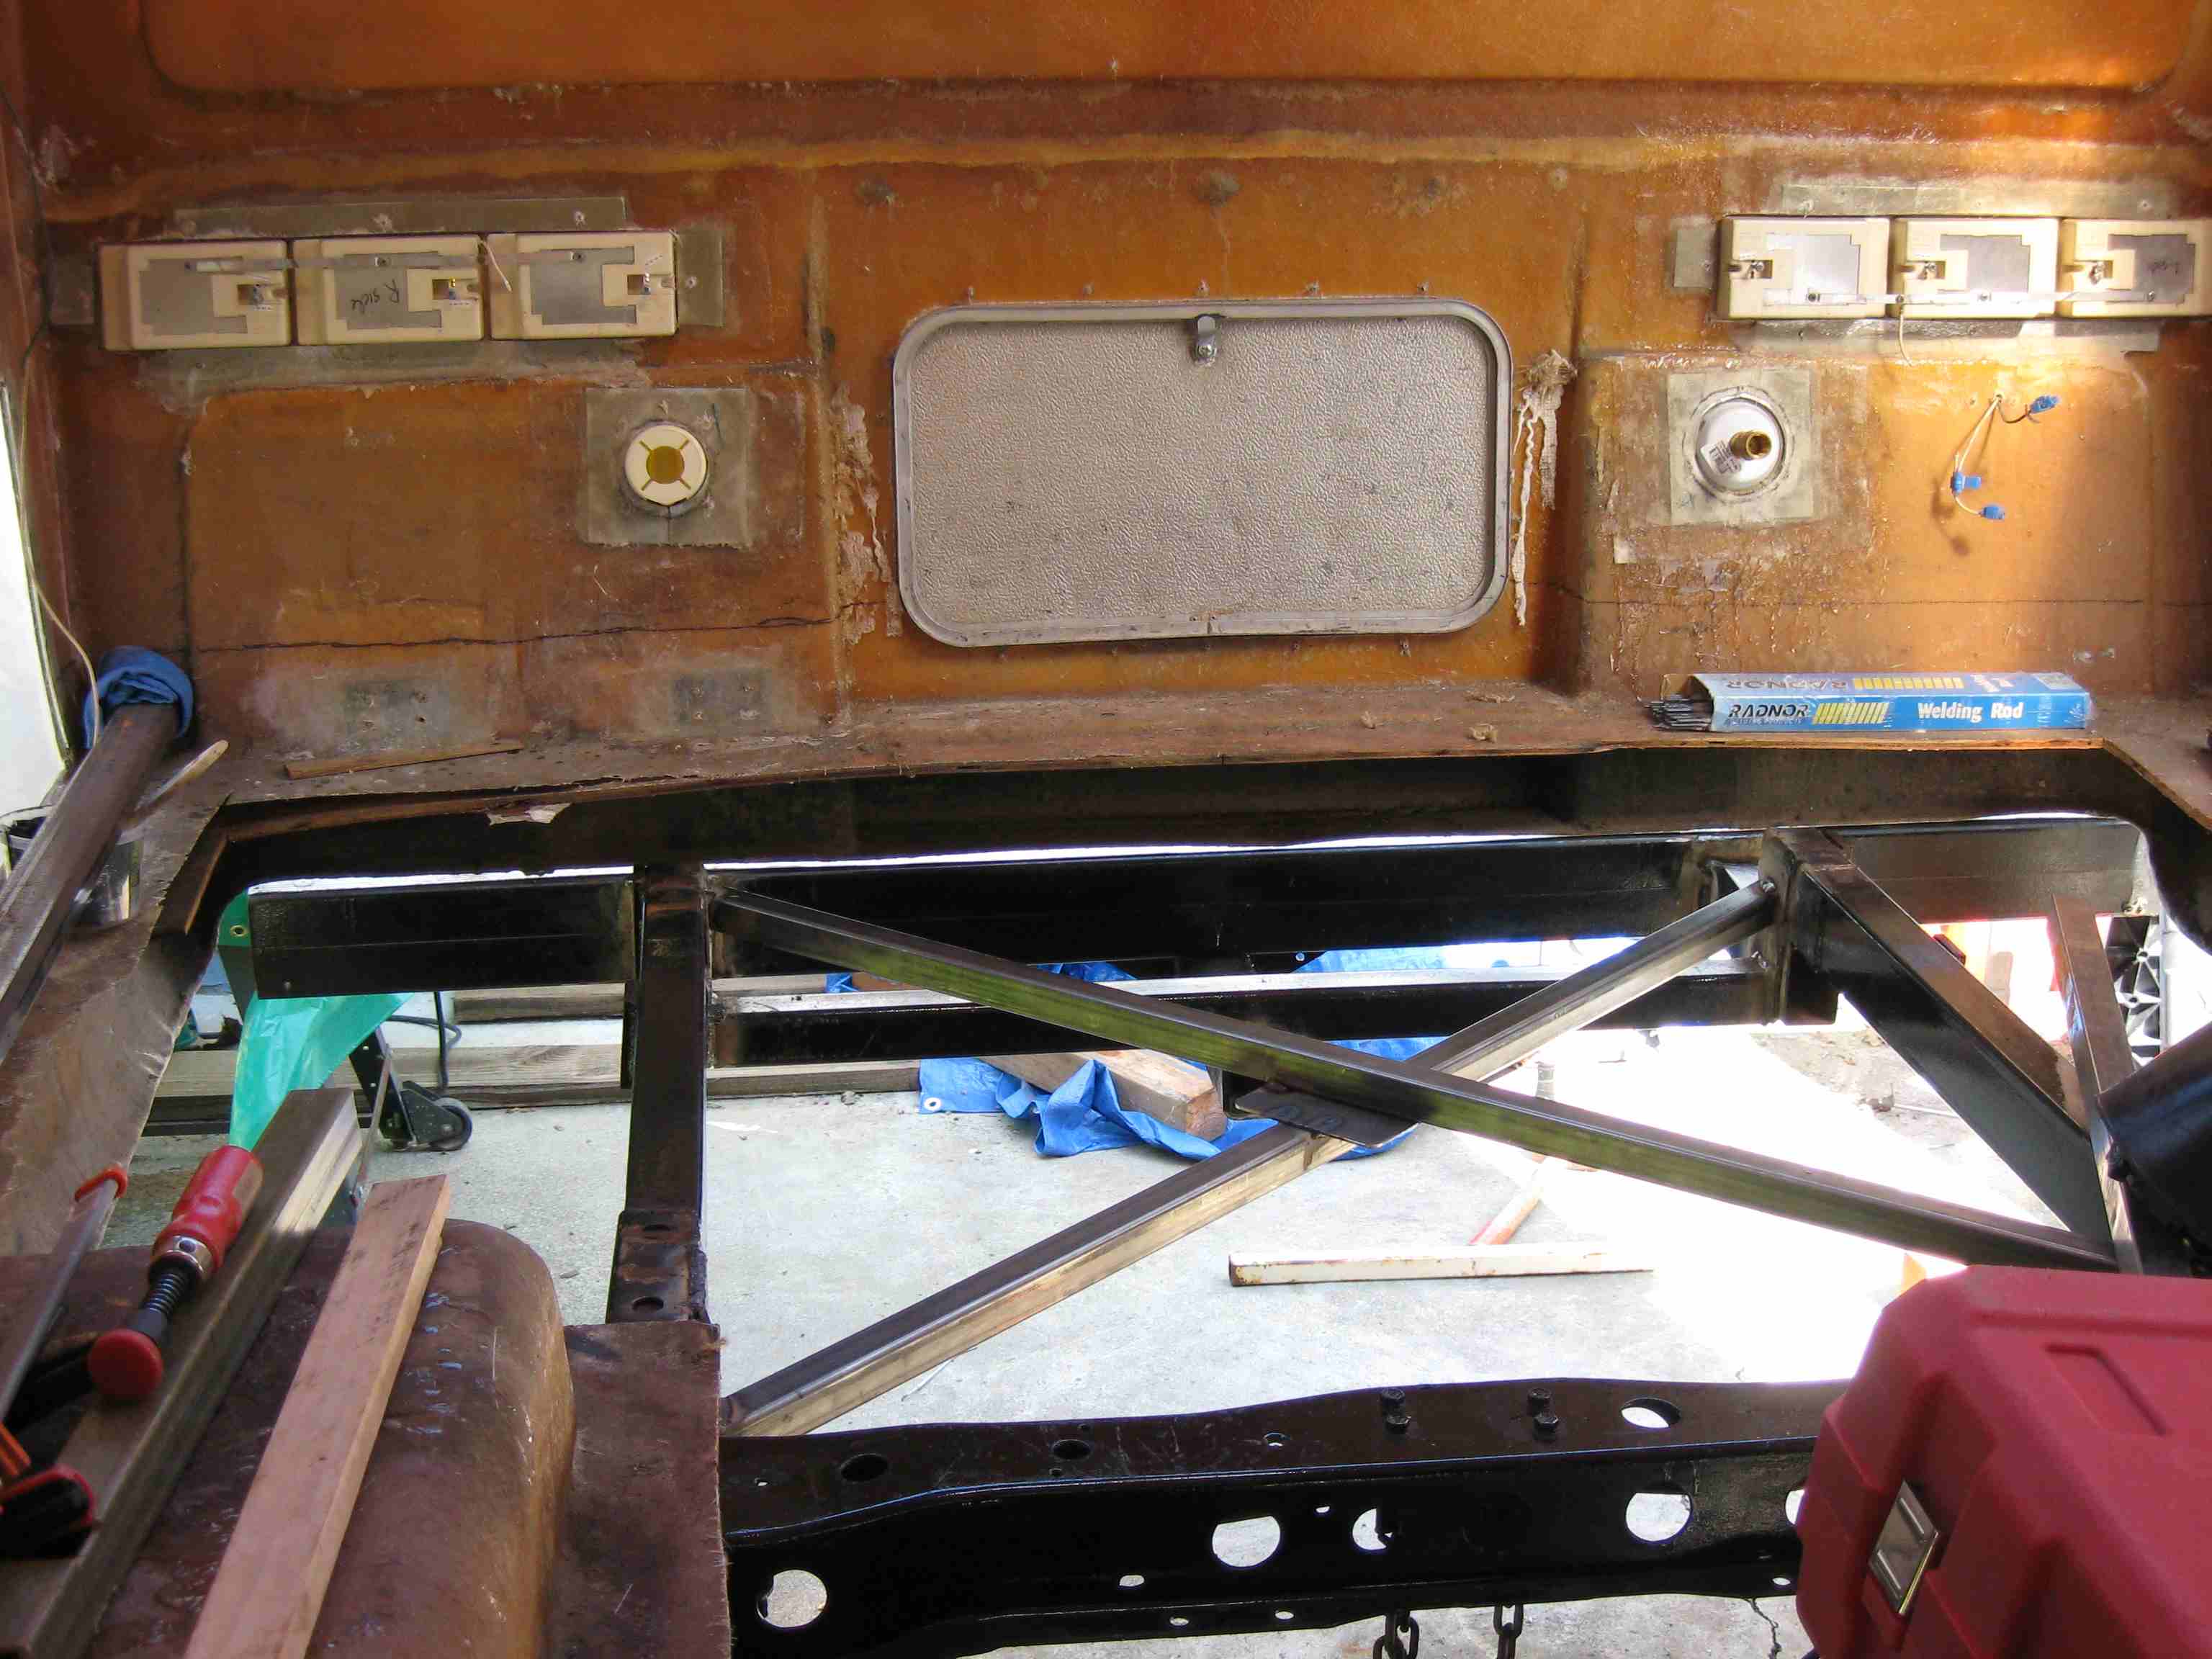
Hi LMBC, Nothing will be as thick as the original fiberglass and gloss Filon is pricey $$$ http://www.all-rite.com/high-gloss-fiberglass. There are other places to buy it I'm sure. Lot's of folks go with common white FRP panels from Home Depot or the local big box hardware store, but that product tends to be "pebbled" on one side and rough on the other for adhesion. It all depends on your tolerance for for appearance and budget. Either way, if you want to be able to crawl on top, It seems like you're going to need to do serious reinforcement. Also, I'm late to the discussion of the roof, but here's what I did. Instead of drilling more holes in the roof, I glassed in 1 1/4" aluminum tube the whole width of the ceiling side to side on either side of the A/C port, as well as over the end plates. I got the contour like it shows in the top photo, by using 3/8" ply and letting the drywall jack push the roof-line up into it's most natural curve, then made a template to give to the guy to bend the aluminum tubing. At 1 1/4" they came out about flush with the finished ceiling panels (with 5/8" insulation under the panels). They've been there about 3 yrs and no trouble so far.... The slight gaps at the ends worked well to route wiring through as well. BTW, the big plywood brace on 4x4's in the back of the pix is what I held the coach up with while I removed and replaced the floor. Welcome to the tribe. BR, TG
-
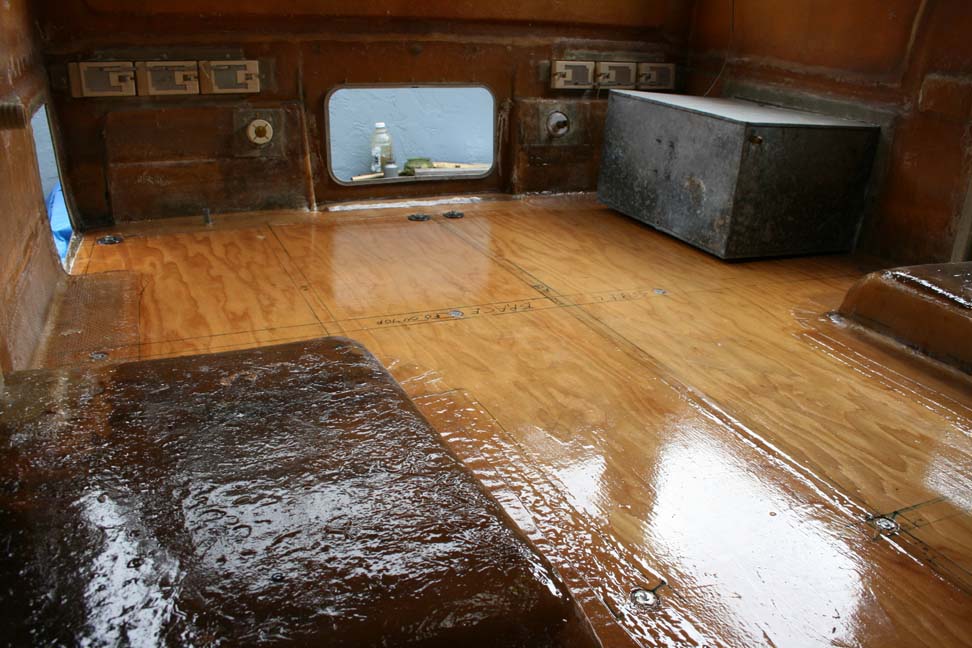
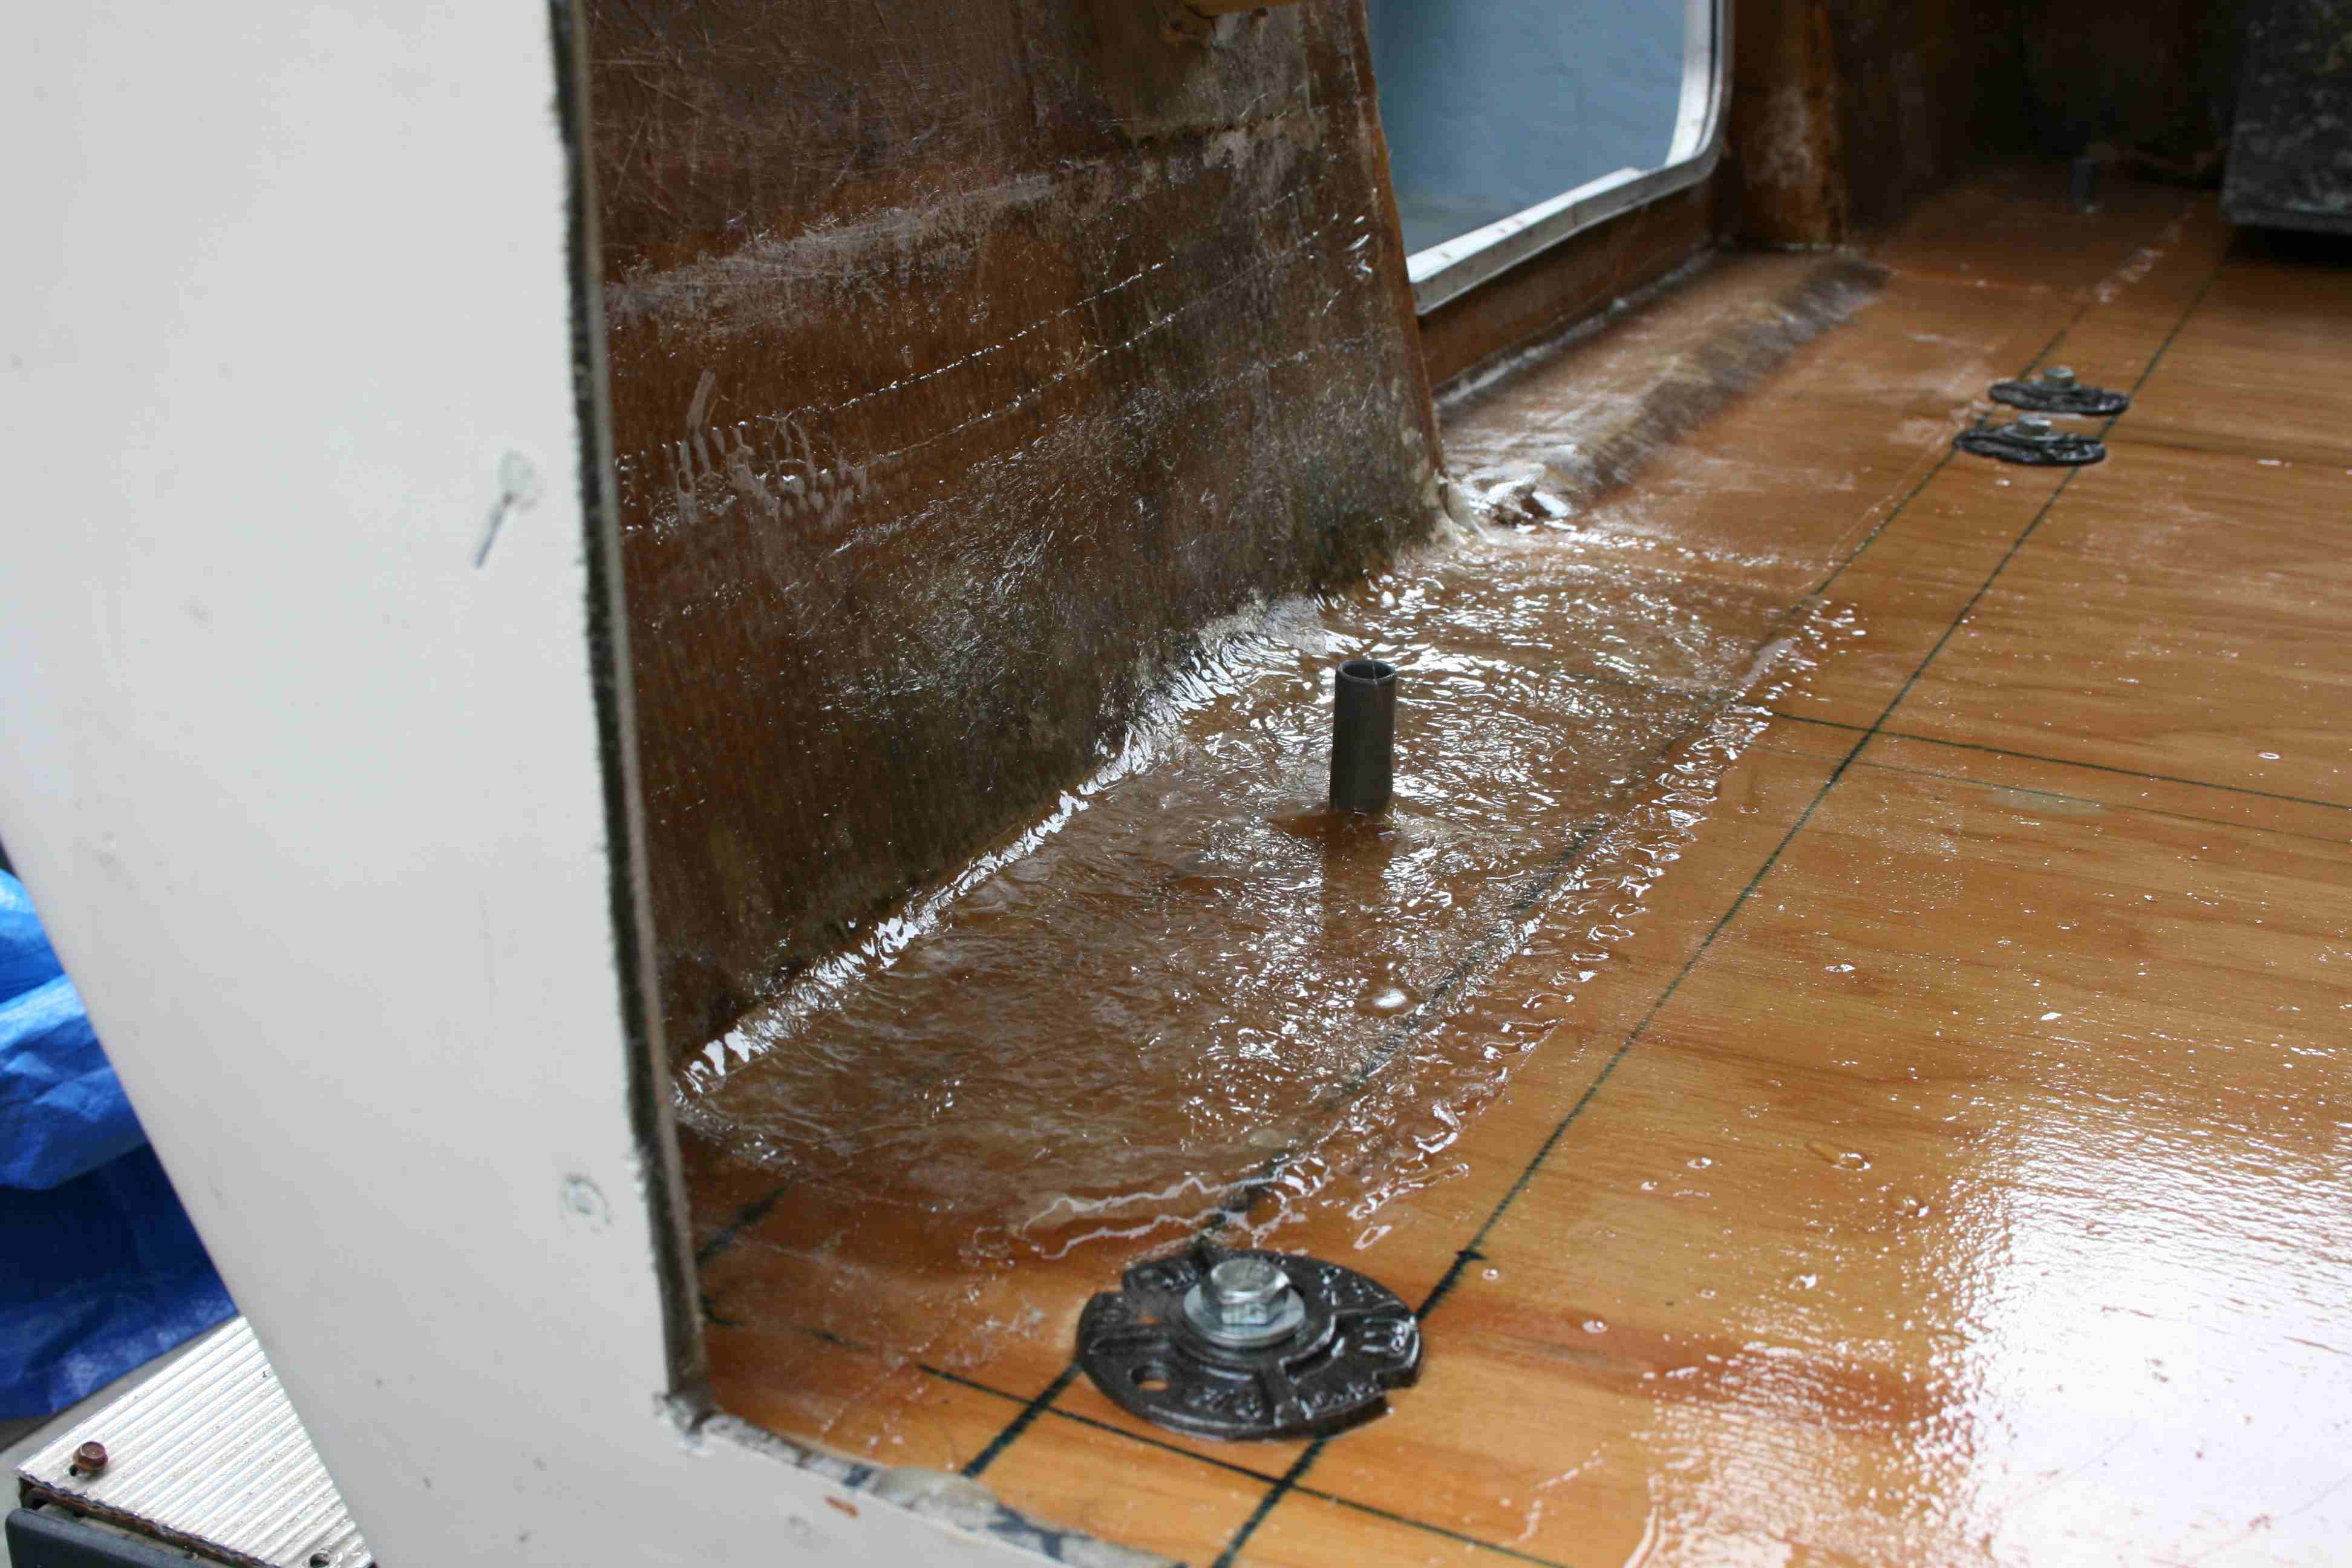
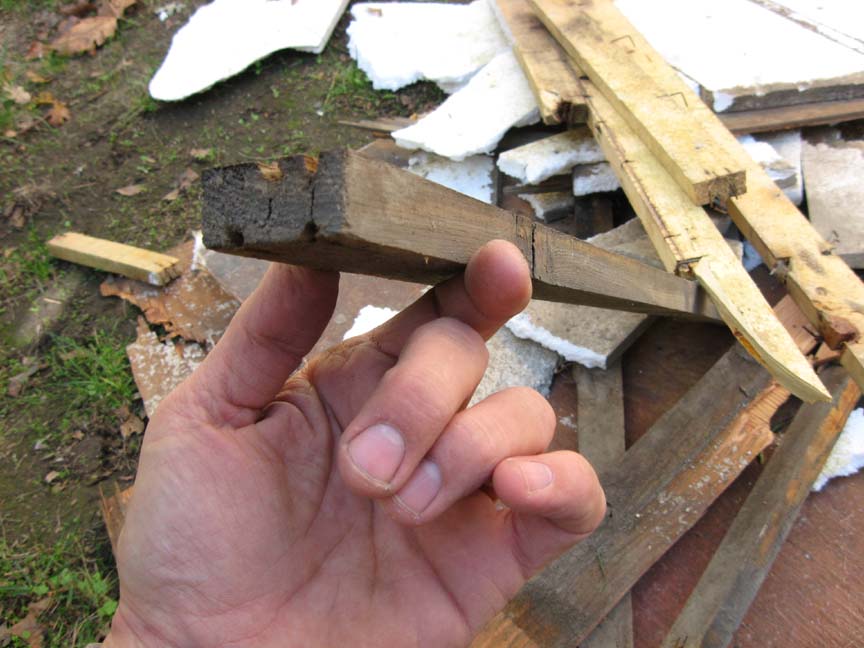
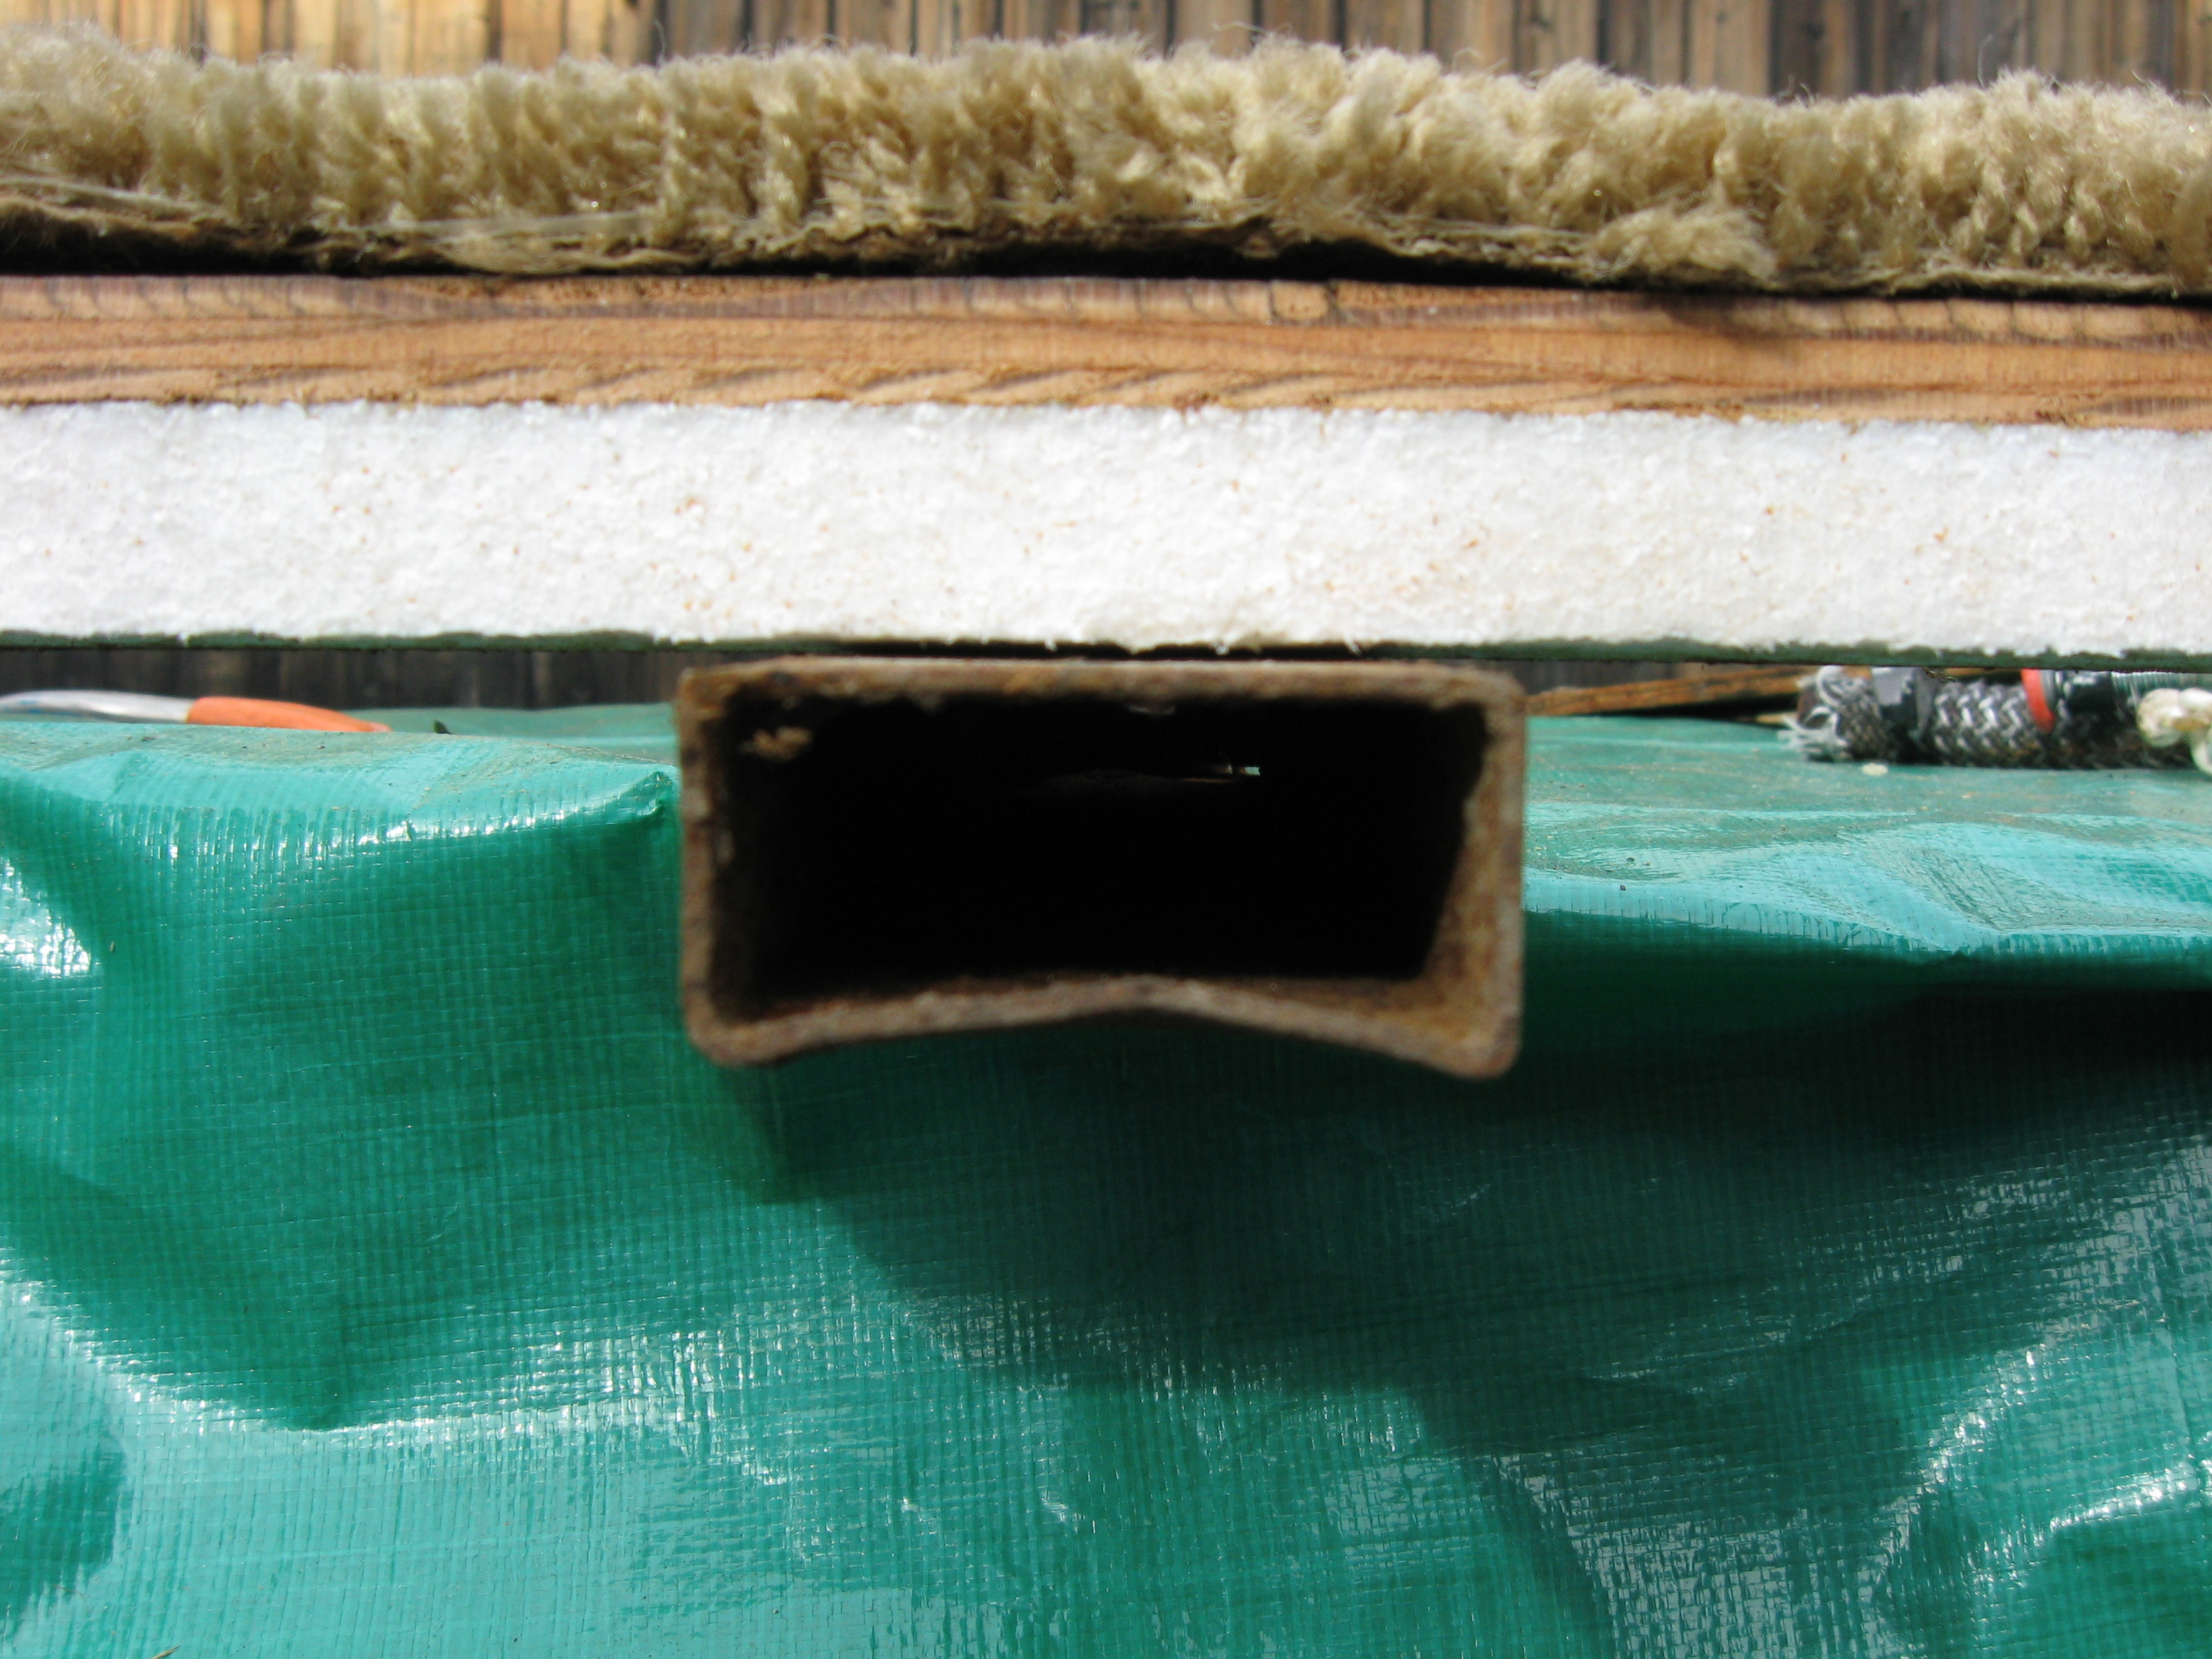
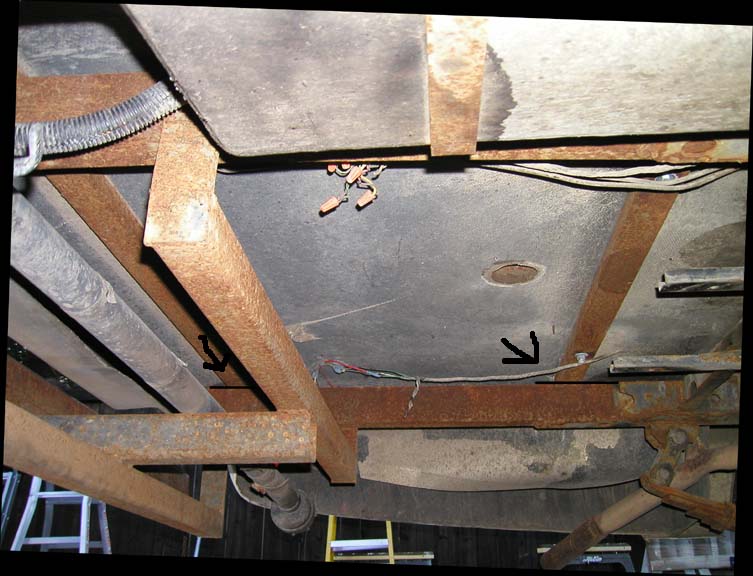
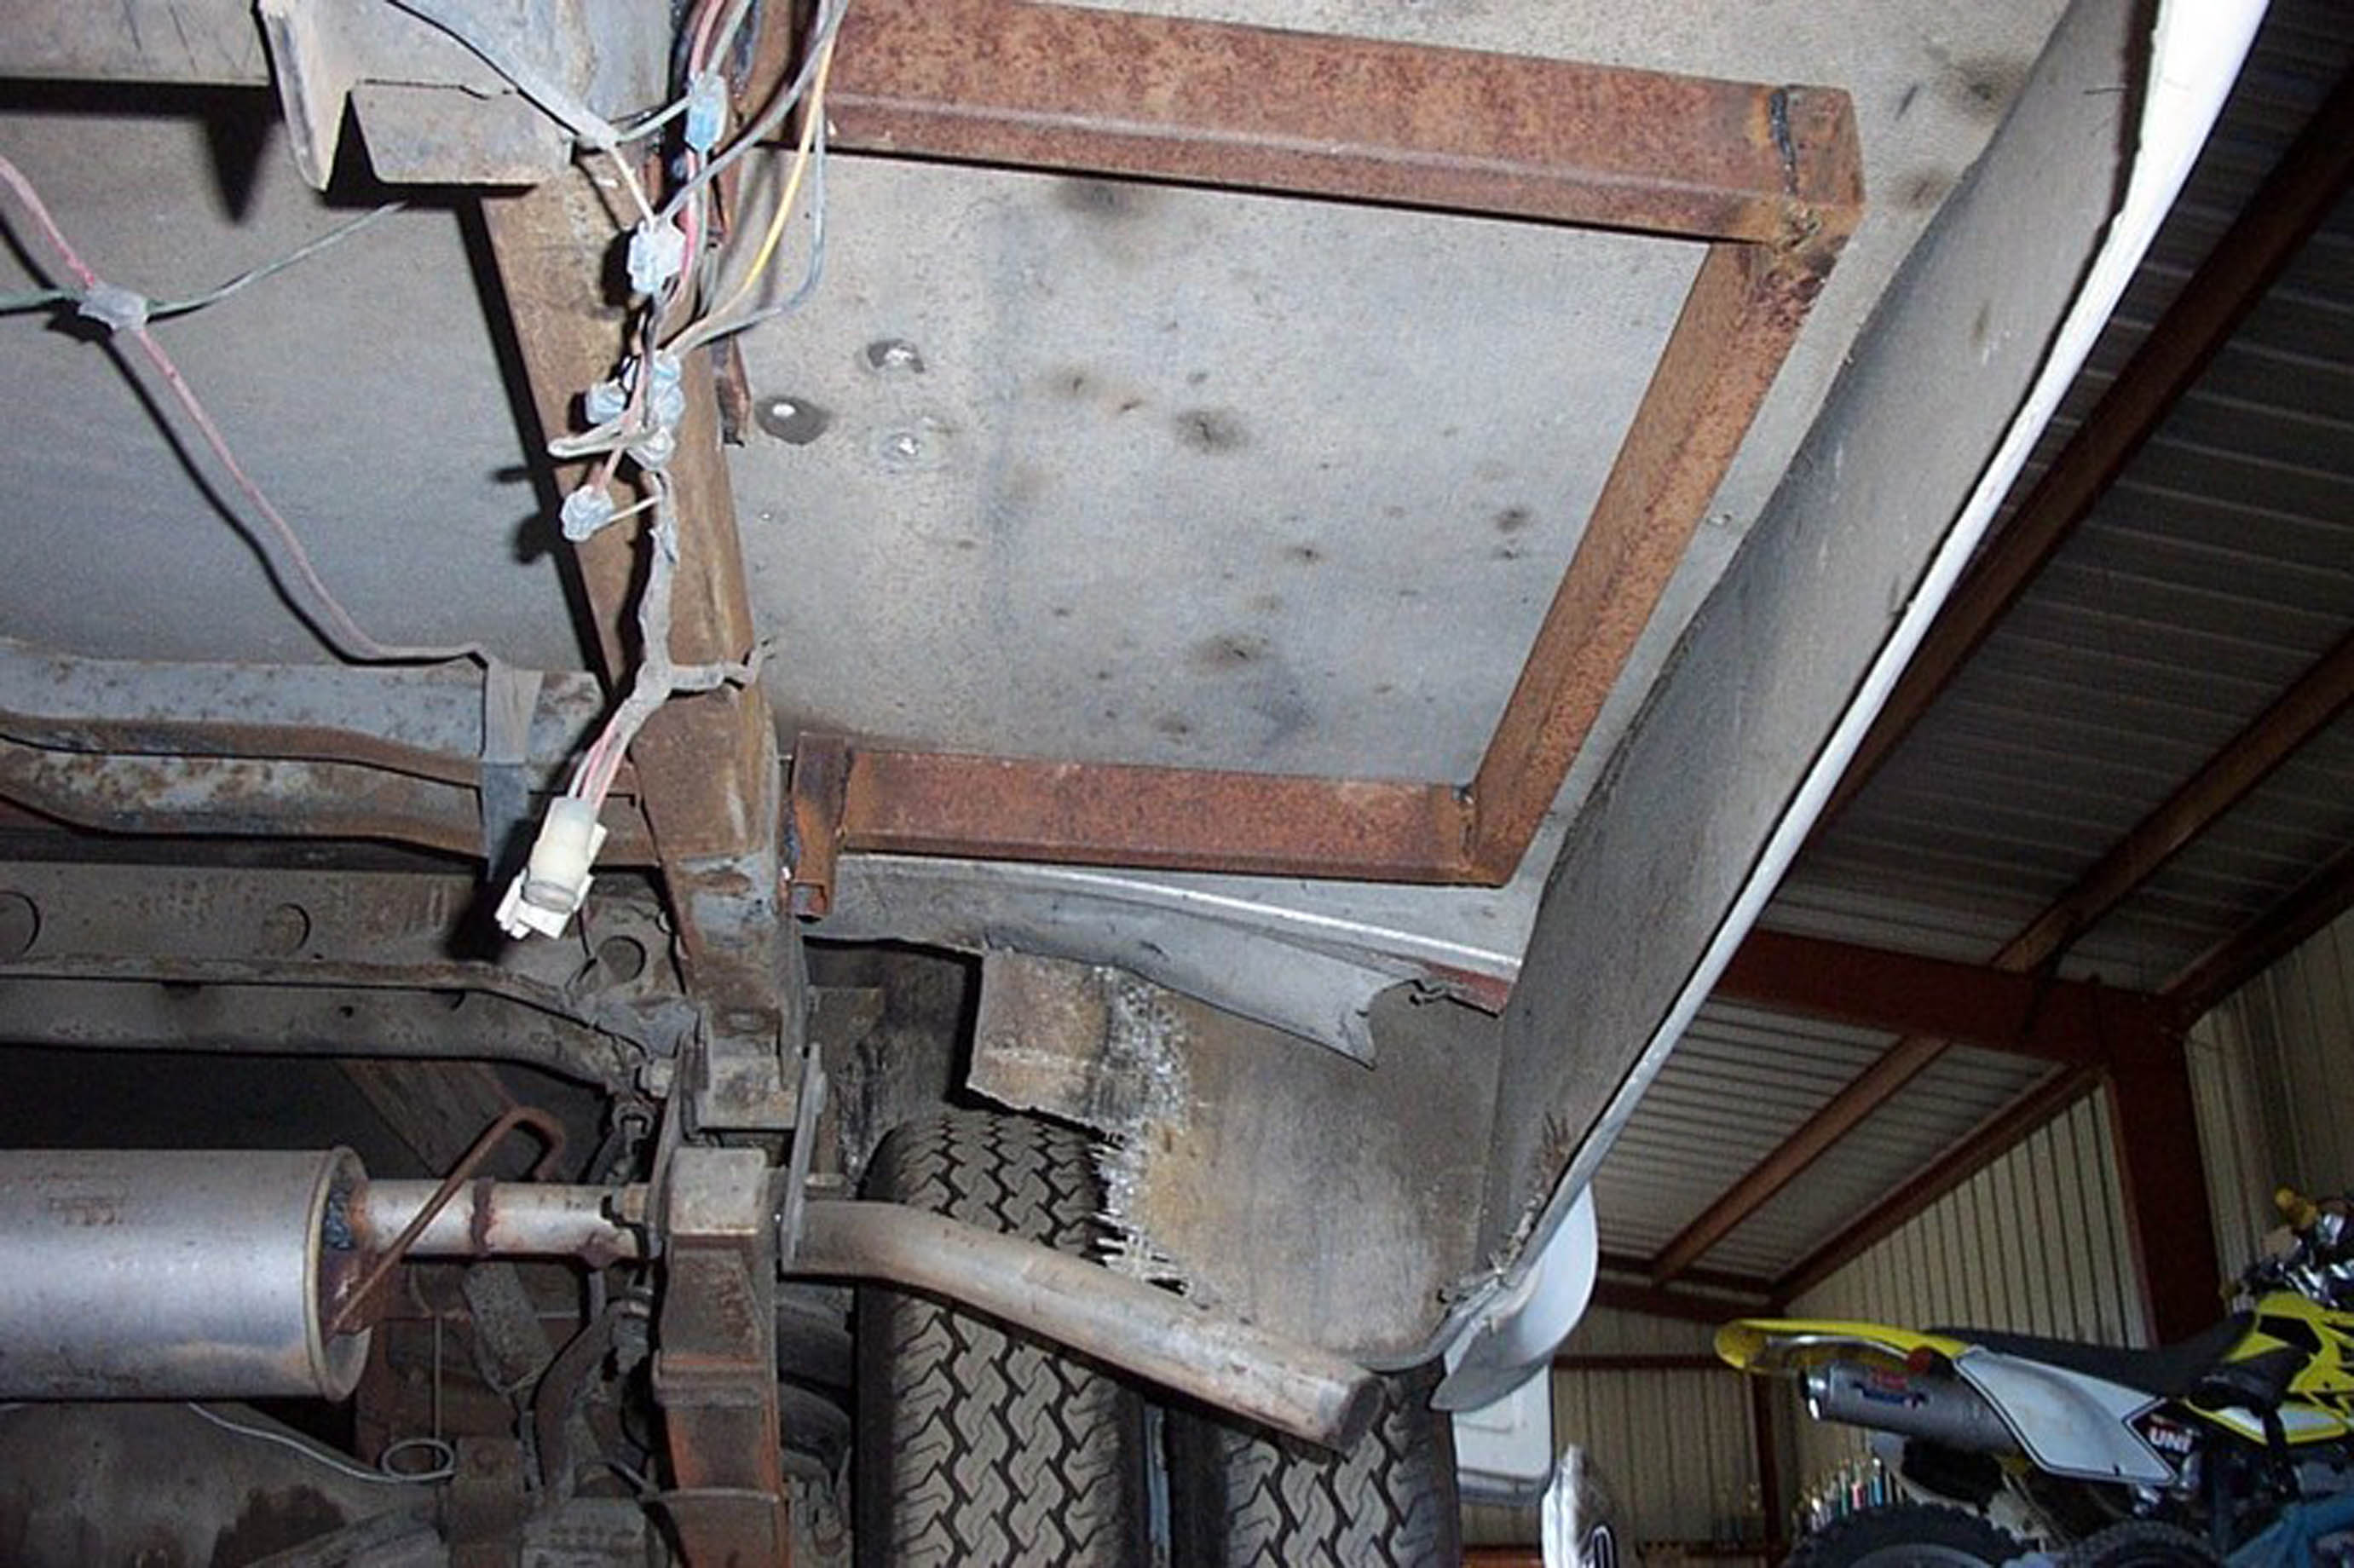
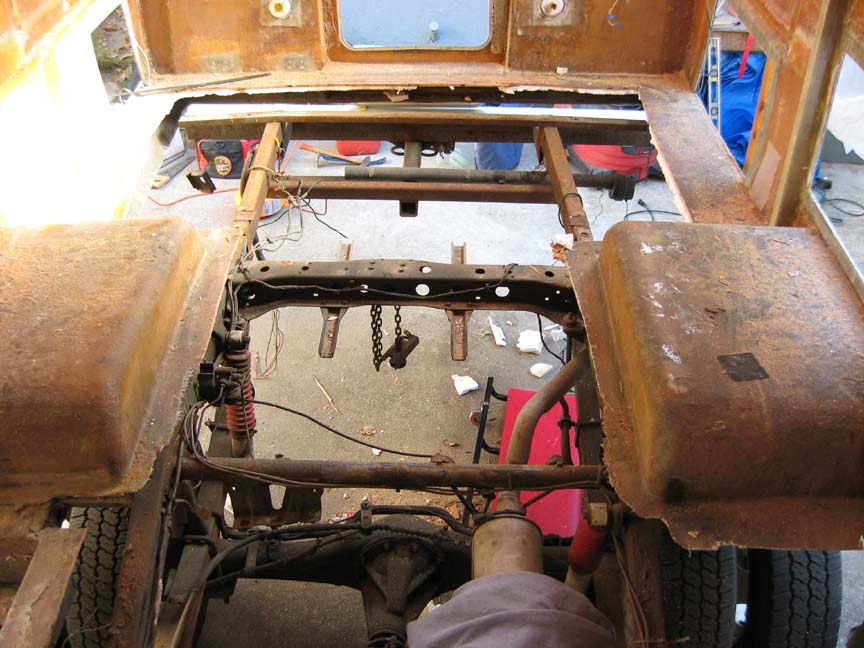
There were originally carriage bolts in my floor, but without the correct washers, 2 of them had torn through the rear plywood flooring in mine. With no pictures, I don't know your rig size, but it seems to me there will be welding traces if there were lateral braces previously installed/removed. It also seems to me, if you have a friend who welds, or a friend who is restoring an old car they may be of help, but, either way, someone will have to spend some time under there figuring out what mods have been tried.I took lots of pictures to explain stuff. ( wish I still had them all) I can only reply from the perspective of an '84 18' Sunrader, but these old pictures of my rig may be of interest. The first shows how much distortion the floor can suffer from weight and the continuing shock of travel and vibration. Picture number 2 shows how much the rear support had bent down at the ends . Picture number 3 shows the size of the floor joists in an '84 18 footer. I feel they were vastly over-estimating the load-bearing capabilities of common fir or pine lumber. Picture number 4 shows a cut-away of the floor material and 1/16" steel tubing for the cross braces. (Mine never had the 1/8" luan laminated at the bottom, just aluminum road barrier,( musta been Friday). Picture 6 shows the location of the 2 back lateral supports, on an 18 ft '84, that is. (back on left, front next to wheel well, on right) What it doesn't show is how they terminated about 6" short of the perimeter of the coach-walls and were actually penetrating the aluminum road barrier and insulation at the ends. Picture 5 shows one member's (YostFMX, I believe) answer to the issue you're describing, lateral "wings" welded to the sides of the frame. I would not recommend replacing the floor like me, it was a very long term project and, for me, necessitated rebuilding the whole interior of the coach to get the build quality I wanted, but.... it can be done. Remaining pictures show some frame reinforcing and finished floor. Welcome to the site, download some pix, if you can. BR, TG
-
Thanks Linda Will try to get part numbers tomorrow. Emailed you the vin,...but the FF kind or type is as yet unknown. Maineah, I appreciate the heads-up on limited value of the auto-adjust (and possible Ford parts-stuff). I used to get disgusted about these problems, now I'm just amused, does that mean I'm an old guy too? BR, TG
-
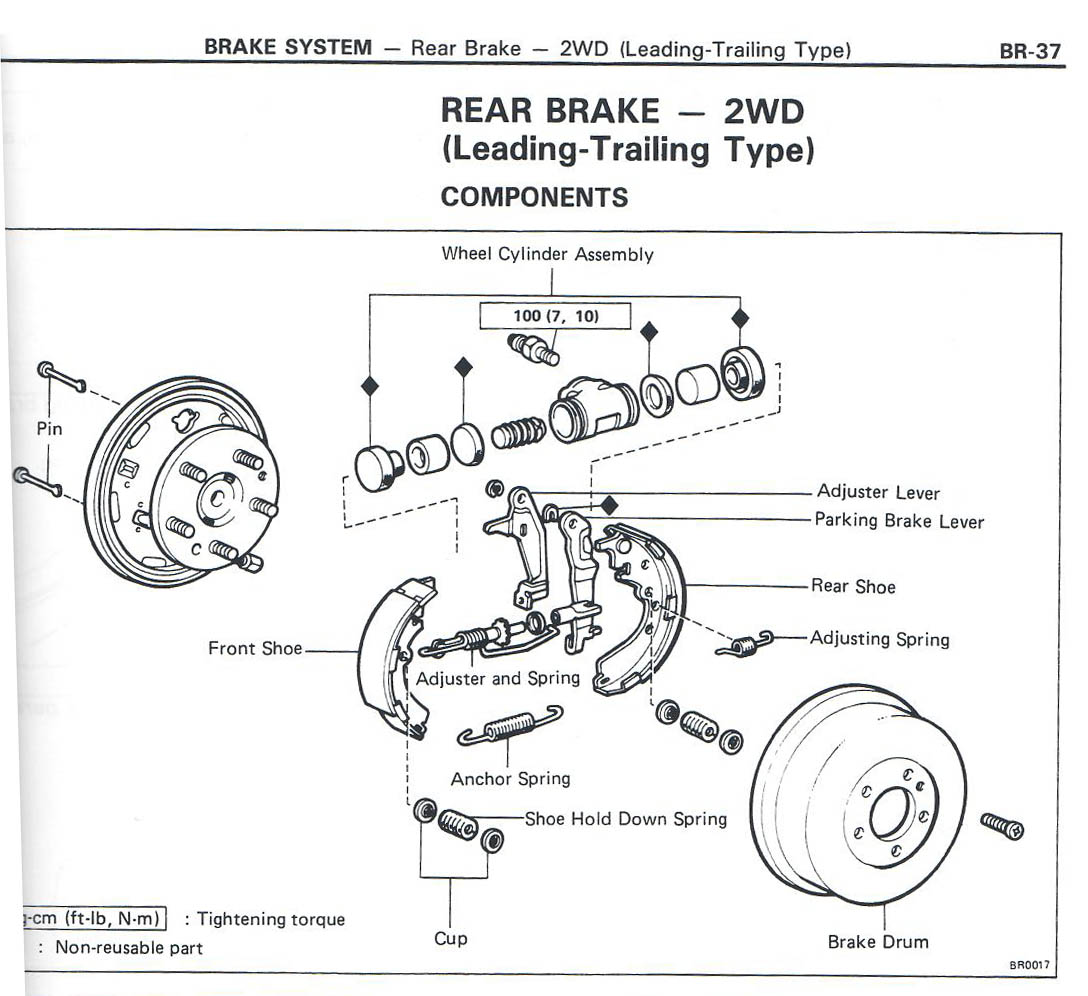
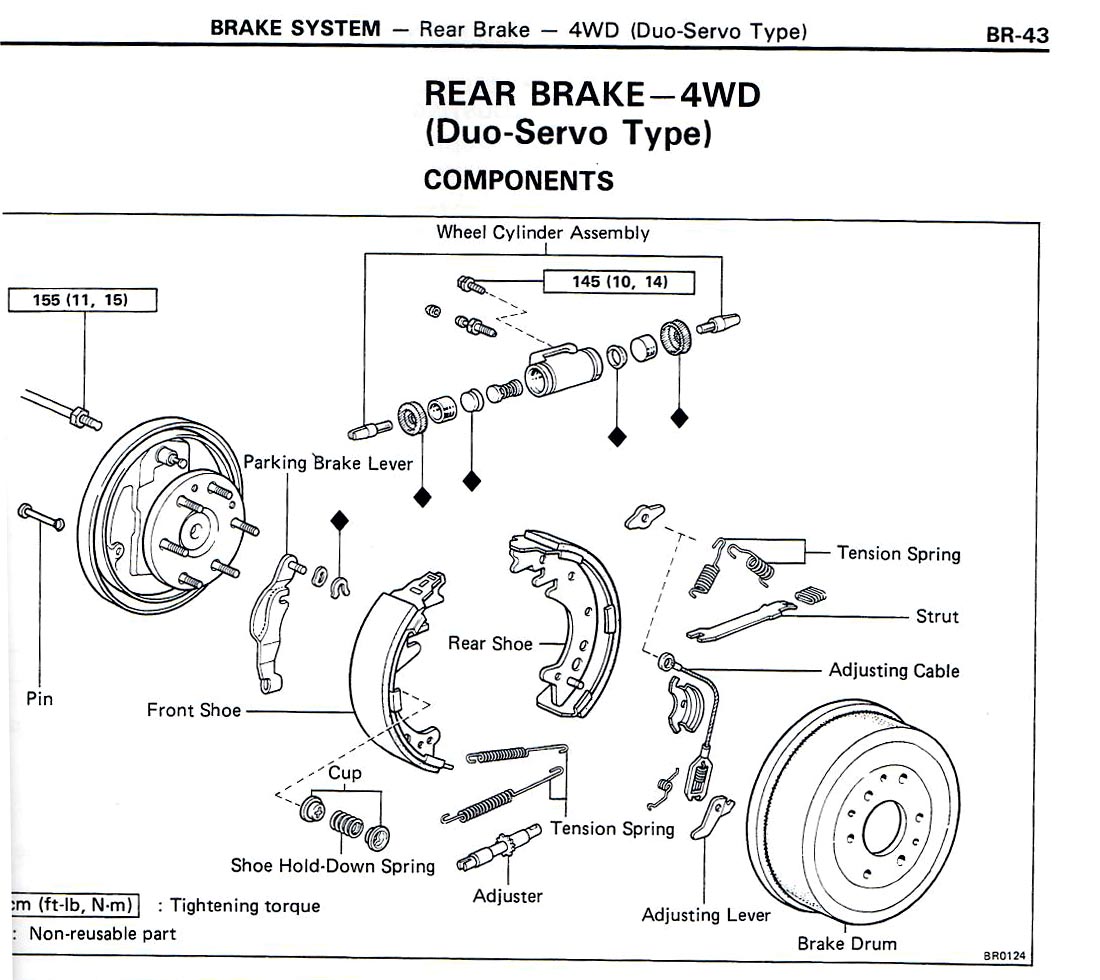
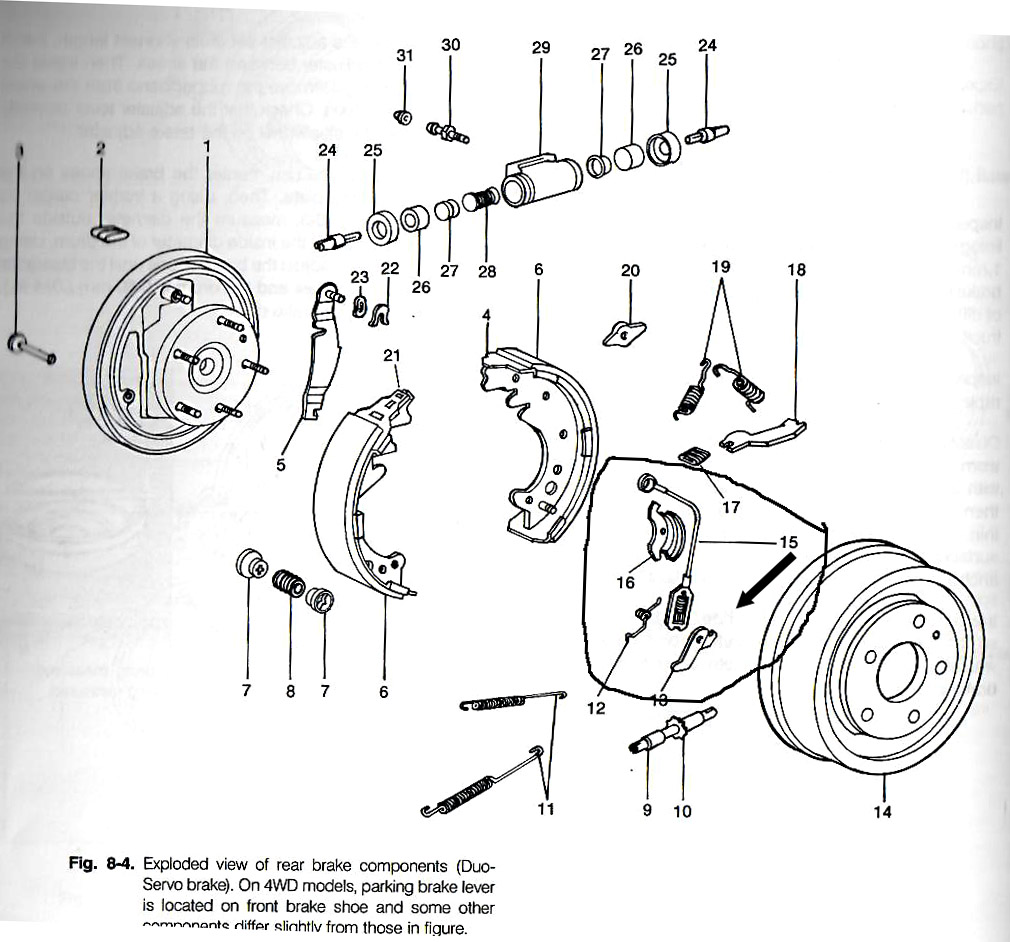
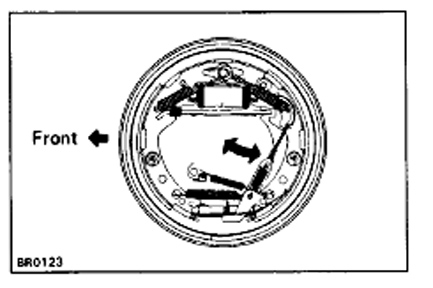
Thanks for your usual speedy reply Linda, So there's actually two types of brakes. Not sure what everyone else has, but mine (Duo-Servo type) are shown in my previous post and were commonly installed on some 4x4's and 2x4's.(There's a lumber joke somewhere there) The type you referenced parts for, is the other Leading-Trailing type. (Attached diagram) Apparently, Leading-Trailing type suffer less failure of the automagic adjusters system. Just looking at the diagram I can see why. Mine being the Duo-Servo type is not-so-slick of a design, I fear. Those self-adjusters are apparently more prone to failure in the long term and harder to locate,.... thus far. On a better note the brakes straightened right out and behaved well with an adjustment, they just don't currently stay that way, so at least now I know that's what it is. Thanks, TG
-
Well, the latest BOHICA on my mechanical - Sunrader- to-do list is the resolution of a pesky brake problem whereby, according to my trusted brake guy, due to failure of the “adjuster levers” (arrow in picture, one broken, one bent and about to go) on my Duo-Servo rear brakes, the rear shoes won’t hold an adjustment. This is apparently not, according to him, an unusual failure on this brake-set, but rebuild parts have proved to be unobtainable so far. There is however, a possibility that they can be modified and converted to manual-adjust, if no rebuild kit or used parts can be located. I would prefer to be able to auto-adjust at my convenience, if possible. Does anyone know of a resource for a rebuild kit? (circled below w / offending component) Any experience with this? Thoughts? Thanks, TG
-
If that stuff interests you, check with RV Georges salvage place up there in Sacramento, he used to collect model and toy RV's and displayed them in the front of his office/shop. Seems to me I saw one when I was up there last, but that was a coupla years ago and they may have liquidated his collection. In any case, it wasn't a "dead-on" reproduction of a Sunrader or anything, just a similar design RV. He's passed on, bless him, but the guys who're minding the store could tell you. BR, TG
-
Curious as to your last count of factory-mades before you stopped counting Linda. That number 26 had a life of it's own for a few years... TG
-
Door locks not working
ToyoGuy replied to jjrbus's topic in Improvement and Do-It-Yourself Projects you have done to Share!
Thanks for the cleaning tip jjr, never thought about carb cleaner. The passenger side of both my pickup and the RV each need cleaning. Hmmm, brand XXXXXXXXX lube... Is that kinda like Brand XXX, but even more effective? -
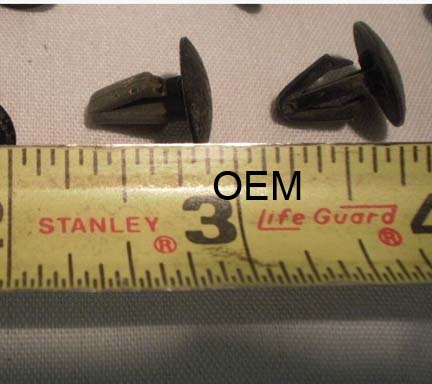
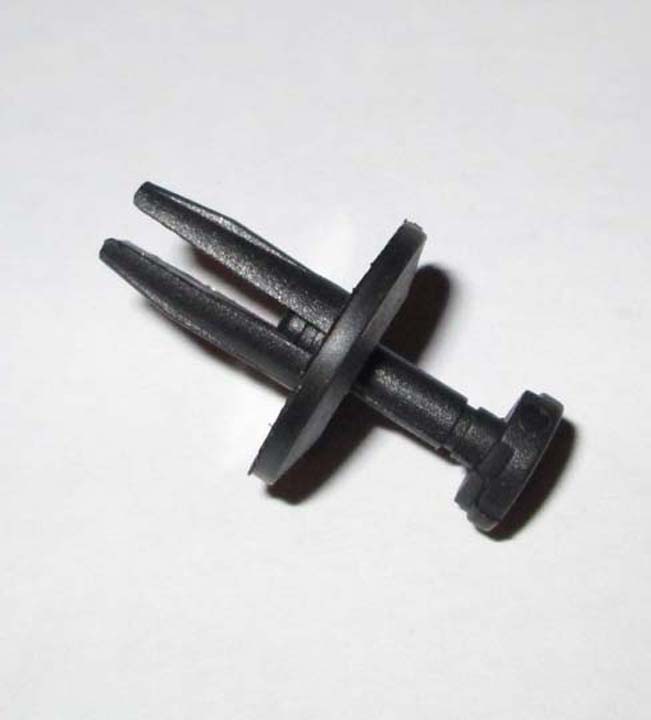
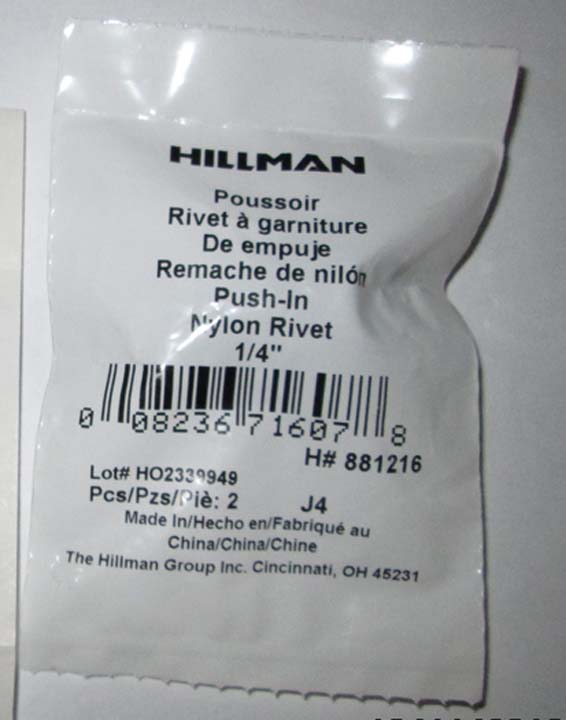
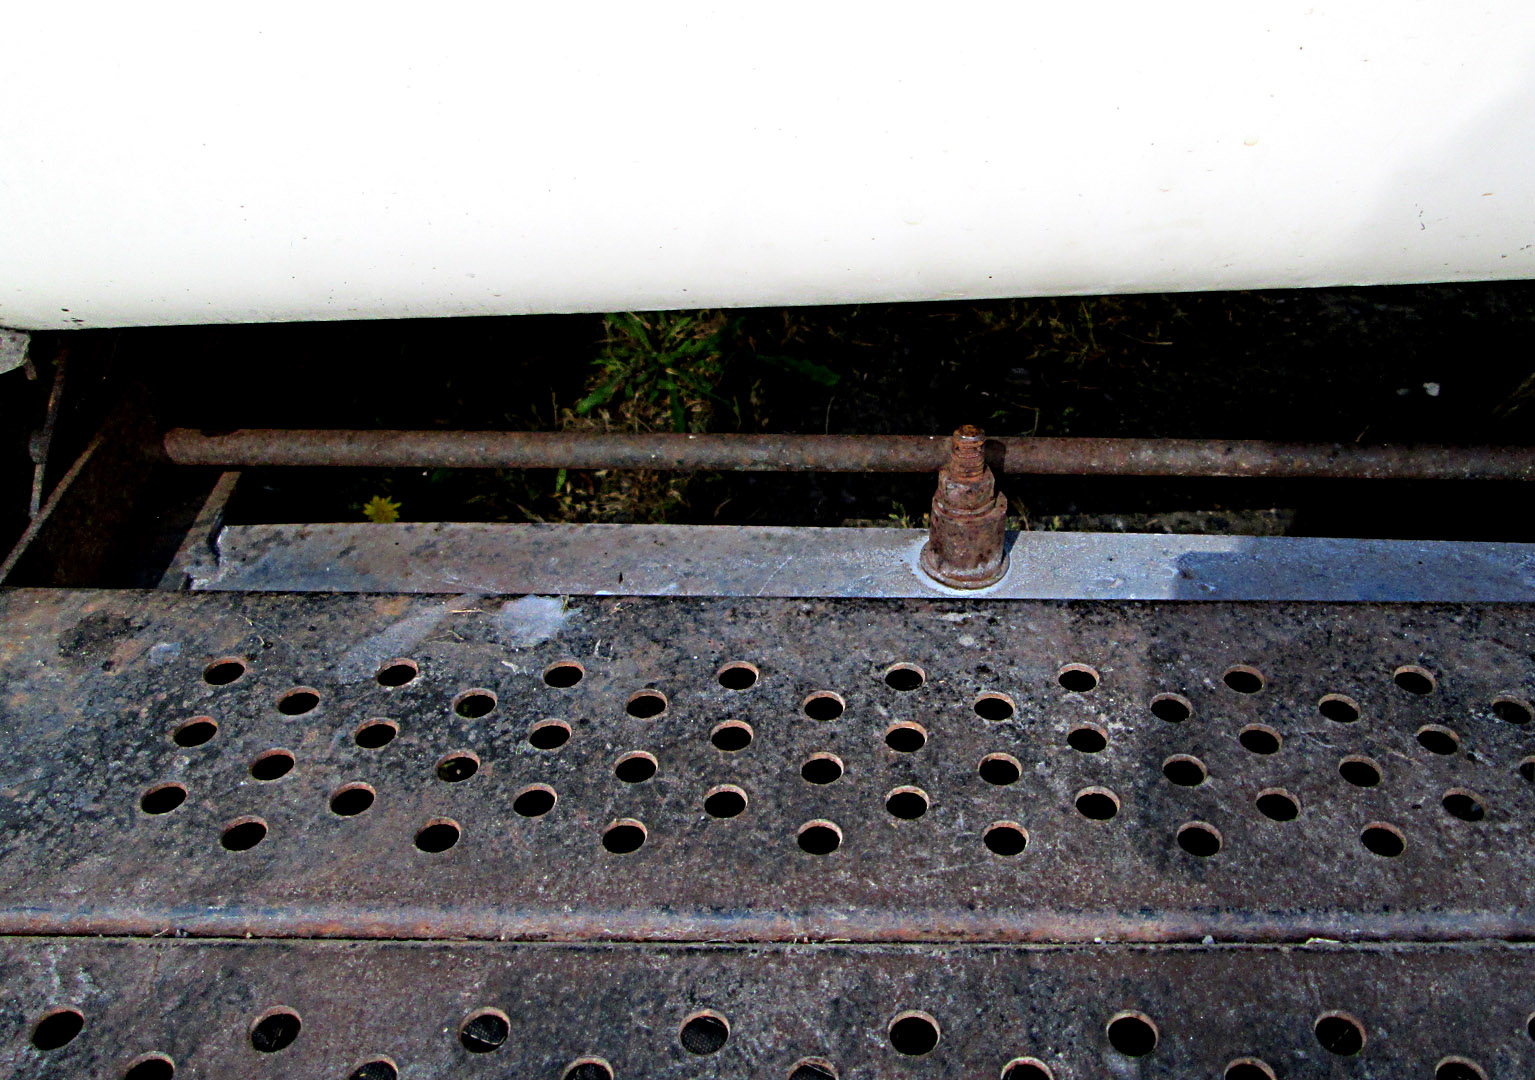
It seems like whenever I shop out front end or front brake work, the flexible splash "cutains" in the front wheel-wells come back missing some of the stock retainers, or worse, in the past have been torn by inexperienced wrenchers trying to remove them. The OEM retainers are kind of a one-way device, unless you squeeze them from the opposite side whilst pulling on the heads to remove them they can be rendered useless quickly. I found a great / easy replacement that's available at most hardware stores in the "misc thinga-majig" section, that has a retractable locking pin action that almost anyone can figure out just by looking at them, and are re-useable. Anyway, "it worked for me", hope it's useful to someone else. BR, TG
-
Sound thinking WME. I'm so used to having lot's of duplicate and extra parts on hand, like I used to, that I get impatient when I come up short. Like E said, "fools rush in"
-
Good call, thanks Linda. Decided to take off the modified one to Toyota and get the correct part number off it. Strangely, it seems to fit the '85 pickup you rode in (22RE) and the Sunrader 22R too.... Looks like I'll be buying online for sure. Even Larry down here at Yodaman in Santa Rosa doesn't currently have anything and he usually has most of what I need. The other thing I can do is just tell him to set the next correct one he gets in aside. Even with the tabs broken off, I can probably just pop-rivet some aluminum brackets on it. Also, I believe up to '79 they had sheet metal shrouds and some will fit, but they are usually so rusted that by the time you wire wheel them to paint them, they're a goner. The other thing is that they have 4 small bolts holding the lower shroud on and they're a hassle to get to. The plastic one's you can just unsnap from above and you don't have to pull the splash pan underneath to get to them. Thanks, TG
-
Runs warmer than any of the 4 previous '84-'85 Toyota trucks I've owned and we've eliminated everything but the newer Chinese radiator/core. I figured I got a known-good stock unit sitting in the basement, why not check it out before the next step of installing thermostatically-controlled electric fans. I've had my share of bad-out-of the box stuff, especially from China and it's the main suspect at this time. TG
-
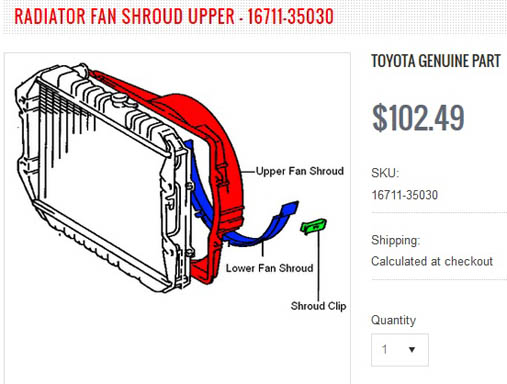
Some time back, I installed an over-sized aluminum radiator during the course of an engine rebuild and had to modify the stock plastic radiator shroud to get a good seal around it. I've always liked the stock 2-piece shroud because the lower, detachable part with clips allows one to easily unbolt and slide-up and out the upper shroud without messing with the fan assy. I am now wanting to go back to the stock radiator, can't use the modified shroud and have been told there are 4-5 different shrouds for the 22RE/R available from Toyota alone.(starting at about $130 for the cheapest) Aftermarket resources online seem to show mostly 1-piece shrouds and some have no picture, or show 3 different angle-shots of different parts and some show one-size-fit's-all 22RE/R! . Has anyone found a reliable aftermarket resource for the 2-piece style of the original per below? Used one's are impossible to find near me because the stock one's are equipped with little slotted plastic "ears" that mechanics seem to love to over-tighten and tend to break off rendering them relatively useless. I still have the lower shroud and clips and just need the larger upper shroud. I know auto tranny and manual tranny are different, but can't see why there would be more versions than that. Maybe 4WD is different also... Anyhow, input from anyone with any luck in finding previous solutions would be appreciated. As I said, I'd really like to stay with the easily removable 2-piece solution, but maybe there's an aftermarket 1-piece shroud that comes out just as easily? Thanks for any input and hope everyone is weathering the first rains well, BR, TG
-
The Magic of Zep Wet Look Floor Polish
ToyoGuy replied to markwilliam1's topic in General Discussion
Yep, it seems it's always worth it to put good work in on the front end of the project. Just another maintenance item to add to the list. Yours sure looks nice . A guy could probably make a buck or two doing premium 5-coat Zep-finishing. TG -
That 's really the way to go, any idea of the cost?
-
The Magic of Zep Wet Look Floor Polish
ToyoGuy replied to markwilliam1's topic in General Discussion
Yeah, it gets easily over 100 in the summer where I live in N. Cal (I've clocked the interior of the upper cabinets at 120 degrees on hot days with an infrared sensor) and I notice that the southern exposure exterior side and top where I park degrade well before the cooler and shaded northern / driver's side. Basically, the coating starts to flake off in those areas first during wash-downs after about 2 yrs for me. I may give Zep product support a call and see what they say about bonding to fiberglass, what the heck, they may have some good input! I only use the Oxy Clean stuff too, it's a great product. -
My agent has found it useful to review copies of comparable listings from Craig's list and other sources of fair-market offerings. These are certainly not verifiable sales, but do help to indicate current market value. When I see these on line, I print them out and save them in a file. It's actually been quite interesting and informing to see the range in condition, modification, restoration and value of a similar model/make/year from over the years. Also, if I'm involved in an accident these, in addition to receipts will help to establish value. BR, TG
-
The Magic of Zep Wet Look Floor Polish
ToyoGuy replied to markwilliam1's topic in General Discussion
Hi All, Read the above and thought I'd share my experience with this process out over a couple of years: My usual disclaimer, it's just what worked for me, no "know-it-all", "one-size-fits-all" instructions are implied. Anyway, per WME, I definitely use gloves and ditto JJR, no TSP for me, I've had some alarming results on other projects with that stuff. I may try a weak Oxygen bleach solution some time in the future. I have applied Zep twice and it has lasted 2 years at a time in sunny Cal being stored uncovered all year in the sun, I couldn't say about covered storage, I could maybe see 6 years though, with good prep and cool indoor storage.This product is, after all, designed for interior use. Essentially, what I've seen is, it just starts flaking off when it gives up the ghost. Now, when I apply it, I use a non-colored microfiber application cloth. The first time, the lightly pastel-colored one I bought bled onto the white outside "field-area" over use/time during the application. (Didn't notice at first, took about 1 hr for the color to start bleeding out of the cloth, luckily I caught it soon enough, on the roof) I also eventually found that a fake lambs-wool floor-wax applicator head with the micro-fiber cloth wrapped around the wool material and stapled to the wooden back gave me the most even, consistent and thickest coats. (got it at Hopeless Depot) Speaking of thick, keep your eyes open to track any errant runs down the side or spots dripped on the hood. This stuff is a seriously high-solids product, it dries pretty quick and will leave hardened "blobs" on other finishes. A singe-edge razor blade will easily remove the stuff from glass windows, but I masked my Sunrader wrap-arounds and fan-vent lids and I'm glad I did. Removal from those could get dicey. If in doubt, mask it off, the stuff sticks pretty well to anything but silicone contaminated areas. (BTW, Having help to move ladders, allowing you to keep moving quickly and efficiently and keep an eye out for drips etc will definitely help). I have done my 18' Sunrader once with hired help and once alone. The application part of the process went far better and I got higher quality, better looking, more consistent results working with a competent helper, but then again, I'm not the young buck I used to be. As far as over-coating annually, my test results weren't impressive and it seems like once the original application is "cooked" or aged, it tends to flake off, which leaves very noticeable voids in new applications. It also seems to yellow some when over-coated. Again, I'm in sunny Ca, so someone else w/covered storage may get better results with that. Clean your rubber gaskets around the windows well, or avoid applying over them, they will streak black rubber over the rest if you apply over them dirty. My prep so far, has been - Barkeeps Friend the last two times, but this winter I'm going to very carefully try Zep's stripper for this product, and if it's a go, use that, then wash carefully, or abandon all that and just go with wet/dry like WME. (Will probably use #800 w/soapy water to save as much of the gelcoat as I can). Again, as mentioned, a cool and windless day has been the best, heat/sun speeds the dry time and the stuff picks up dust, leaves, bugs etc really easily. A closed auto/truck-barn would be ideal, (like spraying, you absolutely need good light to see where you've been <wet>and where you're going <dry>) but few of us have that at our disposal. (I am going to borrow covered space after my prep to do only the application this next time around) Hope some or any of this helps. I must admit, it's a rewarding process after you're done, but it's no walk in the park for me when I do it. BR, TG PS Borrow more ladders or scaffold, I don't think you'll regret it. -
I'm all over those wheels and that "Cadillac converter".
-
I parsed through a couple of instructional videos, this one gave me most of what I needed and I only changed the fuel-line routing a little to give a bit more slack. I also used clamps on all connections, a clamp this size just ain't that expensive. It all worked out rather nicely: Here's the petcock I ran down like his: Enjoy, TG


.jpg.8b14176cd137e3b0243d35d506218d3f.jpg)