ToyoGuy
-
Posts
331 -
Joined
-
Last visited
Content Type
Events
Profiles
Forums
Gallery
Everything posted by ToyoGuy
-
Mines on a bicycle rack.(Couldn't resist ) What the hell,... 25 mph, 225 mpg, Approx. 18-20 lbs. Can't figure out why the guys wearing colors on Harleys don't wave back .

-
 Good for you for waiting before sawing, fortune favors the patient RV owner. Congratulations on your purchase. There are many good RV’ers here. Some of us believe in very thorough fixes including improving design, some believe the most important thing is to get as many hours on the road as possible and don’t care much about condition and some who want to fabricate and use recycled materials to cut costs. Read the previous posts! As I have said before, I wish I did. That said, my 2 cents here :The front “sag” is common to many Sunraders, due IHO likely to the combo of the high-traffic area near the entry/pass from cab to coach (any area of a SR low traffic?) and it’s proximity to the shower, hence errant moisture leakage to floor. The area of the rear separation photo appears to be water-stained, even up to rear wall. (Note also where water pump is situated) Leaks or moisture are a primary RV destroyer, remember this well when you do your fixes and re-plumbing. Fixing symptoms will do you little good if you don’t address the primary problems causing them. Another blurb, one of the reasons I do not generally advise folks is because I don’t know their work skill-set , safety practices or proficiency with tools. For instance, I have used a cutting attachment for my angle-grinder known as a “Lancelot”. It’s essentially a chain-saw chain wrapped around a circular blade. It’s a VERY aggressive and unforgiving tool and an unreal time-saver. I would not advise many of my friends to wield this thing, but it was a huge help to me in my restoration. Oh yeah, the floor thing….. I would get a creeper and carefully examine the bracing under the flooring of your vehicle. Look for logical problems. Is the road barrier peeling back or rotting? Take a look at everything under there, howzit look? Take pictures of problems so you don’t have to crawl under a million times to re-think things. Under my Sunrader, the flooring cross-braces were bent and I didn’t realize it until I looked at them 3 or 4 times. Anyway, some people live with funky floors, some cover them with plywood. Depends on your tolerance for that stuff, talent and cash-flow. Some people have welded in bracing to help arrest the primary condition of what I consider to be design flaws. Disclaimer here! The gas tank lives under there and people have lost their entire motorhome to bad welding practices!! Again, it’s all here in previous posts. Good Luck, and not sure WTH a “troll” is, but I don’t think I am one, for this week at least. TG
 -
Never used it, but might try it now. Can't get ProFlex here in N. Bay anymore except when someone goes to Nevada. I was never disappointed in a 3M product when I worked with them in prosthetics. Wonder how your 3M stuff is for removal during the inevitable exterior re-seal? (Reminds me, I gotta put a pole barn on my Xmas list Says fast cure, how fast did the stuff set up? Cool idea, BTW, interior seal......
-
Hi THFM, What year?, What is the material that the coach is built out of? (ie. aluminum or fiberglass panels, moulded FG ?) 4 or 6 cyl? Standard or auto tranny? Ya gotta throw out a bigger bone to get some real idea of the mfg. There's people in the forums that can tell you a lot more than me, but we need more info. Definitely read the buying info on this site before laying out any hard-earned weasel hides, wish I had... Welcome and good luck. TG
-
Thanks WME, I tried incense/smoke, but TP will be easier to read methinks?! I'll report back w/any findings. It's a long setup to test, lotsa taping etc..... BR, TG
-
I have been exploring pressurizing my 18 footer to find leaks. (I accumulated them by tapping against various interior walls around windows to create paneling templates, I do not recommend this.. ) Anyway, After fabricating a Manometer and air-pressure supply, plus taping off everything I could find, I still only got a less than desirable amount of pressure... These, (below) I think may be the culprits. In spite of this, I did find one or two leaks, but only got about 1/2" of change on the manometer. Has anyone filled these with a bit of expanding foam to prevent uncontrolled leaks/drafts etc? Would this be a bad thing? They are usually covered by upholstery, of course. Thx, TG
-
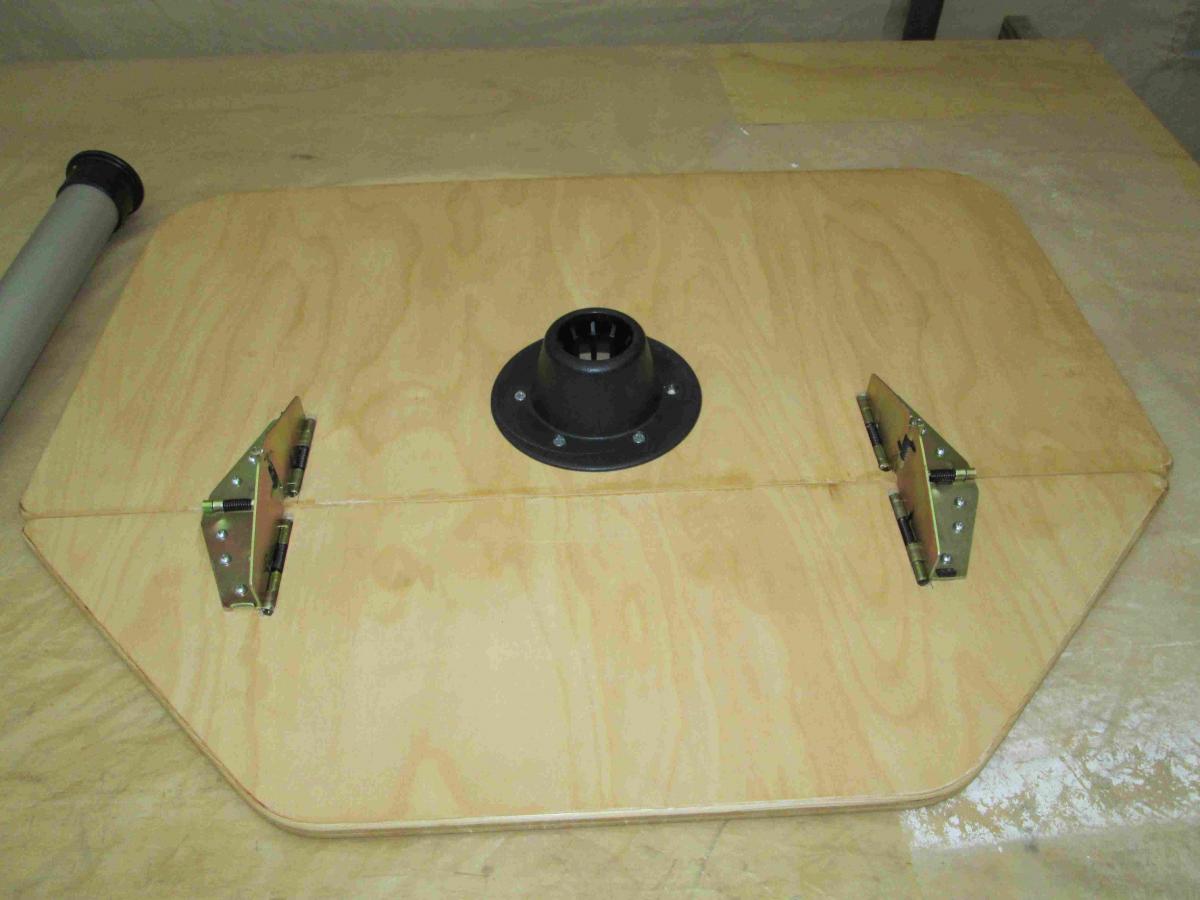
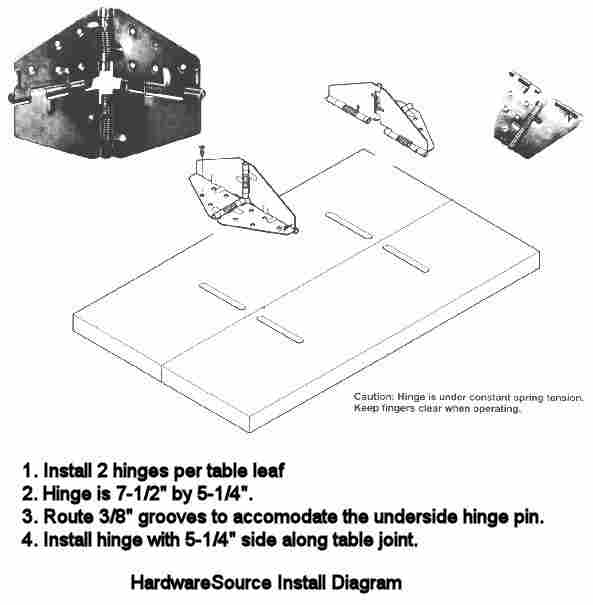
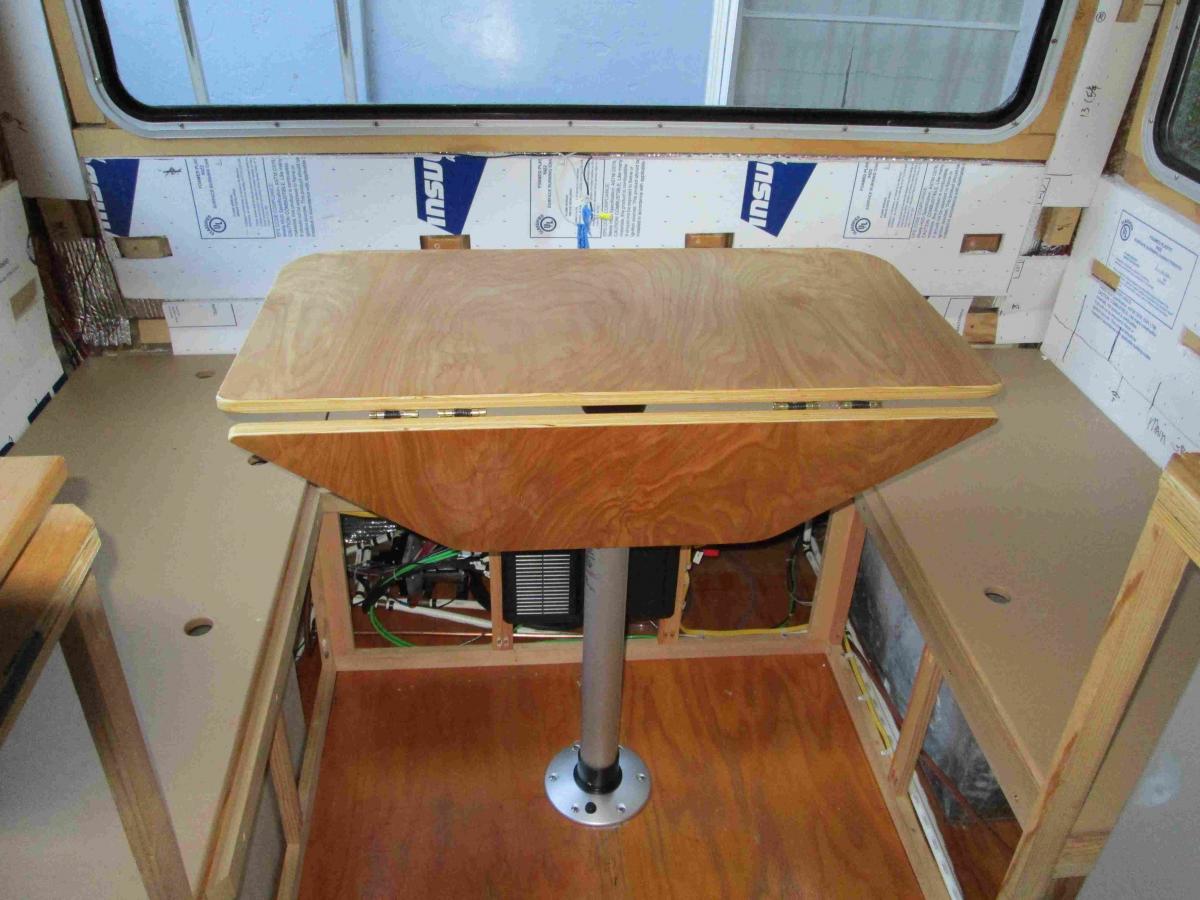
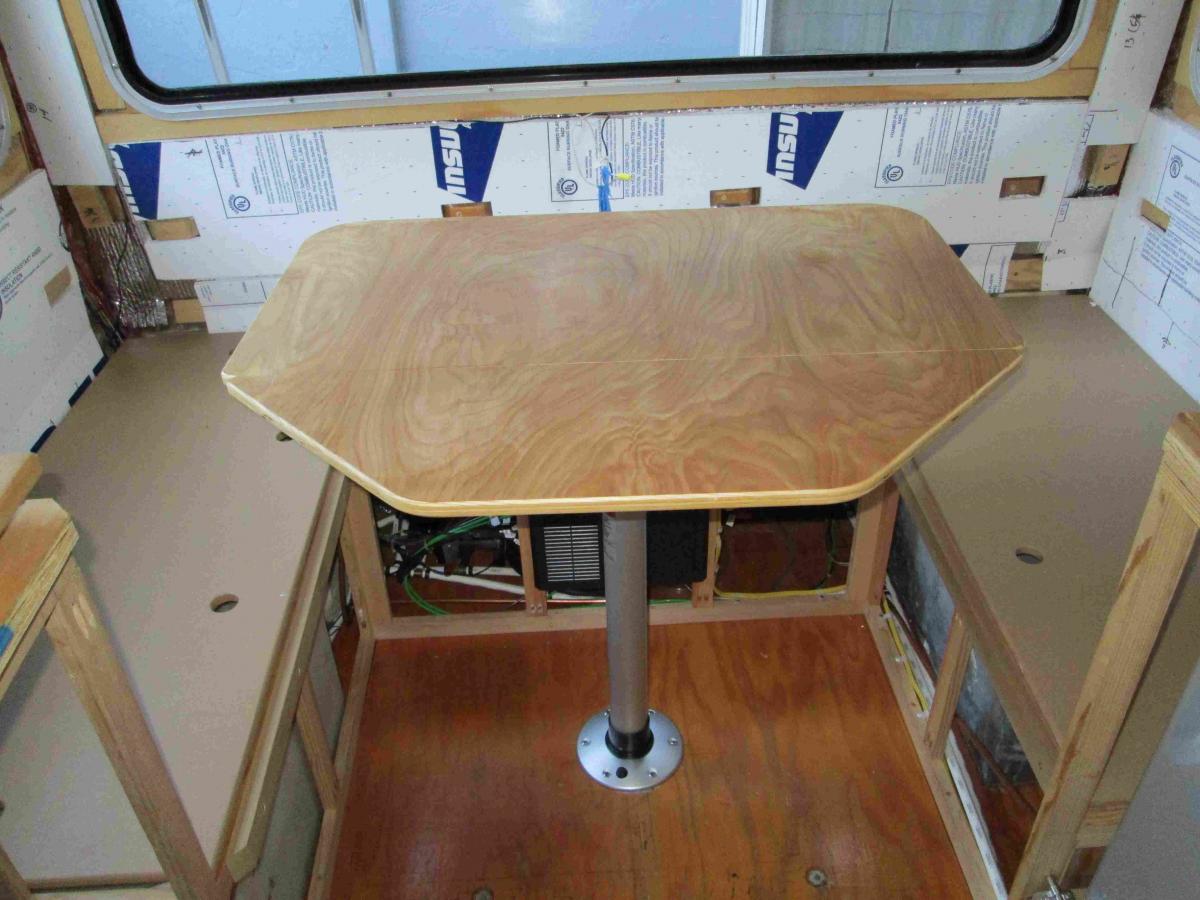
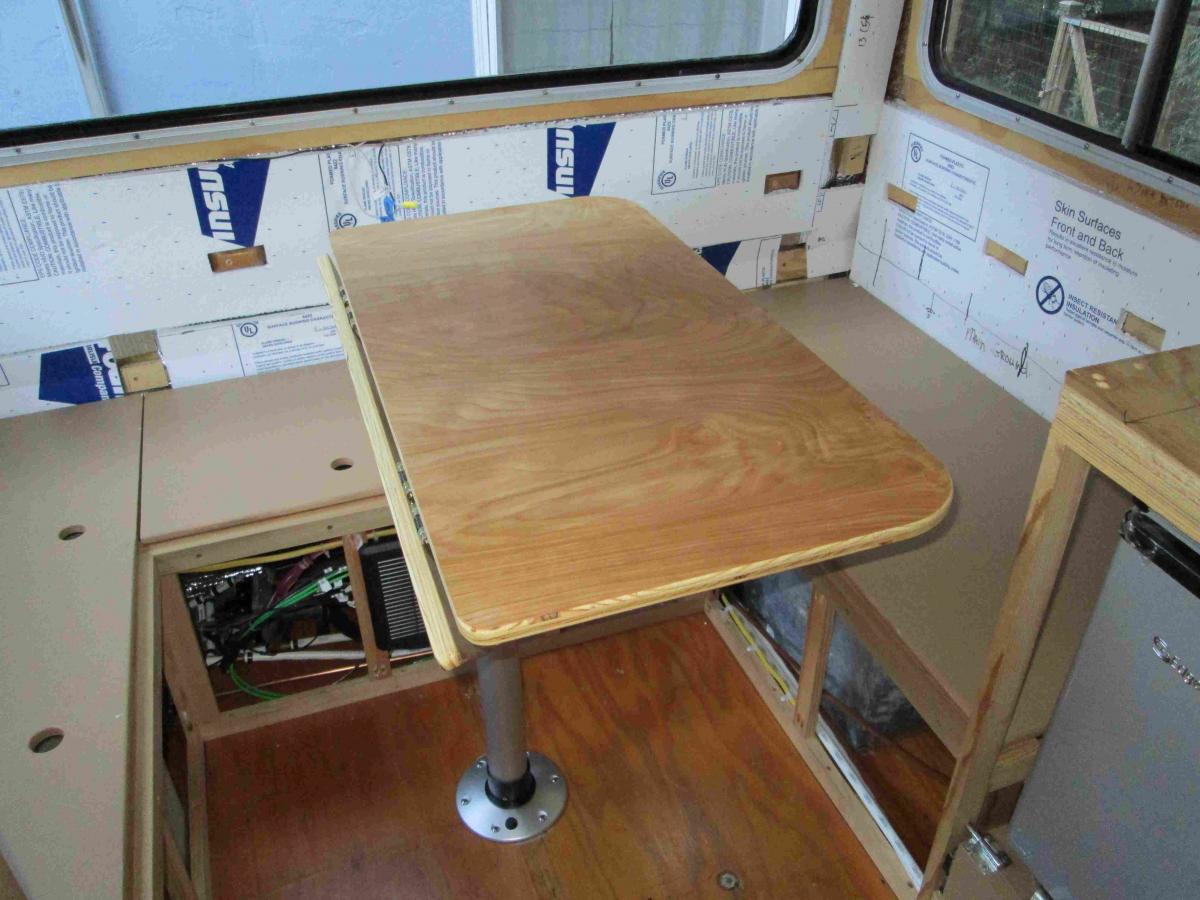
Hello All, sorry for long delay on promised update and pix, got roped into some late season landscaping by the boss. On the table, I went with the Springfield-style locking screw-in base and slide-over pedestal. (Approximately $76.00 incl shipping, not cheap, but I'm in deep) I chose to put threaded brass inserts into the floor for the flange, which was a bit of a hassle, but suits my purposes for removal and re-installations. Also, I wanted extra room in the coach when needed, so I split the table top and used a set of "flip-flop" hinges on it. They allow the top to fold down, or lock up into position for some added space. They do require routing, so it's not a bada-bing kinda install. Note to interested parties, they are spring-loaded and very, very strong. Probably not good for curious children, weak of hand or the "not-so-nimble". I actually cut 2 of the return springs to relieve some tension and they are still plenty strong for me. It must be because of restaurants using them, liability and how heavily tables are loaded. The bottom of the post locks nicely, but it's not metal-to-metal, so you probably wouldn't want to lean on the whole assy the way you can with a drop-in that just kind of bends in the socket. Likely, no forgiveness there, but I should note that "door-slammers" and hammer-mechanics generally aren't welcome around my place anyway. The table-top socket locks on with a trigger release, but will rotate, which I like. I did relieve the sharp outside edge of the pedestal tube and buff it a bit and it makes a ton of difference sliding it on and off. For others nfo, I bought the 30" post and with 3/4" ply for the top, ended up with 31" at the top of the table. I'm a medium-sized guy and that worked out perfect for me. I almost forgot to consider the thickness of the cushions, (the seats are @ stock height) then set them in and it all worked out. Waist clearance is good, but I am building my own non-stock cabinets and I can't help stock 'Rader cabinet owners on that. Having it rotate is helpful though. Another note, in my 18' 84', I couldn't find any way to keep the stock pedestal location under the middle of the top and still have the back space to be large enough for any human over the age of 5, so I moved the pedestal back about 3" toward the rear and, for 2 adults, it's way more reasonable in terms of ease and efficiency. Happy winterizing, TG
-
Well, got the new pedestal w/ base and finished sealing the new 3/4" cabinet grade plywood table-top on my '84 18' Rader today. Can any of you 18' Sunrader owners with the same rear floorplan and original setup tell me about how the table is located and how that works for you? I never had the original table and the floor is new with the old scraps revealing original location long gone. I assume (I know,.. ) that the pedestal is centered in the middle of the table-top. It seems to me from pictures I see, that the sides of the U-shaped dinette have a bit more tummy clearance than the seat with it's back to the window ? Dropping a plumb-line off the sides and back of someone else' setup would tell whether the top is located straight above the space it drops into for the bed make-up, or, whether it's offset. Also very interested what folks think about how well theirs works for them. I did a mock-up just setting the table-top on the pedestal and can't figure how it will work best. I am fairly certain I will create locking hinged drop-leaves for the sides to ease entry and trim the front corners like most of yours I see.. Thanks for any help on this. TG
-
Hmm, my Harbor Freight torque wrench tops out at 159 Lbs and I'm betting I'm loosing some force using 2 extensions to get the angle square and safe/correct. Guess I better put an 8" extension on the shopping list. Does anyone use a little "anti-seize" compound at those upper torque ranges mentioned? I can just see myself packing a 4' cheater bar back there with everything else... TG
-
Sunrader Lpg Regulator Removeable/rebuildable?
ToyoGuy replied to ToyoGuy's topic in Coach ApplianceTech Issues
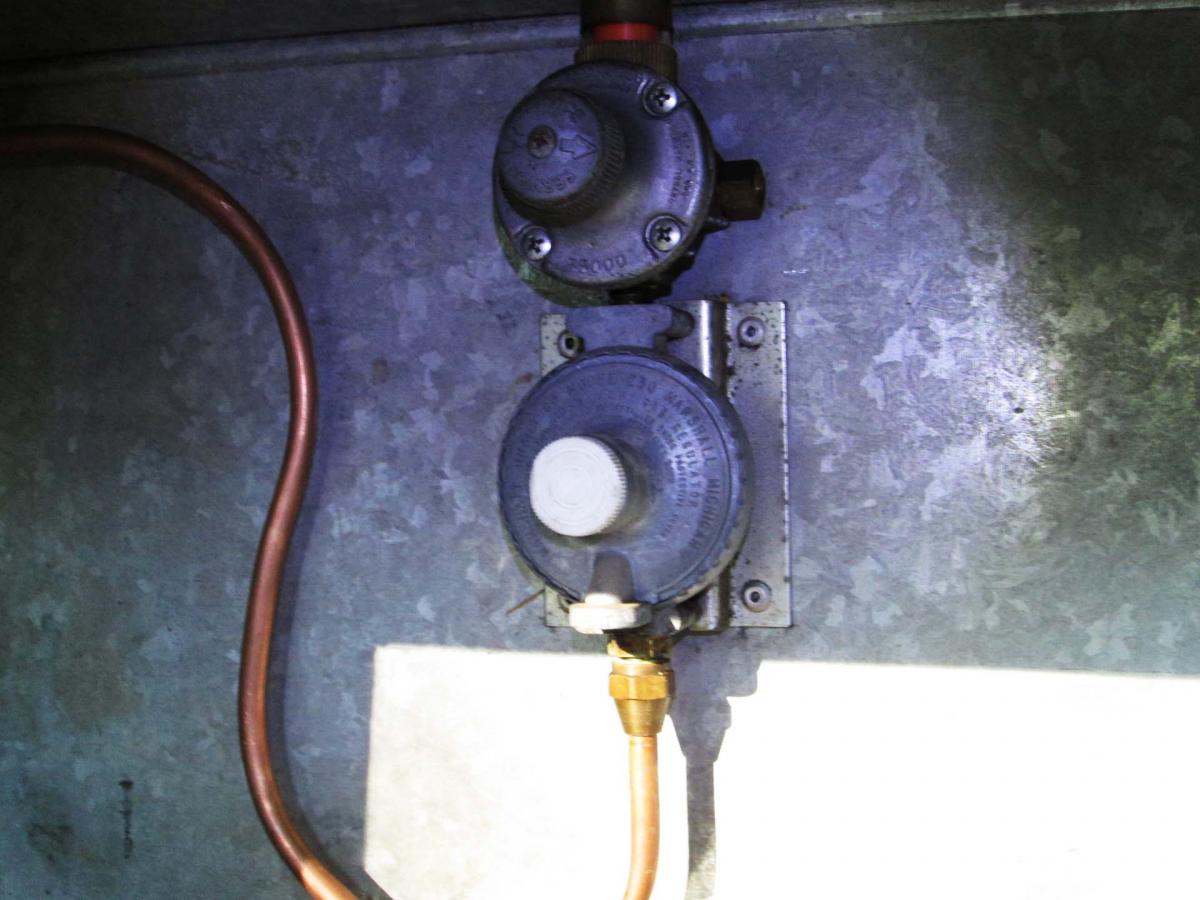
Mine would be a bit tight for a horizontal regulator ........ Got all the new stuff installed and everything is copasetic. TG
-
Sunrader Lpg Regulator Removeable/rebuildable?
ToyoGuy replied to ToyoGuy's topic in Coach ApplianceTech Issues
Got the old reg taken out this morning. Had to drill out the rivits and I was right about the ceiling of the metal compartment pushing on the top of the regulator assembly all these years. The metal cap on top of the full / empty indicator was worn from years of vibration and the clear plastic housing under it just finally gave up the ghost. Amazing that it lasted as long as it did. More amazing it passed QA originally with it mounted that way. Also, the old regulator was mounted to the brackets with wood screws forced into the machined screw holes in the back of the regulator. Jeeze, I gotta believe you folks with newer than '84 Sunraders are seeing a lot less of this stuff... Thanks for the help. TG -
Sunrader Lpg Regulator Removeable/rebuildable?
ToyoGuy replied to ToyoGuy's topic in Coach ApplianceTech Issues
Thanks Linda, The upper of the 2 units has a knob w/arrow on the face of it for switching. The clear-plastic Red/Green gas indicator dome is at the very top of the whole thing and, as currently installed, is right up against the top of the compartment. Good opportunity to move it down a 1/2". The way it is, setting anything on the top of the sheet metal compartment from the inside of the coach, just mashes down on the top of the whole array. Maybe that's the cause of the current problem. I hadn't heard of the specialized gas tape. Thanks for the tip. TG -
Well, something had to go south, it was going too smooth. Was walking past the coach this afternoon and smelled gas and heard the telltale hissing..... Quickly and carefully disconnected both batteries, then opened the access door and shut the gas off at the live bottle (mine has two with a selector at the regulator, as per below) and checked for gas inside the MH. Made note of where I had parked the fire extinguisher just the day before yesterday and then with a flashlight,carefully inspected the interior of the LPG compartment, tanks, hoses and regulator. No clues. I squirted the whole deal down liberally with soapy water and just cracked the valve again. No bubbles but lots of gas sounds and smell. The hoses are old, so I figured I'd replace those on principle, (30 yrs, what the heck, y'know?) It's the original regulator, and it's rivited to the wall of the tank compartment, so I can't easily remove it to disassemble and inspect seals etc. Do folks just replace these instead? It's an awfully archaic-looking setup. On the bright side, I know my gas compartment doesn't leak, I was in the coach making measurements before I went out and discovered the problem. Everything carrying gas from the coach-side of the compartment throughout the coach is new, so I'm not concerned there, but I can only assume if nothing else is leaking, it's gotta be the 1984 regulator somehow. Maybe a diaphram, or seal? Anybody dealt with this? can a new regulator even be had? The fit in the compartment is mighty snug and I would hope for smaller, or same size. Thanks, TG
-
Thanks all, went for the 30" option. Will report as to quality and sturdiness when it get's installed. The old owner threw out the old table and had replaced it with a kind of munchkin-sized rectangular thing like a cocktail lounge. It held 4 sodas and 1 plate, absolutely useless and the 1' x 6" boards needed to bridge the sleeping area took up a lot of the already rare space under the seats. Mine had "ledger boards" that lined the dinette right behind one's knees that the table sat upon as usual?. The old ledgers were 2" x 4" s covered with carpet and huge... The replacements will be much smaller so as not to be rubbing the backs of everyone's calves whilst scarfing. I am seriously considering fabricating the tabletop with hinged "wings" that fold under and secure with small barrel-bolts to hold them in place and keep the table slim enough for my "relaxed-fit" figure to scoot in and out while in use. They would fold out to make it correctly fit the back bunk space for the bed make-up. So many ideas, so little time it seems.... BR, TG
-
Wow, the plot thickens !..... It would be very cool to have a setup like Mopar Earl so the the post just dropped the table top right down into the sleeping position, but,...... the pedestal can't be removed for floor space, if needed. (He has a much bigger rig than me tho). Also, I have the 18' 'Rader w/ U-shaped dinettte, so attaching the table top to the wall with a bracket and using a swing-out leg is out. This (below?) is the system I'm looking at. The base is 1" high when the pedestal is removed, and while it hasn't got the mass and broader base of the telescoping system, I think it looks reasonably sturdy. Interesting that most of these pedestal systems primarily designed for boats seem to be sold for a finished height of about 28". No explanation from techs online. In preliminary measuring, it looks like, for my '84, 18' dinette-in-back, the table height needs to be at least 30'-31" to feel like I'm eating at the adults table, and heck, I'm short!! The seats / cabinets are all new, but I kept the original height and the cushions are original thickness at this point. So, what height is a stock Sunrader table anyway?? Anybody can fill me in? Thanks, TG
-
Thanks corbin. Will do that and look at reviews to get an idea about how well they work. TG
-
Try as I might I can't seem to find information copied from a previous posting (long ago), or the post, about a table-pedestal base that someone purchased, that was surface-mount and had a sort of bayonet twist-lock at the bottom. I would really like to avoid punching a big hole in the new floor and my (somewhat-foggy?) recollection was that the unit was fairly low profile and sturdy. (Yeah, I know,......."The checks in the mail,.... I'll pay you next Friday,... This is a self-cleaning model !!......He's a really nice guy.) Anybody know of such an animal? Happy adventuring to all, TG
-
Since this is the loudest component in the coach ( haven't heard the new fan hood yet ) I'm all over the padding idea, thanks Maineah . The rigidity of the Pex will easily keep it from wandering off anywhere. Now I just gotta remember where all those pipes and drain valves go.........
-
Thanks to all for your kind input. I think I'll keep the current pump and budget for the tank (which has been recommended previously) later. Mine is an 18" rear dinette and space is precious. I do think I will double up on the rubber mounting grommits and try to dampen the vibration/sound a bit more. Also got to try to figure out how to test the pressure switch besides putting my thumb over the end of the supply tube in the bucket. BR, TG
-
Howdy all, Finally at that point in the program where I'm replacing all plumbing. Today I dissassembled, cleaned and fired up the old SHURFlo (model 200-210-39) in my "84 Rader and it worked without a hitch for 30 min. The casing warmed up just a bit, but that's all. Not loud, not quiet. Don't know about any check valves as I just used a 5 gal bucket. My parts guy says " it's old, replace it while you're in there" Surprise huh? ..... Can anybody report significant improvement (power consumption, noise level, or smaller footprint etc.) with a newer unit? Thanks, happy adventuring to all, T.G.
-
Dolphinite, Great idea for material, I keep old cutting boards around the shop for work boards, but I think this rates a new one.
-
Thanks John, As you surmised, the gap is even across top and bottom. ( PTL, Small things make me happy these days) Yours sounds like a sensible plan. Since I have a connection at a place that does plastic vacuum molding, I may see if I can get any suitable plastic scraps from thick material and go with it. I like the idea of strengthening the flange. TG
-
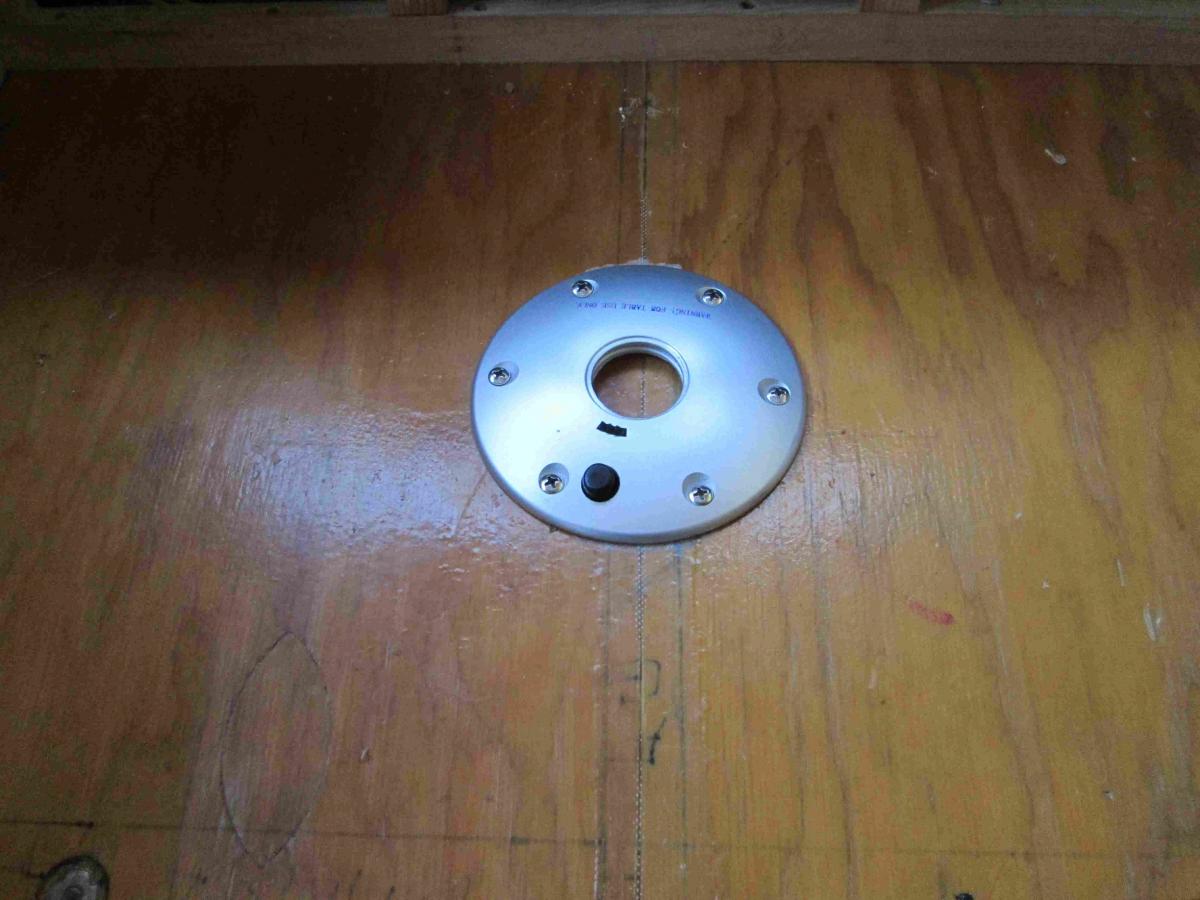
Anybody removed their Sunrader rear access doors and (much) later found they don't mate well to the body curve? I'm trying to decide the best way to tackle this without potting it in with tons-o-caulk. Seems like I have to either make up some tapering rubber gaskets for the sides, with straight ones for top and bottom, or see if I can clamp the sides straight and reinforce with hardwood to hold the shape. The door flanges are extruded aluminum and cannot be bent ( let alone the door ). If I reinforce to straighten, and it holds, I get something to screw the flange to as a second benefit. Sounds easy, but 1/8" fiberglass has a definite memory. The attached picture is the propane port, but the water heater wall on the other side is similarly curved. Can't think of where I would find hard rubber material to taper down on a stationary sander. Any thoughts...? TG
-
Hmmmm, .. now you got me thinking,....maybe just a level 4-8 Kevlar wainscot from the cab back and the bottom of the windows down
-
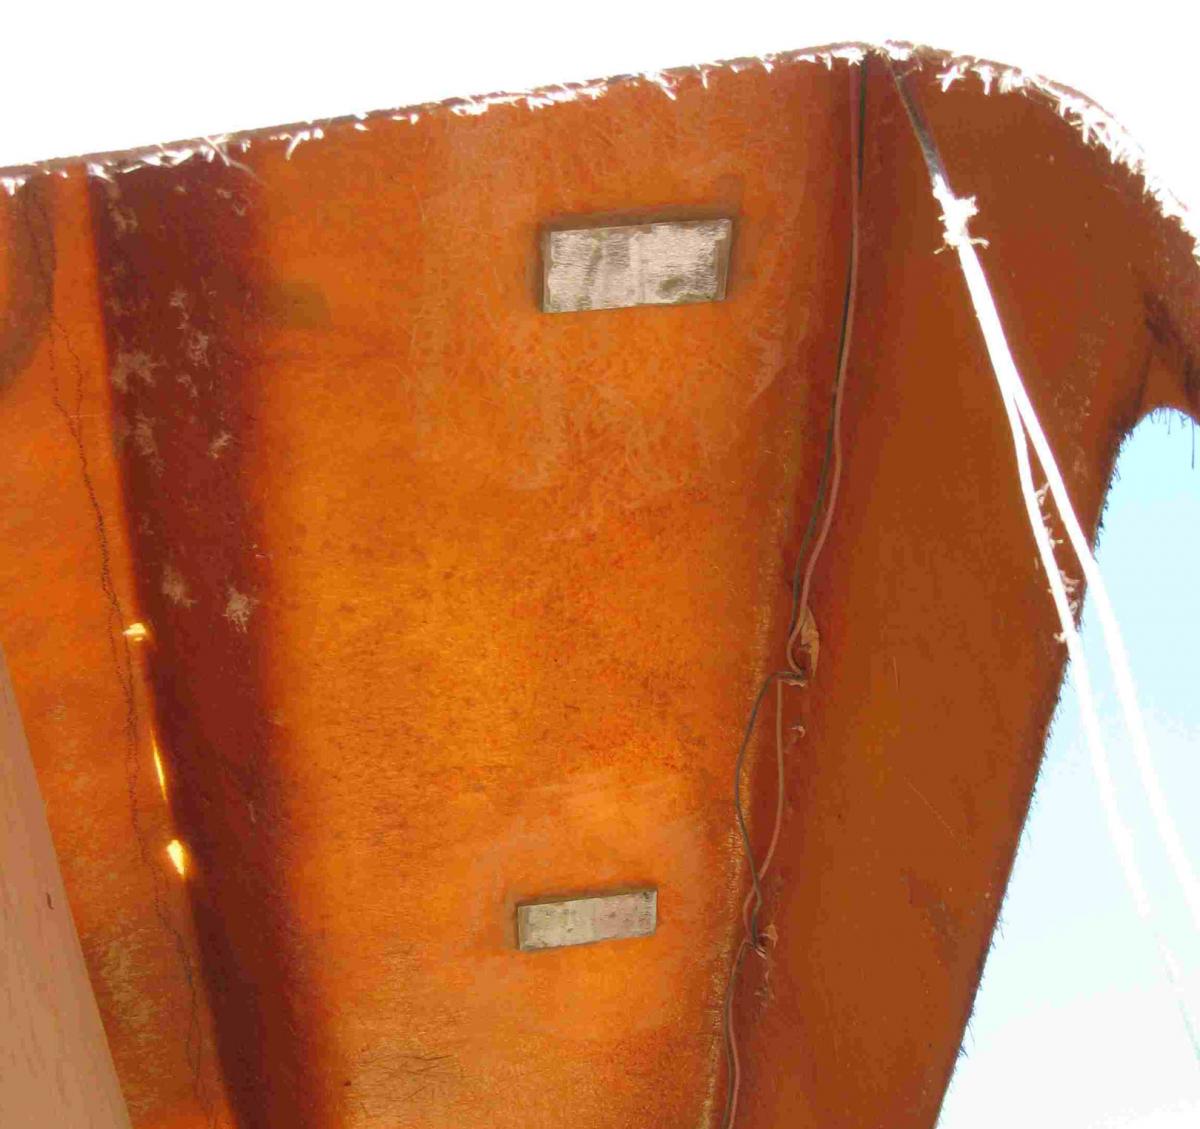
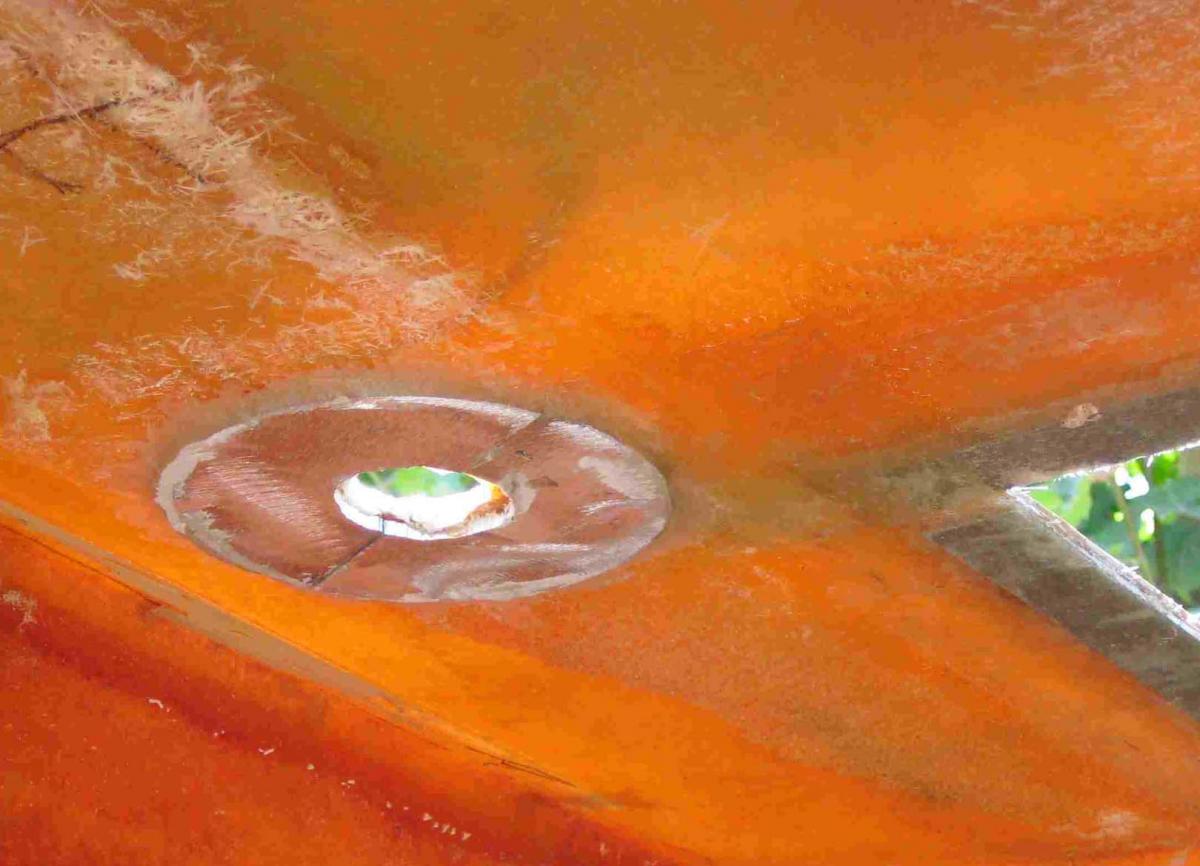
As Baja knows, I have broken every rule of his about "get it done and roll on". I love doing good work on my 18 footer and I hate walking by an older fix a hundred times and thinking "why didn't I get that right" ? Sooo..... Because I really like the Jetsons look of the Rader including racks and wrap-around windows et al, I filled the roof rack old holes, turned the mounting feet and reinstalled them so one set of screws wasn't always sitting in the puddle that inevitably forms in the roof trough when parked. Attached shot shows the underside of the plates before being covered with the last layer of Fbrgls prior to drilling and tapping. I also reinforced all other points of coach mountings for ports, doors, roof jacks, lights etc. (my rig was entirely empty to be fair) I used 1/8" hardened aluminum for all ports, 1/16" aluminum for new LED lights and 3/16" steel plates for ladders and roof rack mounts. I tapped the roof / ladder plates and used stainless socket head screws with a rubber gasket under the roof rack feet. They do not leak,... at all. The discussion of usefulness of the rack is like the functionality of a heater in an early Austin Healey, but I'm in deeper aesthetically than most. Guess I'm just looking at the old brochures too much. I will say that to improve overall strength I also installed aluminum reinforcing bars in the back roof and both sides of the coach without drilling through the sides by glassing them in. It all takes time, but it is a really strong and way better than original coach that looks the same.