canadasunrader
-
Posts
175 -
Joined
-
Last visited
Content Type
Events
Profiles
Forums
Gallery
Everything posted by canadasunrader
-
Jim. Tested the white wire on both sides coming up through the floor as you suggested. All good on each side. Lit up as you said when I touched the black wire. Connected the black wire to the green. Now what? Apologies for my lack of knowledge. And.... yes, the lights were all working on the old tail lights before I began. And.... I do have heat shrink that I used to finish all the new marker lights.
-
Thank you, Jim. I realy appreciate this. There wasn't a jack with this rig. It's on the list. For now, I will just crawl around as best I can. I do have a couple of test lights in the tool box so I will follow your perfect instructions and see where it leads me.
-
Jim, good luck with those leaks. I, too, have discovered one at the end of this big spring rain we are experiencing. I thought I had the roof all buttoned up, but apparently not. I finally got underneath. I don't see anything that stands out as amiss. Although I don't have jacks and had to squeeze in wherever I could. Here is what Bargman says about their lights: "... Our white wire is going to be our ground wire, so we can go ahead and make that connection. The black wire is going to be for our stop and turn signals. And then that would mean that our green wire is going to our taillight."

-
Thank you. I will do that later today when it stops pouring.....
-
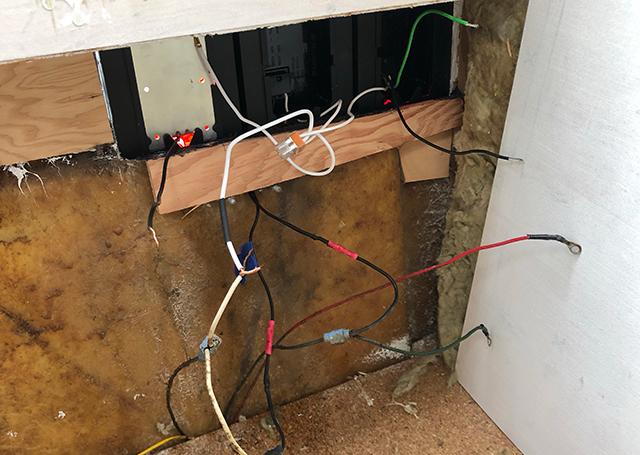
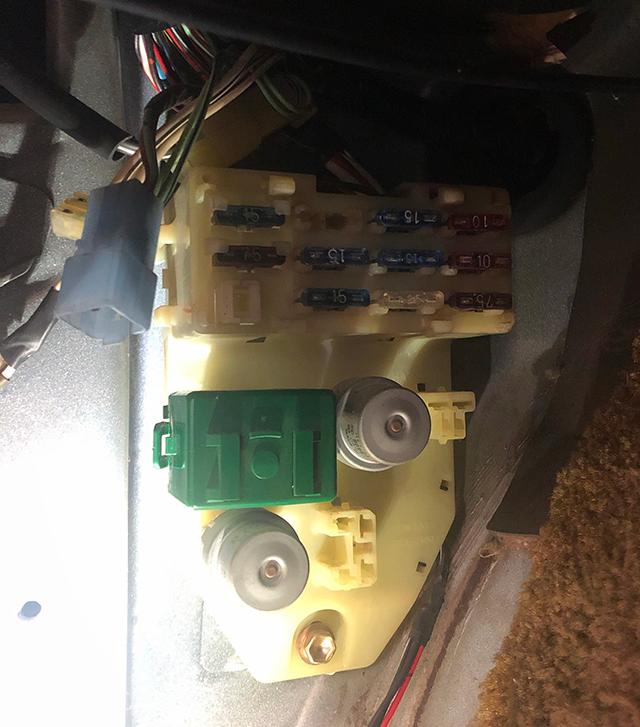
Reverse works. Signals work [need to replace the blinker at fuse box to regulate flashing], but no brake lights. Tried a couple different wire combos but no brakes. Trying combos until I find the brake lights working, but nothing yet. Well, I should say there is a faint bit of light but nothing of note when brakes depressed. Also, there is an intermitent chirp, click coming from the green box near the fuse box, even when key not engaged. Seems weird. Life of its own. Not on a regular pattern, but chirping here and there. I tried removing that green box but must be a trick. The cover popped off, but that's it. Do I just force it off? Here's a couple of photos. Rick
-
Thanks Jim. I will give it a go.
-
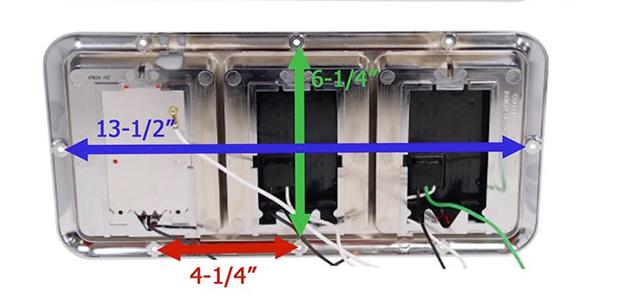
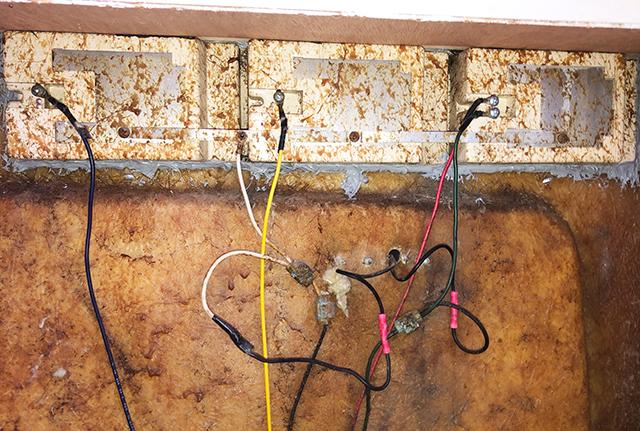
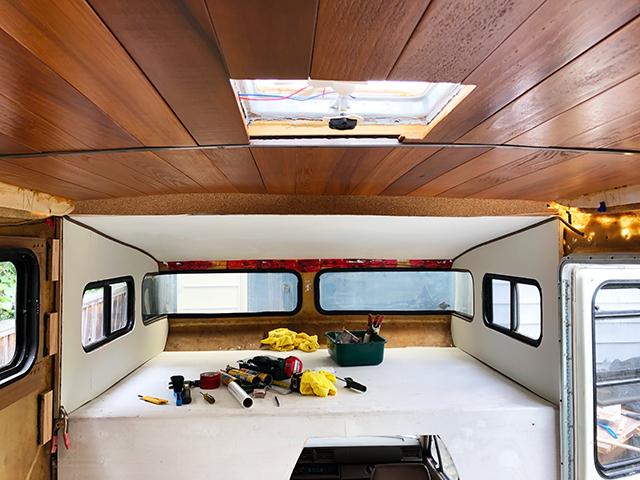
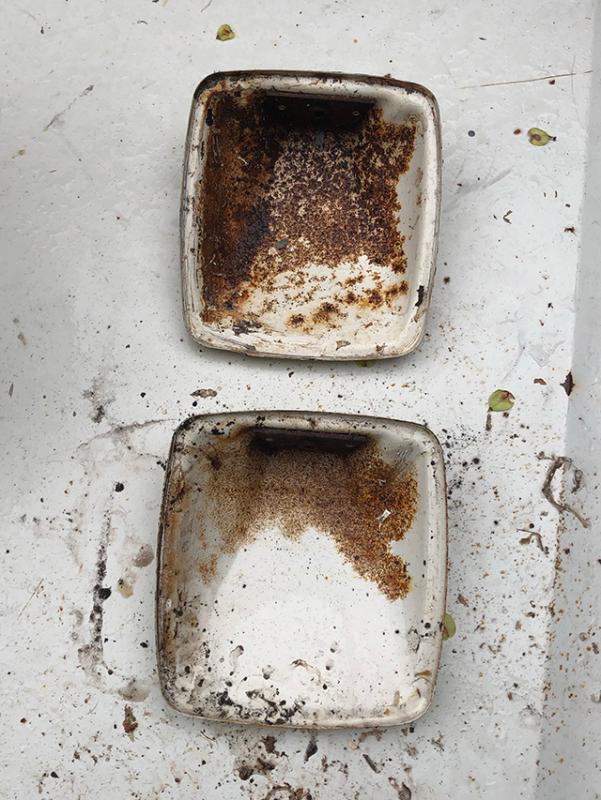
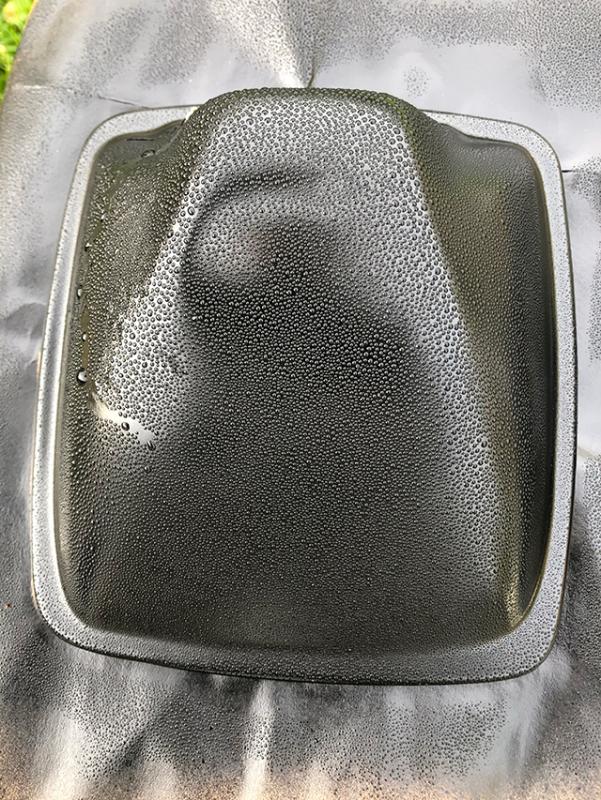
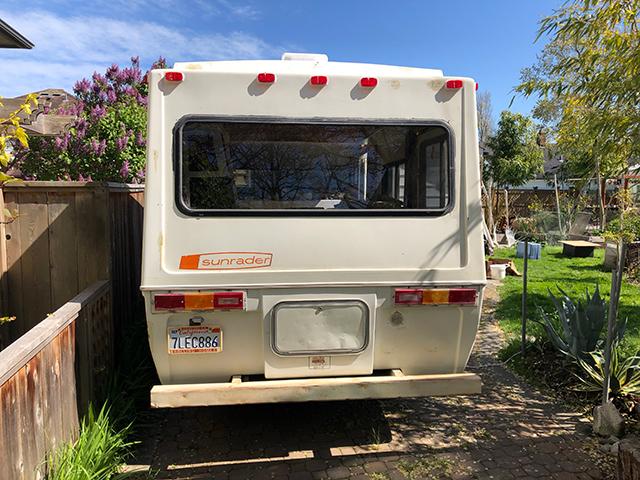
Hello there. I decided to upgrade the tail lights on my 1986 21' Sunrader. Heading towards an inspection here and was told that even one crack in any of the exterior lights can be enough for it to fail. I had fixed up the originals, and they were working and looking pretty good except a few noticeable cracks/ho;es. Of course LEDs are far brighter/safer in the long run so it makes complete sense to change. I am not an electrician. And beyond simply finding the right wire combos through trial and error, I am wondering if anyone here can tell me what goes with what? I have looked at a bunch of different threads here, and there is quite a bit of information, but nothing that directly says "this black wire goes with that yellow wire...." I had to build a plexi template to cover the old hole and cut a bit of fiberglass out here and there, but I feel like it has all come together now. I am just in time with a few days rain here now. Plan to caulk and prime as soon as the sun comes out next week. In the meantime it would be nice to wire them up and get them working. Thanks in advance. Rick Here's a photo of the original tail lights with wires. The little jag below is the licence plate light. I bought a ground terminal block. Do I just screw this down nearby? Or does it somehow have to be connected to the frame to ground properly? This is the Bargman that I bought: Taillight with Red/Amber LED, Incandescent Backup with Black Base #84/85 Series LED triple lights for either vertical or horizontal mounting.1 red LED tail light, 1 amber LED turn signal light and 1 incandescent reverse light. Radius corners. BLACK BASE. Incandescent backup light lenses surrounded by a Class "A" red reflex lens. Incandescent lens, red w/red insert, for clearance/side marker applications only. Lenses meet FMVSS/CMVSS 108 requirements. Prewired (supply and ground) for easy installation. Cutout: 12 11/16" X 5 1/2", Overall: 14 1/16" X 6 15/16" X 1 1/4" w/ 1" depth
-
Sunrader cabover side panel attachment
canadasunrader replied to canadasunrader's topic in General Discussion
Thanks Jim. I, too, am a big fan of the trim head screws. Sometimes they are hard to find in shorter lengths but I love them and much preferred to brad or nails. Mostly because I know myself too well, and I like to be able to go back a few steps when something hasn't worked. I already had to take down a few rows of my ceiling because the wire I set in there for one of the fans was caught on something... My concern around those front windows is putting something there that not only looks good, but will be easy to wipe down. And I am concerned about putting wood there as wet wood is no fun. Perhaps if you paint it it will work. I think we may just draw out the pattern with pattern paper and make a faux leather cover for the wall with a thin layer of insulation behind and be done with it. These are small worries right now in the big world, and I am so lucky and happy to have these little things to take up my time. -
Sunrader cabover side panel attachment
canadasunrader replied to canadasunrader's topic in General Discussion
Nice idea. I guess the only concern is wanting it to stick with the ability to still access behind just in case.... Are you thinking of putting this in that front space on your Sunrader? -
Sunrader cabover side panel attachment
canadasunrader replied to canadasunrader's topic in General Discussion
Thank you. I blindly went ahead and screwed and glued strips to the shell that I can then attach the side wall panels to. All seems good. I put the rubber edge trim back on. As best as I can tell, the trim goes all along the top and then inside the opening for the plexi windows. In old photos I dug up I can see that there was no rubber trim on the bottom of those panels. There was a carpet trim that held the panels against the wall at the bottom. I have removed all of the carpet so I will probably have to just create some trim strip for the gap at the bottom. I have been holding off on finishing this bed area because I have had a small leak in one of the plexi windows. I pulled the gasket off again and cleaned it all up before reattaching. Fingers crossed it stopped that leak. Supposed to rain this week so we will see... Now I need to figure out what we will do on that front wall. Kooky shape and contour so we may have to bite the bullet and get it professionally fitted for some sort of faux leather.
-
Sunrader cabover side panel attachment
canadasunrader replied to canadasunrader's topic in General Discussion
Thanks Derek. But my original question for any Sunrader owners out there is: what does the final panel look like [a photo maybe?] I have plenty of 'edge trim.' I would just like to know where the trim was originally located on the panel. -
Sunrader cabover side panel attachment
canadasunrader replied to canadasunrader's topic in General Discussion
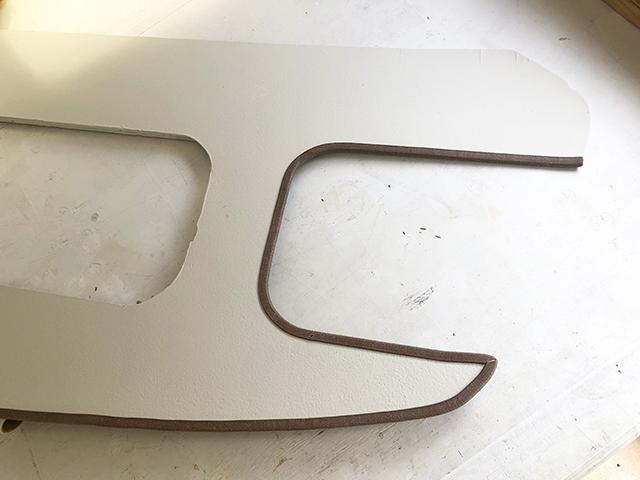
Sorry for the confusion. Not sure what to call it. Here's a pic. Top of the panel is at the bottom of the picture.
-
Sunrader cabover side panel attachment
canadasunrader replied to canadasunrader's topic in General Discussion
Another question regarding the side panels, please. There is a brown rubber fringe that sits around the outside of the panels. Does anyone have a photo showing what these panels look like finished? I have the rubber fringe, and the pieces that fit the top curving around the plexi windows at the front are all good... I know where they go. But I have other pieces of the fringe and I don't know where they go. Does the bottom of the panel get some, too? Any help greatly appreciated. -
Sunrader cabover side panel attachment
canadasunrader replied to canadasunrader's topic in General Discussion
Thank you. Moreso, I am wondering where the strips were originally placed? Is there just one that runs the length? Or, like I did with the other walls, just a mish mash willy nilly here and there? -
Sunrader cabover side panel attachment
canadasunrader replied to canadasunrader's topic in General Discussion
Thanks Derek. I see that there are two screws - now rotted - that come through from the outside.... and I am wondering if that was something that was used to tie strips on to the shell? -
Does anyone have suggestions on how the two side panels in the Sunrader cabover attach? There was a lot of rot in there when I pulled everything off and out, and it was hard to make sense of how it was put together. I am guessing there were some wood strips attached to the shell that we can screw into, but I'm guessing. Thanks.
-
Ahhhh ha. Makes sense. Thank you. Rick
-
WME: Not sure what that means? "Resistors will work, but it is easier to just get a LED rated flasher. Just match the pins on yours to the new flasher." Just shows how much I know about electrical. Can you please elaborate? Thanks again. Rick
-
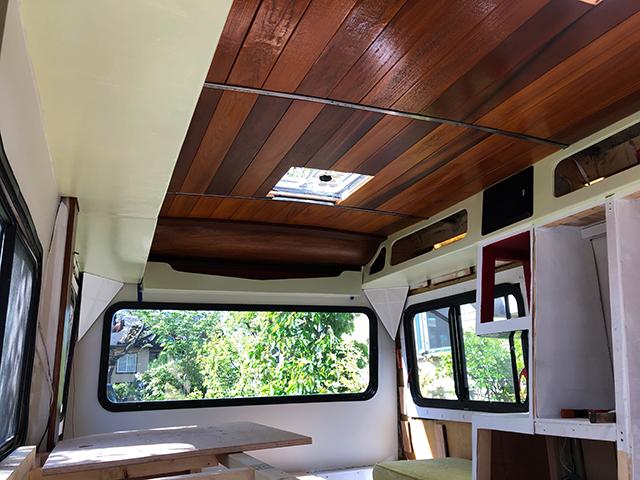
Ongoing work on the 86 21 Sunrader. I am hoping to get the inspection soon so we can move on towards registration/insurance and road tripping. It has been a long haul since Xmas 2019 when we began. Cleaned up, painted rearview mirrors and braces. The fuel gauge is now working. Turns out the float was detached. Reattached, cleaned up and back together, working now. Windshield wiper motor went on the way to the mechanic's. Replaced. But through this we now know there is an electrical problem somewhere near the fuse box. I am no electrician so who knows? But looks like the fuses and box have some corrosion.... needs attention. Also, before inspection have to replace tail lights. Ordered Bargman and hoping to install next week. Do I need resistors to make these LED tail lights work properly? Inside is coming along. Ceiling done. Upper cabinets need doors. Saving money towards house battery system etc. Fridge and small stove top to come. Anyone attempting to restore one of these should know it never really ends. And that could be a good thing.
-
Sorry to hear of your COVID predicament. Hopefully this will all work out for you in other ways. I am prepping to paint soon. I will leave the truck cab for another day, but hoping to get the house painted at some point soon. Removed all the decals and did some final epoxy prep all around. Soon.....
-
I'm In Love - Sunrader 4x4 on the line
canadasunrader replied to Sally's topic in General Discussion
Hey Sally. If you have fat stacks to spend, certainly a rig like this is attractive. As others have said clearly here, this is the type of recontructed 40 year old motorhome that can be great for a mechanic/carpenter/electrician possessing myriad skills and a lot of tools. The Sunrader is a difficult beast at the best of times in its stock state. One that has been modified like this one will require a lot of TLC and it doesn't sound like you are prepared to this. So that means cash, and lots of it. Also, this rig looks to me to be water damaged inside. This means pulling things apart to investigate and repair. Again, this means cash. I would politely pass, and keep your eye out for something better. There are lots of great choices for someone patient enough to just wait for one. -
Just to follow up on this: Got the word from the mechanic today. Fuel pump, excellent. Fuel gauge sender unit, good. Float was off and floating free. Reattached now and all back together. Gauge working. We are toasting you all with a nice tequila tonight.
-
I'm In Love - Sunrader 4x4 on the line
canadasunrader replied to Sally's topic in General Discussion
IMHO 30k is far too steep. Because, as you say, you don't have the skills or tools, it is going to cost lots of time and far more money to get it livable than you may be willing or able to invest. And for what? It's a 40 year old rig and there is a lot of work to be done, and you don't even know the half of it. Be patient. You can find a stellar Toyohome in great condition for under 20 and be up and running in it the minute you sign the papers. -
"How would they know if it's actually 'working'? " I believe these inspections have a checklist. And if anything on the checklist fails it has to be repaired before the vehicle can pass. If the fuel gauge doesn't move from empty when they turn the key they may figure out it's not working. Rick
-
Thank you, Linda. I passed all of that great info onto the mechanic, and crossing my fingers that we can get this sorted soon, and get out on the road. Rick