thewanderlustking
-
Posts
520 -
Joined
-
Last visited
Content Type
Events
Profiles
Forums
Gallery
Everything posted by thewanderlustking
-
This is kinda a continuaion of my Roof HELP! Other than setting this on fire, any other more realistic options? thread, but I have very specific information I am after and don't want to jumble that thread up. I will leave that one as my "roof rebuild project' lol! I am trying to figure out any specifics of the roof construction and bracing structure that you guys can tell me. I have mostly finished the outer skin repairs, but now I need to move on to the inside structure. And I am trying to figure out exactly how R.B.R. put this together WITHOUT opening the can and peeling the roof off. On mine I can't tell what was original and what has been repaired in the 35 or so years since... I have found a couple references as to the bracing beams underneath. (I am failing at quoting the original post and link, I will edit this to fix that later if I can.) Anyways, this is also what I see in/under my roof. What I can't tell is how these steel beams attach to the sides. Best I can make out, they do. I am also interested in the structure of the roof and sidewall connection. My roof has additional 3" square aluminum bracing above where the 1x3 wood beams went. My wood beams though do not go side to side. But they appear to have been replaced with pressure treated wood sometime recently. Obviously, I need to replace these. I haven't decided what to do about the rusty steel beams, but one is sagging and attempts to rebend it back up don't seem to be very promising. I am likely going to need to replace this one. But if it is welded to the sidewall structure... My interior isn't gutted. The ceiling is mostly out up to the outer aluminum skin, but the walls are intact. The cupboards are out at least. The wood up in the wall to roof transition/joint is mostly gone, and what is still there has to be replaced. So I am trying to figure out how that portion was built, and come up with a suitable plan of attack. I plan on welding up a steel support framework for the AC unit. I will probably rivet it in from above, I don't want to weld anything inside if I can help it. I can see 3 steel beams. Two, while crappy, can probably be left in and just rust converted and sealed. But that third sagging one is where the steel AC framework would need to attached too and really needs to be replaced. I don't like the idea of steel touching aluminum, something needs to be done about that. But I also don't think I could get away with aluminum square tube structure. I don't have a simple way to weld it, and 3/4" aluminum tube is too flexible compared to steel.
-
Heads up on testing these beasts... (disclaimer most of us know all this, this is for newbies on here or guest readers) First you sometimes have to blip the throttle to get it charging. Next if your house battery is dead, or bad, it can give you some weird charging system readings. If your alternator appears to be putting out, but not seeing it at the engine battery... If need be disconnect the house battery temporarily to verify.
-
1986 Mini Cruiser House Flow Diagram or description???
thewanderlustking replied to thewanderlustking's topic in Electrical
Black AND red are used for positive? Thats dumb... Well whatever, at least I have figured it out now!!! Anything I redo, I will standardize to red for positive and black for negative. There isn't a whole lot 12v wiring back there, I could easily redo it all in only a few hours.... I want to replace the fuse panel anyways. I need to redo the floor underneath the couch area where all of that is anyways. It is disintegrated and delaminated, but not soft and moldy. I can stabilize and seal it with some z-poxy PT40, then bolt a new piece of plywood down on top of it, and seal that up too. PT40 is awesome as you can thin it down slightly with denatured alcohol and it will go on almost like paint. But it soaks in and created a hard and waterproof epoxy layer. I always have some on hand for my hobby projects. No kidding! And time is not a friend to ANY RV. There looks to be a "Golden Era" in an RV's life. Seems to start about 5yrs after it is built and then goes for maybe 10 after that. The first 5 years, it is new and anything not built perfectly will break. After 5, it is broken in. Then you have a nice stretch where just routine basic maintenance seems to be enough. After that though, anything that has been let go is going to come back and haunt you. In my case I am lucky that I have a VERY LOW mileage chassis at 30k. But it is still 37yrs old and ANY poor or neglected repairs have had enough time to do serious damage... Hopefully I chronicled my research of the previous owners and its history I uncovered... I was going through my thread to see if I had. And yes, I did! Here we go! Unfortunately, I also added some bad repairs on top of those just trying to get the roof sealed up..... But it is getting sorted, better now at least. Perfect would be replacing the whole roof, that isn't realistically going to happen. -
If you can get everything at a scrap yard everything. I asked searched and poked about for over a year before I found my donor. These were specifics nobody knew. It took me about 10 minutes a side to just grab it ALL. if you decide to take it all apart in the JY, you would be there much longer. As i said above, I ”believe” that the hub adapter will bolt to the 5 lug stock 1986 smaller hub/spindle/brakes. But you are also putting a LOT MORE rotating weight out there. The bigger brakes are a very smart upgrade. The newer bigger calipers do not mount to the older spindle. Again, simple to knock the upper ball joint and tierod loose with a hammer. Lowe ball joint you need to unbolt. You will reuse your current ball joint though. It is a pain to undo the main nut without disassembling it all. You will also unbolt the sway bar. Save that weird boot bracket thing. Unbolt the brake line. I don’t remember what ones I used, but I think it was the larger 3.0 flexible line. Try to get all 7 wheels (and i grabbed the spare holder) if you want a full matching set of wheels. The 1986 has some weird wheels. I have 2 or maybe 3 of those left. But they are over $100 each to ship. I have done this swap and it is GREAT. I forget what the exact time was but it took me less than half an hour to pull both front off that way, and it was something like 100 that day. I did not grab the master and booster, currently mine is working fine without that upgrade but I quickly get a hard pedal, like no booster. The newer one is a much better dual stage.
-
Gads yeah that’s going down a hard path to find info on. Having had all the parts in my hands, the dually hubs should bolt right up to the 5 lug stock hubs. Let’s assume you are putting this onto a 1986 with 5 stud fronts and dually 6 stud rears. Correct me with the right info if I’m off. The donor is likely a 3.0 from 1990-94 dually. But safer path would be to grab everything and upgrade the front brakes. They are bigger calipers and different spindles. Zip-zap. Knock the tie rod off. A couple hammer whacks there and also the upper ball joint. The lower one you can unbolt from underneath, but you will reuse your old one so toss it aside if it is a scrappy that charges you $10 a used ball joint…. Oddly, o think the rotors might have been the same, but I took it all in one grab. The one additional upgrade to consider if the donor is a later V6 with a 3.0, grab the master and the booster. This is a grey area…. The master and booster are different though from the earlier 2.4. The front 3.0 calipers calipers have more volume too. The 3.0 master theoreticaly moves more fluid. But it is shorter…. The booster is a dual stage matched to the master. The master is/was aválenle cheaply on RockAuto, but the dual booster either wasn’t or was really expensive. Yherr is a y bread in the suspension section I believe but it wasn’t the clearest. Dig through my 1996 Mini Cruiser Comedy thread, I usually try to link my references. I don’t remember if I really documented that conversation though. I might have the pictures still. Let me know!
-
1986 Mini Cruiser House Flow Diagram or description???
thewanderlustking replied to thewanderlustking's topic in Electrical
Not sure what you are saying here? It will only top off the house battery when it is on shore power. Ugh good catch, I missed that. It won't charge LFP bricks. As for power output, not sure I need a whole lot unless I am trying to run the AC off the inverter... That is a whole nother problem to sort out. I currently have just one really nice deep cycle AGM. So this is still a valid option I guess. But if I am going to spend $300 or more on this, then I want the ability to upgrade later. I was just out in there working on trying to remove the Triad and reorganizing that area. I actually have room for 3 battery boxes if I use the space a little smarter. Not sure I would want the WEIGHT of three boxes, but removing the Coleman AC sure gave me the weight back!!! I am seeing a lot of inexpensive options like the WFCO WF8955PECB Black 55 Amps Power Center Converter Charger. I REALLY like the power distribution panel especially since mine needs to be replaced anyways. Not going to live with glass fuses... Some thought is needed here though, I can quickly wire up simple ATC fuse panel for $10 in about half an hour. And probably have a few already on hand in my parts bin... Plus that is going to require making a place for it, cutting a hole, trying to make pretty. The PowerMax PM4 55A 110V AC to 12V DC 55 Amp Power Converter with Built-in 4 Stage Smart Battery Charger is another good one. But not surprisingly, these inexpensive options don't have built in inverters. I keep going back to Renogy stuff though. They have a whole lot of pretty awesome products with some cool interconnectivity. I would seriously consider them, but none of them seem to specifically interface with the RVWhisper monitor systems. I can pay less for other options (like above) or perhaps a little more for Victron stuff with IOT functions that do interface with RVWhisper. Not sure that is worth it though. I want to start with the Thornwave Labs as my main power monitor sensor. So it kinda frees me up to utilize whatever I want the rest of the system. Save some money there... It is all a shell game. At the moment I have zero need for any power hungry AC devices. My AC outlets don't need to do much more than power up a laptop charger and a few small things like that. I have a microwave, that is probably getting removed for the counter space. Air conditioning is another story, but unless I get one for 12v, I have no expectations of running it off an inverter. I am leaning towards a more simple Powermax PM4, and a separate cheap/basic inverter. I don't think monitoring AC consumption on shore power matters. If I am on the house battery, the Thornwave PowerMon will do everything needed. Well back to work, lunch is over! The dog and I am are tackling the 12v system and trying to get the shurflow and tank monitors online. I will post this a little later. ---------- WOW!!! EVERYTHING IN THE BACK JUST POWERED UP!!! So way back when we got this, I had some weird power issues and after some hunting found the main 80amp (maybe 60? I forget...) fuse popped in the engine bay. I thought this was a bit odd, but it is over 30yrs old so I didn't suspect any more. I had some other weird issues going on too like the ignition switch worked for a brief bit again, then didn't.... Some moron used black wire to replace a portion of positive side wiring at some point. Somebody not knowing this, hooked it back up backwards. It is going to an electronic breaker or something next to the house battery. So I guess it was dumping the battery, short, dump, reset... A portion goes upfront somewhere to the engine bay. So this is likely what took out the main 80amp fuse. I still need to poke and prod a few things into life, but we are mostly there now. The panel is powering up, pump light on, tank levels all reading low. Switches between tanks. Lights came on I didn't realize I had. The pump isn't kicking on yet, but there is no water in the fresh tank. And I keep getting drips from the lines anyways. I need together some water in the tank and sort those out. I am wondering if the refrigerator will now work... Would be really nice. Not counting on it though as I couldn't get it powered up on propane or AC either. Alright, I have some more testing to go do! Big breakthrough though! -
So we probably all know that older pressure treated wood contained arsenic and other potentially dangerous chemicals. Don't eat the wood, yada yada. And modern PT wood is much safer. From a health standpoint it potentially still isn't the best stuff. But if one is ignoring that aspect... I was about consider utilizing it for bracing my roof. Seemed to be the perfect choice. Sealed away where it could be exposed to moisture. Inexpensive, strong, etc. I was thinking about how crazily my steel beams were corroded in the roof and then I had the thought and googled "Does pressure treated wood react with aluminum?" and I got his: Does Treated Wood Corrode Aluminum? Yes. Most of the new chemical treatments contain copper and should never come in direct contact with aluminum. Total failure caused by corrosion can occur in less than a year. This actually explains a LOT. The previous owner was a contractor and said he had done a bunch of repairs to the roof. But stuff quickly has gone from okay to bad, then worse. The repairs I am assuming he did, some were actually pretty well thought out and should have solved the roof issues. Ignoring the AC unit being glued on with 20 layers of crap... I am blaming the previous-previous owners for that. By the time I got it, and same for when he did, it already had layers on layers and was simpler to try to fix it, then to redo it completely. Anyways all the places that had lots of pinholes were right where the bracing was. I figured I would toss this out there so nobody else makes the same mistake the P.O. did, and I almost did. I have seen a few RV repair projects use this. Like somebody rebuilding a door with it.
-
I don't think this matters. You are thinking of the automatic transmissions. Yes, wiring up the auto, this would defiantly be there case. But the manual transmissions do not have anything electronic inside. Maybe a speed sensor, but nothing that would stop the mechanical bits from slipping and sliding. Gary_M's original response is the likely culprit. A sudden failure after a swap is going to be either a bushing like mentioned in that thread, adjustment, or a shifter fork. I don't know the manual Toyota setups well, but also check and see if there is any adjustment procedure for aligning the shifter. On the old VW transmissions we would have nightmares setting up the adjustment and done wrong you could loose 3-4, 5th, reverse etc depending on how you adjusted it wrong. Very different setup though so mostly just thinking out loud.
-
I really like the portable AC unit Idea Linda! I saw one ages ago for camping and emergency use that I am wanting to find again. It was really intriguing. Kinda compact and could run off of a battery pack. It wasn't a water chiller setup either, but a legitimate AC unit... Hummmmm.... I think it was a Zero Breeze unit. Yeah that's what it was! I guess I can see why I didn't consider it a great option. Kinda expensive. A quick look around though finds me the NeoAmico, and a couple other similar units in a slightly more reasonable price range. Stil, an upright kinda portable unit like you are talking about that is only $300-400 (even with its bigger footprint) is hard to argue with. But then just putting a Dometic Brisk back on the roof that is double the BTU of the old Coleman for $600, is almost a no brainer. Whatever the case, I have lots of time to go hunting and decide what direction to go. At this point being concerned about $400 vs $1400... It is more about just getting it done and out on the road. I have to prioritize finishing interior and roof, but once those are out of the way, an extra $1k for the best option isn't going to be a big deal. I just have to finish with all the projects and parts already on hand. With that said, a nice and truly portable unit can actually serve double duty and the additional cost easier to justify. The Eco Wave unit is another super interesting unit! The more I look, the more REALLY interesting options I am finding. The ability to utilize an AC off grid, boondock, in a hurricane, or in other power outage emergency at the house would actually sell me and the wife on the right unit.
-
We found 4 different sections with holes. I went inside with a bright light and Victor looked for the holes. The welding idea didn't work, we still think it can on small pinholes with a more controllable temperature. But the big areas were just blowing out. So he used this instead. The plan was pretty simple, we used the cut outs from when I did the taillights to make some patches. Prepped them, drilled holes, then used the plastic metal ad adhesive and riveted them in place. After that he filled the centers and put more overtop as filler. Afterwards, we could feel the difference in the panel strength. He did an AMAZING job! Can't thank him enough!!! His wife helped out too and vacuumed, and vacuumed, then vacuumed the interior some more! By the time she was done, it looks a bazillion times better. And as close to zero smell as it has ever had. The normal old RV smells were even gone. She also was a huge help with fetching tools, fire watch, organizing parts we were saving in the shed, and much more! Heh, I didn't sit idle and watch though! There was a WHOLE LOT if scheming and brainstorming going on. We looked over everything and I think found all the other areas still needing attention. A lot of time was wasted trying to weld the patches, burning my hand by picking up the hot body dolly, finding a bucket to fill with water and ice so we could drop the dolly in it... Then rain threatened to darken the skies and it actually sprinkled for all of 30 seconds. In a frantic hurry I used some coroplast to seal up the big 14" hole. Then I tackled a big side project. The awning. When I pulled it off the Warrior, I had ended up basically cutting and breaking it off the side. It was glued to it. The back was covered in shredded fillion and glue. Not sure why they did that... Anyways I sat for probably 2hrs with a chisel cleaning it off. Long enough I dulled the chisel and blew the head off the mallet. Inexpensive Harbor Freight stuff, but it has served me well and I didn't feel guilty abusing it that way. I have maybe 6" left that while passable, I still want to get cleaned up the last little bit. My hands hurt and itch today... I will probably go tackle that last bit after breakfast to get it done and over with. There is so so much more to do, but it suddenly feels a lot less daunting than it did a few days ago! The worst part left is probably still much cleanup... There is STILL TONS of crap up on the roof around where the AC unit was. That flex seal or eternal bond tape is seriously evil and tenacious stuff! It holds the tar and other 30+ years of crap together and doesn't want to let go. I have had to burn, heat, pull and sometimes cut it off. Only have maybe half of it off... There is still more cleanup of damage inside. While we have most of the wet rotten stuff gone, there is a lot of okay crap left that needs to be gotten out to make room for the new stuff. It finally poured sometime last night. But it is dry as can be inside this morning. I think we are finally making some good progress!

-
No surprise I guess but trying to heat patch/weld didn't work... I had high hopes it would. Roof aluminum is just too thin. So we are trying another approach. I will post up pictures of that shortly. I haven't decided on an approach to the AC issue. In the hunt for MPG, I am contemplating NOT putting a unit back on the roof but perhaps looking for something small and portable. Thats down the road though I guess. For now I have holes, interior, and roof structure to worry about first.
-
Oh and the AC unit was too depressing to take pictures of. It came off in pieces. Trash. We were using a 4' piece of rebar to lift it up, hold, wiggle as we could hear the foam separating. It was damaging the case, not a big deal. But then a piece of the case punctured one of the coils or condenser. Psssssssssssssssssstttttttttttt for well over 2 hours... No wonder the roof collapsed. That damn thing probably weighs 200lbs!!!!
-
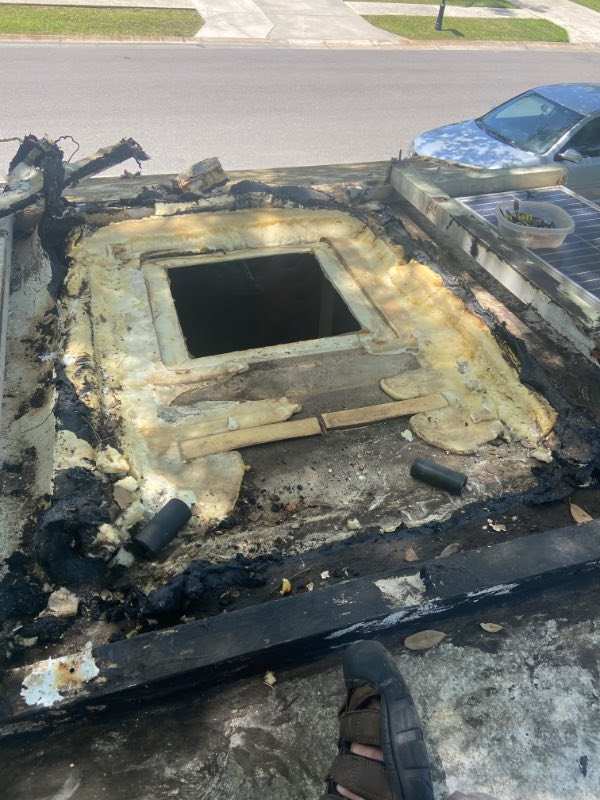
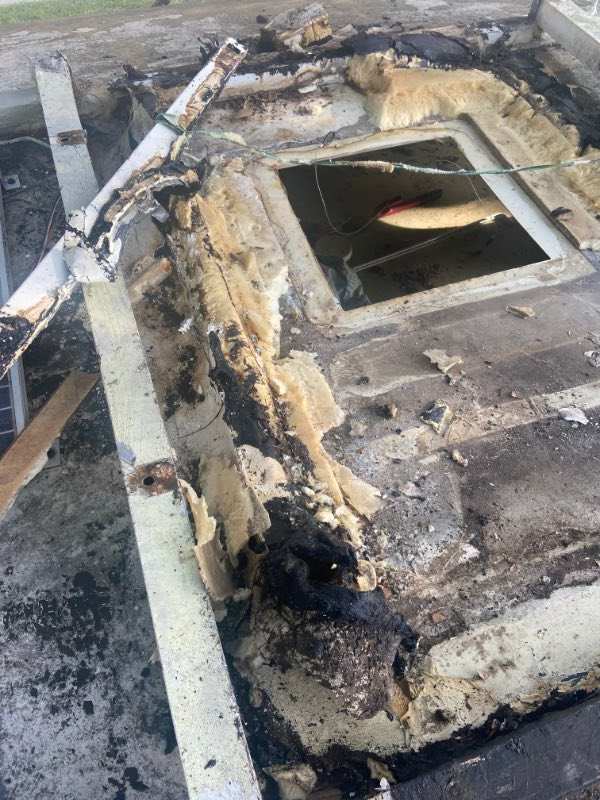
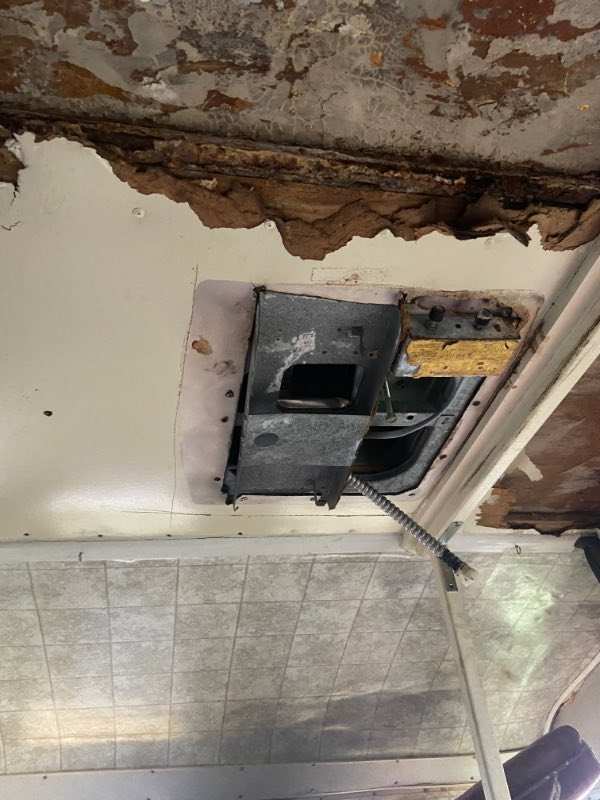
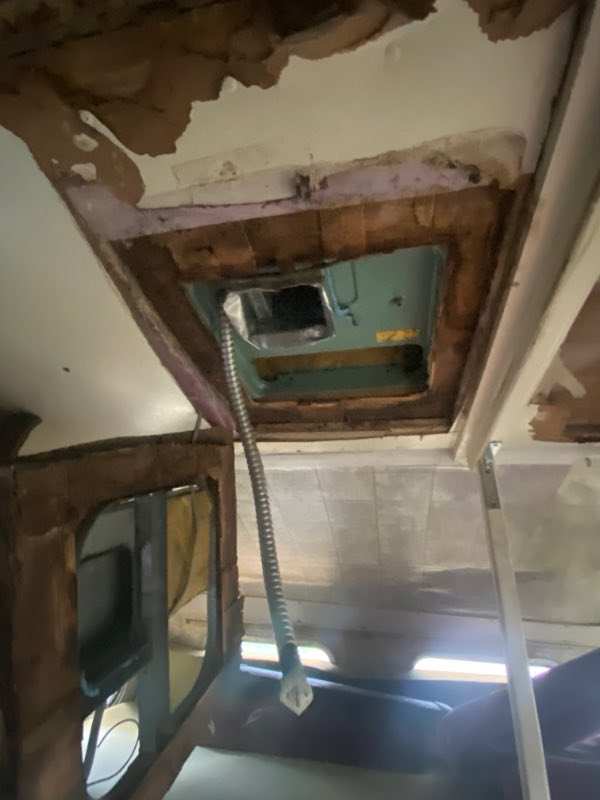
Believe it or not it was mounted mostly flush... There was a regular gasket in there too, I forgot that part lol... I suspect it was the original one, it was hard. The front to back 3" square side brackets you see are actually for the upper shield cover. There were two more smaller steel beams/brackets inside that. Those held the house wire sling to take some sag out of the assembly I guess, and then were glued to the side of the case. There was probably 20+lbs of tar filleted to those brackets and all the way around where the case touched the roof. There is essentially nothing left inside. The aluminum with a coating of glue and remnants of the luan plywood layer. ALL the bracing around the unit, rotted away. Support beams, gone. The inside is much more depressing than the outside.... There are no intact beams left, other than the rusty metal ones, to bolt anything too. Good news is that the upper side to side braces work really well. My rambling post above was how it is put together. I think I am going to make up new interior beams for the front two out of some multi layer furniture grade plywood laminated to the thickness needed. I can then have the framing around the hole also be this plywood and extend to the braces. Then I can bolt it all together. I don't know yet. There is more demo to do inside. I need to grind most of the junk off the aluminum ceiling skin and find any more pinholes. I think I can repair this without opening the can and taking the roof all the way off. Maybe, hopefully???
-
Well it is off and wow it was a mess to get off. The unit did not survive. The first ring where the gasket goes was silicone. Then spray foam that didn't go back all the way. Then a couple rings of who knows what type of adhesive /sealant. Then some sort of tar. Then a rubber roof coating. Then Flex seal. And more tar.... There was house wiring strung between the beams to help support the load... This is after about 10lbs of crap are removed... This hole is inside of the sealed area but underneath where the condensate drips through. This is why it was traveling so far from the entry and drip points... Found another hole in a section we thought was good in the middle, poked it up from underneath. Not sure why I took this picture??? It is possible the roof has had a membrane put on it at some point. Maybe. The ceiling is demoed inside. Had to remove all the cabinets. Will be removing the settee/benches. The flip flop couch is fairly intact. I am missing a couple pictures. We had really good success brazing some of the holes with aluminum welding rod. I have some spans to fill and not a whole lot of material to do so, but I do have some aluminum skin saved from the taillights I can use.
-
1986 Mini Cruiser House Flow Diagram or description???
thewanderlustking replied to thewanderlustking's topic in Electrical
Interesting! Alright I will take a look at those. My whole tank panel has no life... I think it is pretty easy to get access to the backside of the panel too. And it is the common one installed in most/all vintage RV's, other than it is vertical instead of horizontal. Horizontal is the more common it seems. Lol yeah for sure I am coming to this conclusion!!!! I have been staring at various remote monitoring systems for a while and I am likely going to utilize a Thornwave Labs bluetooth battery monitor combined with an RVWhisper station. The Thornwave Labs monitor does everything I want in a monitor, including a second simple voltage input for the engine battery (I don't need to monitor power consumption on that one). The RVWhisper system turns this into a wifi setup and will let me configure push notifications for the batteries, and give me room to add in many more features like tank level monitoring (including LPG), temperature, humidity, door sensors, and a whole slew of other things. The RVWhisper setup also interfaces with some of the Victron stuff. This could potentially be useful, but the Thornwave monitor probably does anything I could need. Where this gets really interesting is it can control this little device: TL-SSR – 12V / 100A DC UNIDIRECTIONAL SOLID STATE RELAY (SSR) That could be used to turn off the output from the Triad... Although with just setting up the basic power monitoring, I can should be able to safely get away with charging the house battery off the solar panels alone... I need to at least move the Triad from its current location anyways. But I am not sure I actually need to replace it with anything. How about this Renogy though? Renogy 1000W Pure Sine Wave Inverter Charger RV Trailer DC to AC w/ Eco Mode That looks like it is pretty smart, will swap over and select the correct power source, and give me a reasonable 120vac off my battery to power some small devices. And the size and price are both manageable. That looks like it will be several steps up from the Triad and add in an inverter too! -
Try the best online salvage yard, eBay! https://www.ebay.com/itm/255597733861?hash=item3b82cfe7e5:g:S50AAOSwZmFgsMfi That might actually be the one you are looking for. There were 550 hits on eBay for "vintage rv light" and those were top of the first page. If you are trying to save the vintage rv look... These covers might do ya! With a little digging, you might be able to find more too. Myself I prefer the yellow incandescent light color, but LED lights make MUCH more sense from an energy standpoint. If you have the fixture housing still, then it isn't too hard to change the bulbs out to LED, or change the inside portion of the fixture and put something in like Linda suggested.
-
Best I can find is "wheel hub nut" and it is 76ft lbs. This is the norma Toyota wheel nut torque though. On my Mini cruiser there is a plate that says 89ft lbs for wheel nuts. So I tourqued inside hub ones down a little more to 100ft lbs. Exact number honestly doesn't matter, ideally do it just a little more than the wheel nuts, and evenly. 100 is a good number. If you want to go digging yourself, good luck and go grab the Toyota FSM in my library thread. I didn't find our 1ton setup, but I suspect it is in there somewhere.
-
1986 Mini Cruiser House Flow Diagram or description???
thewanderlustking replied to thewanderlustking's topic in Electrical
Ahhhh alright that makes a LOT MORE sense than my assumptions on how it all worked... And answered most of my questions with one simple paragraph too, thank you Extech!!! Mmmkay, so it sounds like my idea I was contemplating for my setup and almost posted for the battery charger adjustment thread is actually a valid idea. Also sounds like Gary_M is essentially doing the same thing. Verified, I have a Triad converter too. I just went out and stared at the setup for a while now that I have a better idea of how it "should" work. I can see it has two heavy gauge outputs for the 12v buss, no additional wires. So it is simply dumping 16v (or whatever crazy amount it is) to charge the battery through those. Yuck, no wonder these boil house batteries. My thought was to simply plug into the 120vac side something like the Stanley charger/maintainer, or use one of my own favorites, a Deltan maintainer. Deltran has a cool, and cheap, wifi module that can be used to send text notifications. Only difference in my thought process and Gary's, I was hoping the charging output could be disconnected without eliminating the 12v buss output. Not the case, oh well. The original R.B.R. Triad converter sounds essentially useless. Can't leave it connected long term or it boils the battery. No inverter, just a rectified (ie probably noisy noisy) 12v. Probably weights 50lbs... Does it have ANY redeeming qualities??? It is easy to unplug at least! So utilizing it to rapidly recharge the battery like Gary said above isn't a half bad idea in an emergency... In fact I wonder if that weird LONG cable I found was so it could be used to recharge the engine battery in a pinch... Alright I know what I am looking at now! Can't figure out why the previous owners didn't just unplug that cord, or eliminate the Triad altogether, and hook the solar charge converter up to the battery. They were probably just as confused when they looked at it! I think even my cheap solar charge converter is smart enough not to boil the battery... As for my shurflow, it has multiple tap connections... I am sure one of those isn't making a solid connection. The positive side has it going through two... Durrr! Can't see why the tank panel isn't working, but that looks simple enough to sort out. I am going to go hunting for replacement options and ideas. Chances are high I will need to rewire the 12v side of things. It is a MESS underneath the couch. -
I was reading the "battery charger adjustment" thread over here, and wanted to speak up with an interesting thought I have had, but realized I don't have a full comprehension of how this system interconnects. I have no flow diagram, or even a basic schematic I can puzzle over. I tried to google it, but am not asking the right questions or looking with the right terminology... My file folder with all the original manuals and diagrams went missing long ago and I haven't dug up replacement schematics and manuals (doesn't help that I don't know what was actually IN there either...). I am missing some key pieces in how my system was setup from the factory, and how it is actually setup now... The simplest path would seem to be "Power up everything and see what happens, try it out, poke buttons..." But I have never been able to get a few systems to power up at all... Like the tank monitors and 12v water pump for one. Some of the interior lights work, some don't. I have a switch I can't figure out what it is supposed to turn on. Things like that. As far as how it is setup now, I have tried to eliminate all the extra crap that has been added and get it back to the original build configuration. I think I have it back to original now, but R.B.R.'s wiring was kinda messy to begin with and sorta hard to tell apart from some of the 'hacked since" wiring... Having a hard time trying to explain what I am trying to figure out to ask the right question or questions here... I guess what I am trying to sort out is what powers up when it is on shore power, and what powers up when only on house battery? From what I can tell the main charger/inverter/"battery boiler" box plugs into shore, has power out for the 12v bus in the house as the 12v lights mostly come on, and has crappily inverted 120vac power going to two electrical sockets in the house, the AC unit, refrigerator, and hot I think the hot water heater. In mine I do not have working 12v water pump or tank monitors. Seems like these should work off the 12v bus without the house battery connected if we are plugged into shore. Since the lights (some) work. But when off shore power and just on the house battery, does the "battery boiler" box actually power the 120vac side of things? There are breakers I believe for all the 120v powered stuff. Nothing is reasonably/easily accessible though so I suspect you are just supposed to switch power over on the refrigerator to 12v, and turn the AC unit off. Not sure if the hot water heater is just propane, or dual power. I know that the AC unit won't kick start on just the house battery. But then again is the house battery just powering up the 12v system or does it power the AC side through the original charger box??? I am trying to grasp a few things: 1) How the system is supposed to work on shore vs on house battery? 2) Since a bunch of systems ARN'T working I need to know if it is something procedural I am not doing, IE on shore power breaker x has to be flipped on, or if I am looking for a wiring fault(s) or some bad component in the mix? 3) Can I disable the 12v charging output from the converter/battery boiler box (lol)? Obviously, I could just completely disconnect it from the 12v system... But is this... 4) ...12v "charging" output separate from the 12v input from the battery that I am assuming powers up the 120vac side? If the charging output is separate from the 12v input for the 120vac inverter, then keeping this heavy antique charger/inverter makes some sense, at least for now. 5) If not, is there another strategy that makes sense (other than replacing the whole system)? Perhaps simply unplugging the 120vac shore power cord to it and rewiring that to a mini breaker box? I need to know how this system is supposed to work first, so I can then figure out specifically what isn't working... There is an ugly rats nest of wiring and fuses that I am sure need some attention. I didn't find any blown fuses with a quick look, but there is plenty else going on in that mess...
-
Do a little research. This isn't meant to be the rude "ljust google it" response it sounds like lol! I found one in about 30 seconds. For instance If you go onto Rock Auto and put your year in (call it a pickup) you get a 100 amp option that comes right up. Rock Auto is about the quickest most reliable way to look up and cross reference parts. (Amazon is the worst... at best go there AFTER you have the part number you need). eBay is really good too and will find you a broader range, but it isn't as accurate as Rock Auto and you should verify with a couple sources or auctions. Even easier, just call your local parts store, they will most likely also have a higher output option available. You should probably call them all, see who has the best one, be it price or highest output. This is also probably smarter way to go as it lets you pull your alternator out to compare and make sure the replacement is going to fit, and quickly exchange it if not. As a mechanic I can't even tell you how often parts ordered are wrong... I ALWAYS check every single alternator side by side before installing the new one. Verify mounting brackets, plugs. A higher output alternator will frequently be larger, but if the mounting brackets match up, it usually will still fit. You don't necessarily need to "color outside the lines" and get tricky by asking for a different make/model/year that you found will fit.... That option is frequently available, but takes brand familiarity and knowledge. For instance on Volkswagens I know I can bolt a 120amp alternator onto a 2.0 4cly that usually comes with a 50-70amp one by ordering a specific 6cyl alternator instead. This kind of information though requires either some serious digging, asking the right people, etc... Finally, many towns will have a place that can rebuild alternators to spec and rewrap them for higher output. This is the kinda place that a good local stereo shop will know about. These are rarely cheap though. And there also becomes a point where a really high output alternator starts to sap too much power from the engine under heavy load. Getting your 70amp alternator rebuilt to pump out really silly numbers is going to take precious power away from the engine. So be realistic though with your "wants" and do a little math to figure out what you might actually need A stock alternator will recharge your slightly drained engine battery (from a normal startup) in under 7 minutes. A dead no-start battery will usually be charged up within 14-20 minutes. The battery isolator in your engine bay adds some minor complexities to this system and they work in different ways. But in the most basic form, once one battery hits a certain voltage, it switches over to recharge the other one. If you have a single lsay 100ah sized deep cycle house battery, you once the engine battery is charged, the other one will take 1 hour to charge with a 100 amp alternator. Google "how long does the alternator take to recharge a house battery?" and you come up with a lot of good information and formulas for figuring it out.
-
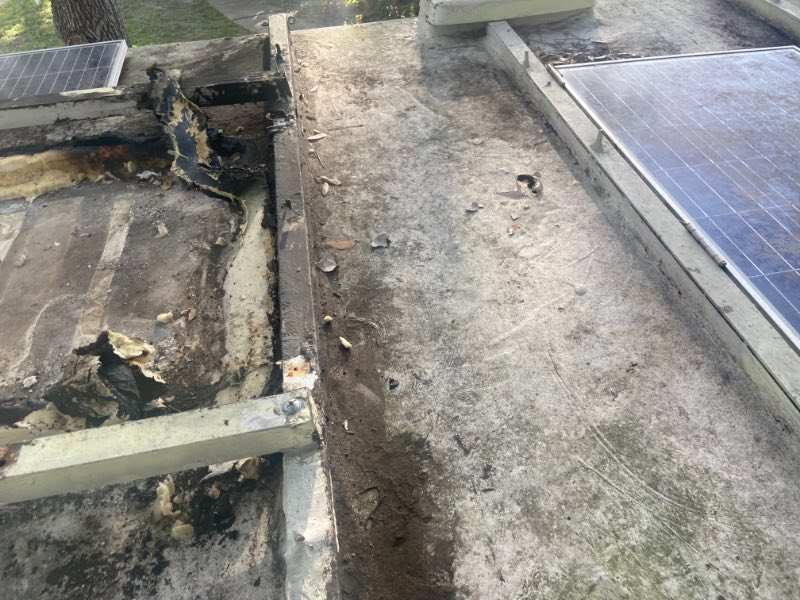
What a mess... let me see if I can describe it well enough without pictures. I will try and get those too, but for now... I went back and reread everything that has been posted (since I initially posted this a ways back). Lets look at a few things! Looking at the installation manual Linda posted, I can't be fully sure where the condensate drain iso my 6727 (I believe that is the model), but I suspect it is somewhere obviously outside of the 14" square, but underneath the unit, so INSIDE the outer gooped ring. I think this is why a heavy rain takes a bit before it starts to get in. Like 20-30 minutes. Speculation, but it does make sense. I was suspecting this before re-reading through the thread. This would be a VERY VERY major undertaking on my Mini Cruiser. Without destroying the roof, if probably isn't even possible to do this... At some point, somebody put three cross braces up on the roof going from side to side. They are like 3" or so square and pretty substantial. From what I can see where the ceiling is down inside around the middle one, they then used some 1x3 wood interior cross braces inside underneath these. This middle brace does not extend all the way across inside, It goes maybe 2" overtop of the outer cabinet edge, cabinets, so stopping about 6-8" from the edge of the roof, top of the wall. They countersunk and put carriage bolts up through this wood brace to sandwich the roof skin. The roof is SUPER SOLID at this point. There is another wood brace maybe 18" in front of this. That one is not sandwiched to an exterior brace, and there is a 1/4" gap between it and the outer aluminum skin. I am not sure how far this one goes to the edge, it could go all the way. I can't tell if it has any real purpose, but it sorta looks like it could have been to support the edge of the farming for the AC cutout. I did some search and googling on the framing and construction and found this post: The 3/4" square steel tubes are there. Rusty but still strong and intact. Those do go all the way to the edge of the roof/wall. These 1x3 cross braces actually sound like they could be original. But I strongly suspect the upper aluminum tubes are not.... I think they were posts for aluminum railing. Finishing the description, there are two front to back aluminum tubes that are bolted, again with a carriage bolt coming up from underneath, to the side to side aluminum braces. I suspect these are also coming all the way from inside and going through the wood brace too, but I can't see/find these from the inside yet. This makes me a bit nervous as the quickest solution up on top, is simply to cut them. But if they don't go all the way though and the head is between the roof and the upper brace... Or somewhere else I can't get them driven down through.... Logically they SHOULD go all the way through to the inside. Should. Why do I need to cut them? They are COVERED in sealant. I will try to just unbolt them, but cutting them would also give me a little less distance to struggle through. They do stick up about 2" past the upper brace. The front to back braces that these hold on, are GLUED with god only knows what to the side of the AC unit case. It is hard and glued from top to bottom and along the whole length. If I unbolt or cut the bolts, I think I can lift or pry the unit up without too much damage to the sides and only have to worry about the insanely glued on bottom. Also this bracing system does seem to be VERY secure. The unit wasn't sagging down inside, and there was little real structure inside holding that framing for it. Not 100% on that though, there is a poorly done interior brace that was added below the ceiling that is bowed and goes front to back over the table area. But I can't see the corresponding bow in the roof itself, so this brace doesn't really make sense. I am tempted to remove the posts and see what happens... Anyways while the aluminum braces are defiantly not original (other Mini Cruiser pictures verify this), they were actually thought out really well. If I got so motivated at some point, they would make it super easy to add a simple plank crosswalk. They make being up on the roof very secure (if you are on them) and you can feel how much stability they add to the in between spans. Unfortunately, they also make it impossible to put a rubber membrane down in any way that could be effectively sealed up. But, I can attach things to them, like the solar panels and AC unit bracing, without screwing through the roof itself. So while they greatly complicate my repairs, they are likely the reason the roof has survived a couple hurricanes, big tree branches, being crawled on, and this leak hasn't collapsed it. Unfortunately, the ceiling hasn't done quite as well... Today was pretty successful. While I didn't get the unit off the roof yet, I feel like I have a good understanding how it is all put together and a reasonable plan of attack. Tomorrow I am taking down the interior post supports and the bowed beam, then pulling down the rest of the ceiling panels. Hopefully, I then find the last 4 carriage bolt heads for the ac braces. Get those unbolted or cut, and then I am ready to try peeling the AC Unit off... I will have help, and the cable saws, on Friday.
-
Do a little digging around with search here. I vaguely remember seeing a mention of these simply getting stuck now and then from lack of use and that some gentle taps to them might solve the issue. Again have a look about and see if you can verify this. A quick google verifies this issue being common on more modern swappable tank setups, slightly different from ours but kinda the same. Shut the valve off, give a couple gentle taps on the regulator and try opening it back up slowly see if that does it. DO NOT bypass this regulator. It limits the pressure in the lines going to the appliances. And I believe on a sudden pressure loss in the line, it will also shut off to prevent a massive leak. The regulators at the appliances also are unlikely rated for the full tank pressures. A dual setup like this is very commonly used for additional safety. And to get finer control at the appliance regulators.
-
Yes I did miss that somehow thank you again! Whoot! It is pretty close but it does show 4 bolts and mine has 3. Still its close enough once that is figured out. BTW if I do get those manuals, I will get them scanned to PDF so we can upload them onto the "library thread". The Paper install manual on eBay was slightly more specific. Hummm it looks like I can actually get a replacement shroud or outer shell fairly cheaply... It looks slightly different, not sure if that really matters? There are some interesting Coleman parts for sure. I like the bluetooth control assembly. I can find better ways to spend $500 though lol. And I am sure that wouldn't just bolt right to the older units like mine.... Man I hope this thing comes off without resorting to a wire pull saw. That is a SERIOUSLY AWESOME idea BTW WME! That might just be a useful trick... If this thing IS glued all the way, I am going to try that. I just went and pulled the trigger on the one you picked and another more aggressive one. Unfortunately they won't be here until Thursday, but whatever. If I don't end up using them for getting the AC off, they are good for cutting PVC pipe, and the other one is hopefully a decent emergency/survival kit saw. Alright well tools are ready to go, lower assembly is finally off. And tomorrow is the day! I am finally feeling better about success on this. Although I guess at this point success is relative as whatever does happen is repairable anyways. I am already doing repairs to the underneath of the roof structure. Not much more to repairing the topside I guess. I am just relieved to have the first part sorted out and to realize it wasn't me being a 🤡 ... Not sure that makes me feel better though as I am pretty sure I am in for a bigger mess than was planned for. Oh well.
-
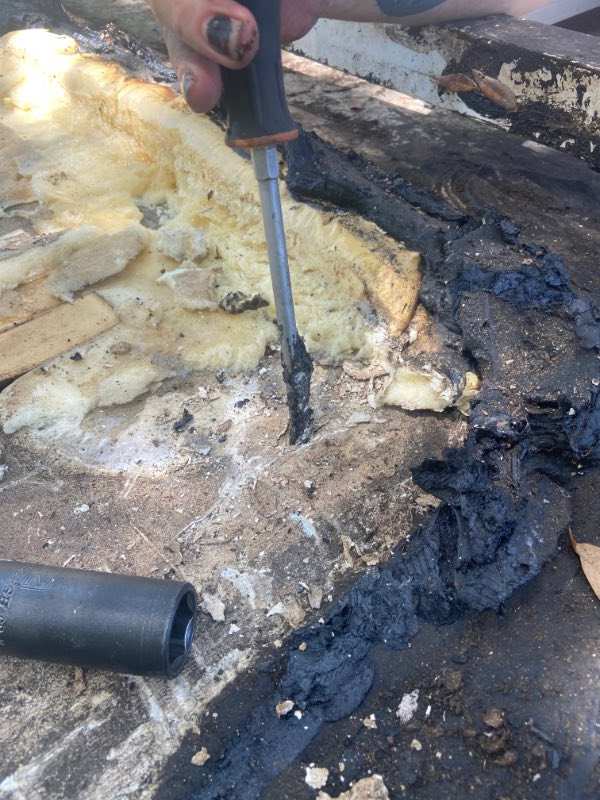
I will pull the trigger tomorrow on those manuals, if I get it off the roof without further damaging the unit! I am a little more optimistic after using this tool below. What a pain though I'm COVERED lol... If I have a 6727 model, it only has the three bolts. I think I understand how/where the leak is occurring now though. I DON'T think it is actually coming around the gasket to roof seam. Unfortunately, I am getting the very distinct feeling that a P.O. (or should I say a P.A.) actually glued THE WHOLE bottom of the unit down to the roof. I bet the leak is actually outside of the gasket ring and I am going to find a damaged spot or hole somewhere. I can see where they siliconed the gasket itself to the roof and it oozed out underneath.
-
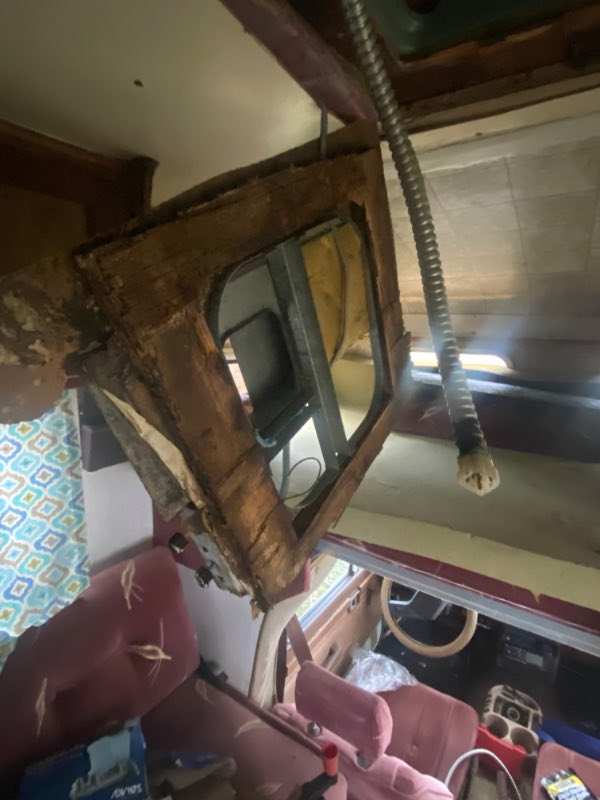
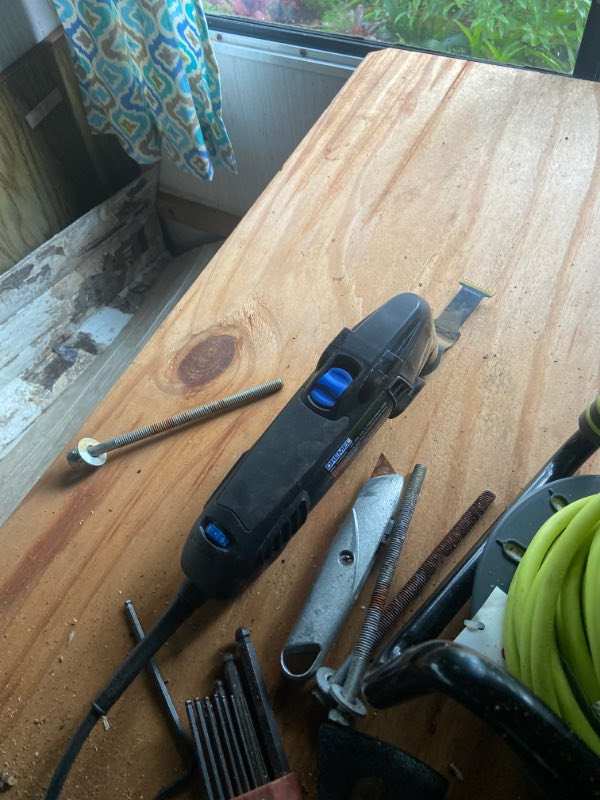
Yes it is for sure!!! This is the intelligent engineering I am having to deal with... I had tried to cut this MDF crap before with a utility knife, useless. This is the first time I have used the vibratory tool for a saw, I am impressed. I still need to unwire the power supply cable, but this part came down easily.