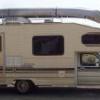
bufbooth Posted July 9, 2007 Share Posted July 9, 2007 Hello All, I built my canoe rack to be 2 inches lower in the front than the back, but I am wondering if I should go lower on the front. I can go lower another four inches. Here is a picture: www.tipton-in.com/canoe/100_3447.JPG Thanks, Dennis... Quote Link to comment Share on other sites More sharing options...
Gulfstream Greg Posted July 9, 2007 Share Posted July 9, 2007 Dennis I uploaded the photo for you. I would lower the front if you can to keep the wind from getting under it when going 70. Looking at the photo not sure if you can lower it because of the A/C. Quote Link to comment Share on other sites More sharing options...
bufbooth Posted July 9, 2007 Author Share Posted July 9, 2007 Hello Turbo Greg, The A/C will not be a problem, the canoe is about 4 inches wider than the A/C cover, and it looks like if I drop the front of the canoe by 4 inches, I still may be above the A/C cover, so either way I will clear the A/C. The front escape hatch currently fully opens, and if I drop the canoe by 4 inches, I will still be able to open the vent part 100% and the hatch door by about 80%. Also, I will have two nylon straps in the front and two in the rear securing the canoe to the bumpers. On the front, the straps attached nicely to the two tow hooks, and in the rear to the L-shaped bumper supports. I will also have three rubber straps to hold the canoe down to the rack, and I am able to tie the front canoe support bar direct to the front rack crossover bar. I am in the process of adding blocks on the crossover bars so that the canoe cannot move sideways on me. I was surprised on how easy it was for me to put the canoe on top. From the drivers side, I stood the canoe up on one end and layed the other end on the canoe rack's side bar and then slide the canoe up about three feet. I then got up on the roof and pulled the canoe all the way on to the roof, with the canoe going across the rack like an airplane wing. I then slide the front of the canoe onto the front rack and then centered the rear of the canoe on the back of the rack. Since the canoe was on the bar, most of the 70 pounds of it's weight was on the bar. The canoe felt like it weighed 20 pounds as I was handling it. I will be swaping out the front 6 inch pipes for two inches to get the front down by another four inches. I will be taking a 200 mile trip this weekend, so I will be able to test it out before my YellowStone trip (a 3000+ mile trip) later this month. Thanks, Dennis... Quote Link to comment Share on other sites More sharing options...
Charlie Posted July 12, 2007 Share Posted July 12, 2007 Dennis: I don't know whether level or lower is better, but I was wondering how you attached the rack to the roof. what kind of screws, and what sort of backing did you find under the metal roof skin. thanks. Quote Link to comment Share on other sites More sharing options...
bufbooth Posted July 17, 2007 Author Share Posted July 17, 2007 Hello Charlie, I used 4 inch self threading screws. I drilled a 1/8 inch pilot hole about 3 inches from the edge of the roof (on the sides) and passed through a thin steel support and what appeared to be a 2 x 4. The screws ended up passing through the ceiling in the cabinet and closet area, about ¼ to ½ inch through, and about ½ inch from the wall. They screwed down nice and tight. I took the canoe on a 220 mile road trip last weekend and it was great, the canoe did not move at all and about 200 of the miles was doing 55mph to 60mph on a two lane State route in which a few large semi-trucks passed by and did not notice any movement or problems. I will be taking a 3000 to 4000 mile trip next week (Indiana to Yellowstone) and will be checking the screws often. The way I designed the rack is that it is self supporting, that is it stands by itself, sort of like a bed frame. I secured two 8 foot by 5.5 inch, by 1.1 inch composite decking boards to the roof with four screws each, the rack then bolts to the decking board. The canoe is tied down by two straps to the front bumper and two straps to the rear bumper. All the screws have to do is keep the rack from moving forward/backwards and left to right. If I end up having issues with the screws, for example if they end up loosening up, I will replace them with 5 inch bolts and instead of using Fender washers on the inside ceiling, I will just get a three inch by 12 to 36 inch steel plate (1/8 or ¼ thick) and use that as a support beam to attached the bolts to, most hardware stores carry them. I puttied around the boards, but may end up scrapping the putty off and just using rubber washers on the screws (or bolts). Also, it was very easy to get the canoe up on the rack, actually, a single person can do it. I loaded it from the driver’s side. I just raised the canoe up on one end and placed the top end on the side rack pipe and push it up 2 to 3 feet and it balanced / leaned nicely on the side of the camper. I then got up on the roof and pulled the canoe the rest of the way up as I slide it on the side rack pipe. The canoe weights 75 pounds, but felt more like 20 pounds since all the weight was on the pipe. Once I had it on the roof (sideways) I just spun it around to face forwards/backwards and again, it felt like 20 pounds since I was on the pipes. I tied the canoe’s main support to the front rack pipe, and then used heavy rubber straps over the Top of the canoe to secure it to the front and rear pipes. I then secured the front of the canoe to The front bumper (the tow hooks) and used some rubber pipe installation to fit over the front of The hood to keep the straps from rubbing the paint. I then secured the back of the canoe to the Rear bumper. Also, I took 4 U-bolt clamps and placed one on each side of the rack pipe right Against the side of the canoe, this gave me a two inch high stopper to keep the canoe from moving left or right on me. Will provide a trip report when I get back. Quote Link to comment Share on other sites More sharing options...

Recommended Posts
Join the conversation
You can post now and register later. If you have an account, sign in now to post with your account.