Kale
-
Posts
87 -
Joined
-
Last visited
Content Type
Events
Profiles
Forums
Gallery
Everything posted by Kale
-
You can also see some of the LED lights I installed in the picture above. Whoever mounted the AC unit didn't seem to realize it now blocks the closet door on the right. I had to lower the door quite a bit, leaving a large gap. I cut a piece of 1x3 and wedged it in at the top, then I covered the seams with wood epoxy. Still need to sand it down and paint it.
-
Progress on the cabinet doors. All the original door latches were broken when I bought the Toy. They had been replaced with a variety of other latches; all in some state of failure. They also had handles embedded in the doors, many of which were also broken. I removed the handles, filled the holes with spray foam insulation, and cut down the excess. Then I spackled over the foam and painted the doors. Either the foam wasn't fully set or the heat caused it to expand farther, but it's fairly noticeable where the handles used to be. I replaced all the door hardware with some inexpensive self closing hinges and handles off Amazon. Most of the doors are secured with strong magnetic latches. I didn't like having the upper cabinet doors swinging out to side and getting in the way. Instead I bought some gas springs and mounted the hinges on the top so they would open up and out of the way. First I tried screwing them into the MDF, but with the force when closing being exerted front to back, the mounts quickly tore out. I screwed some scrap pieces of wood to the sections between the cabinet opening and screwed the mounts in there. I'm pretty happy with how it came out. I ran out of handles, should be getting some more soon to finish it up.

-
My Toy has some rust. When I bought it I knew there was body rust, thought it all appears to be on the surface. Today I was crawling underneath and realized that there is far more on the underbody than I realized. (Yes, I'm an idiot and should have inspected it better before buying.) Nothing looks to be rusted through. I'm pretty much a complete noob when it comes to this sort of thing, so I'm wondering how bad this is. I realize that eventually the rust is going to eat through everything, but is it alright for the time being as long as it's solid? Is there anything I should do to slow down the progression?
-
That's an interesting idea. Which thickness were you considering? The 8mm is 2.8lbs/sqft, seems pretty heavy.
-
Thanks! I'll check them out.
-
Thanks for the info. I've never been a big fan of sheet vinyl, but it might be the most practical option in this case.
-
Not completely sure what I'm doing with the floor, I was thinking laminate, definitely no carpet for me. I'll probably go down to Home Depot and get whatever's cheap and in stock. Hopefully get started on that this weekend. The windows have come out pretty easily. The dry rot slowed me down because I had to let the glue dry overnight on the wood I replaced. Hard to say how many hours. I bought it about a month ago and have spent most nights, weekends, and work breaks on it. Though there have been frequent pauses; working in there when the electrical is disconnected and it's >100F outside is not fun. When I bought it, the refrigerator was sitting in the middle of the coach. It also happened to be much larger than the stock one, so I had to tear out and build a new enclosure for it, which ate up time. I also spent a bunch of time installing the furnace (also not stock size), there's another thread on that somewhere.
-
Couple random photos on my progress. You can probably tell that the paint job is... sub-par. I mostly wanted it to look better than when I started, not necessarily great, so I'm ok with it. Resealed most of coach windows. Found a little more dry-rot, but was able to cut it away instead of going down to the fiber glass. Now working on getting the cabinet doors reinstalled. I also replaced the converter and have been spending way too much time on the cab stereo (weird voltage issues due to reusing an old inline fuse).
-
I think picture 1 is a converter, picture 2 is an older inverter, and it's difficult to tell what the connections are in picture 3. What do you mean when you say shore power is connected up to solar power internally? Solar power usually goes into a controller, which connects to and charges your batteries. The batteries supply 12V and feed into an inverter for 120V. EDIT: Your batteries are probably physically cabled into the converter, since the converter can charge batteries when on shore power. If it's like my converter, that set of fuses is where the 12V is distributed around the coach.
-
Saying hello with pictures (warning questions inside)
Kale replied to systematical's topic in General Discussion
Your story sounds vaguely familiar. I'm a software developer who recently bought a Sunrader and have been fixing it up with the ultimate goal of going on the road for a bit. I'm a newbie, so I can't help with much with your questions. I'd guess that's an Odyssey, but I'm sure one of the more experienced folks can say for sure. Welcome to the fun! -
I have a tentative plan to drive my Sunrader back to Alaska. So far I've only driven it from SF to Sac, Alaska is a slightly longer drive :). Didn't notice any problems bringing it back from SF, but I'd like to have someone who knows what they're doing give it a thorough look over. I've noticed there a few Sac area folks on here, any places you'd recommend taking it to?
-
Much appreciated! I take it JR Products makes many pieces of these RVs. I'll keep that in mind next time I break something
-
Managed to bust the door knob while I was reinstalling my bathroom door. Any ideas where I might find a replacement? Don't necessarily need an exact replacement, just something that would work.
-
I used Loctite PL Premium. Seems to have worked pretty well.
-
I'm going to try to put foam insulation covered with plywood up there too, just haven't gotten that far. I may take the rig back up to Alaska with me at some point, insulation is important there too :). Speaking of heat retention. I was thinking about getting one of the thermal cameras that plug into a phone (FLIR ONE or Seek Thermal) to find the hot/cool spots. Has anyone else tried one of those out?
-
Thanks! I used butyl tape as Linda suggested. I suppose I should check the wiring. I'm a bit hesitant to do anything that might make more work. I've got several half finished projects in the rig. Every time I tear something apart I think "well as long as I'm here I might as well do X" and another project starts.
-
Not sure I'm doing any of this "right", but I've been slowly plugging away at it. Ended up tearing everything off the rear wall. On the plus side, it gave me a good opportunity to remove some more old carpet (I dislike carpet). Glued some 2x3s up, filled in with foam insulation boards, and covered with some 1/4" plywood underlayment I found at Home Depot for $9/sheet. I may try covering the rest of the interior with that plywood. Seems like an easy way to get a smooth surface for painting.
-
Same image is used for a "Morpower DIG02010": http://www.toxicbowfishing.com/product-p/dig02010.htm
-
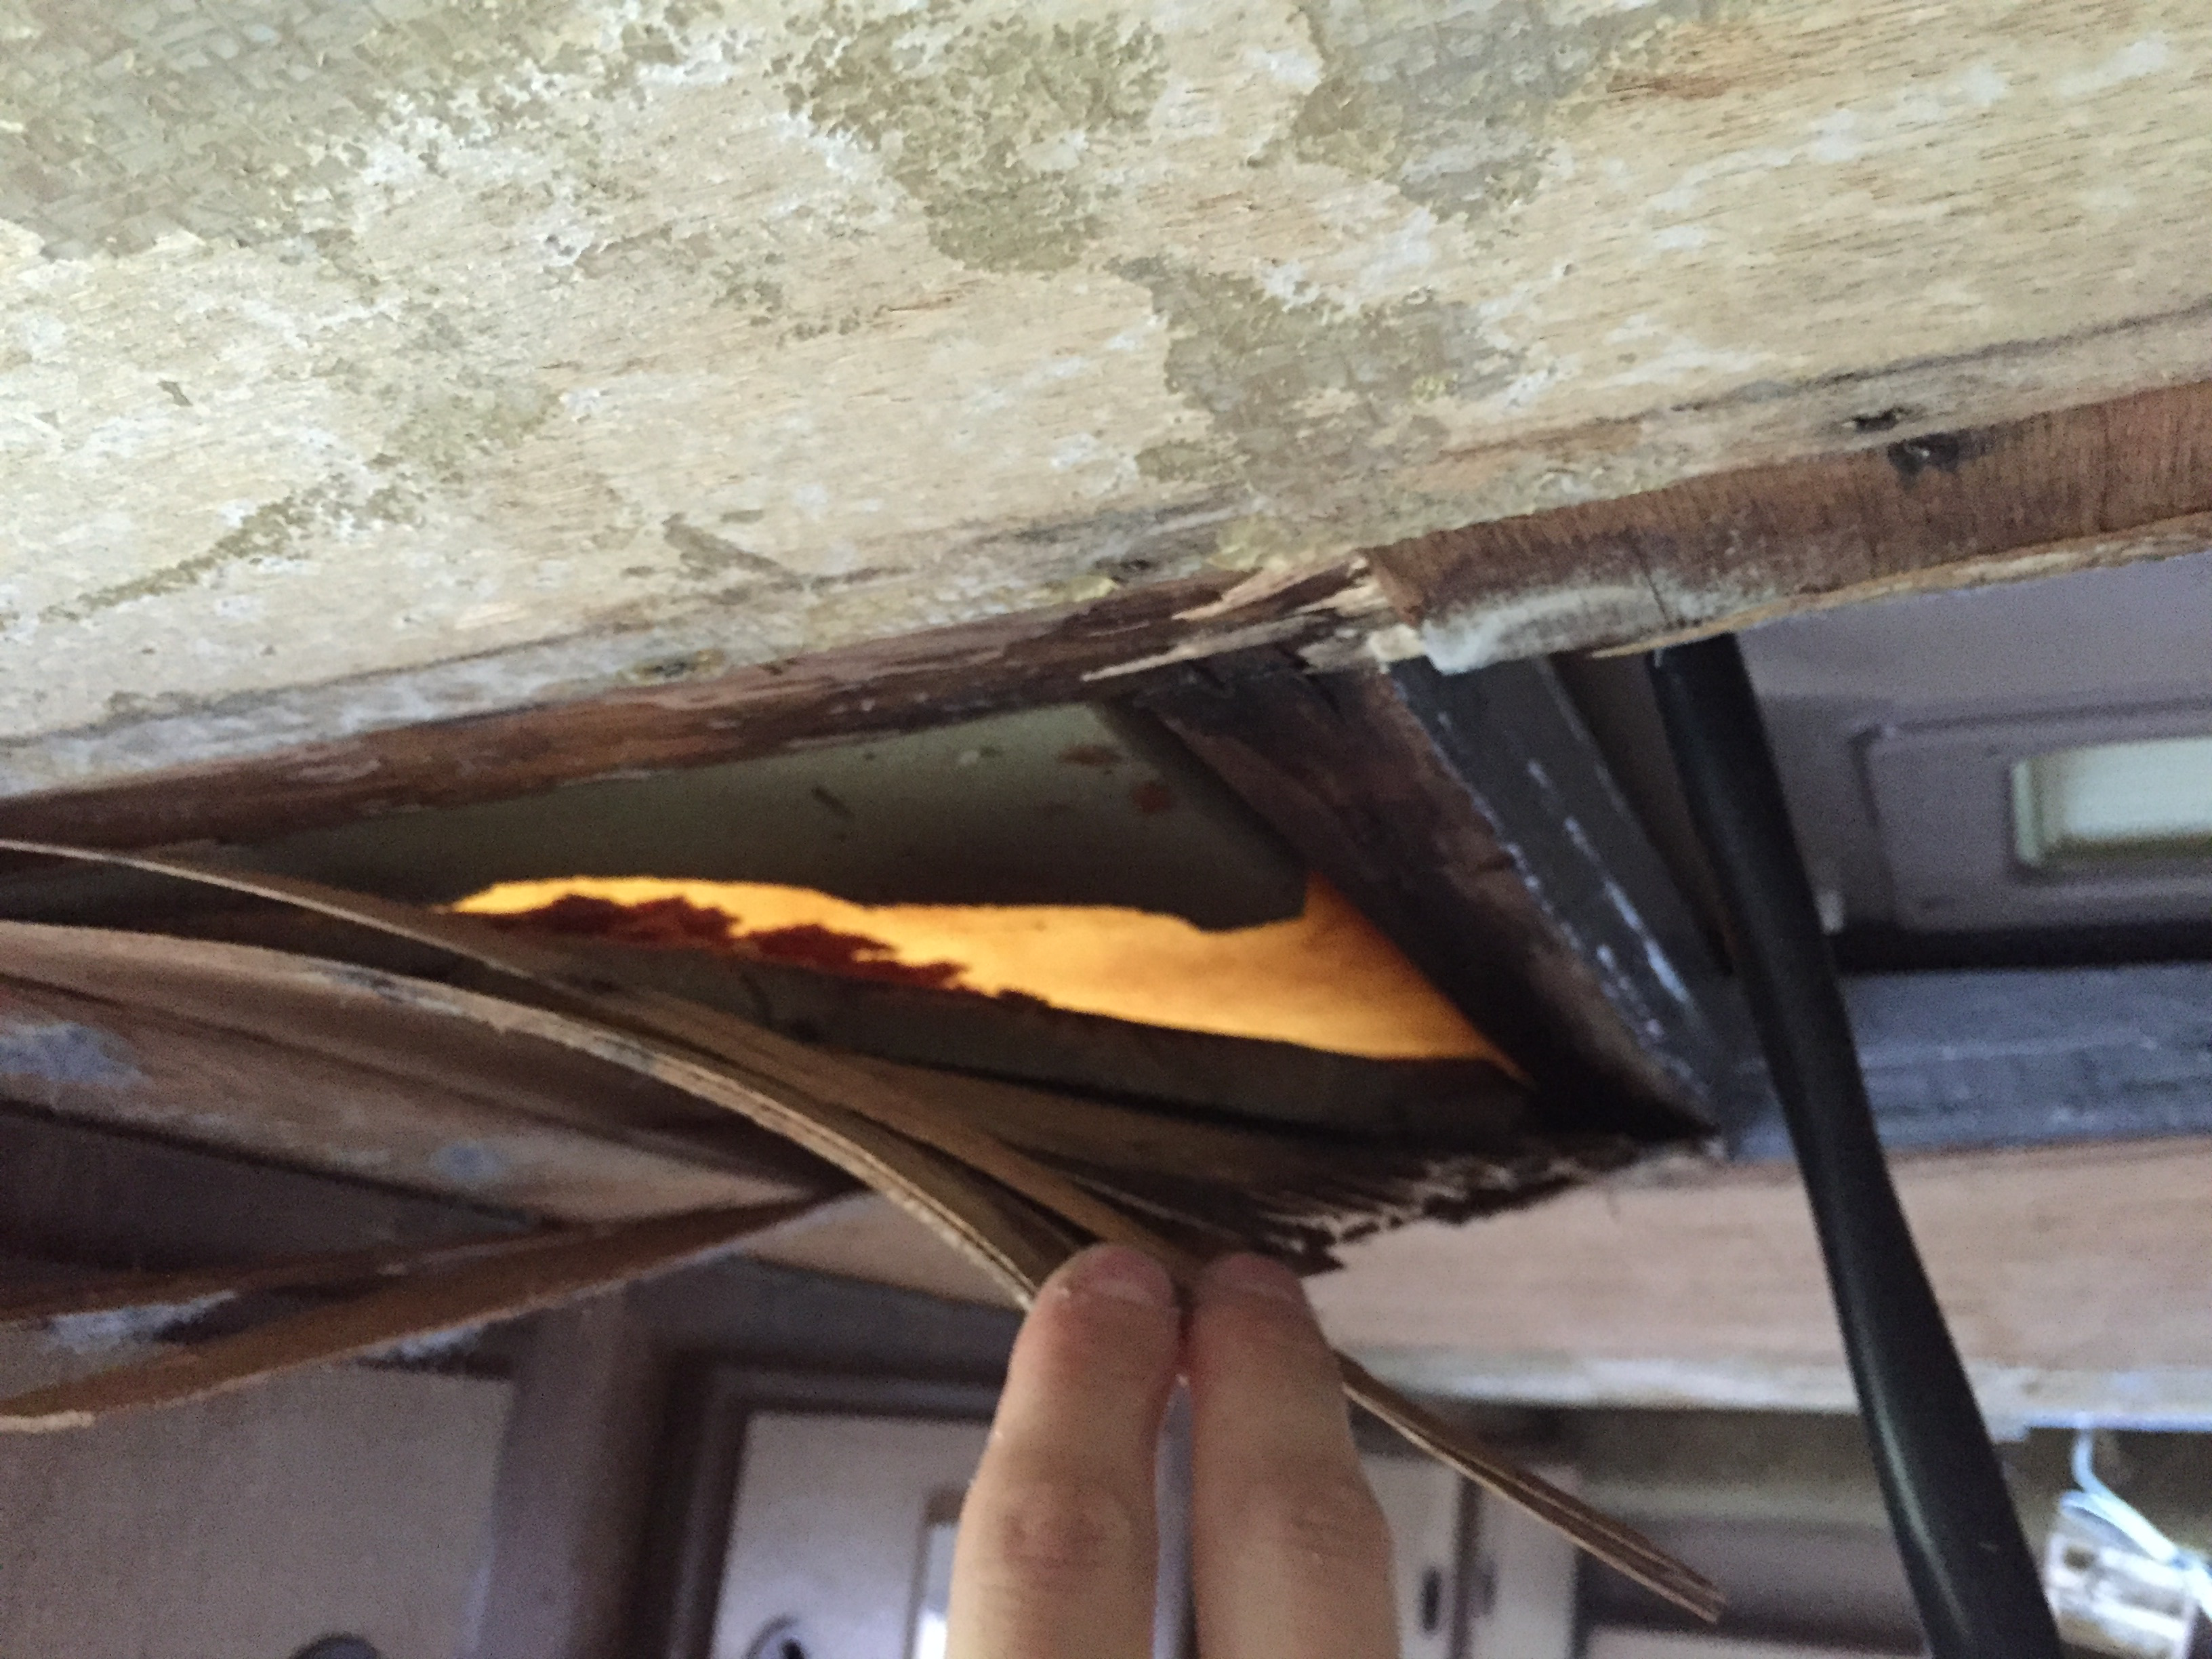
How much space is there normally between the fiberglass and ceiling? Seems to be about a 1/2" here. If you're looking at the A/C opening, some wood was added on the roof to level it out. I like the idea of a satin finish for easier cleaning. The wood around the rear window is pretty well shot. Guess I'll be replacing it and resealing the window while I'm here.
-
Probably should have seen this coming. Pulling down the carpet brought a bit of the ceiling with it. Also found a bit of rot near the rear window and roof AC. Is there any reasonably easy way of dealing with these issues? I wouldn't mind redoing the whole interior at some point, but not this summer.
-
Good advice, thank you. I've used TSP before, but had forgotten the name. Seemed to do the job when I helped a friend paint. What about the small space makes spraying difficult?
-
Over the last week I got most of the appliances installed and working on my new rig and am now turning an eye to the interior appearance. Currently there's thin carpeting glued to the walls and ceiling. I've been thinking about tearing it down and repainting everything (wall, ceiling, cabinets). It seems like a good time since I haven't installed flooring yet. I don't have much painting experience and just wanted to make sure I'm not doing anything stupid. I'm imagining the general steps to be: Tear down carpet Sand everything Tape off stuff that shouldn't be painted Prime Paint Anything I'm missing there? I have an electric paint strayer (TrueCoat Plus II) I plan to use.
-
It's double the energy (3dB), so essentially the same: 59dB + 59db = 62dB / ~30% louder than the original loudness. In this case we're talking about putting them inside a metal box, which is likely going to transfer vibration to the box, don't know how that would affect the loudness. What specifically do you see there that contradicts my statement? They don't show specific numbers, but it seems that the difference between "EU2000i, 1500W, ECO Off" and "EU2000i(x2), 3000W, ECO Off" is roughly 3dB.
-
Decibels are on a logarithmic scale. Due to that 54dB + 54dB is 57dB. Which is 2x more energy but would be perceived to human ears as about 30% louder.
-
I did point out that Boost runs on Sprint's network. https://www.boostmobile.com/#!/about/