zulandio
-
Posts
82 -
Joined
-
Last visited
Content Type
Events
Profiles
Forums
Gallery
Everything posted by zulandio
-
OK, should this thing be here? If not, what should? (minicruiser)
zulandio replied to Boondockit's topic in Electrical
What terminal does it go to on the battery? -
OK, should this thing be here? If not, what should? (minicruiser)
zulandio replied to Boondockit's topic in Electrical
On mine that is where all the Negative wires go to complete the circuits as well as a wire from negative battery. -
OK, should this thing be here? If not, what should? (minicruiser)
zulandio replied to Boondockit's topic in Electrical
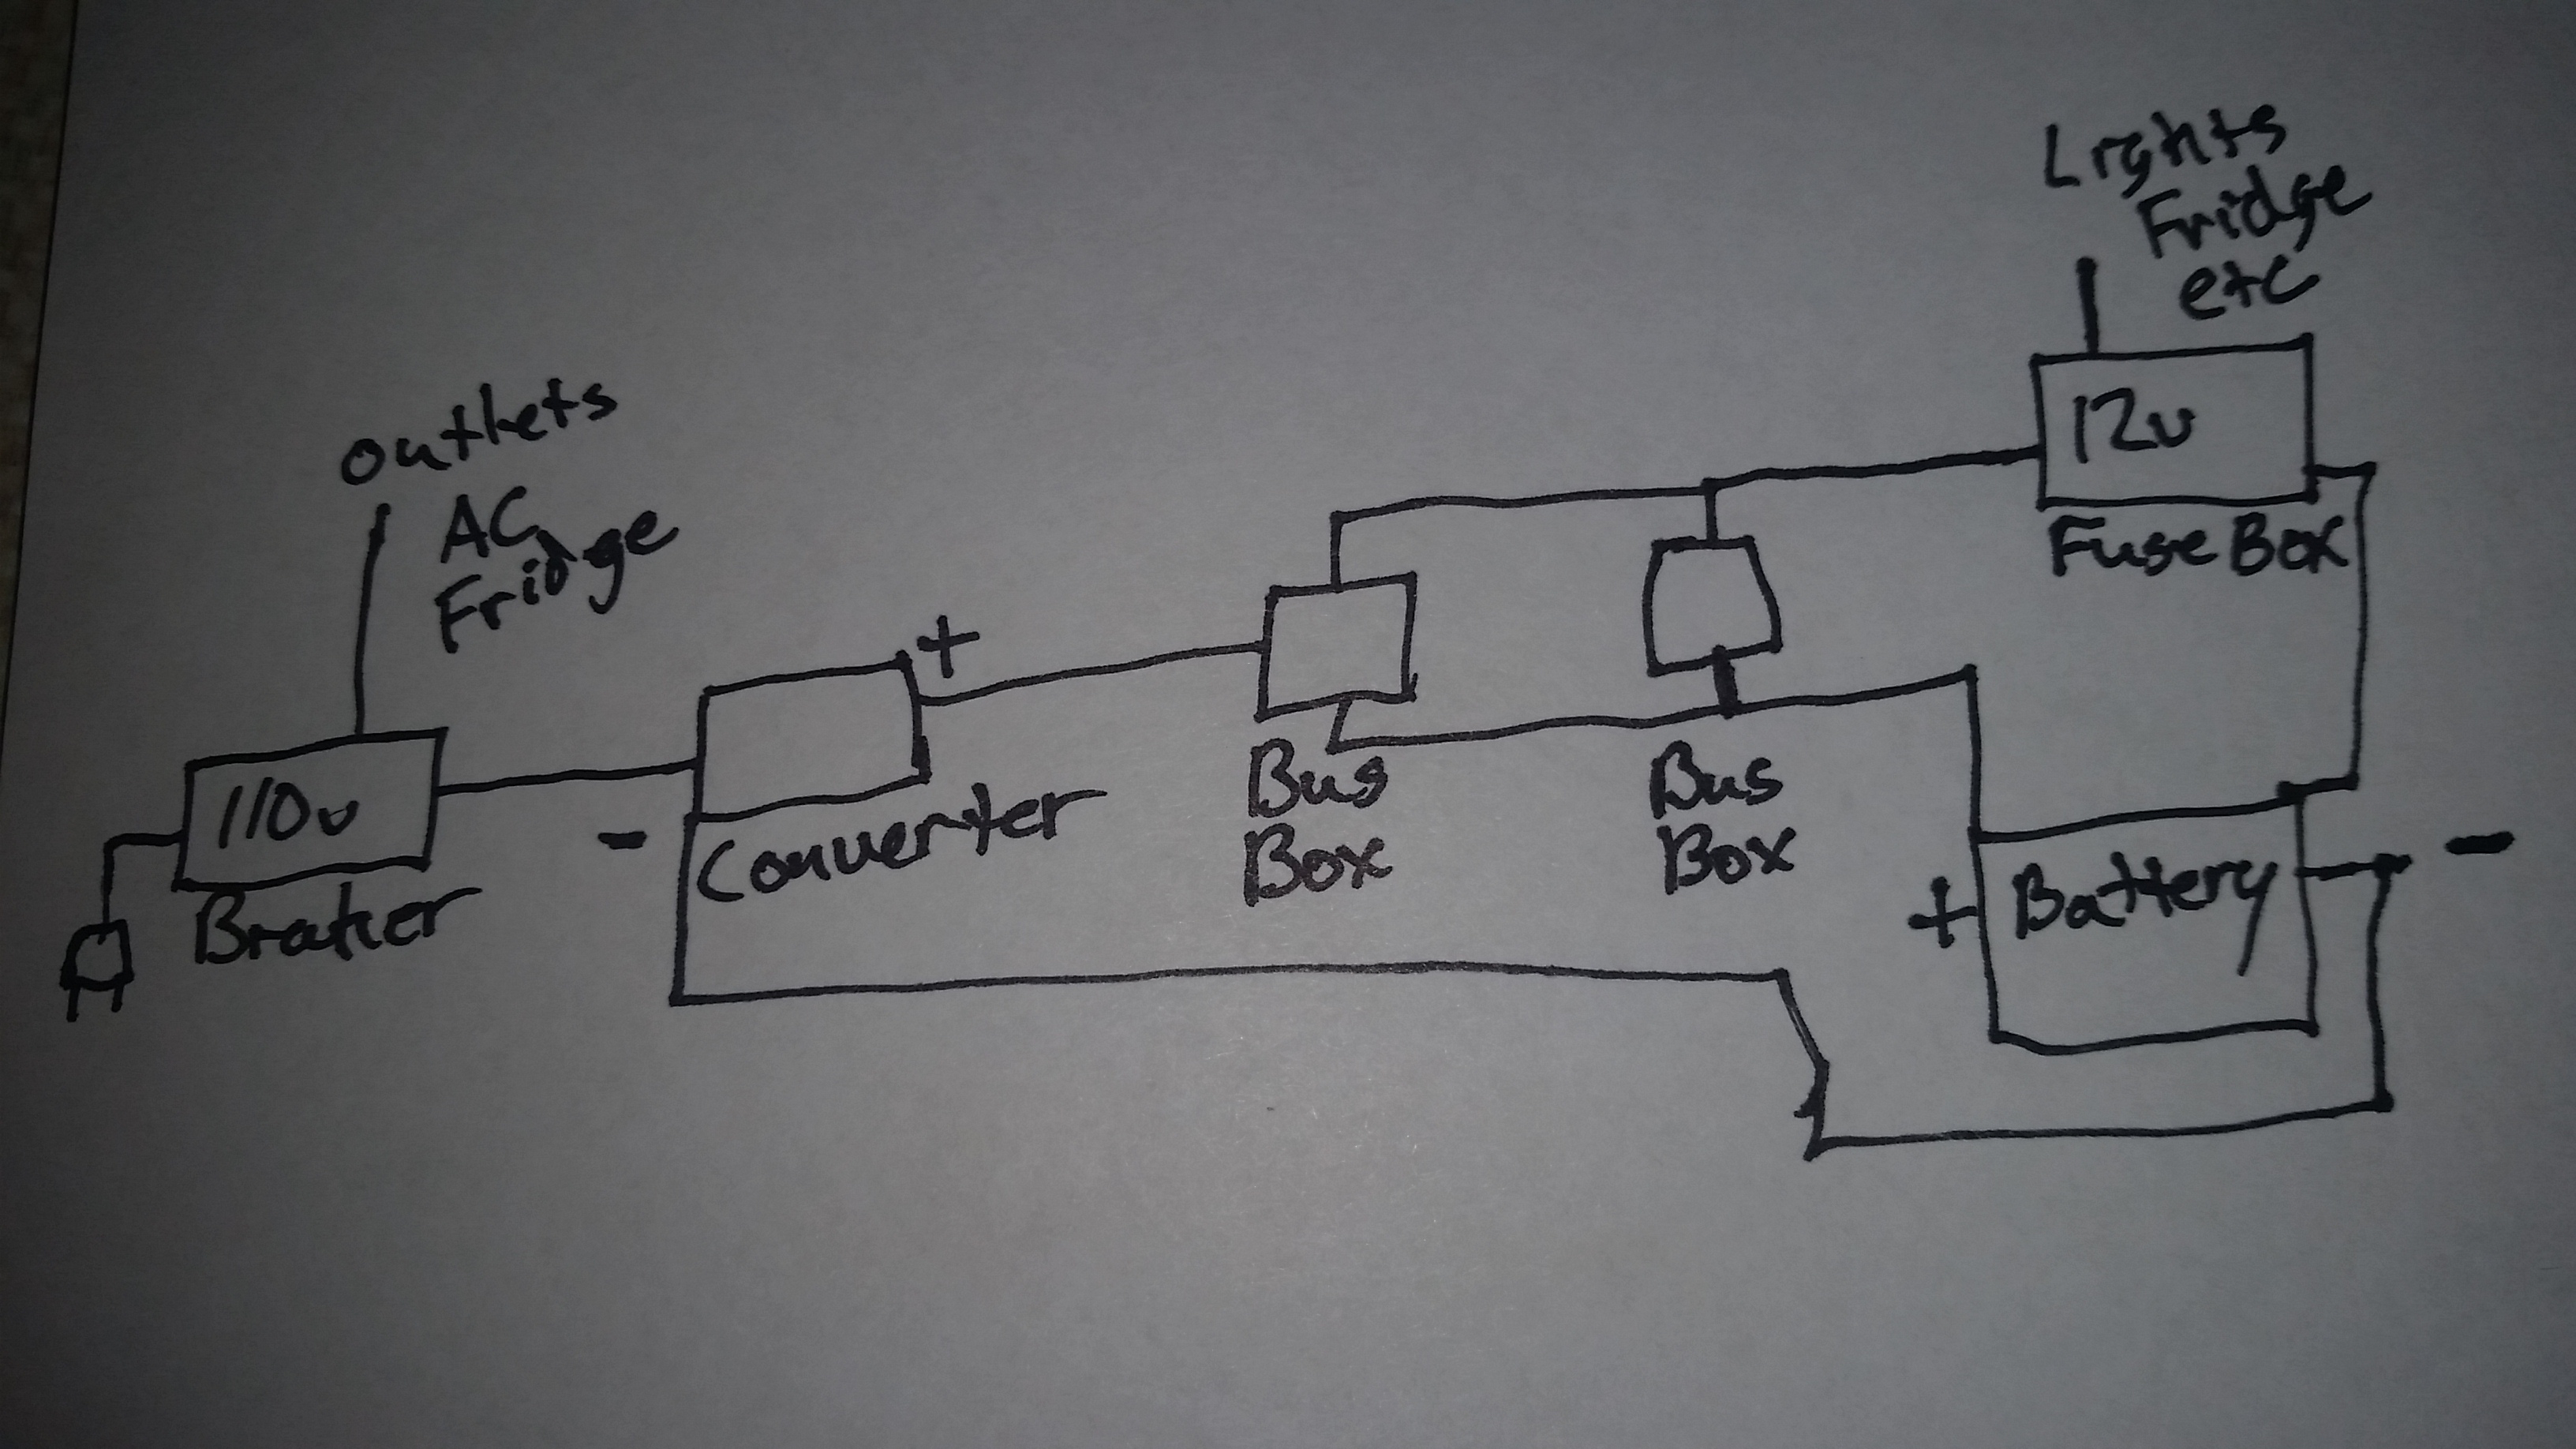
Okay I figured out how my system is setup I think there is a redundant bus box/splitter but oh well.
-
OK, should this thing be here? If not, what should? (minicruiser)
zulandio replied to Boondockit's topic in Electrical
This is my converter/charger the white wire goes to battery negative. The red goes to the splitter brick? I can't get to my battery without dismantleing the couch. But I recall another one of those 2 prong splitter things. I'm guessing one goes to battery and the other to my 12v fuse box. The negative battery terminal has a copper wire that goes to the negative of the fuse box as well.
-
OK, should this thing be here? If not, what should? (minicruiser)
zulandio replied to Boondockit's topic in Electrical
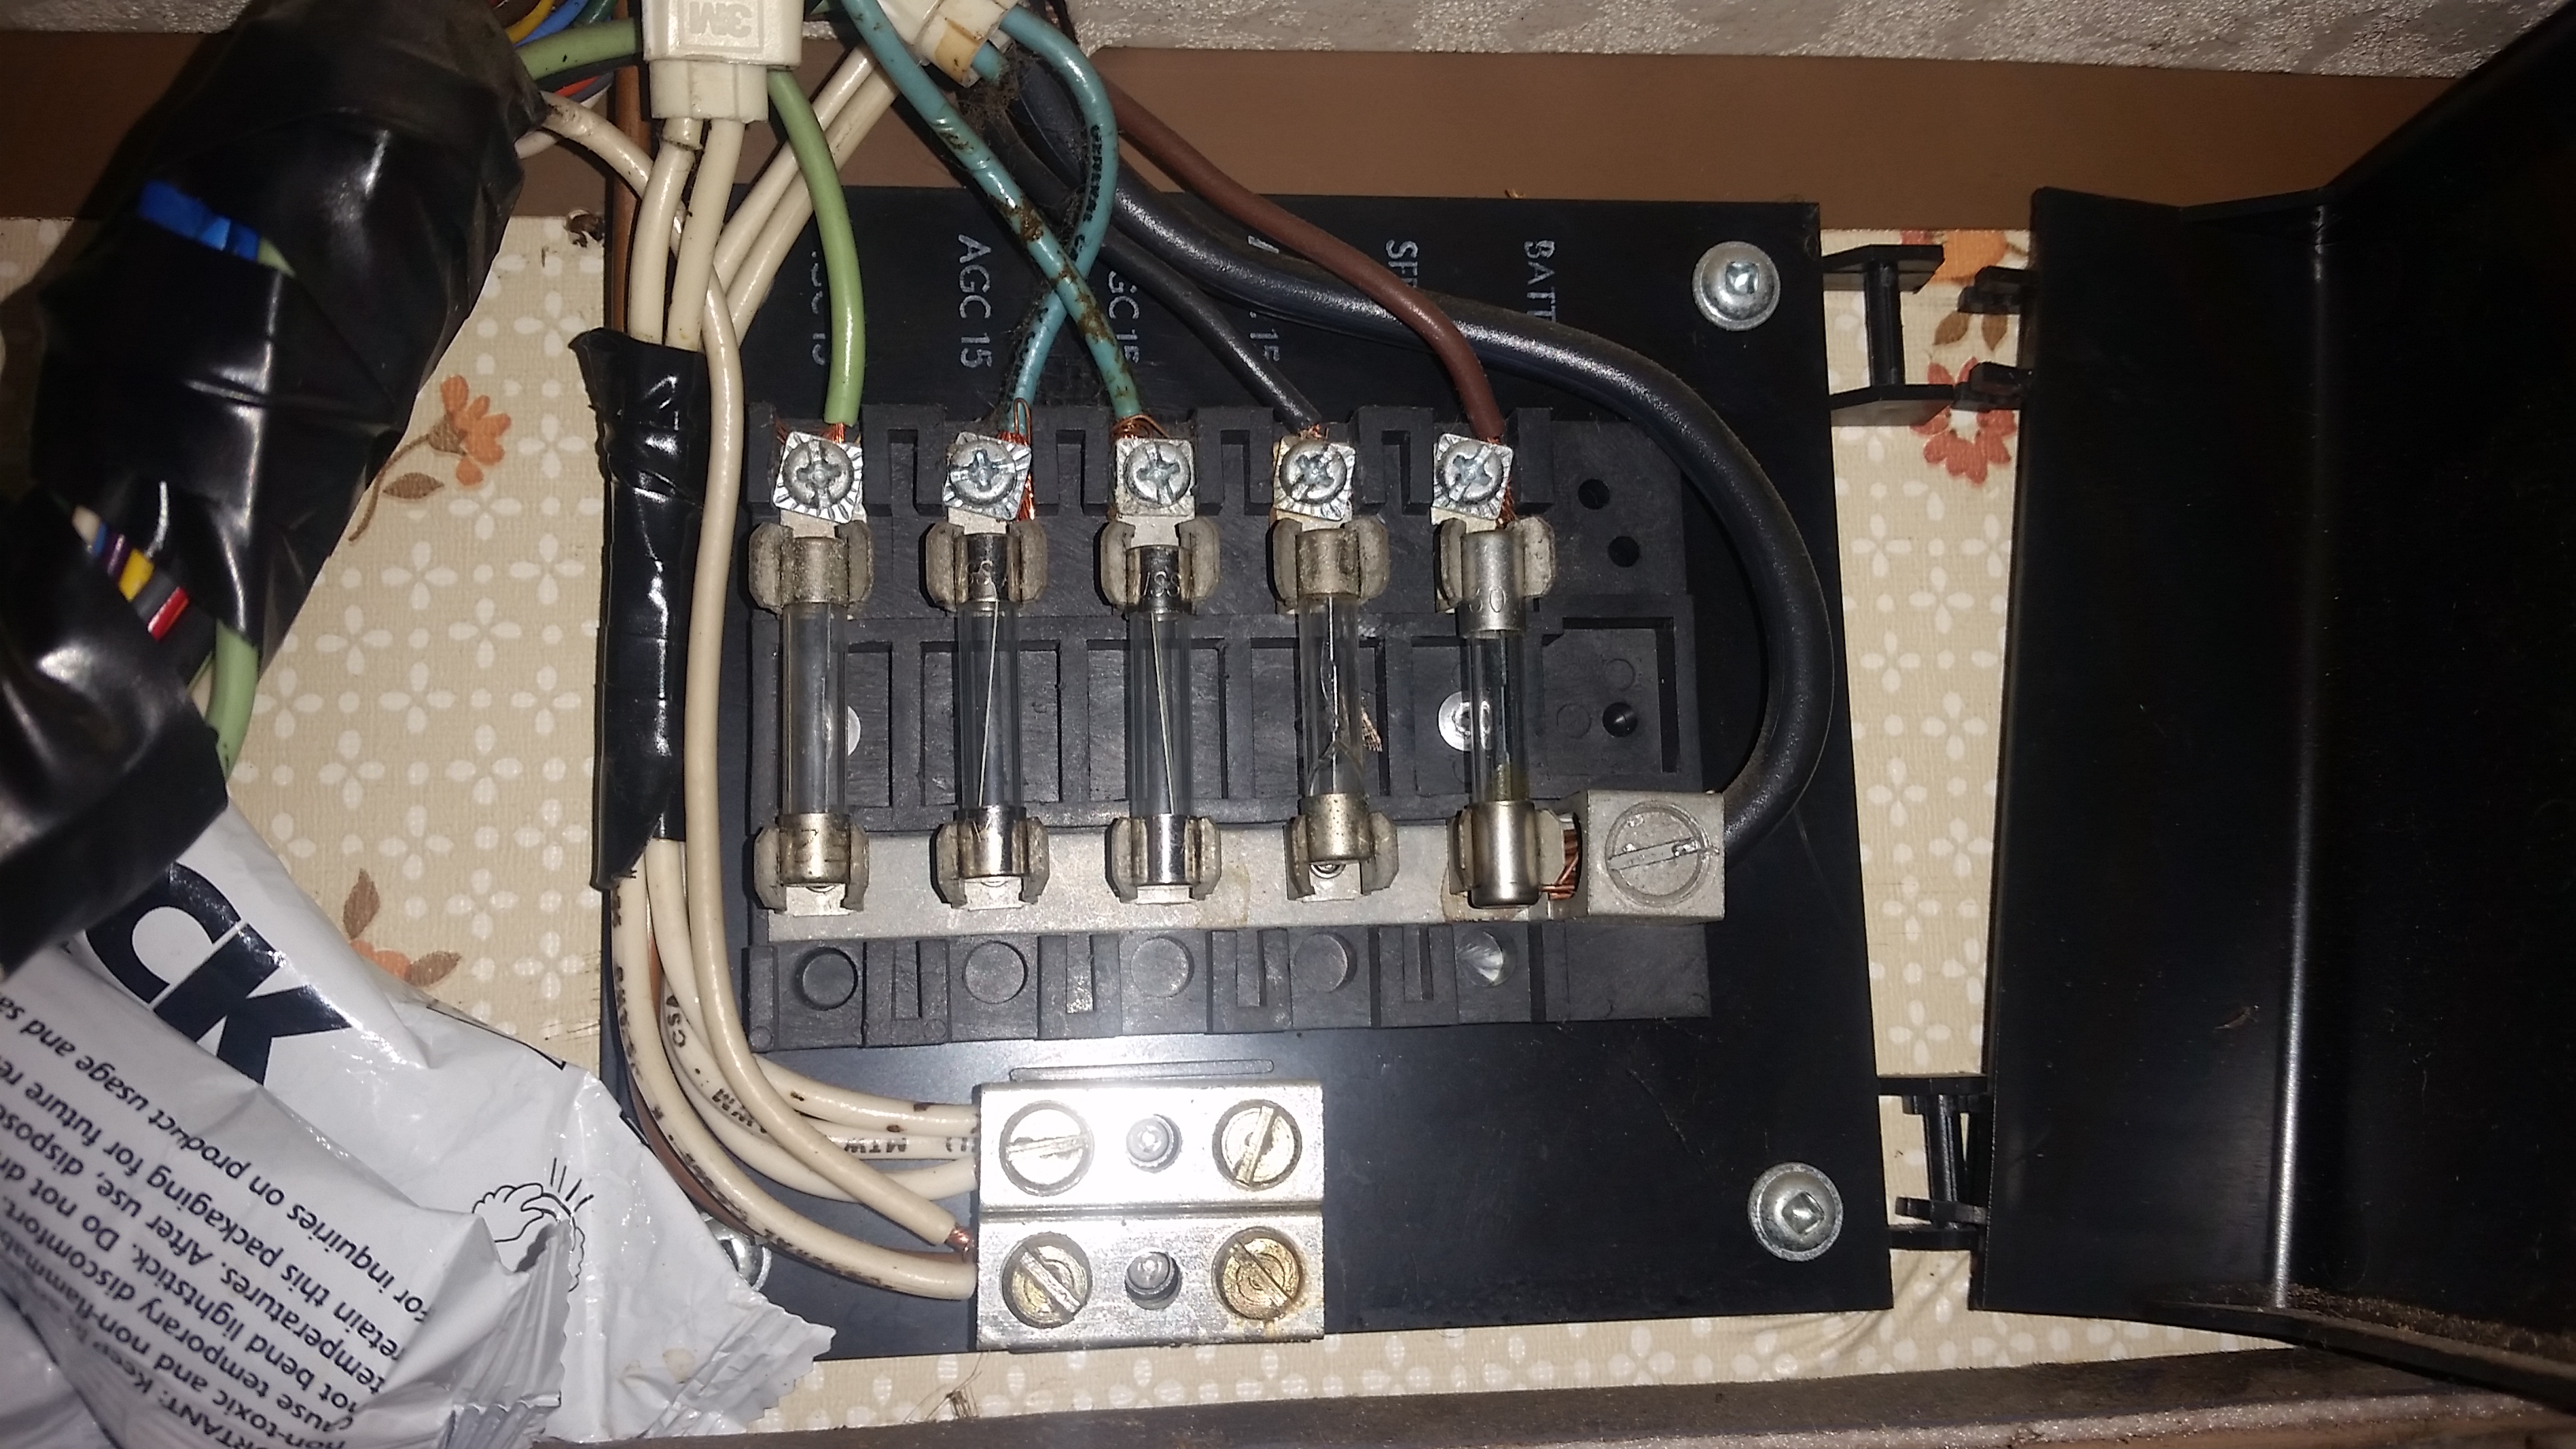
This is my box the thick black wire on the right is coming from the battery. All the white wires are grounds. The colored ones go to the 12v lights, fridge, furnace, and water pump.
-
OK, should this thing be here? If not, what should? (minicruiser)
zulandio replied to Boondockit's topic in Electrical
That's how my system is setup. Like I was saying yours doesn't seem right. Is there other wires somewhere that may go to your battery around there? Perhaps look at the connections on your battery and see where they go and what color they are. Try and trace them. I see a white wire with green and another regular one? Are there two wires or is that just the same wire going to the charger? -
OK, should this thing be here? If not, what should? (minicruiser)
zulandio replied to Boondockit's topic in Electrical
It looks to me like that your 110v circuit breaker box and 12v fuse/distribution box are there, only thing missing is the converter/charger. I'm guessing any outlets you have work fine just no lights or water pump which are 12v. The converter would hook to that white wire which feeds the 12v. Mine is set up differently the converter goes to the battery which then goes to the 12v distribution. It seems odd that someone would set it up with the 12v box in front of the battery. Maybe someone else knows more about it than I. -
Here is the one I bought. http://www.ebay.com/itm/Power-Max-RV-Converter-Battery-Charger-PM3-55-AMP-120-V-AC-to-12-volt-DC-Supply-/291306119317
-
Stock chargers from that era are rough on batteries from what I understand. They only charge at one voltage modern converters have 3 or 4 levels of charge. The final being trickle which is easier on batteries once fully charged.
-
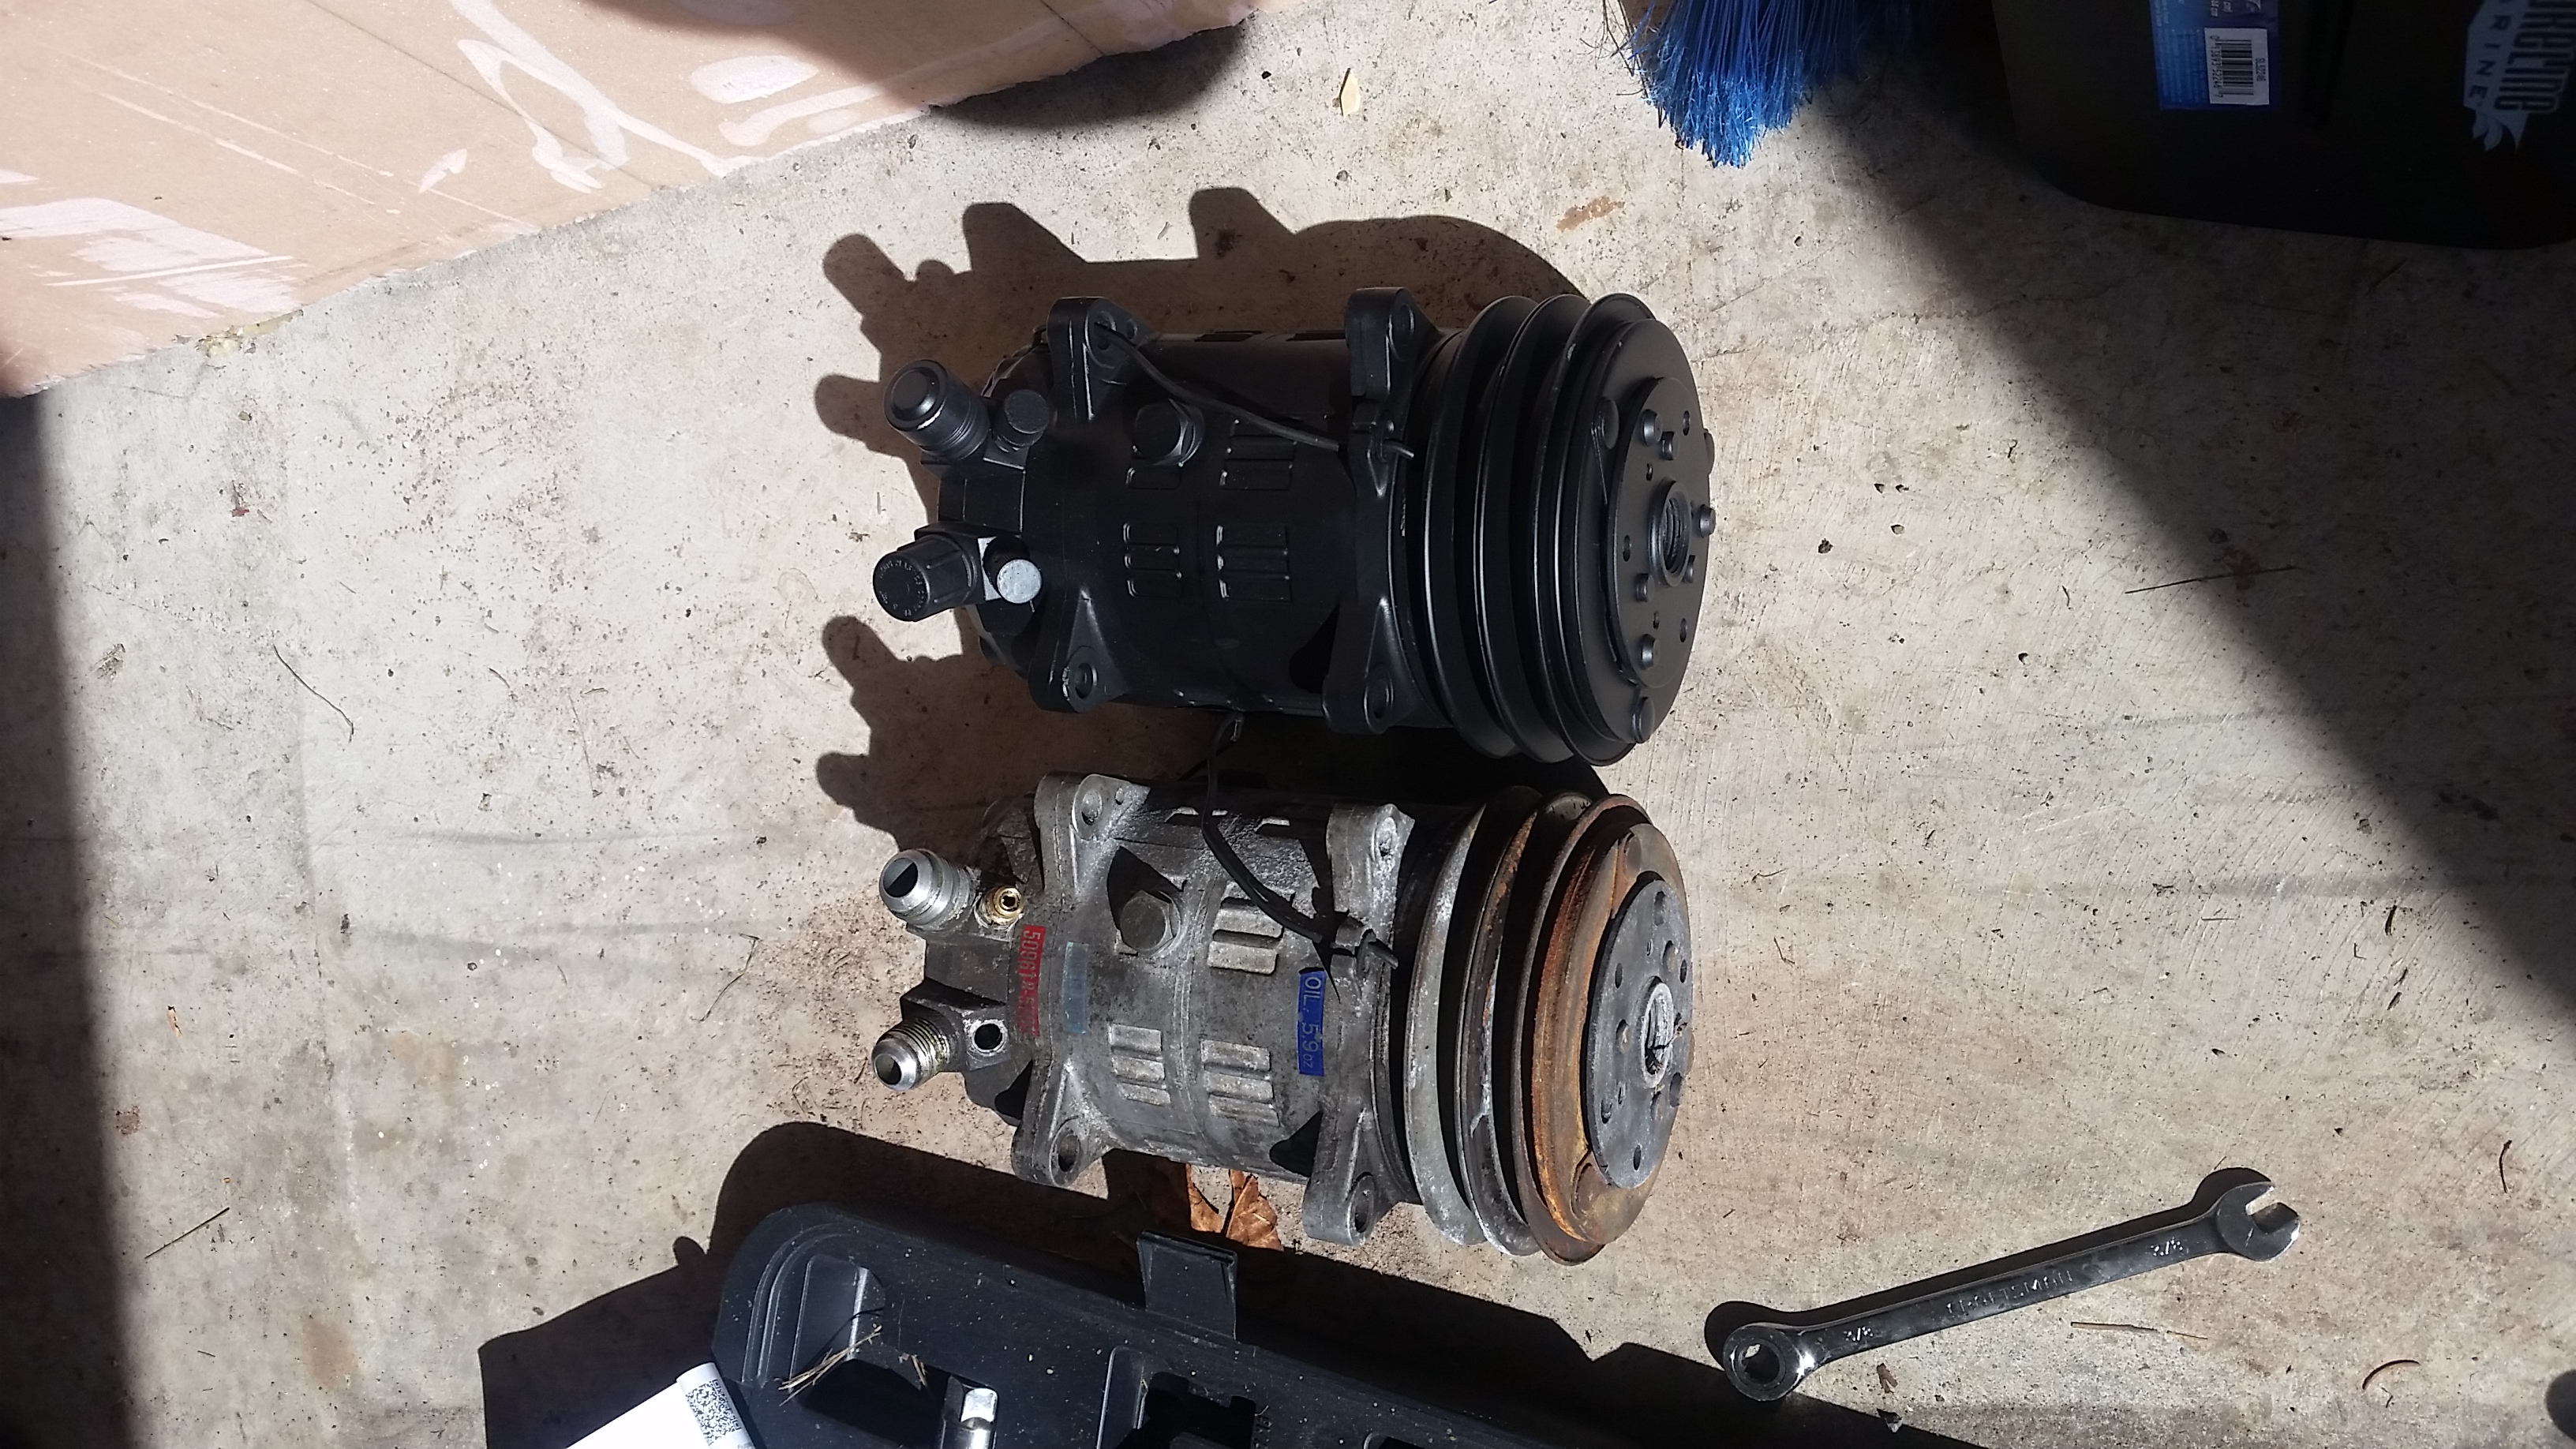
Replacement compressor showed up today. Drier is part number 33318 (that's what it was at O'Reilly) Compressor 57511, and expansion valve 38608 hoses made at local radiatior shop flushing with acetone then ac flush after. And no need for these adapters I got now since this has the flare fittings.
-
oh crap your right how did I miss that... Okay so I only have 235 AH.. Kind feeling stupid now.. At least 6v were cheaper for the AH I got. I paid $260 total for both. Online it's about that for Trojan 12v with 225ah but then you have to pay shipping and warranty claims get expensive so I guess I still went with the best setup for my wanted system..
-
I have thermal black out curtains connected via velcro on the inside. Makes it pitch black inside and helps keep heat in or out. Looked at 4 types of curtains to get a true blackout. And you have to sew or know someone willing to do it for you for cheap or free. My mum did mine.
-
Oh I got them at batteries plus for around $120 a piece.
-
I went with 2 6v in series for 480 ah storage. I had to make a new battery box out of storage bins but now I have lots of reserve power. Also an inverter for my CPAP. In a pinch I can use 12v to run my fridge if need be for the night and it will run my TV and charge my laptop and then recharge when driving or charge with the generator and my 50 amp power max converter.
-
OK, should this thing be here? If not, what should? (minicruiser)
zulandio replied to Boondockit's topic in Electrical
Yeah that isn't a good charger. It's actually worse then stock which was 5 amps usually at least. I bought a 50 amp power max to replace mine. It has 3 levels of charge high for dead battery, med once batt gets to a certain point and trickle for maintaining battery. They come in many amperages I got a 50 because I have 2 6v in series giving me 480 amp hours of storage so it will fully charge in about 8 hours. Normal setups are with lower amp hour single 12v batteries. Anywhere from 50 to 150 amp hours. -
I just used eternabond tape on mine 50 feet was enough to do all the roof edges about 3 inches down in back, the front and rear seal on the roof, and all the way down the cabover. I pulled the channel cover out since it was cracked and leaking. It flexes and sticks for up to 35 years if done right. It can be taken off with a blow drier if needed.
-
Help with leak, bathroom floor is soaked.
zulandio replied to Movingcastle's topic in Coach ApplianceTech Issues
Sounds like a broken waterline somewhere if it's worse connected to water. Wouldn't explain the leak without hook up unless you always have water in the water tank with pump on. -
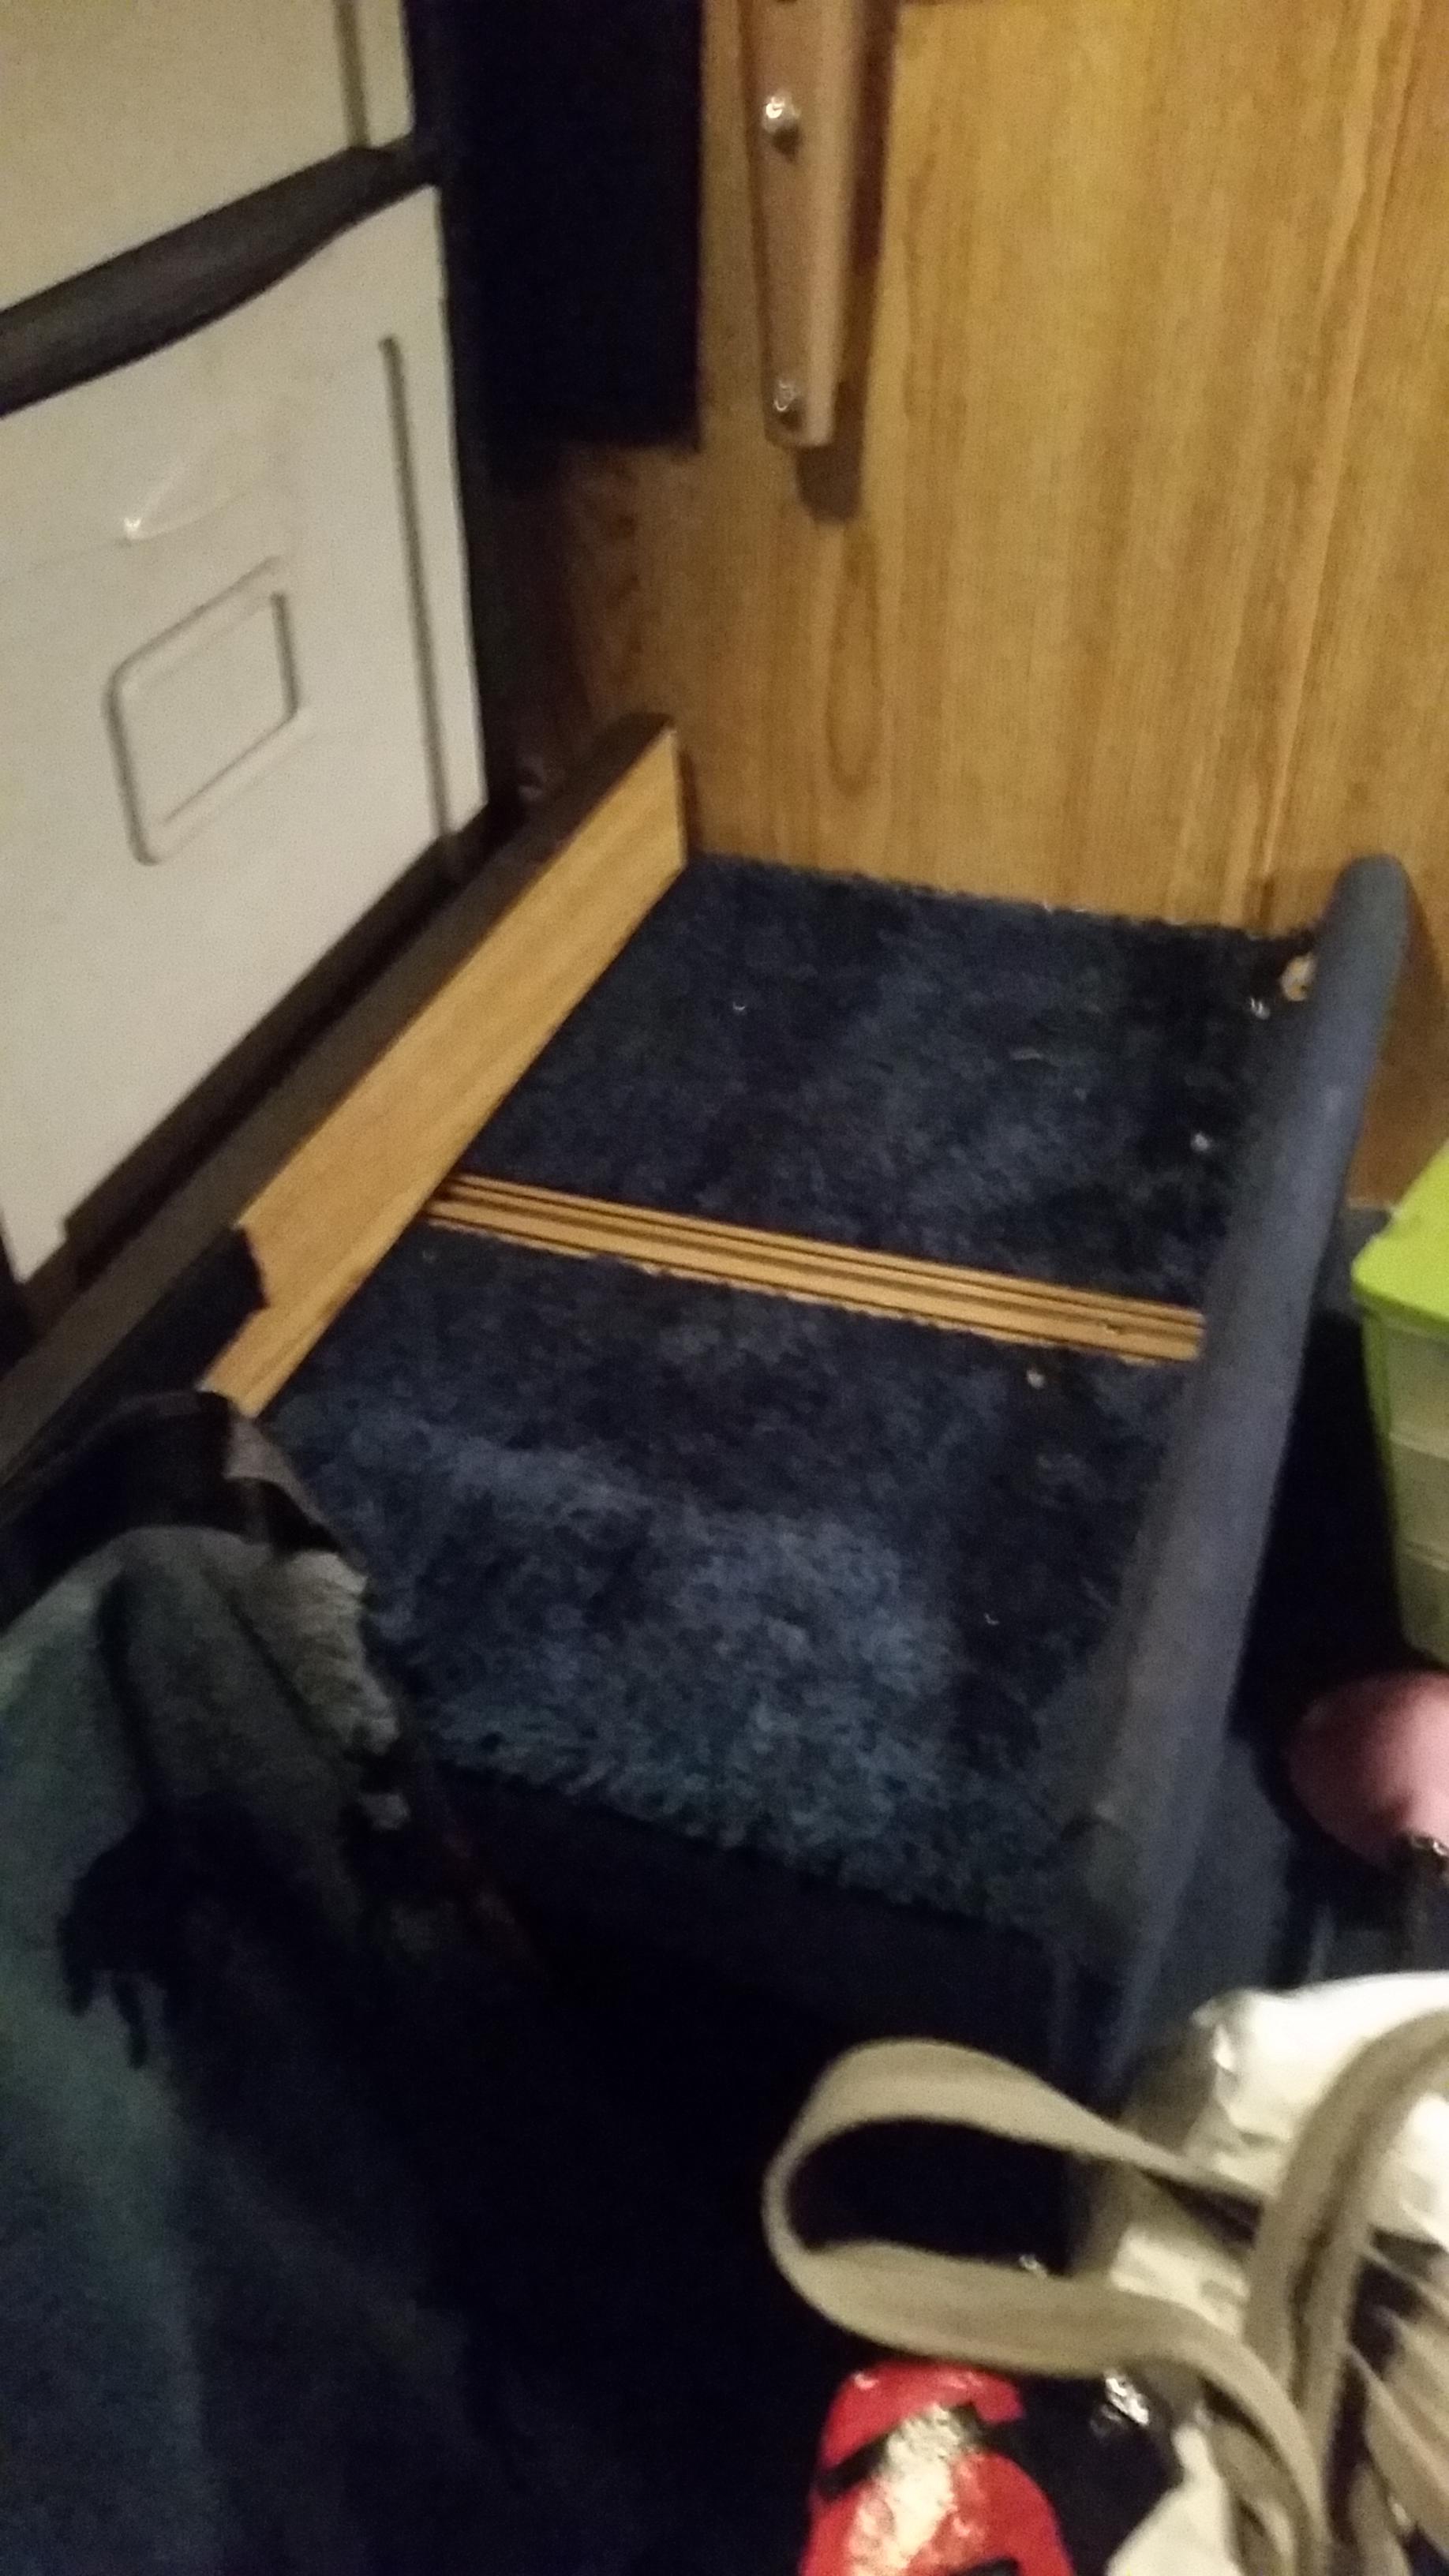
I'm fairly certain New World did this when they but it. They were going for a high class model I'm assuming. Perfect for Princesses lol! Here are some better pictures to get an idea. It's a solid piece of wood half the depth of the overhead. With another piece of plywood to level it out making it a level surface all through. The slides allow the pass through access by sliding the whole thing back.
-
Mine was like this when I bought it and it's a pretty slick setup. You'll have to excuse the mess I turned it into my closet and am in process of replacing the carpet with linoleum so everything is up there. It has rails it slides back on and another piece of plywood with two cushions.
-
Okay so apparently you had these? http://www.tirerack.com/tires/tires.jsp?tireMake=Yokohama&tireModel=Y356&partnum=975R4356&vehicleSearch=false&fromCompare1=yes Which are for the higher load I apologize. But they are also wider. I had 195/75/14 on mine when I bought it and replaced them since they were 10-14 years old. And they defiantly do rub together. You could see the imprint of one of the tires name on the other tire from rubbing together. There is a bigger gap on the 185 since they are a narrower tire. There seems to be a lot of debate on here and other forums on what tires to actually use. But I'd go with what the factory sent. I know my spare was original due to it being a pain to turn the chain down the rust on the rim and the date bieng pre 2000 and labeled the same year the truck was made. Said made in Japan on it too. I'd just go with the 185R14 C at least that is what I did..
-
The 195/75/14 are a Passenger car tire. with a load rating of like 13xx# single. Dually decreases that rating to 12xx# giving you maximum weight of 48xx#. Like I said the spare that came with my rig which was original from the manufacture was a 185R14 C which are truck tires. Mine was a floating axle from the factory. So Toyota was sending out their 1 ton dually trucks with truck tires on them. You can most certainly put the 195/75/14 on it they will work but don't plan on hauling anything in the tanks or towing anything. That's why although you can use them it is better to get the 185/14 C's. They have a dually weight of 17xx# giving you a total of 68xx# of load capacity enough for tanks to be loaded and your kitchen food/pans'/dishes/etc plus something to tow. So the reason his tires blew was maybe a combo of under/over inflated and too much weight.
-
Was it in Superior, WI? If so that was mine lol.
-
I bought 195/75/14 at first but took my spare down to find it was original and a 185/14 C. So that's what I bought they have a higher weight rating and inflate to 65 PSI. Those little tires don't even have a dually max weight. And they are wider so they touch too. I believe mine are 1600# a piece dually so a total of 6400# being that dry the back weighs upwards of 4000# its not a surprise yours blew especially if tanks were full and storage in the back.. I think those little ones are only 1200 a piece dully so you only get about 800 extra pounds which can add up fast. And those foolies are dangerous I'd get that taken care of.
-
So since last I looked here I've purchased new tires and I did put the P195/75-14 on the front but went with the 185-14c on the back. Also yes the floor is OSB however it has an aluminum panel under it. So the OSB is not actually exposed to the elements. I've had to use EternaBound on the roof edges to stop roof leaks on it but any other model with the leaking this one seems to have seen would of been trash. But the aluminum frame has saved it. A wood frame one would have collapsed.
-
So I have discovered that the DKS15BH in our rigs is not really that but more like a TM15HD.. I bought an 58521 4 seasons from summit racing which states it is a DKS15BH replacement new not re manufactured, I wanted new so not to have to worry about it. However the manifold is not the same and it does not fit! Sorry RiggerRob yours likely isn't going to fit either... A motor mount is in the way... It would be possible to mount it with only 2 of the 3 bolts but that would leave the bottom loose and flooping around. And requires plugging up the High pressure port as well as getting an angled adapter for the low pressure port. I did also see the option of using spacers and longer bolts to mount it making the inside grove line up with the crank pulley. But that also seems ill advised and would involve more modding.. I actually looked on the back of my compressor something that couldn't be done with it mounted and got this part number 48822022B. And upon googling it found this. http://aczk18.com/products.asp?/2229.html And yes 57511 is at summit but they want $300 plus a core of $20. So I did some more searching and found this one on Ebay http://www.ebay.com/itm/A-C-Compressor-Compressor-4-Seasons-57511-Reman-fits-85-88-Autocar-ACL-14-6L-L6-/351793281721?hash=item51e8837ab9:g:Sr0AAOSwHoFXvTUV&vxp=mtr Just got off the phone with summit and they PRICE MATCHED! So i'm getting one shipped directly from 4 seasons for the same price as the one on ebay! This is my first experience with Summit but it surely won't be my last! 5 star service!! As far as the R12/134 discussion. I'm going to be doing 134a this new compressor is Pag46 oil previous owner replaced 2 lines and I just replaced the other two due to leaks plus I'm replacing the drier and Expansion Valve and flushing everything really good so I may as well. And Menard's has it cheaper then Ebay right now in my area (WI) 4.88 a can for 134a. Also if you want to reclaim refrigerant all you need is empty cans of R12 or 134a, hell maybe even a propane tank lol, hook them up to your system and put them in a salt+ice+water bath. Let sit and it will pull the refrigerant out of your system! Cooling the gas that collects in the can when you hook it up will compress it causing a vacuum which = more gas which = more vacuum next thing you know you have a full can of refrigerant!! Dry ice will work better but if your not in a hurry and want to save a buck ice,salt, and water will work slower.