


turtle
-
Posts
590 -
Joined
-
Last visited
Content Type
Events
Profiles
Forums
Gallery
Everything posted by turtle
-
 Where did the user's photo galleries go? There is no longer a link to them.....
 -
Small Computers
turtle replied to motoyhomme's topic in Reviews - New Products - Campgrounds - Links of Interest
Don't forget woot I've seen lower end refurbished lappys for $2-300 but they go fast. -
In the past I have always used Axxis Metal Master pads but they no longer make these for the older Toyota trucks. You can go over what they offer on this site (good pricing also) http://www.buybrakes.com/axxis/
-
Your 20R engine has 96 hp A 22R engine will have 97 hp A 22RE will have 105 hp (it is computer controlled EFI) A 3VZ-E (3.0 V6) will have 145 hp Even going all the way to a 22RE you only gain 9 hp. Cost for a healthy 22RE and paying someone to install it for you...... $3-4k Don't think about a Toyota 3.0 or any later EFI engine unless you can get a "install kit" as the mods are extensive (engine compartment, mounts, EFI, it is a nightmare) I lived with a 2L diesel motor home that had 82 hp for 14 years. You DO get used to it after a while. Some things you can to do your 20 R engine that will help. First things to do..... #1 Tune it up (new plugs, points, plug wires) #2 Keep fresh oil in it (change it at 2500 miles) #3 Change the fuel filter (take off everything on the fuel line and only use a factory filter) #4 Run only high octane fuel (premium) #5 Maintain proper air pressure in your tires (look at the recommended max on the tire and do not over inflate but do NOT under inflate) More expensive things you can do (minimal performance increases) #1 Webber carb (36/36 model) #2 Headers and free flow exhaust #3 Electronic ignition Most expensive things you can do #1 Re-gear to 4.56:1 If you do all of this you can get closer to the hp/torque/pull that a stock V6 puts out from your 4 cyl 20R but you better make sure that the 20R you start with is healthy before you start "beefing it up" and asking it do do more than it was designed to do. Anytime you do performance enhancements you decrease the longevity.
-
If you use a 350 Chevy you can get a complete kit with everything you will need, mounts, wiring harness, throttle, radiator...... the works. There have been people putting 350 Chevy's in Toyota trucks for over 30 years. It is all down to a simple step by step kit with everything you will need. If you use anything else you will have to design and fabricate everything yourself If you are a good automotive engineer and a good from the ground up fabricator go for installing anything under the hood. If you are like most of us joe six pack types, go with the simple stick it together yourself kit. I have seen a couple Toyota RVs with 350 Chevy engines with GM automatics in them. They are a clean fit and they work. If you are worried about the weight of the cast iron 350 find a Buick aluminum block V8. Lots of people make complete GM/Toyota swap kits. http://www.northwest...neadapters.html http://advanceadapte...on-package.html http://v8conversions.com/ Your truck is an older model so finding a complete kit for it might take a little calling around
-
Have you drained the holding tank yet? It may be full and over flowing when unlevel.
-
These Toyota RVs are nice for 1 person, maybe a couple but more than that and it is way to small. Not only small physically but the holding tanks would have to be emptied 2-3 times a DAY if 4 people were using it for a long trip and overnighting in it. These things were made for short weekend vacations get aways for 1 or 2 people. Sure you see the pretty sales brochures with a smiling couple and a few little kids enjoying themselves but believe me if you get more than a wife coming along with you it will be "hel!! on wheels" within 3 hours. Not to mention that you will still have to drag along a box van with all your "stuff" in it. If you are looking for a short or long range band vehicle get a bus and make a portion of it a living area and keep the rest for instrument, pa, and lighting storage. Depending on where you live, retired school busses can be purchased at city/county/state auctions for little to nothing and they come in many sizes from shorties to full length diesel coachs.
-
About the only thing you can do to alleviate the "slow as $#!+" aspect of a 20r powered motor home is to do a V8 transplant. There are several companies that make 350 Chevy swap kits (mostly for the 4x4 crowd). Anything other than this is only a minimal improvement, although my V6 shorty is rather peppy. The cost of any engine swap is the time/labor so it is best to go the whole enchilada and get a modern V8 and auto trans. Believe it or not your gas mileage will go up with a V8 dragging you around as it does not need to work as hard as your little 4 banger. I owned a 1981 2L 83 hp diesel powered Toyota motor home for 14 years. It had far less HP than your gas engine. You do get used to traveling slow, given enough time. Stay off of the interstates and if you do have to travel interstate for a few miles keep it under 55 and stick in the slow lane. There are a few tricks you can do like lowering the rear end gearing to 4.56:1 but unless you have a 1 ton rear end it would be a waste of money to do anything to the light weight 1/2 ton rear axle other than taking it out and replacing it.
-
You may want to consider an earlier 4x4 truck or spending some additional cash and putting in a solid front axle. Anything more than a light slide in camper or a small Chinook might be straining the IRS front suspension more than it was designed to handle.
-
If you are talking about the aluminum channel that goes around the exterior with the vinyl screw covers. Reuse the original as bending new ones to fit will never work and you will always have leaks. Remove the old aluminum channel, clean off the old putty tape, put new putty tape on the underside of the channel and replace it. Put on new screw cover. Your leaks are more than likely from the windows and the marker lights if it is the bunk area. Remove the marker lights and windows and put new putty tape on them and put them back on. This needs to be done every 5-7 years and you can bet that it has never been done on your coach (no one does it because no one knows it needs to be done and those that do know HATE doing it). You need to remove all side channels, marker lights, windows, roof vents, and stacks and replace the putty tape on them every 5-7 years also. Owning an RV is just as high maintenance as owning a boat. All boats want to do is sink and it is a constant effort to keep them from NOT sinking. All RVs want to do is leak and it requires the same constant diligence to keep them from rotting away. You can keep a boat out of water to lower the maintenance on it just like you can keep an RV in a garage to lower the maintenance on them. Most people do not keep their RVs in a garage, I do.
-
Both of the Toyota RVs I've owned had molded showers of either fiberglass or ABS. They were/are GREAT...... the only way to go in my estimation is a 1 piece or 2 piece solid molded shower. These CAN'T leak. I'm not sure if you could find something like that for your Winnie as both mine were 18 footers and were small shower/head combinations. If you are going to replace the walls you may want to do it with malemine tile board (MDF). This is home shower board. It is about as water resistant as you are going to get. If you want to take it a step further you can get sheets of ABS and glue that over the malemine. Once the ABS is caulked it would be 100% water proof as long as you keep it caulked and sealed. You can get malemine shower board in a variety of colors and patterns from plain white to tile impressed to pretty patterns. There are several brand names of this product that you can go with if you want good quality such as Barker Board and Georgia Pacific. I used a plain white malemine for the ceiling when I rebuilt the interior of the diesel. Looks great and it is won't "punk up" if it gets wet.
-
Depending on the age and condition of the unit it might be more economically viable to replace it with a new fridge rather than just replace the burner and coils. There are a couple people who rebuild RV fridges using new parts (they replace the entire cooling unit, coils, burner, etc). It will be expensive to have the old one removed, packed, shipped, refurbished, reshipped, and reinstalled. The cost of a completely new fridge is very close to having your old one rebuilt. If your old unit is showing its age (cracked or worn seals, rusty shelves, funky outside, exterior rust, etc) get a new one. There are "surplus" places that have over run new units for less than retail and with today's economy as it is many large RV locations will discount a big purchase item like this. So the question is..... what model is yours and how old is it?
-
If you have anything other than the factory 17.x gallon tank you have an aftermarket tank. As with any aftermarket product/part you will have to deal with the manufacture of the part/product if you have problems. Most of them used the factory mounts that were used on the 17.x gallon tanks. The best thing for you to do is to get under the RV and take a look at how yours is attached to see if supplemental supports were used There were a few aftermarket fuel tank manufactures and some who made auxiliary tanks that work in conjunction with the stock fuel tank. There is no "standard/norm" for how these tanks were made or installed. As to your floor flexing. A little give is normal. Pull back your carpet and take a look at the sub-floor to check for signs of past water leaks/damage. I would not worry about falling through. That won't happen with a Sunrader fiberglass shell.
-
There was a free one on craigslist but it was out in Seattle (a ways for you to go even for free... unless you know someone out there) http://seattle.craig...1330723059.html There is one in Graham Texas 1-800-766-2009 One in Little Rock Ak 888-945-9685
-
They are out there, you just need to do some calling around to salvage yards in your area. Most salvage yards are hooked up to a parts search network and if you call one they can search the surrounding area for what you are looking for and have it delivered. When you get the axle get the springs and 4 rims along with it. You will also have to modify the shock mounts as later model shocks mount to the frames not the cross member as the early ones do (this means new rear shocks also) Where are you located (what state)?
-
They have some square aluminum tubing and wood framing with solid insulation board between the framing. This is covered by thin paneling then on the outside there is filon (thin fiberglass sheets) and on the inside by plywood with wall paper on one side. All of this is glued together under pressure into what I call a "sandwich board" panel. These panels are screwed together to make the coach body. The joints where the panels are screwed together are covered by aluminum channel with a vinyl screw cover running the length of it. The aluminum channel uses butyl putty tape as a waterproofing to seal the seams where it is assembled. These channels as well as the windows and all roof "bits" (vents, stack covers, etc) need to be removed every 5-7 years and the old butyl putty tape removed and replaced with new butyl putty tape and everything put back together. The AC units use a rubber/foam gasket but everything else is just putty tape for a seal. You can get a diagram/drawing of where the wood and tubing is located inside of the panel assembly from Winnebago if you want to attach something to the roof or sides.
-
Small Computers
turtle replied to motoyhomme's topic in Reviews - New Products - Campgrounds - Links of Interest
I have been using a Lenovo x300 for more than a year now. ultra portable (3 lbs - less then 1" thick), core 2 cpu, 4 gig ram, high rez graphics, 5 hour battery life, full size screen (13.3"), full size keyboard, built in verizon high speed, wireless nic, SSD (solid state drive), dvd/rw, and it has GPS on top of it all. I've been VERY pleased with it It is more than most people need in a lappy but I have to be connected 24/7/365. I am even considering putting a motosat on the roof (it's sitting in the corner of the garage now) -
the 1 ton axles came geared either 3.90:1 or 4.10:1 depending on if it was in an automatic or a stick shift. I have changed the gearing in one to 4.56:1 (14 years ago) and am in the process of changing the gearing in my current Toyota RV to 4.56:1. This seems to be a good compromise with top end speed and pulling power. You can still run comfortably at 65 but you do not slow down on the hills (unless it is a killer) I have purchased all of my rear end gears from Summit Racing (Ohio) http://www.summitracing.com/ I always use Richmond Gear ring and pinion sets. http://www.richmondgear.com/ Don't forget to get an install kit with shims, spacers, and bearings when you get your gear sets
-
Call some salvage yards in your local area. If they do not have one in stock have them search for one. Try to get a complete axle with springs and 6 rims. They are not hard to locate. It might take a few days but you should be able to find all of the parts you need within driving distance of you.
-
I built up a riser out of wood which was covered with fiberglass when I cover the entire roof in fiberglass. This was for a power vent not AC unit but the idea is the same.
-
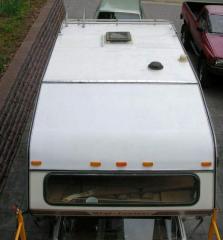
From the album: Turtle's Toy Pics
-
Condition determines price (as with anything). I've seen Chinooks sell for as little as $500 (requiring a chain to go get it) and as much as $10,000 for a pristine, garage kept cream puff. The truck part is just a standard Toyota so anyone who can work on a Toyota should be able to work on it. The coach interior just requires handyman/handygirl skills (basic plumbing, electric, carpentry).
-
I've found that builders plastic covered by a plastic tarp is the most water proof (not pretty but works as good as keeping it inside). The builders plastic is waterproof and the tarp keeps it from blowing away. I attached boat cleats on the side to make tying the rope easier.
-
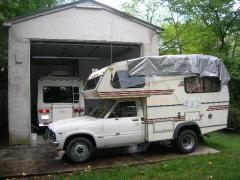
From the album: Turtle's Toy Pics
-
http://www.rvwholesalers.com/catalog/adco-...ft-01-1144.html You are right... they will be like a big sack over your little Toyota