waiter
-
Posts
2,282 -
Joined
-
Last visited
Content Type
Events
Profiles
Forums
Gallery
Everything posted by waiter
-
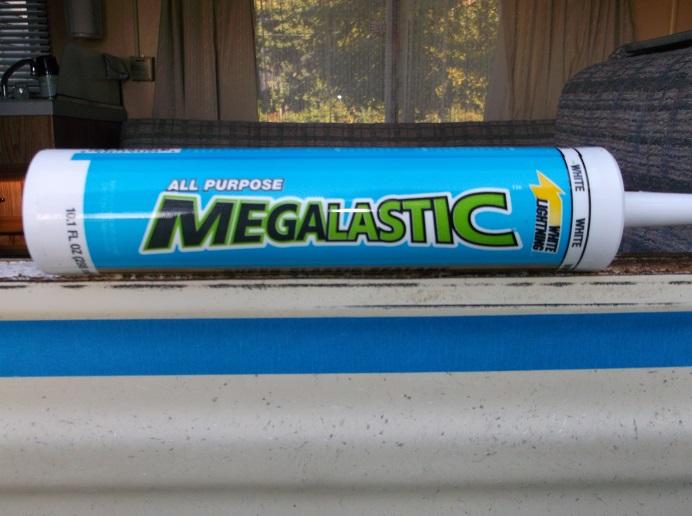
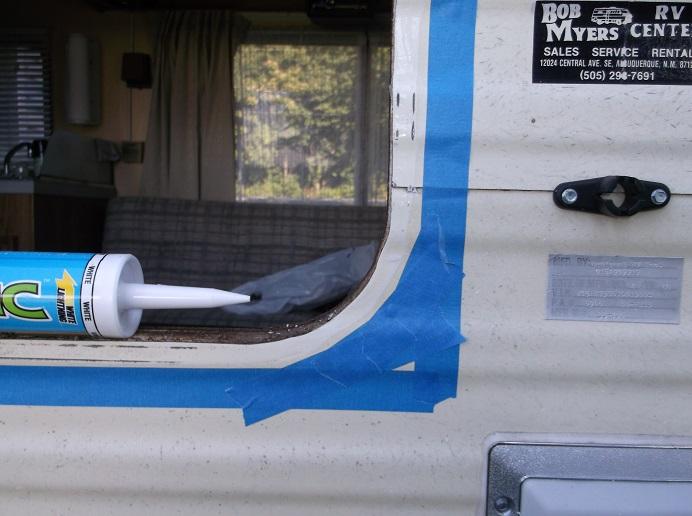
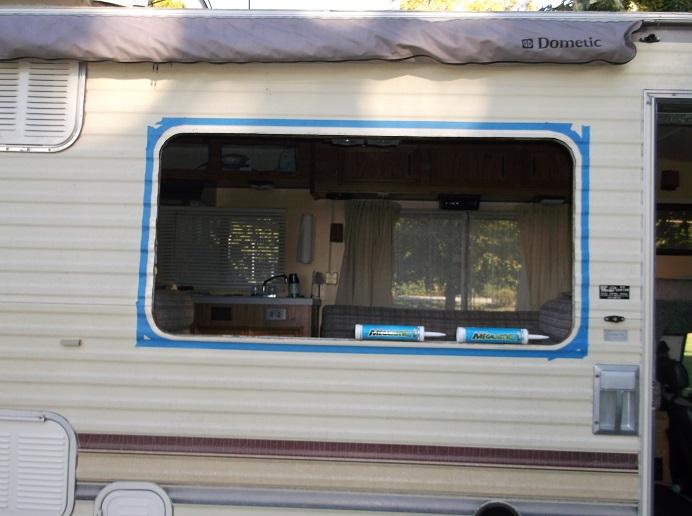
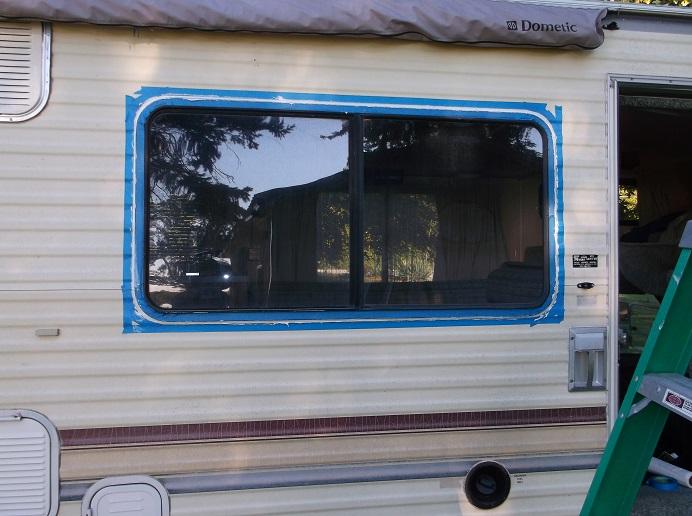
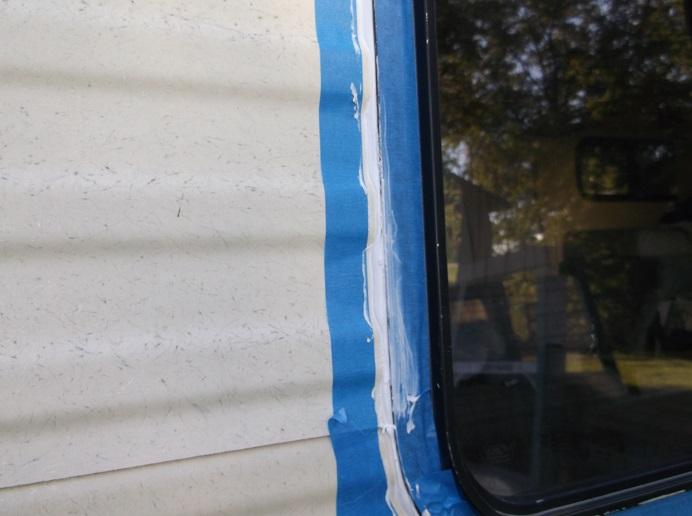
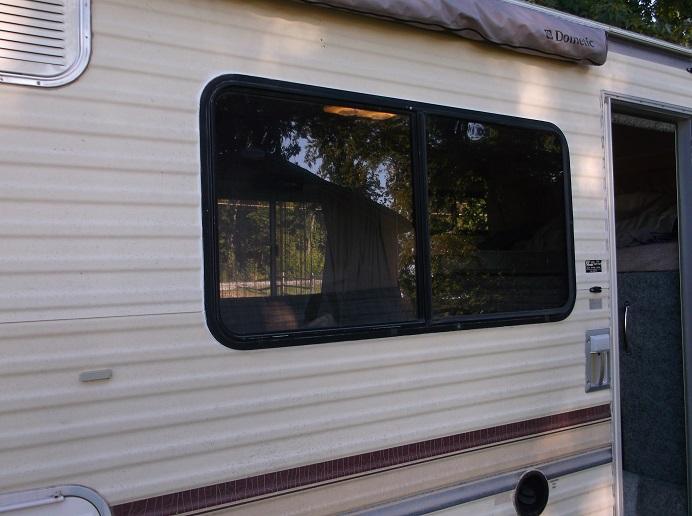
 I resealed two windows last year, but failed to get some photos. So when I resealed another window last night, I made an effort to get a few photos to describe the process. Like the other two windows, this one also seemed to have a small leak coming from the top. Even though the sealant looked OK from the outside, I would get a small amount of moisture on the wall. We also noticed that the windows always seemed to have a cold draft coming from the bottom of them. What we seen after removing the window explained the water leak, and the air leak. You can see where the water was leaking past the sealant in the upper corner. Also, like the other windows we resealed, this one had absolutely no sealant on the window bottom, hence the air leaks. The sealing method that Dolphin used differs from the method I've seen in the video thats circulating on the internet. Dolphin didn't use butyl tape, but instead used a piece of foam around the entire window, and also used a acrylic sealant on the sides and top (the sealant you see if you look at the window edge). The black foam rubber was the supposed to be the main water seal, but after looking at it, we could see where the rubber was not compressed between the RV wall and the window frame. In this case, the sealant that they ran around the exterior became the main block to water. The method I used, The sealant becomes the main seal against water and air, Sealant is firmly sandwiched between the frame and the RV wall, not just a bead around the outer edge. There is no rubber foam, the sealant acts as the rubber foam. I choose to use a similar method as the original Dolphin, but use a LOT more sealant. I used an exterior, flexible acrylic adhesive / sealant. REMOVE THE WINDOW You need a helper for this. Open the window and have the helper on the outside, holding the window in the middle and gently pushing inward. Their job is mainly to make sure that window doesn't fall out on the ground and break. This will ruin your entire day if that happens, so make sure they know why they are standing there holding the window. From the inside, remove the screws that hold the inner frame to the window. The inner frame is what holds the window in place. As you remove the inner frame, it may stick to wall paper or paint and start peeling, use a razor knife and gently go around the frame to cut the paper or paint, pull the frame off, the window is now ready to come out. On the outside, you can go around the frame with the razor knife to cut the sealant, don't press hard, just enough to cut the sealant. Now start at the window bottom, and slowly pull the window out and away from the RV, Press on the side of the RV so , the sealant will tear and separate from the RV. Make sure your helper has a good grip on the window as you do this in case it decides to pop out. Be careful as the sliding window will want to slide, as you remove the window and frame from the opening. CLEAN WINDOW AND FRAME I used a flat razor blade to clean the sealant from the RV and the window frame. Remove the foam sealant from the window frame, take you time and get as much off as you can. Look carefully on the window frame outer edges that contact the RV, you'll see a ridge about 3/8 from the edge. Everything between this ridge and the outer edge must be clean. This is the surface that the new sealant will be adhering to. Use brake cleaner, or acetone, to clean the inside of the frame and a RV frame are. These need to be clean as you can get them. CAUTION The brake cleaner may remove the paint from the frame so be careful. SEALING THE WINDOW Look carefully at the opening on the RV and you'll see where the old sealant was. I used Blue painters tape and ran it about 1/4 past where the old sealant was. The tape will help keep getting sealant all over everything. Apply the Blue tape on the outside of the Window frame also, right up to the edge. Double check the RV opening and the window frame. You'll need two tubes of sealant, I used the exterior, acrylic, flexible adhesive / sealant. Before applying Sealant, read thru this and make sure everything is ready. Once you start running the sealant, you must complete the installation and cleanup before the sealant starts to harden. On the RV, Run a 3/8 to 1/2 inch wide bead of sealant on the opening edge. Make sure to apply thicker where the sides of the RV have the ridges, so the sealant will fill in the ridges. In the window frame. Remember the 3/8 inch area on the edge of the frame, run a 3/8 - 1/2 inch bead of sealant around the entire window frame. INSTALLING THE WINDOW Place the window in the opening, Center it using the blue tape as a guide. Have the helper place a small amount of pressure on the window to hold it in the opening. On the inside, Place the inner frame against the window and install screws, Don't tighten screws until they are all started as you may need to shift the window to get the inner frame to line up. Start at the bottom, install one or two screws, but not tight. You may need to slide the window up a little. Put one or two screws in the sides, again, you may need to slide the window sideways to get the inner frame to drop into the opening and line up with the screw holes on the window. Do not tighten any of the screws until the inner frame is completely installed, top bottom, and both side. Then tighten all the screws. Paper towels and a few Popsicle sticks. Go hold the Popsicle stick at about a 45 degree angle and go around the entire window, scrapping away excess sealant. You may need to wipe the sealant off the stick with a paper towel. Look carefully, and you'll notice the edge of the sealant goes up to but doesn't touch the blue tape While the sealant is still workable, look carefully and use the pop cycle stick to wipe away excess sealant. If you using acrylic sealant, dampen a paper towel, with water and you can wipe gently around the entire frame with the wet towel to clean up even more. Don't press hard. Wait until the sealant is tacky or cured before removing the blue tape. This should eliminate the water leak, AND, also that cold air leak we had under the window. The original window didn't have any sealant on the bottom.
-
Lights and outlets not working all down the passenger side
waiter replied to smagnus3's topic in Electrical
On some Dolphins there is a ground fault type outlet in the bathroom. The other outlets on the passenger side are wired in series with this outlet. If the ground-fault trips, it will kill the outlets that are wired into it, I believe the frig and the outlet above the frig. There is a small button on the outlet to reset the ground fault. check to see if it needs to be reset. John Mc 88 Dolphin 4 Auto -
Thank you Linda, Very eloquently said. John Mc 88 Dolphin 4 Auto
-
ssssshhhhh. For years I had my wife convinced that all news cars came with the odometers that read 100,000 JOhn Mc 88 Dolphin 4 Auto
-
I installed a 5,000 BTU unit above the frig. But I would not have done this if I had a roof unit. http://toyotamotorhome.org/forums/index.php?showtopic=4077 Read down thru the thread, I think on the second page are some Infrared photos that evaluate airflow thru the air conditioner. John Mc 88 Dolphin 4 Auto
-
Hard to tell, sounds a little loud (ticking), but I didn't see any roughness in the engine shaking or the sound. Not sure about white smoke, I don't think I could see any in the exhaust. Is the engine consuming coolant i.e. you fill the radiator, and it goes somewhere and you need to fill the radiator again. Jo0hn Mc 88 Dolphin 4 Auto
-
Lights and outlets not working all down the passenger side
waiter replied to smagnus3's topic in Electrical
Your lights and range hood operate off of 12 volts, the outlets are 110 volts and run off shore power or a genny, if you have one. John Mc 88 Dolphin 4 Auto -
Paul, make sure it works ok, and remove it carefully, I bet you can get a hundred for it if it works. It does weigh a lot, I doubt seriously it contributes significantly to drag. JOhn Mc 88 Dolphin 4 Auto
-
Don't make me stop this car..... JOhn Mc 88 Dolphin 4 auto
-
Mason; Look at the top right of this thread. There should be a button labeled "Start new Topic". I think you need to be in the sub-forum topics, i.e. General, Electrical, engine, etc. Paul; Air Conditioner. Why do you want to remove your existing A/C unit and replace it with something else? I believe the roof top units do a good job and put out some cold air when working properly, and they don't take up any weird or valuable space or require any strange plumbing or installation work. JOhn Mc 88 Dolphin 4 Auto
-
Yah, sides and top. The only thing I would add to that drawing, I bet there is a bow wave also. the area about a foot or two in front of the truck is dead space, no ai movement. thats probably one of the reasons the cooling clutch seems to cycle at highway speeds, air is not being forced thru the front, it is stagnant. I've been meaning to put some tufts on the hood and take some photos going down the road to see what the airflow looks like. John Mc 88 Dolphin 4 Auto
-
Seriously, they are nice to have, just so you know where your being watched more closly. I have an older unit, radar and laser in my car. I don't remember the brand. John Mc 88 Dolphin 4 Auto
-
Speeding ticket in a Toyhouse??? I'd put that in a frame. John Mc 88 Dolphin 4 Auto
-
Get a 6 ft long piece of plastic pipe that's 12-24 inches in diameter. Cut it longwise into four or five equal pieces, i.e. 6 ft long, and it would be 90deg (or 1/4) of the pipe diameter. Mount these on the back corners and top so the stick out in the airstream a couple inches. John Mc 88 Dolphin 4 Auto
-
I've often thought of doing similar, perhaps using two small fans, one would kick on at 190 and the other at 210, or something like that. Cost for the retrofit would be around $150 - $175 for the two fans and two thermostat controllers. Look on e-bay, for electric radiator fans. Here is one that might fit that has a cowl. I need to check the radiator size and mounting) http://www.ebay.com/itm/Dual-11-Electric-Radiator-Cooling-Fan-Extreme-Twin-Fans-HD-street-rod-/320924100851?pt=Motors_Car_Truck_Parts_Accessories&hash=item4ab89128f3&vxp=mtr JOhn Mc 88 Dolphin 4 Auto
-
Anything would help, Rounded corners help a lot. The idea is to fill that rear end with air and do it as cleanly and with the least amount of turbulence. There you learned in two sentences what too me 6 years to learn. There isn't a lot structurally to mount stuff to, so look at that before you go to far. How much would you gain?? If you were able to put large deflectors on the sides and top, I believe you could see a 10% increase in MPG at 60 mph. That rear end accounts for a lot of drag, and drag goes up by the square of speed ( twice as fast, 4 times the drag) John Mc 88 Dolphin 4 Auto
-
What year and model do you have. Not sure what you are asking? Your coach should run on battery or shore power. John Mc 88 Dolphin 4 Auto
-
Shouldn't be necessary if everything is working properly. i.e. if the fan clutch is working, and the radiator isn't plugged, the engine will stay within the operating range. The only time I seen mine go dangerously close to red line was when I was stopped in I-80 traffic for an hour outside Chicago with the outside air temperature running 95 Deg. If I revved the engine or turned off the Air Conditioner, it was OK. John Mc 88 Dolphin 4 Auto
-
These are standard ole self resetting circuit breakers. They are probably 30amp. They are standard on all RVs and in all electric circuits. Their purpose is to protect the wiring and distribution system. John Mc 88 Dolphin 4 Auto
-
make sure its level, if its not level, it won't work. JOhn Mc 88 Dolphin 4 Auto
-
Check, make sure vacuum hose are re-connected properly, and to the correct locations. clogged PCV valve, sticky idle air valve, etc John Mc 88 Dolphin 4 Auto
-
Mine has a forward/reverse switch, Its also wired to a thermostat on the wall so it can turn on/off with temperature. You might consider installing one of those "MaxxAire" covers. that way you can leave the vent open, even if its raining outside. John Mc 88 Dolphin 4 Auto
-
I need to find a new exterior access door for my frig.
waiter replied to gringo's topic in Coach ApplianceTech Issues
I bought one on e-bay for my Dolphin. Search on RV Exterior door hatch, or Dometic RV door, John Mc 88 Dolphin 4 Auto -
Not sure what your asking? If you can get a camera up there, take a couple photos. JOhn Mc 88 Dolphin 4 Auto
-
I winder if you could wire in an old ignition coil from a car to replace that coil? John Mc 88 Dolphin Auto