Bob the Builder
-
Posts
85 -
Joined
-
Last visited
Content Type
Events
Profiles
Forums
Gallery
Everything posted by Bob the Builder
-
Sorry, meant to have a couple more pics.

-
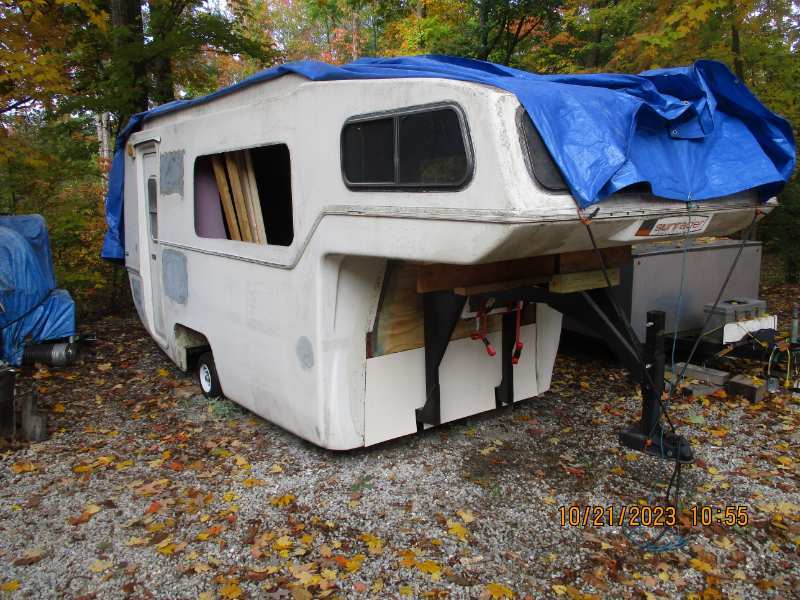
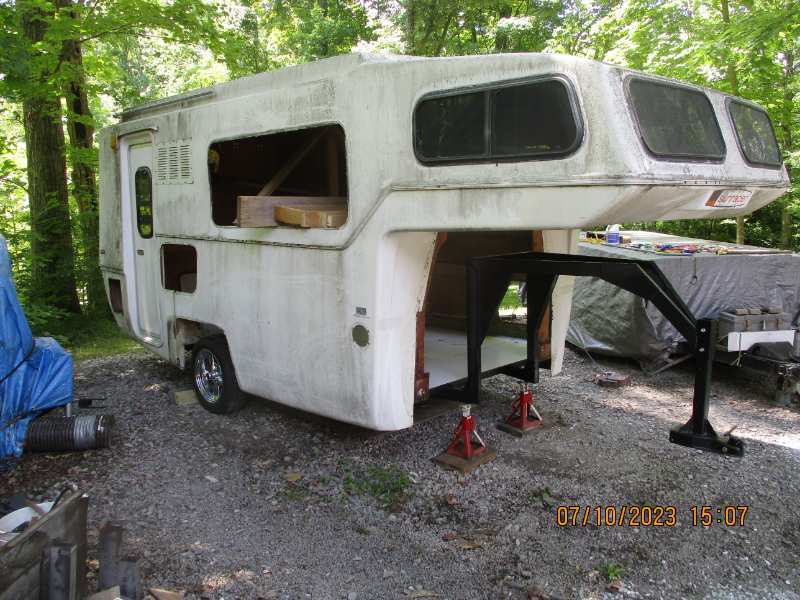
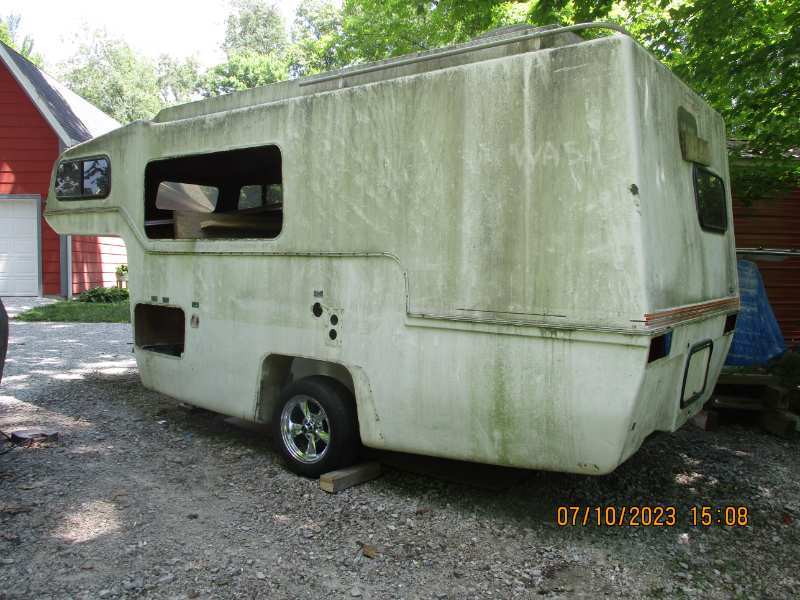
It has been a few months since my last post on the project. Have been working on getting the large holes not needed in the shell filled in and somewhat finished on the outside, closing in the front a bit, figuring the ac location and mount position, making a floor layout on the inside of where the crossbeams are located under the floor, where the black and grey water tanks will be located in reference to crossbeams, and where the shower pan/drain will be. I just put the shell back down onto it's "baby" wheels in preparation to move it into the garage for the winter. Hoping to continue working on it thru the winter instead of just putzing on small stuff. I'm just going to post a few pics of this stuff unless someone wants more explanation.
-
Looks to be something right in my price range,too!
-
I even pack a bit of grease inside the seal around the spring to stabilize it, so the shock of install doesn't jar it loose.
-
Thanks for the input WME, but from the profile I see on the top surface of my roof and given that I can barely force it up any from the inside, I don't think I have any sag. I'm going to go with just some reinforcement spanning the ceiling. The thought of putting more holes in it makes me cringe!
-
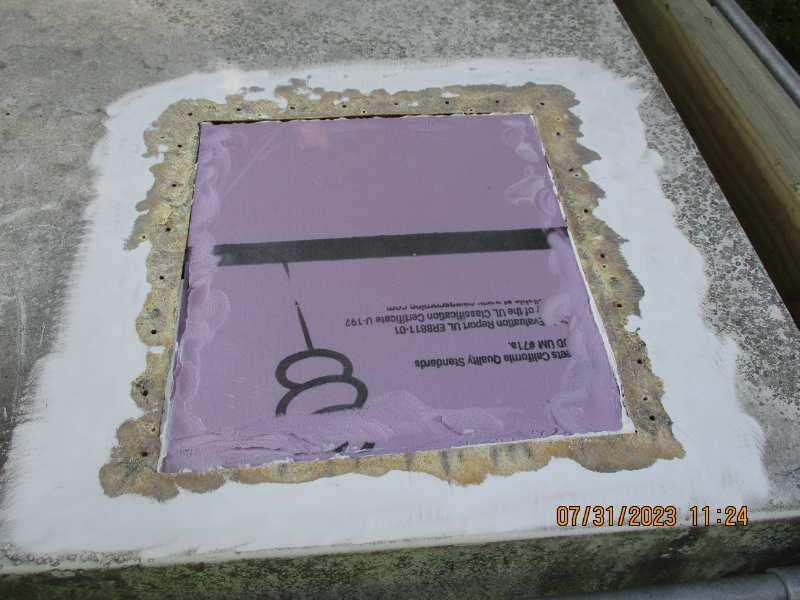
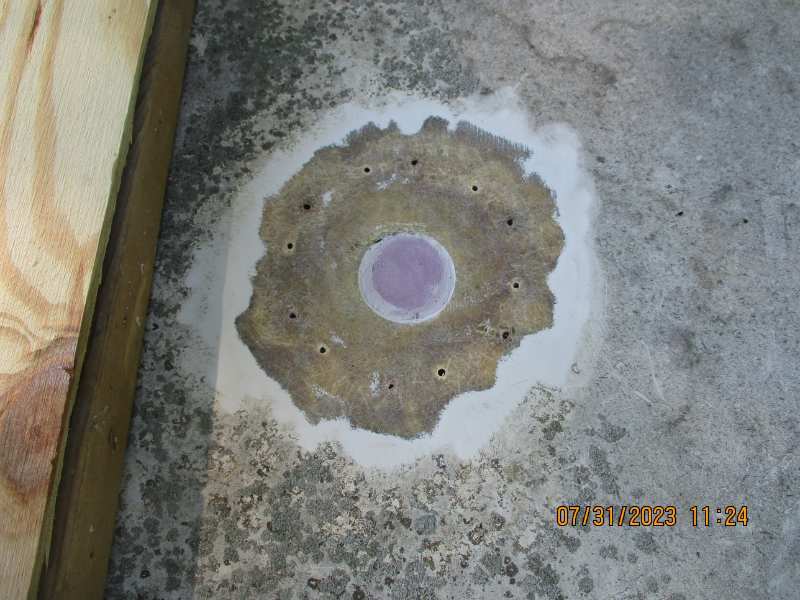
Just a quick post to anyone following the build. I have used and plan upon using quite a bit more of the pink styrofoam board in my build for various applications. I am also using both epoxy resin and polyester resin depending upon strength needed. A word of caution! YOU CANNOT USE POLYESTER RESIN WITH THE STYROFOAM BOARD: IT EATS IT ALIVE! The epoxy resin is perfectly fine with it. I had no idea until I started fiberglassing in my repair hole plugs. Luckily I started with the vent hole repair and it immediately started melting! I will be using the epoxy resin instead to finish these repairs, obviously.
-
WME, thanks for the input. Since I have now a little extra headroom, I was considering this approach: 2" strips of plywood on 24" centers, glued across the ceiling with the 3M marine glue/sealant and braced up from the floor. Then when solid, and leaving the braces, fiberglassing around the strips to give them the permanent arch and the additional strength of the fiberglass on the sides. Then in between, I can glue my 1/2" styrofoam and then have a strips to fasten my finishing ceiling panels. I can put small tubing for wiring across to the center for lighting where needed. I don't think that the width of the plywood strips matters as much as having the fiberglass on the sides. What do you think?
-
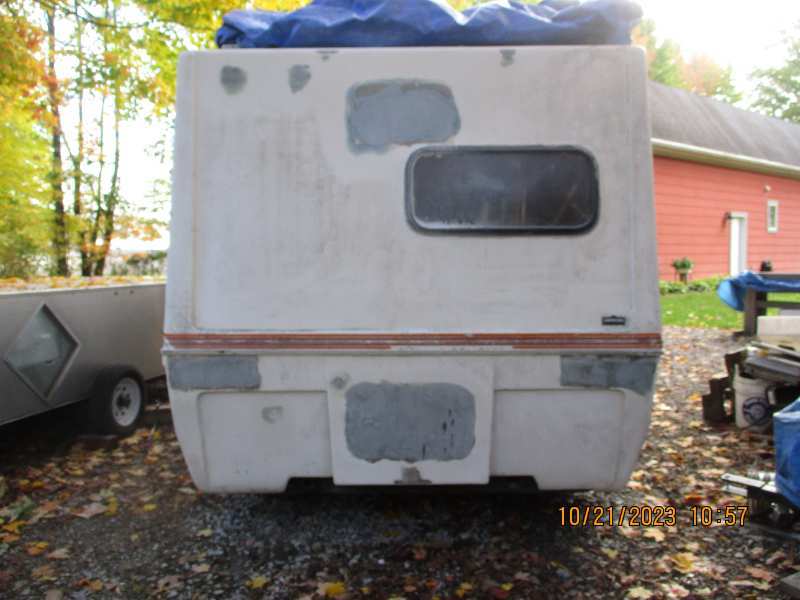
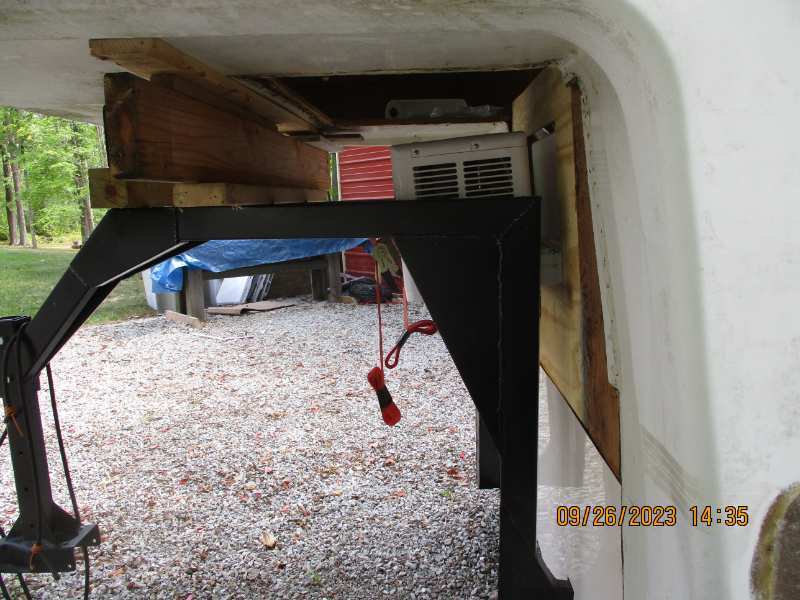
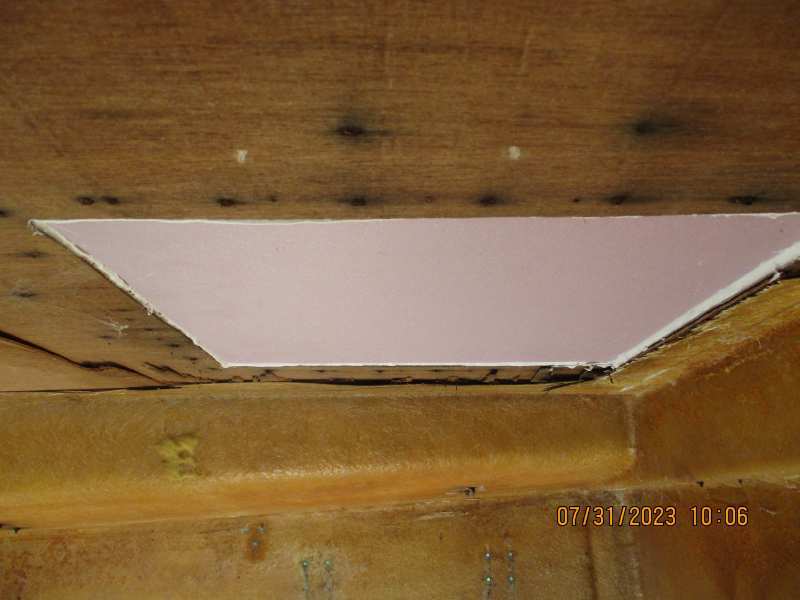
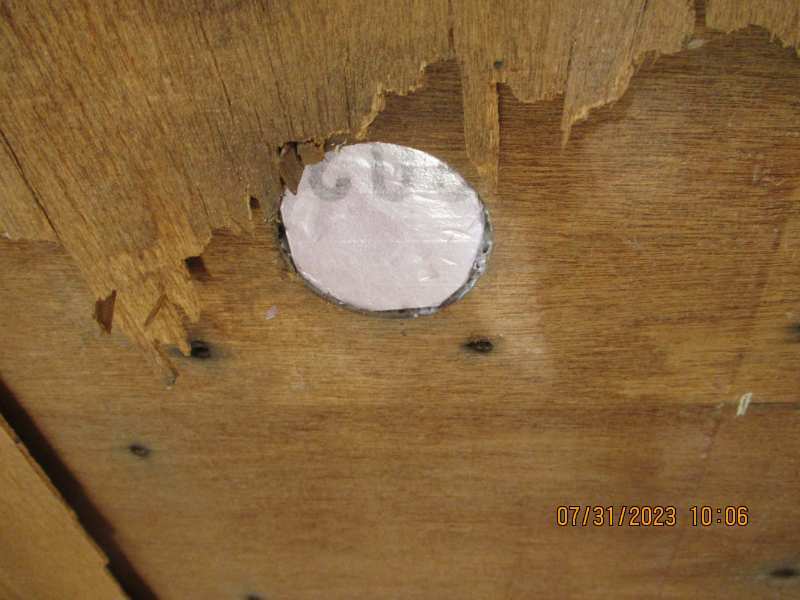
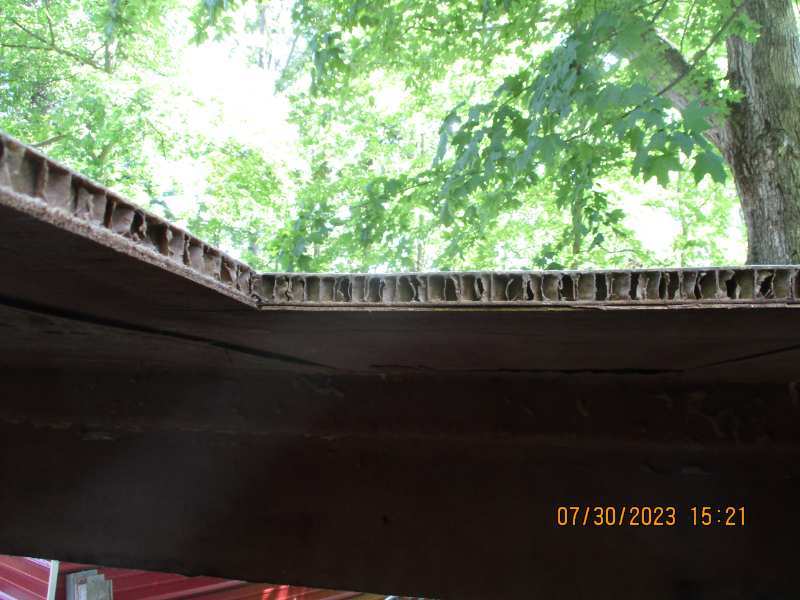
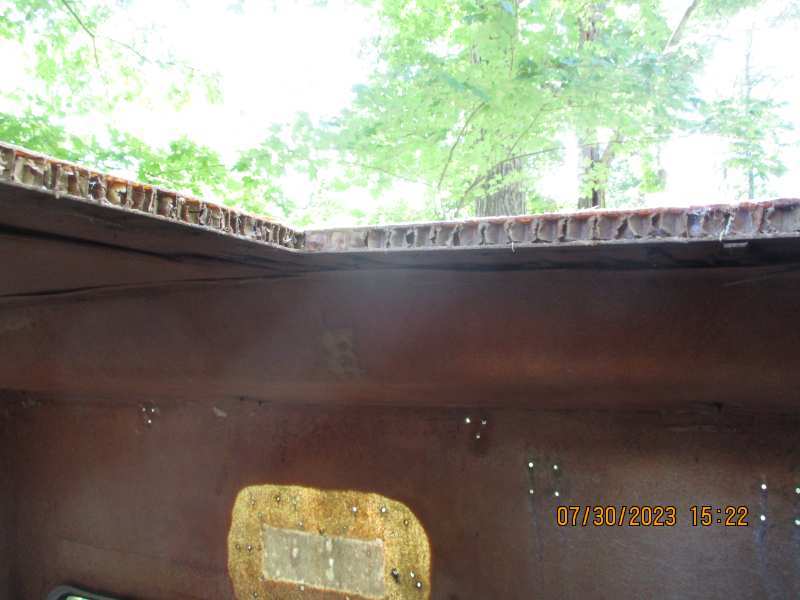
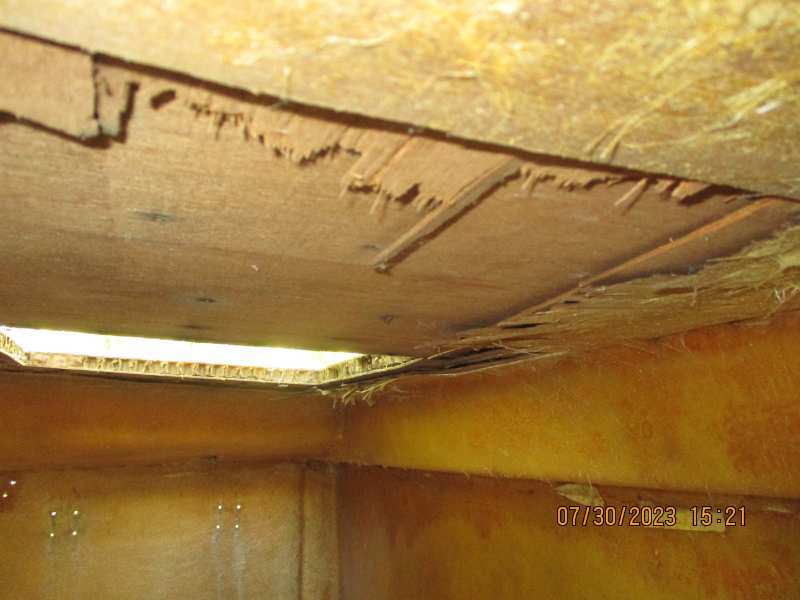
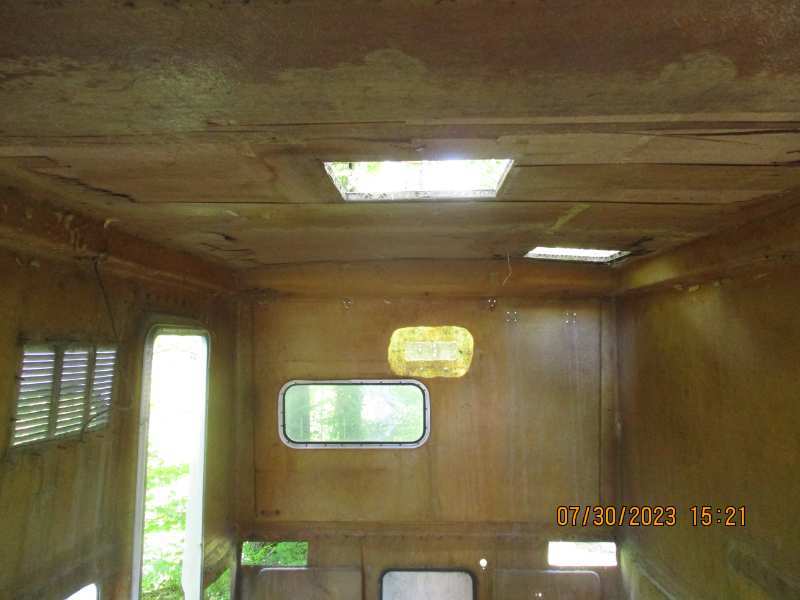
Starting on all the exterior fiberglass work for step 3. Removed the rear crank up vent from the roof and took off the temporary wood cover where the ac used to be mounted. This is my first close look at the condition of the roof, and I'm pleasantly surprised. There has obviously been a few leaks from time to time but I don't see anything extremely severe. The rear vent hole has some de-laminating of the luan from the waffle fill of the roof cross section toward the edge of the roof, and there is some de-laminating of the first layer of luan in the area of the ac opening. I have checked the rest of the roof for soft spots, staining, etc., and it feels rock solid. I cannot push any of the roof up anywhere. I put a 20 x 20 square of 5/8 plywood against the roof under the ac opening and with a pry bar between a 2x4 and the floor, I can't raise the middle of the roof more than 3/8 to 1/2 inch with quite a bit of force, (and this is a bare shell). So I think I'm good to go structure wise. I also removed the bathroom vent and will be filling that hole and relocating it to the lower step of the roof on that side. My plan is to not have any thing taller than the raised center section of roof line. I cut approximately 1 1/2 inches of the suspect side of the roof vent opening to good core and then fitted and glued 1/2" pink styrofoam board there, a round piece in the vent hole, and a 14 x 14 piece in the ac opening. the 1/2" thickness fits perfectly between the gelcoat and fiberglass on the top side and the luan on the bottom, leaving the thickness of each showing. I will be prepping & fiberglassing the exterior to at least match the top level of the gelcoat and also the interior of the openings. I am debating with "Bob", whether I need any roof "bows" or support of some kind since the roof is very tight. Insert opinions here please! I will try to remember to get some pics of the openings with the styro in them before I fiberglass tomorrow.
-
Thanks, nicklee, just step 2 out of many. Finally the epoxy and hardener arrived, and I was able to finish glassing around the rest of the wall. I still have to fill and finesse the cut out for the door frame on the bottom at the entrance but pretty satisfied with the rest. I weighted the floor in the raised spots and poured some epoxy across the seams and that did the trick. Smooth floor side to side and front to back. I've been wondering for quite a while just how much this combination would weigh at this point, so today we took it to our local quarry and weighed it. It towed straight as an arrow and the walls were very stable, I thought, for not having any support structure yet. Total weight is 1380 lbs so far. I am thrilled! I was hoping that at this point I would be around 1500 lbs or less. My next question naturally, was how much does the shell weigh. I knew the trailer weight before the flooring because I had weighed it, 550 lbs. So I figured the weight of the flooring material for 78 sq/ft of flooring (avg width of 78" x 144" length): composite aluminum 122 lbs, 3/8 plywood 70 lbs, 2 gals of epoxy 18 lbs and nuts and bolts at 5 lbs for a total floor weight of 215 lbs. So trailer frame with floor in at 765 lbs. That makes the weight of the shell bare in it's present state to be right at 615 lbs. Now, I know the side windows weren't in, so I just checked to see what they weigh so I guess we can add another 10 lbs or so for a completely stripped out shell for the weight of 625 lbs. I was thinking around 700 to 750. I intend to keep pretty accurate account of what weight I add from here on out, but I think I will be able to keep the total weight very manageable for either tow vehicle, the '36' Ford or the '38' Diamond T pickup. Now I need to decide what will be step 3 and get going.
-
Excellent, Linda! That's the type of info I was looking for. Thanks.
-
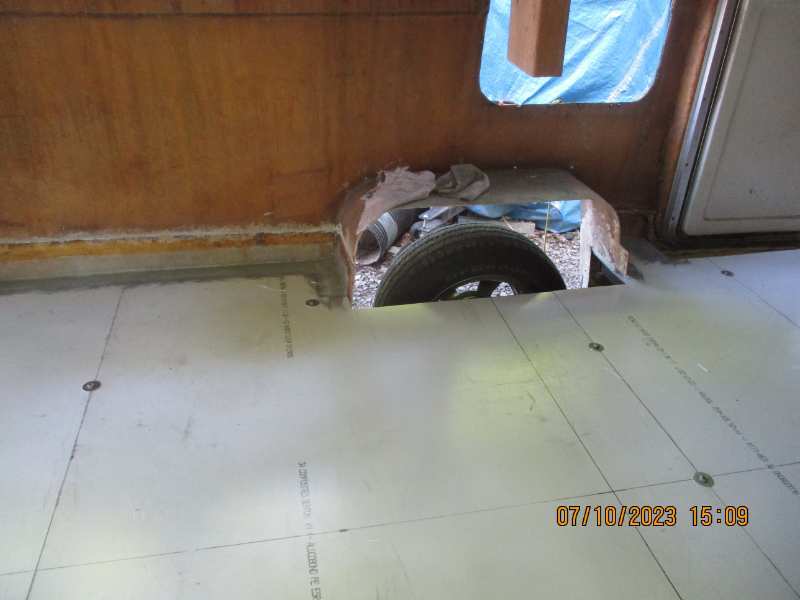
ID, plan is to put roll linoleum on the floor and curl up the wall a bit. I will have to pull center bolts back out and countersink a little, and I have two spots about 6" on a couple seams that stand up about 1/16" to 1/8" before I put it down smooth. I used my John Deere weights to hold the each panel of plywood down for install, but I only had five of them. I think when I pulled the bolts down the seam puckered a hair in those spots, otherwise the seams laid down real smooth. I can push on the seam and make it match perfectly at those spots, so when the resin and hardener gets here I'm going to make a weighted bridge across those places and run some epoxy down along the seam. I hadn't considered painting the whole floor before the linoleum. Now I'm wondering how does the floor glue work on paint and how long would the paint have to cure before I can put it down? It makes sense to have a double barrier to protect the top of the plywood, after all there is now a double barrier on the bottom.
-
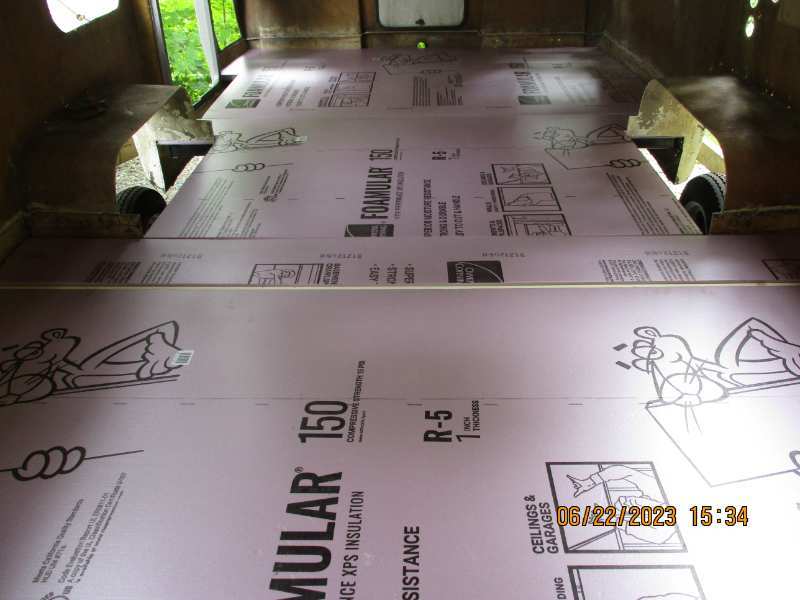
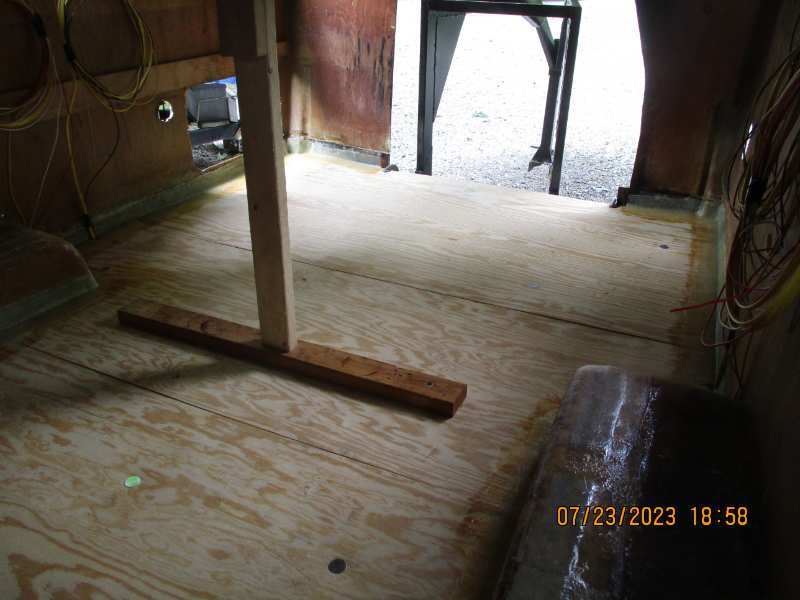
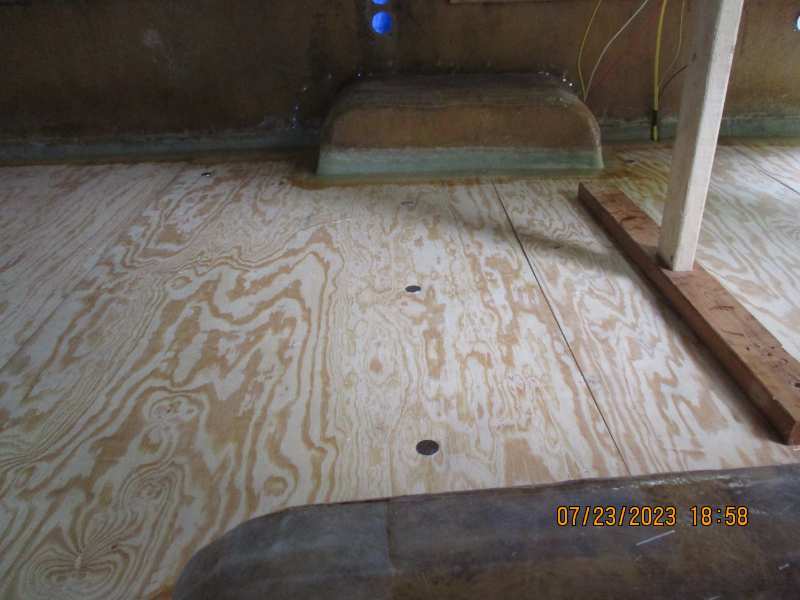
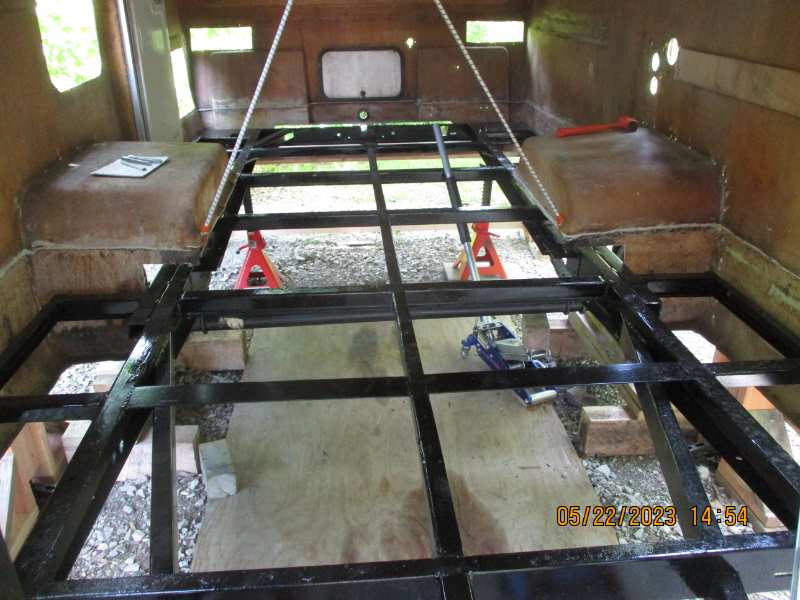
Been busy with fiberglassing for a while now but thought I would kinda catch up on the project a bit. 3rd layer of floor is down and just about all fiberglassed in, (waiting on more resin and hardener). I ended up using 16 bolts through the flooring to the frame. I believe I will be glad that I did run some electrical across the floor between the layers, 2ea 14-2 for 120 volt and 4ea for 12 volt circuits. Everything ended up being pretty tight and snug. I had narrowed the wheel wells and glassed them to the 1st layer of flooring so the styrofoam and 3rd layer are then cut out around the wheel wells and fiberglassed in. I will probably pull the wheels off when the floor is all finished and fiberglass on the outside of the wheel well surgery just to reinforce and clean up the looks underneath. After all of this fiberglassing, I hate to say it but the next item will be filling in the open holes in the shell that will not be needed. I plan on using polyester resin for those so that I have better choices as far as fairing them instead of the epoxy I used on the floor. It's hard to look at all that floor space and resist starting on something inside. Ended up with a full 74" to 75" of headroom so far.
-
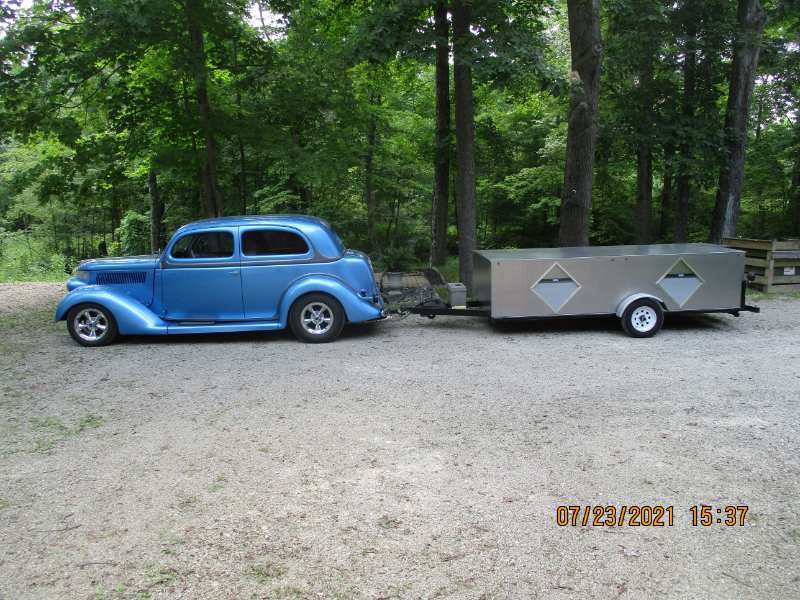
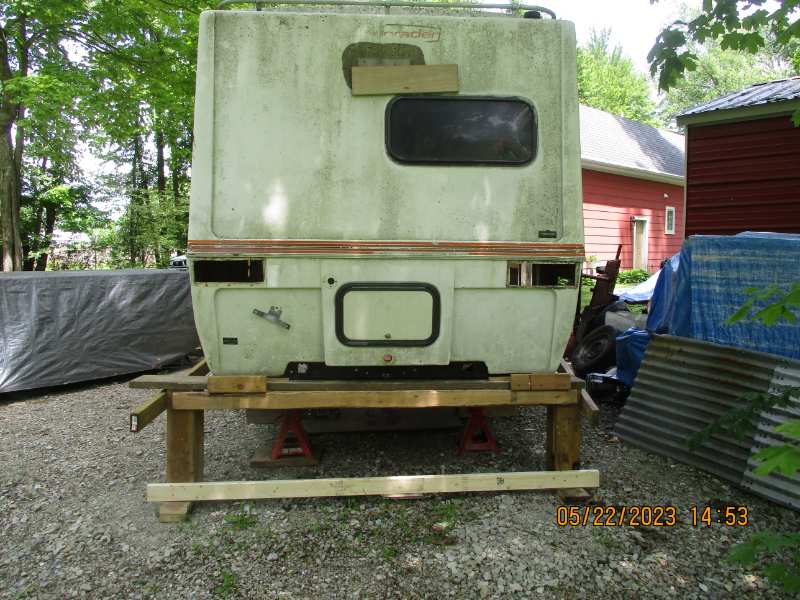
Thanks Linda. It's a long way to go yet but the information I find on here is very much appreciated and invaluable. A lot of very talented people willing to share. Yes, I will be pulling it behind the 1938 Diamond T pickup (To be finished after this project is done), but I built it so that I can also pull it behind my 1936 Ford, (picture attached). We hope to have it far enough along to take it out next summer some. The interior will not be close to done, but we hope it's usable enough to camp.
-
OK, it's been a while so I'll catch up a little. Been working on the project almost some of every day but it sure seems like it's taking forever to get somewhere. I centered and leveled the frame in the shell (for the twentieth time) and wedged everything so nothing could change position. I made patterns for and cut the first layer of flooring, (the aluminum sandwich panel). Then modified the patterns and cut the styrofoam. Then once more modified the patterns and cut the plywood. There are no seams matching on the floor, and the aluminum panel seams all are in the center of a crossmember running side to side. I glued down the aluminum panels to the frame using adhesive/sealant and took care to double bead the seam crossmembers and a bead between the panels as I seated each against the adjoining panel. As I had already marked and drilled holes in the frame previously, I placed a lot of stabilizing weight placed on the panels and drilled holes for my through bolts. I made sure that I had bolts going exactly in the middle of where the seams would be so that I could draw down the seams in unison. With the aluminum laminates glued down I put the syrofoam and plywood down into position and weighted them down in position. Then I drilled up through for matching holes in all layers of the flooring. Removed everything but the aluminum laminate layer, put bolts through to hold into position, and started glassing to the walls. I don't think there is much need for describing the fiberglassing much, it's pretty straight forward. Since this was basically the sealing level of fiberglass on my floor I layed it all up using a 2" brush and a 3" x 3/8" roller where possible. I think when I do the plywood glassing, I will use a roller pan and soak the mat & cloth before placing it against the wall. I was worried about getting all the air out so that I was sure I had a good seal against the rough wall so I dabbed a lot with the brush. The second level will be much easier I think.
-
Just wondering. Has anyone built lightweight cabinets for their camper by using styrofoam insulation board and fiberglass? I know about the guy on U-tube with the van, but I mean taking some time and making really decent looking ones. I built a prototype 4-piece 12" x 14" square (meaning no front or back)with 1 inch pink styrofoam board and 1 layer of very thin, I think 1.5oz) fiberglass cloth on the inside and outside just to test the possibilities. Rounding the outside corners helps the fiberglass lay down smooth and I used a roller so that the weave was smooth with no air bubbles. They end up with the weave showing as a pattern kinda like the rv wallboard paneling. My wife says she would just paint them, but I'm wondering about a coat of gelcoat on the outside, (more strength). I've only built one so far but it is amazingly strong and LIGHTWEIGHT! I can sit on it and that is without a front or back! I'm wondering how strong it would be fiberglassed or glued up on the wall like a shadow bow with a cutout front and a net to keep stuff in or possibly a short bottom rail and bin boxes. You could shape the back to match the wall profile and run them up or across the wall overhead. If anyone out there has tried this I would like to compare some notes.
-
I already am up to my neck in a project, buuuuut. Just posted on facebook 1986 Toyota Sunrader with blown engine for $2000. Lebanon, Oh. Pics show it pretty complete inside, duals, etc. Just saying!
-
Weighed just the trailer frame TG. 500lbs the way it sits before going under the shell. I know there is no way to start making comparisons, just curious what it will weigh with Sunrader shell added. Plan on weighing the bare combo before I start remodel. Went through pics and info you posted on your floor and have a couple questions and, yes, all seams from anything in the floor will be staggered. Did you put a layer of epoxy resin on your plywood before glassing them to the wall and did you put anything on the underside (again, of the plywood) before putting them down? Finishing up my patterns and getting to the critical part of prep before putting the floor in.. Going to use West products for the fiberglass stuff. Assuming you used both mat and woven cloth. Did you use any filler to make the radius right at the wall or were your floor pieces close enough without filler? How many layers of fiberglass did you put down at the joint? I will have the advantage of my subfloor already being glassed against the shell and waterproof already. My wall/floor joint will be really close, so I'm thinking that using a 3/8" roller will create a strong enough joint at the wall. As long as I follow correct procedures with the resin, etc., I'm thinking my (double joint will be super strong. I'm going to use 5/16" stainless countersunk elevator bolts going through from the top of the plywood to the frame below. I struggled with how many to put, and discussed it at length with "Bob". Again, probably over engineering, but "Bob" and I both think that we will not be the ones who will ever be taking this thing apart in the future sooooo, I've spotted about 12 to 16 positions for flooring bolts at key points to secure the duraplate seams and then to secure the plywood. All duraplate seams will be matched up on cross members and sealed so there should not be any possible water intrusion. I'm sure this will all take a good bit of time, especially at my speed, but again, I only want to do this once. If it finishes up looking anything close to yours, I will be a happy, shall we say camper! Thoughts and comments by any and all appreciated.
-
Yeah, TG. I finally figured it's like that old adage, "Nobody will notice it on a galloping goose, they will be busy watching the goose gallop!" Another what if? If I glue in a length of 3/4 PVC tubing across the top of the first layer of floor in the seam between my styrofoam insulation, will it weaken the floor structure? I'm thinking I could run my 110V through it for AC which will be overhead the refrigerator above the pass side wheel well. Possibly another at the next seam of styrofoam for ? I plan to stagger all the seams of each layer so that none will match out of the total floor construction anyway. Pros, cons? More minds make a better finished product!
-
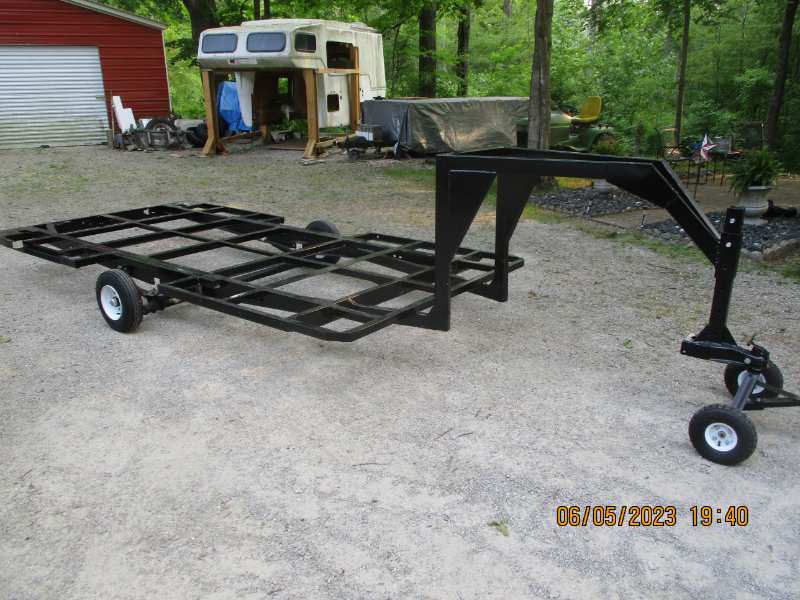
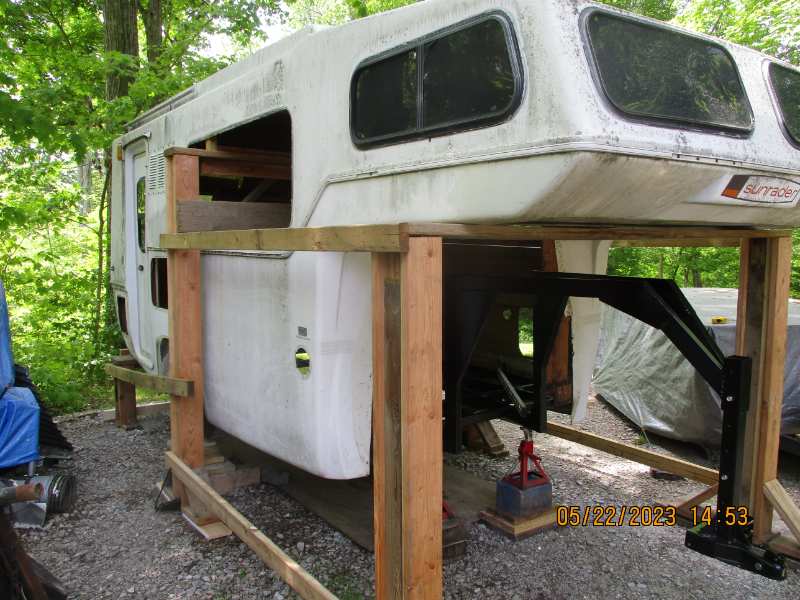
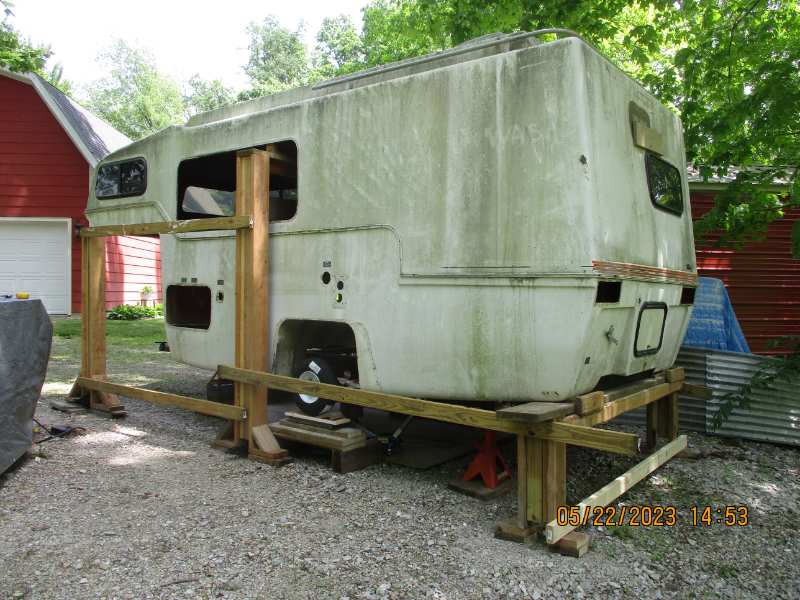
OK, it's been a couple weeks or so. Life, (wife's garden, painting the house, landscaping, etc) has slowed the build for a bit but back to it now. Gooseneck trailer and edge wings are done and it's time to get serious about mating these two together for the final time. I'm sure you guys already know this, but there is absolutely nothing about this Sunrader body that is even remotely level, equidistant, or symmetric from side to side, corner to corner or front to back! It's kinda like trying to center an egg around a perfectly formed rectangular platform without two matching places to measure from. Finally had to turn off a bit of OCD that I didn't know I had and rely on common sense generalizing. Leveled the trailer frame, (the easy part), at a starting height close to the approximate floor height on the shell that I'm after. Centered the rear of the trailer frame on the hole in the back (which by eyeball measuring with a tape on the outside is pretty much center of the shell at that level), then measured side to center on the front pass-thru opening at floor level. On my shell, the opening for the pass-thru appears to be centered in the overall width across the front of the shell, (again with eyeballing the tape measure). I had to adjust the height of the shell in the front a smidgen to get the window cutouts to read level across the bottom front to back. As ToyoGuy had suggested, I had already mocked up approximate ride level, orientation of the shell, and after many conversations with "Bob" decided that I had arrived at the profile I wanted to present. The trailer is level, the shell reads level across the back bottom transom fold in the middle, the front pass-thru reads level across the top of the overhead opening and the center of the gooseneck reads level and is centered in the pass-thru opening. This will give me 77" at the rear, tapering toward the front to 76" (before the floor thickness),and will position the final top of the floor surface approx 1/4" above the door transom. The walls at this point are free floating with no obstruction on the sides since they are suspended on the columns. When I position the interior wheel well caps level according to where the original floor was glassed, the width from centerline of the trailer to either side wall is within 1/4" both in front of and behind the wheel wells. So I'm saying I am satisfied this is as good as it's gonna get. Now for the oddball stuff. The axle is off on one side by 1/2" from being centered in the wheel well when comparing side to side. It is also off about 1/2" in and out when compared side to side. The equidistant line that I marked around the interior perimeter by measuring straight down from the original floor glass line is tapered down from the front of the wheel well to the front corner (both sides), by close to 1/2". I know that fiberglass things out of a mold are not entirely exact and nobody can look down both sides at the same time, so I'm going to go with where it's at. However, if any of you technical people spot something wrong with my process, please let me know! I'm ready to order my fiberglass supplies and start the point of no return. Thanks for putting up with the rambling again and I appreciate any input.
-
That would be a hoot! Can you imagine learning how to back up all over again with RHD. But look at all that room! It would probably mess with my mind too much trying to figure out alternative uses for all that medical equipment. Generator, navigation, all kinds of neat stuff. Shipping would really gouge into the build budget though. I don't think I would have a build that big left in me. ??? But oh the possibilities!
-
Now that looks very promising. Lots of options there. Thanks.
-
Not really worried about the aerodynamics. Was trying to keep the overall height low enough to be able to put this through my 8ft garage door when I have my final height set. Would be much easier to continue work on the interior this winter if I can get it inside and to maintain it after that. Not quite close enough to see where it will end up as far as height yet but getting there. Thanks
-
Just curious again. I'm trying to keep my roof profile as low as possible. My Sunrader shell has the typical 14x14 (about 4 inches tall), roof vent at the rear of the roof. I would rather not have anything that tall above the roof line back there so I will probably remove and seal the shell there. The over the cab front profile is considerably lower than the roof at the rear. I'm thinking of installing a streamlined vent/fan arrangement at the front to pull air in over the front bunk and put either one or two small exhaust fans in the rear wall to create circulation when not wanting to run the ac. Pros, cons, would it work or not worthwhile?
-
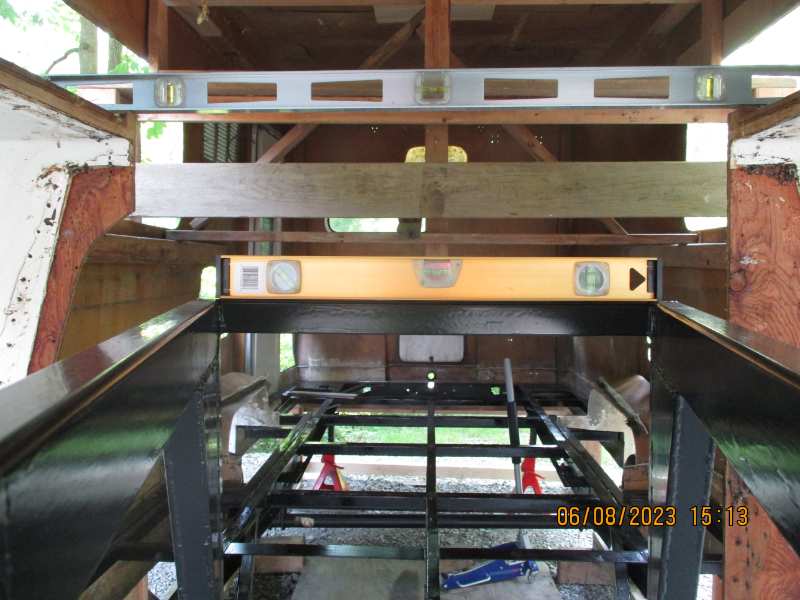
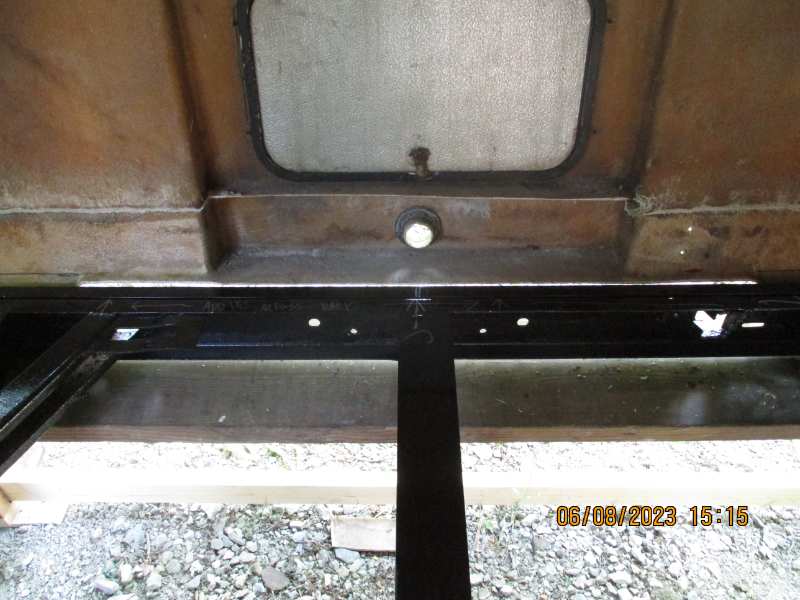
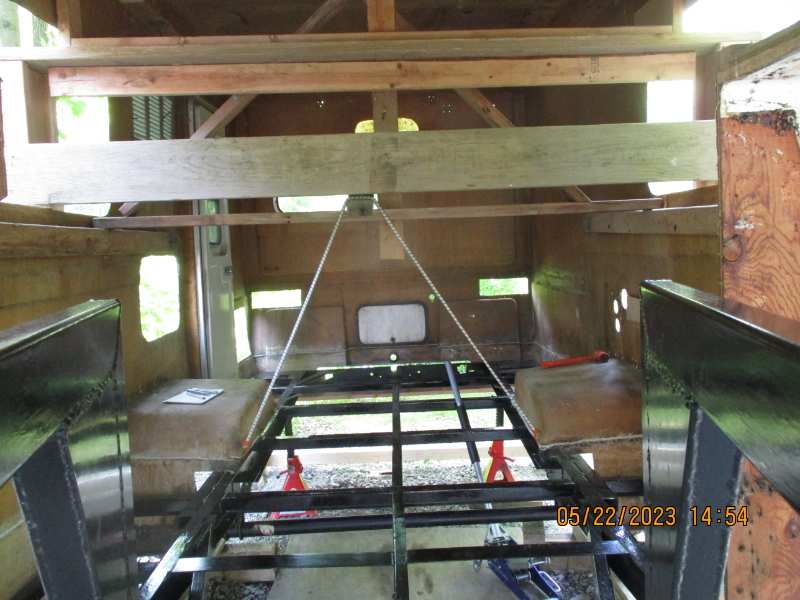
So I built two new short columns for the rear and took out all the bulky cribbing. It took an entire day to roll the trailer under the shell and lift it into place going a few inches at a time to clear the rolled bottom edges of the shell on the sides. The trailer has to go in toward the back of the shell at a nose heavy angle to clear the fiberglass flaps in the wheel wells. The little tires helped to roll it past and then I could start to level out the trailer and go further toward the rear. Block, lift, nudge, lift the back, lift the front, pull the shell wall out, scoot it to the right, then left, then repeat everything over and over. I finally have the trailer in position, centered inside the shell, level in every direction and blocked under the tires in a loaded stance. I then went around several times adjusting each of my supporting columns on the shell until it was equal distance to the top of the trailer frame 4 1/2" below the original floor line. (This should also put the floor surface right at the trim height of the door bottom). I took my sawsall and cut out the outer frame rail for the door notch that will be in the floor to get at the trim screws. So the trailer is solidly sitting there in the middle of the shell and I can rock the walls on the sides so nothing is binding. I will put a 1" angle flat side up across the rear, and that gives me a real close fit front to back. I went down each side and marked where I could put either a 1" or 2" strip of angle on each side. That should get my sides relatively close enough to give the floor good support. I will position and drill these strips but I cannot put them on until I have the trailer back under here for the last time. Now all I have to do is get this trailer back out from under here and into the garage again for the final mods. This makes me wonder why I traded in my little 120v Hobart welder for the 220v I have now. I could have carried that little one all the way out here and plugged it in to an extension cord. Oh well, better job in the garage anyway. I know, sorry for another rambling post. Just trying to keep somewhat up to date.
-
Passive Auxilliary Hot Water Heater Assist??
Bob the Builder replied to Bob the Builder's topic in General Discussion
Yep, looking to heat up approx 7 gallons or so. One quick shower's worth will do. Using the hot water heater for "tank" during the day. A 12 volt fountain pump is fairly low volume and will pump 3 meters of "rise". I'm thinking how ever many feet of pex will coil flat in maybe a 4ft x 4ft square flat frame on top, painted black, and under an acrylic top surface to keep the wind off. Should only stick up an inch at most on the top. Just an idea, lot to do before then. I will probably plumb in the inlet/outlet, cap off and revisit when the big build is done. Thanks