Bodybagger
-
Posts
123 -
Joined
-
Last visited
Content Type
Events
Profiles
Forums
Gallery
Everything posted by Bodybagger
-
 Read the spark plugs. The correct heat range for 1978 gas is probably one range too hot for 2009 gas. Possible vacuum leak. Check all hoses. Check and adjust the valve lash. Check the ignition timing. Make a note that optimum timing burning 1978 gasoline (ie Toyota's recommended timing) is more advanced than timing burning 2009 crapoline with 10% crapohol. You may need to retard the timing 2-5 degrees. Also, note that in 1978 there were two kinds of gas at the pump. Regular and unleaded. 1978 unleaded blows the doors off today's premium unleaded. The quality of gasoline available at the pump has gone way down in 30 years and this is no doubt a significant contributor to your problem. You should address this backfiring immediately because it will damage your engine, especially your carburetor.
 -
Just bought 88 sunrader classic. Newbie questions
Bodybagger replied to jerseyshorejay's topic in General Discussion
See http://toyotamotorhome.org/forums/index.php?showtopic=1995 Since you are taking this to a mechanic, I recommend attention to the following areas: Tire pressure and overall condition. Transmission extension housing bushing for zero play (VERY IMPORTANT) Fluids, make sure the transmission fluid is checked WARM, LEVEL, in PARK after cycling through the gears. Belts (wear and proper tension) Hoses Pressure test the radiator Load test the alternator Check battery electrolyte specific gravity with a battery hydrometer (voltage alone doesn't tell you anything until the battery is DEAD) Load test batteries Distributor, plug wires, plugs, and general ignition condition. Fuses Headlights (function and proper aim) Windshield wipers (17 inch) Brakes Wheel bearings U joints Not necessary but you MAY want to charge your AC if it doesn't work and make sure the radio works. For you after your mechanic checks these things and clears it: Get a cheap torque wrench and lugnut socket. You'll be re-torquing the lugnuts every 50 miles for a few times. They WILL work loose! Get a dual wheel tire gauge and inflator adaptor. Only truckstops will have the dual wheel inflator nozzles. Avoid rush hour. Take your time and drive slow. 50 is probably a good speed. The idiots that honk at you for going slow will not help you if you overheat or burn out your tranny trying to do 80MPH. The faster you drive, the more you are asking of your engine and transmission. Don't try to do it in one day. Don't run the battery down on your first night. Make a habit of stopping once per hour for the first few hours of your journey to check fluids, lugnuts, and tire pressures. If anything is going to happen, such as an oil leak, best to catch it early. There's more, like water, fridge and hygiene stuff. But hey, being stinky is NOT going to leave you stranded beside the road! -
Just like the bumper sticker says, leaks happen. You need to inspect each one on a case by case basis. The manner of storage has the greatest impact on current weathertightness. These things are in the ballpark of 20 years old. Expect any model to have developed leaks by now. The question is, did concienscious owners stay on top of it and repair them...
-
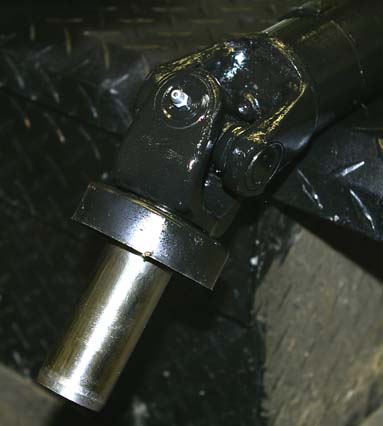
I took no chances and installed premium U joints from Napa. They have the grease fitting threaded into the race instead of into the spider. This makes it MUCH easier to grease. I think they were 24 dollars a set.

-
I can't tell you if it's "good" or not (I mean it may have bad wheel bearings or other issues). But that is a 1 ton full floating axle.
-
It's the 4cyl 22RE with A43D tranny.I also replaced the small stock tranny cooler with a much larger Hayden. Not sure what the model is but it's about 60% of the area of the AC condenser. Much better flow rate through the cooler as well. Idle fluid temp went down from 165F to 135F and I expect higher transmission temperatures to result in better cooling due to higher dT between fluid and ambient combined with higher air flow at speed. I'll let you know how it does when I take it out in the mountains during hot weather. If you're going to braze it instead of welding, you can use iron or steel, but brass melts around the same temperature as the bronze oxyacetylene brazing alloy. You'd have to use either 45 or 56% silver brazing alloy such as Radnor Stay-Silv, and the mechanical strength will not be as high as a bronze rod.A welding shop should be able to TIG weld the fitting for 20 bucks, but silver brazing may cost more since a single short stick of Stay-Silv costs 10-15 dollars (at HVAC wholsalers).
-
A bridge rectifier is 4 diodes arranged into one unit that takes AC voltage on 2 legs and outputs DC voltage on the other 2 legs. Diodes have a peak inverse voltage that they can withstand before breaking down. Shutting down the generator under load causes voltage spikes that can exceed the limitations of the originals. Without the bridge rectifier, your genset cannot maintain the feedback loop of converting the generator's AC into DC to feed into the rotor to regulate the voltage. Some models of control boards will shut down the generator if it is not making 120 volts. Some models of Onans have a bridge rectifier that is part of the voltage regulator circuit. Some have this bridge rectifier buried in an epoxied modular voltage regulator. Some will run without the VR and some will not run at all without the VR. Depends on the model. On some where you can get to the bridge rectifier, you can replace it with a 5 dollar one from radioshack. On the ones with the modular voltage regulator, you'll have to order an aftermarket one from Flight Systems for $200 or from a Cummins/Onan dealer for $389. Of course all this depends on what model of Onan you have. Troubleshooting these in person can be a pain. If it's not something obvious, you'll be troubleshooting electronics.
-
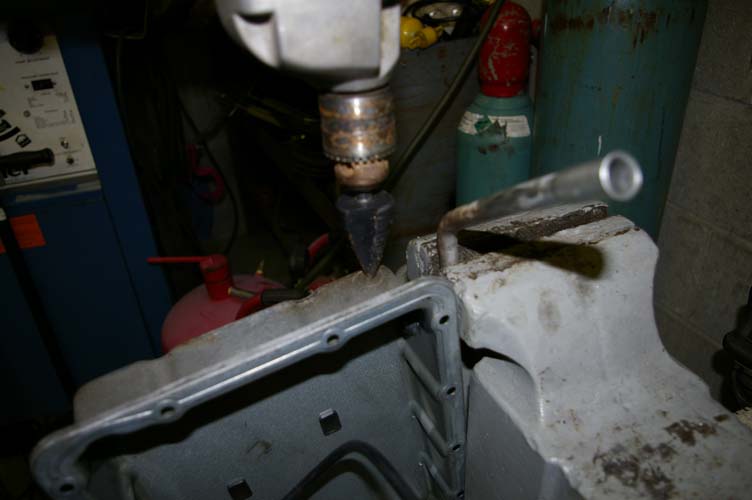
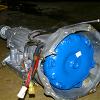
The return line from the cooler is a terrible place for it. It's like cooking a turkey with the thermometer outside the oven. By the time an excessive temperature registers outside the oven, your turkey has already been burnt for an hour. The line TO the radiator will register the actual temperature of the transmission fluid. The pan is a very good place for it as well. Here's how I did mine: Here's the sensor, the pan, and the fitting I used. I used a 3/8" FPT air hose fitting because it was steel and had the right threads. After careful consideration, I decided to locate the sensor on the front face, passenger side, of the oil pan, due to adequate clearance and the protection provided by a frame crossmember in front of it. I drilled it out with a step drill. A step drill is the best way to drill a round hole in sheet metal. This is the hole as drilled. This shows the fitup between the fitting and the hole. The edge of the hole just touches the edge of the fitting, which allows for complete penetration of the weld. I cut the air hose detail off of the fitting. I could have just used a pipe fitting, but I wanted steel, not iron, so I selected the air hose fitting. Here is the fitting after TIG welding. I ran a 3/8 NPT pipe tap down the thread to clean up any distortion and weld bead encroachment into the threads. And here's what it looks like with the sensor installed. I removed it before installing the pan onto the transmission because this was done during a rebuild and I didn't want a jack to break the sensor in half. However, there are no worries about the fitting itself. Steel on steel TIG welded with ER70S-2 and with full penetration. It will never leak and will never break. Make certain all the galvanizing has been removed before welding. Brazing will work well, too.
-
The charge probably leaked out from non-usage. If you dont use it a few minutes per month, the seals dry out and let the charge leak. A simple check with gauges and bypassing the low pressure cutoff will verify that. Then again, you could have thrown the AC belt. Take it to a shop that will recharge it with R-12. There's no reason to convert it to R-134a unless the compressor is already burt out. If you convert, you will need to recover the R-12 that's already in there, new seals, accumulator, and flushing all the mineral oil from the system. You will have a reduction in cooling capacity and have a risk that it will end in compressor failure. If you stick will R-12, you probably just need to have a pound or so charged in. Though R-12 hasn't been manufactured for a while, it's still available and the going rate is about $20 per pound. Note that R-12 systems are much less sensitive to the problems that plague R-134a systems, which have a very hygroscopic lubricant. Do not be talked into spending $400+ to convert to R-134a when all you need is an $80 recharge. If they won't do R-12, find a place that will. DO NOT, I repeat, DO NOT let them put FR-12 in it (R-416a) as you will have the triple whammy of not being able to recharge it yourself, having an oddball refrigerant, and losing cooling capacity as well. They probably won't even recover the R-12 before contaminating it with FR-12. Read this... http://www.machinerylubrication.com/articl...p?articleid=310
-
I recommend using a product called Peel and Seal. It is a multipurpose roofing material that consists of a bituminus membrane with a thin aluminum metal surface. It comes in rolls and one roll will be just enough to do your roof. It's generally used as an underlayment on very low sloped roofs and as a repair material. The aluminum sheet protects the bituminous membrane from the sun and air so it doesn't crack and "alligator" like mopped on asphaltic sealants. I recommend you apply it on a very hot day with the RV parked in the sun and roll it in with a formica roller on flats and use rags to form it over bumps. Use a heat gun for additional heat if necessary. Remove the AC unit if one is installed, then propery reinstall and seal it. If you get it hot and press it on, it will never come off even at hurricane speeds. We apply it with a weed burning torch... The aluminum reflects a lot of heat as well. It comes in plain aluminum and white. About $100 per 3'x33' roll, and generally only availible at wholesale roofing supply companies (as in NOT Lowe's or Home Depot). http://www.cofair.com/peel_seal.aspx PL Polyurethane caulk. There is a white one for siding and windows and a black one for roofs, but I've used the white one on white roofs and and the black one on black trim. It's about 6 dollars per tube at Home Depot/Lowes. Very hard to clean up messes. Wear throwaway clothes and have a paint thinner soaked rag ready for cleanup. http://www.stickwithpl.com/products/detail...?PLProductID=21 http://www.stickwithpl.com/products/detail...?PLProductID=22
-
Just bought a Dolphin 83 and my searches thus far have failed
Bodybagger replied to evereste's topic in General Discussion
See attached. toyota_ebrake.pdf -
Check to see if your 120 volt circuit breaker box has the neutral and ground bonded together. This is typically done by either connecting the grounds and neutrals to the same buss bar or by inserting a green grounding screw through the neutral buss bar into the breaker box. Isolate the neutral from the ground! Not sure about the output of your inverter, but on the ones I have seen, the neutral terminal and the battery negative terminal are NEVER at the same potential. There is generally a high AC voltage difference, which could explain the 110 volt taillights.
-
Nope. Just because the engine runs doesn't mean the alternator is putting out 120 volts. To get 120VAC/60Hz, you need the following series of events to happen: *You need the controller to send 12 VDC to the BRUSHES of the alternator rotor during cranking. If this doesn't happen, no rotating magnetic field. *You need the brushes to make good contact with the rotor's slip rings. *The rotor windings must complete the circuit and allow current to flow through, otherwise, no magnetic field. *The stator windings must pick up the rotating magnetic field and induce an alternating current voltage in their windings. *The RPM's must increase to 3600 or 1800 depending on whether you have a 2 pole or 4 pole alternator. If you have a microlite, it is 3600. A Marquis is 1800. *The electronic voltage regulator must sense the voltage output of the stator and and adjust the DC voltage being sent to the rotor accordingly to provide 120 volts. If the regulator senses a frequency of less than about 55 Hz (3,300 RPM) or more than about 66 Hz (3,960 RPM), it will shut off the DC voltage to the rotor, and the alternator will put out about 1 volt AC from residual magnetism in the shaft. Now it is impossible to say what's going on without knowing which generator you have (model number) but the 6 possible culprits are: *Erraticaly running/surging engine (verify 3600 with a tachometer. The RPM's are CRITICAL) *dirty slip rings/brushes *bad voltage regulator *bad control board *connection problems (ie tripped, faulty, or incorrectly switched circuit breakers and load switches) *shorted or open windings in the alternator's rotor or stator. Long story short is that if you have an electronically regulated alternator, and your trouble is something other than somehow not being connected to the genset, you might as well leave it to the Onan shop. Now here's how you can find out if your problem is simply not being connected to the genset's 120v ouput... Remove the control panel and find the busses labeled L0 L1 L2... or find the back side of the circuit breaker. L2 should be empty. Measure between L0 and L1 with the genset running and see if you get 120VAC. Remember that there is enough voltage there to kill you. Please tell us the full model number of your generator and maybe we can help more. See http://www.gmcws.org/Tech/dsimmons/onan/onan.html
-
batteries engine and camper size
Bodybagger replied to hs86toy's topic in Coach ApplianceTech Issues
Let me guess. You asked the folks something like "What size battery do I need for a 1986 Toyota Escaper Motorhome?"And they probably tried to look it up and found out quickly that there is no listing for any Toyota motorhomes. To get the right engine battery (or any part for tha matter), you need to have them look up a 1986 Toyota RN Pickup. As far as the coach battery, it depends on your electrical usage. One group 27 deep cycle battery is a bare minimum. Should have two connected in parallel. Also note: do not be fooled by "marine starting" or "deep cycle/starting." If it says "starting" anywhere, this is not a true deep cycle battery! It is a hybrid battery which is a comprimise between the two. It's a battery that you do not want. You want a real-deal deep cycle battery. -
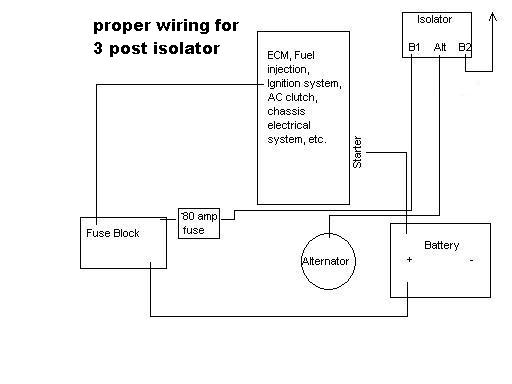
Everything in the attached picture runs on that fuse. If your isolator blows, depending on how it's wired, you will lose charge from your alternator. Coupled with an already weak battery, these systems may pull more current to operate at a lower voltage and blow your fuse. First, make sure your engine battery is completely charged. This is indicated by an electrolyte specific gravity of 1.25-1.27 and a battery voltage of about 12.6 -12.7 volts. Start the engine and see if the voltage at the battery climbs to 14 volts ( give or take one volt). If so, the charging system is working and you likely have a short. If not, find out why the charging system is not working. Possible cause includes blown isolator.
-
I couldn't help but notice the hubcaps... what's under them?
-
One option is to look for GM 6 lug wheels. They are a 6 on 5.5" pattern just like the Toy. Just be sure the hub will fit through the center hole and the width is acceptable. There are lot of places purveying alloy dualies for Chevy trucks.
-
The DC ones use the Hall Effect. The one I've got is http://www.sears.com/shc/s/p_10153_12605_0...%26+Accessories and the only problem I have with it is that it's not a true RMS meter. In fact, today I was soldering some stuff in in a gate controller on site and I was using my inverter to power the soldering iron and I measured the voltage at the inverter... this meter read low at 104VAC while my true rms meter read 114VAC. Oh well, for 50 bucks on sale, I suppose I will sacrifice accurate measurement of AC votlages with harmonics. Maybe one day I'll get a true rms AC/DC and sell my half dozen other meters.
-
The only real gain from alloy wheels is looks. Rotational mass only affects fuel economy insofar as extra energy is required to accelerate it. With a cruising machine such as this, you don't spend a lot of time accelerating. Also the weight savings (when compared to the total weight of the vehicle) is so extraordinarily small that it's truly negligible. You'd be better off from an improved economy and performance standpoint by removing your radio antenna to reduce aerodynamic drag.
-
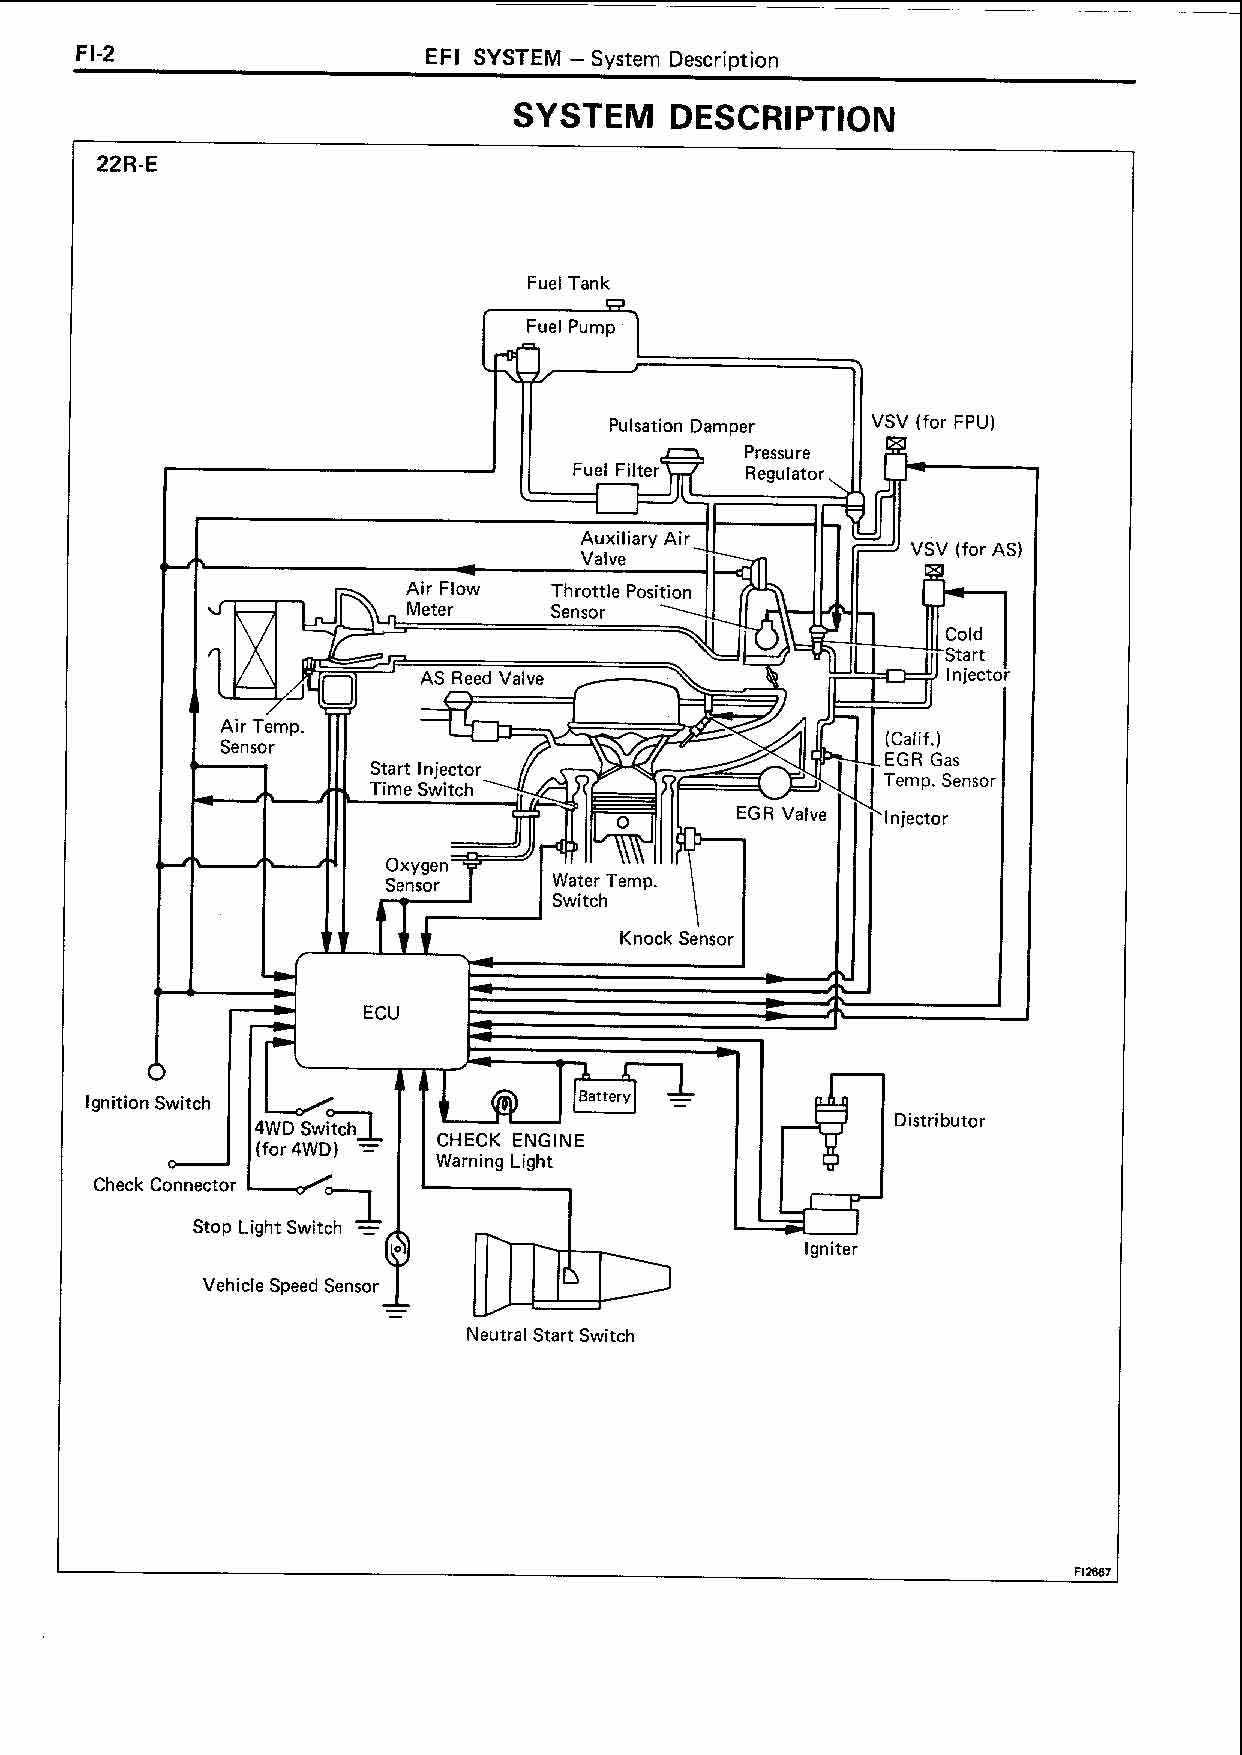
I had a bad experiece bringing the TMH home on the maiden voyage. I left town at dusk and bam! The battery would not charge. I planned on stopping and using jumper cables to periodically recharge the Toy's battery by jumping off the escort vehicle's charging system. This didn't work very well and we limped to a motel. Fast forward to today. I was recharging the AC system with good old R-12 and tested the amperage draw of the AC compressor clutch as a routine check (too high and it will likely burn up soon). While I had my AC/DC clamp on meter out, I decided to check total current drain of the electrical system under various conditions (lights on, lights off, etc) to see what I was up against that fateful night. Engine running ONLY=8 amps (This is the combined load of fuel injection, fuel pump, ignition system, and engine control computer. Absolutely nothing else was on. This is the bare minimum to keep the motor going.) Engine running + headlights and taillights=22 amps Engine running + headlights, taillights, and running lights=30 amps Engine running + headlights, taillights, running lights + AC on with fan on high=41 amps This DOES NOT include charging current to either of the batteries. So it seems that if you have a 60 amp alternator, and it's hot and dark out, you have only 19 amps available to charge both batteries and run the radio, electric fridge, reading lamps, etc. This may be enough, but it's cutting it close. Particularly if you are recharging large batteries. So I suppose I am going to eat my words and say that if you want a heavy duty alternator with greater capacity, that probably is justified. Also, a good case could be made for LED running lights, brake lights, and taillights. Also, if you have to beat it with a bad alternator, keep in mind you are going to get a LOT further before your engine dies using 8 amps than using 30.
-
Just curious. Why are you changing the pulley? Does one have a serpentine pulley while the other has a V-groove pulley? Or are they both V-groove with different diameters? I would not change the pulley diameter. And my personal 2 cents is that there is something anomylous about how they are testing those alternators. If 3 of 4 alternators were bad right off the shelf, they'd have jumper cables in the impulse buying section at the walmart checkout. You don't have to be an ASE certified mechanic to work at a discount auto parts store. My first question is, did the alternators test WITH or WITHOUT the pulley changed? Also, what is the part number of the 60 amp alternator? And lastly, do those 2 schematics help you somewhat?
-
First, was the AC running when you shut off the generator under load? If so, you may have a bridge rectifier failure. Otherwise... Your oil pressure switch is probably indicating a low oil pressure condition and it automatically will shut off. When starting it, hold the start switch in until well after it starts, say 5-10 seconds. If it runs until you let go of the switch and immediately cuts off, this confirms the diagnosis. One of the problems I have run into is that Mobil 1 will foam in these units and cause the oil pump to lose its prime. This switch prevents catastrophic engine failure in that even. Once it has foamed really good, it takes forever to re-prime. If it will start and run until you release the switch, try this simple fix. Change your oil and filter and use a conventional SAE 30 oil. That will boost your oil pressure and can overcome a weak oil pressure switch. If the problem persists, you'll need to remove the oil pressure switch and test its operation (it should trasition from closed circuit to open circuit around 3-8 psi). See http://users.california.com/~eagle/generator.html#switch Now if you genuinely have low oil pressure, you need mechanical service on your generator or you will burn up the engine.
-
It's hard to tell if it works until it's connected... See below. No!The wire between the battery + post and the fusebox connects your vehicle battery to the positive buss of your fusepanel. This is where your ignition system and ECM etc gets its voltage from. It's true that the battery is charged through this wire, but the positive buss receives its charging voltage from the alternator. If you disconnect this wire and attempt to start the vehicle, it will try to pull the starting current from the coach battery, and the voltage drop will be enormous (hench the clicking and not actually starting). The alternators charging post (in a stock truck) is connected to an 80 amp fuse or breaker in the fusepanel. It is labeled ALT, or CHARGE, or something obvious. See the attached diagrams at the bottom of post. Right. That's expected given your current hookup. If it actually charged at 80 or more amps, it would blow the charging fuse. Realistically, can your wiring even handle 80 amps going into the coach for a sustained period of time? You'd need 4 gauge wire for that and I bet you don't have nearly that heavy wire. Besides, they say it has a blown diode. Go stock.
-
Jack up one rear tire and place it securely on jackstands. Put the transmission in neutral. Rotate the driveshaft clockwise just enough to take the slack out of the gears. Mark the wheel at a spot plainly visible from underneath the vehicle. With the slack still taken up with clockwise pressure, mark the companion flange where the driveshaft bolts to the rear end... mark it at 12 o' clock Then turn it clockwise until the free spinning wheel makes exactly 4 revolutions. Note where the mark is. If its between 9 and 10 o' clock, you have 3.9 gears If it's between 2 and 3 o' clock, you have 4.1 gears If it's just past 7 o' clock, you have 4.3 gears You could also try to look for the axle tag... See: http://www.off-road.com/trucks4x4/article/...l.jsp?id=274535