KonCon
-
Posts
144 -
Joined
-
Last visited
Content Type
Events
Profiles
Forums
Gallery
Everything posted by KonCon
-
Dang, already has been a lot of work. The only good thing is it is only on one side. Should I try the zep remover?
-
Thanks everyone. Got it to work. Only problem now is that the screws that hold the headlight on the driver side in place are completely rusty and the Philipps part is broken. Tried to get them out with one of these grabit speed out bits but I was not successful. Any idea how to get these out so I can put the window new headlight in?
-
Just their in house brand.

-
Thanks for the explanation. Please disregard what I said about self explanatory. Might help to look at wiring colors. I won't say more but I'll try again and let you know 😂 🤦♂️
-
I think this is the one you recommended. https://www.ebay.com/itm/373542811783?hash=item56f8e2f887:g:7PQAAOSwHstgeUhi
-
So I bought the relay on ebay that was recommended and installed everything yesterday. Unfortunately the lights to not work when plugged in through the relay. When I plug in the original cable, everything works but not with the relay. Is the thing broken or is there something I missed. Plugging in was somewhat self explanatory so I don't think I made some major error there.
-
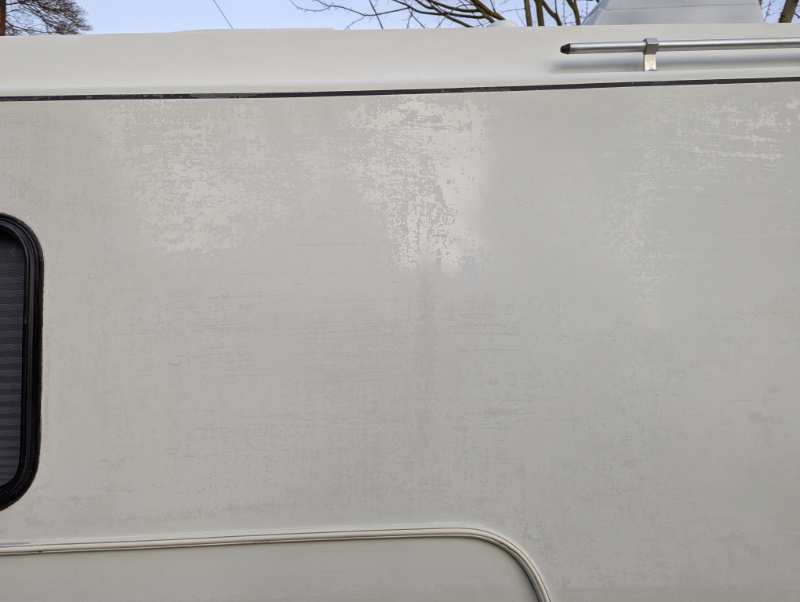
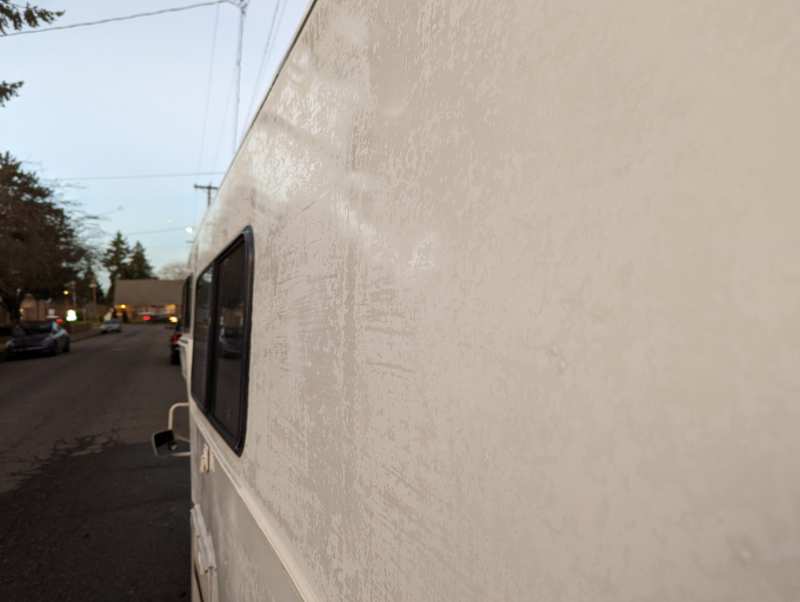
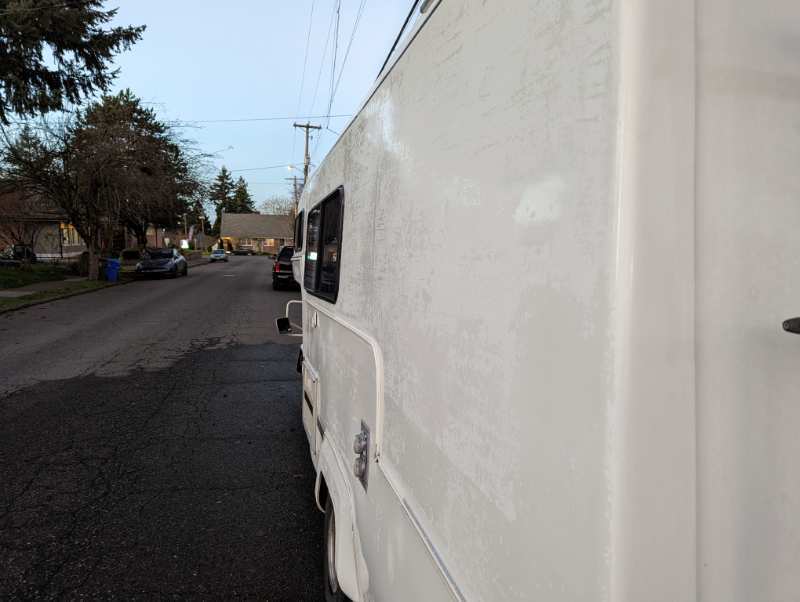
Thought I just post here instead of opening a new thread. I cleaned my rig today with BKF. Much more exhausting than I thought but it's so satisfying seeing the dirt come off. Even after using BKF, the surface still looks a little flaky, especially on one side. What is it and does this need to come off before I do the 5 layers of zep? Weather is supposed to be nice next week here so I plan on applying the multiple layers throughout the week but want to make sure the surface is ready before I start. Any concerns when you see this or is it good to go for the zep? Thanks, Nico
-
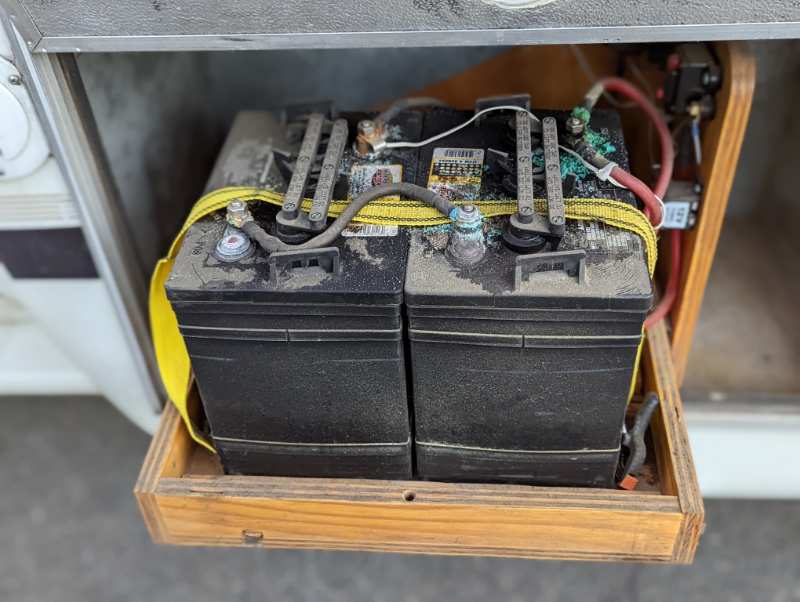
Thank you everyone. I eneded up going the $350+ route and got a new set of batteries since the old ones were dead. I will take a look how to maintain batteries and make sure I have a routine. Old ones were pretty dry so I want to make sure that doesn't happen to the old ones. Let's hope everything goes well. The dude at the store installed it so I think it should be good. Again thanks everyone.
-
That's sounds like something I should be able to do 🙂 Thank you so much!!!!!!!
-
Can't say often enough how thankful I am for everyone's input. Attached a picture of the current setup. Looks like the guy built it specifically for two 6Volt batteries, so I would tend to just go with that and copy the wiring as it is now. I'll check out the internet for a place where I can go here in Portland, OR that seems to know what they are doing. I'll keep you posted. Edit: How about something like this if they have this type of battery: https://www.unitedbattery.net/reconditioned-batteries/
-
In that case i will just order two of these since it says "E-Code": https://classicgarage.com/withbulbshield.html Does it make sense to pay for one of the higher wattage bulb options? Will also order one of the relays. I'm not 100% clear yet on where to plug in the vehicle headlight socket (is it in the existing plug that currently is attached to one of the headlights or another socket somewhere else?) but I'm pretty sure I can find that out by watching a few youtube videos.
-
I might just try to get the exact same batteries that are in there if it turns out they need to be replaced (which I assume). The pictures I posted show the battery tag. It says Group Size GC2 so I would look for something like that right? I'll probably have the person who tests it decide on what ones to take.
-
It's been a while since this topic has been active but I'm looking to upgrade my horrible head lights on my 1897 Toyota. I clicked the link you posted and there are 3 options. Would all of these options be plug and play? I don't have any experience with headlights and the electrical stuff so I'm looking for an easy swap out with much better lighting Which ones would you recommend? I just want a real nice bright light that is easy to assemble and lets me finally see in the dark. Thanks, Nico
-
Thank you both for your input. I don't think I'm able to perform this load test with what I have. I was thinking just going to O'Reilly's and have them test. Would that work? Any recommendation for a spacific battery or can I just use any standard battery they would sell? Thanks Nico
-
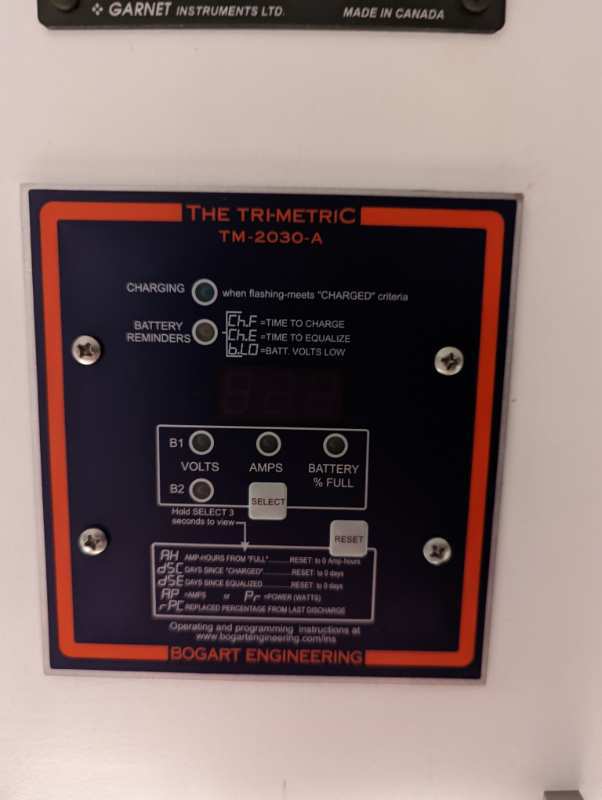
Hi everyone. After a couple of months running without issue, something new came up where I was hoping to use everyones knowledge when determining how to move forward. Here's the current setup to my knowledge: - There are two batteries installed to power the coach (small picture see below). - 300 W converter installed. I can turn on and have two switches powered with 300 W when the switch is flipped - Tri-Metric TM-2030-A (second picture). I don't know what you call this piece but I would guess it's to monitor the battery - Battery reads 100% at 13.1 Volts. Here is the issue: - On my most recent trips, after an hour or so running the furnace as well has having some lights on, I hear a repeating beeping. The indicator reads b.LO. According to the manual, this means low battery. - It first happened a month or so back when I plugged in an electric device with 98W. Shortly after plugging it in, I heared the sound. I left it in for a minute or so to see what happened and then unplugged it, Gut the b.LO light flashing throughout the night when the furnace was on. - On the last trip, I turned on the furnace when we arrived and a couple of lights. After about an hour, I got again the b.LO and the lights went dim as if the power was reduced. Luckily we were at a powered site so I just plugged in the rig and everything worked fine. I'm trying to figure out what the issue is. The batteries holding 13.1 V and showing 100% seems to indicate that there is no issue. But the power drops significantly after a short period of time so I'm trying to figure out if it is just bad batteries or something else. According to the records I have, I suspect the batteries to be installed in 2015. Happy for any advice. Thanks, Nico
-
Idk what happened to the fan. I was just looking and saw there was none. Never heard anything that indicated something broke. Maybe I bought it this way....
-
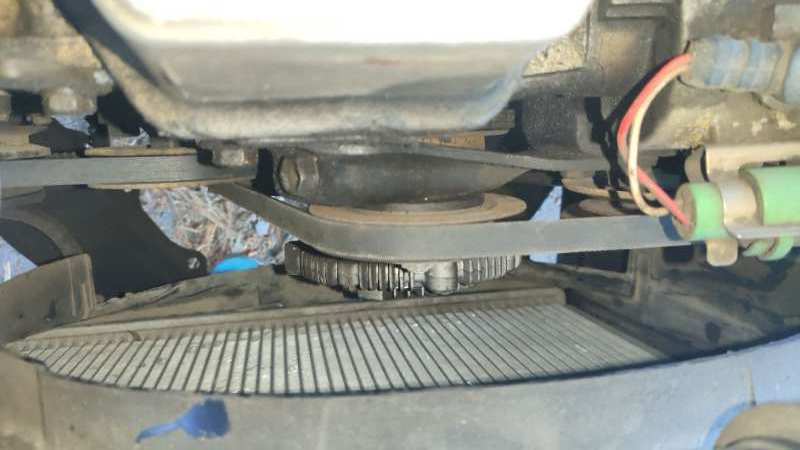
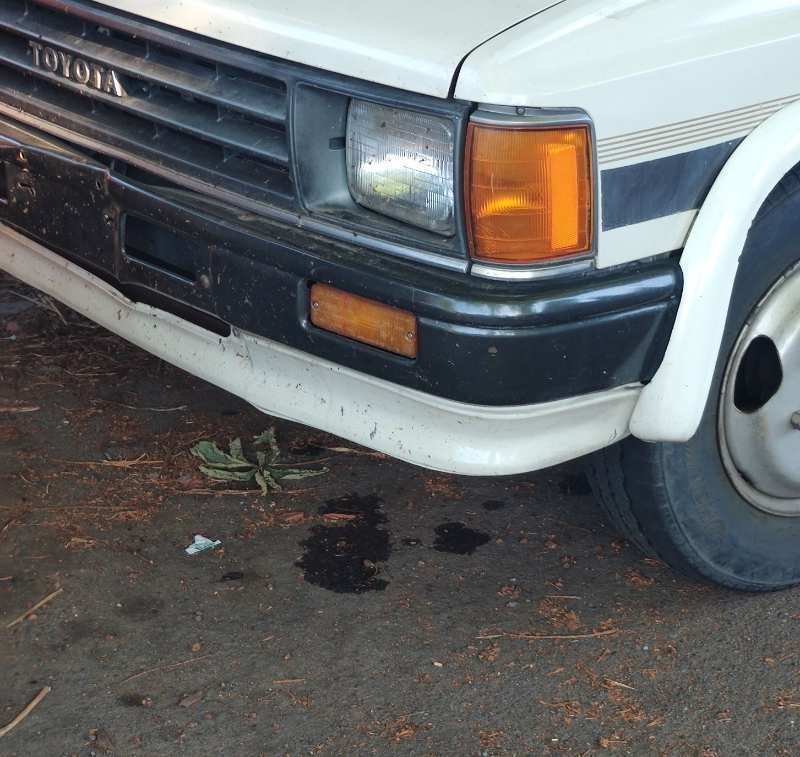
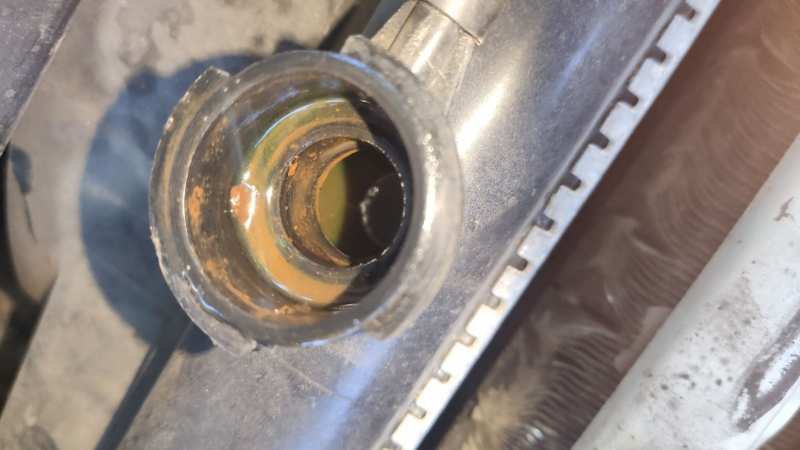
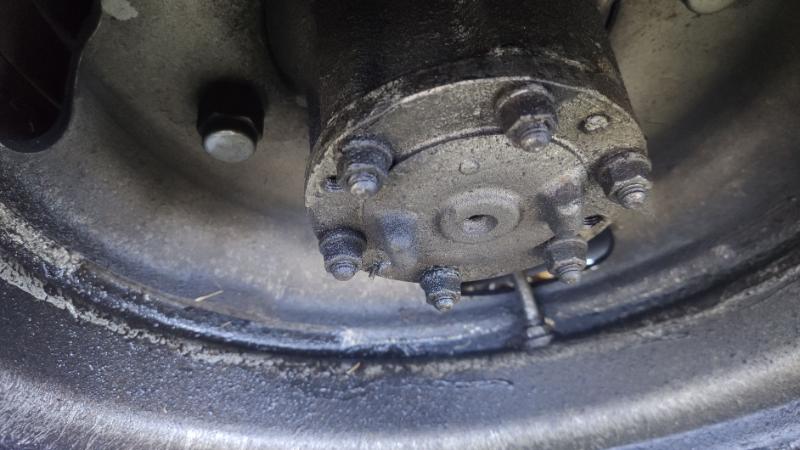
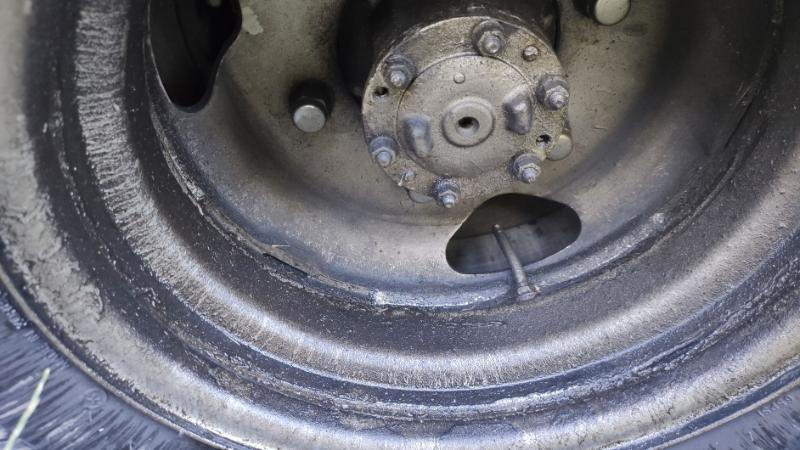
Hi all and thank you very much for all the answers. I will look what I can do myself. Regardless great input and I'm learning a ton along the way. Repairing the head gasket myself definitely would be above my skill level so I would never do that myself. I have never worked on an engine before so chances that I will break something are very high (and I'm pretty good at breaking stuff I'm trying to fix). So the car was parked since Friday. I just came back and took another look (as well as a few pictures). Wanted to post them here before I take it to a shop some time this week (given that I find a shop I trust). I am not a mechanic but I have a engineering background so I have a basic understanding and this basic understanding tells me that the fan actually is missing 🙈 Some drops below the driver front of the car. Could be that it is just remaining liquid that slowly dropped down after the overheat had sprayed the liquid everywhere but I would guess it is more a leak. When I look under the hood above the leaking on the floor, I see this oily piece with a yellow hose. IDK what that is but the piece looks quite oily. Also the whole block behind the fan looks very oily. Not sure if this is oil or coolant. Also took a picture from below and again it is very easy to see the significant amount of oil radiator level was low as well as the reservoir. Definitely more coolant missing than is on the ground. I would guess this is the case because the motor now is completely cold. I don't know how the belt tension is supposed to be but it seemed pretty strong. But then again the whole fan seems to be missing so..... Not sure if this indicates anything to anyone of you but still wanted to share. Nico Missing Fan: Drops under car Oily block behind the fan Oily piece above the drops outside oily piece above the drops outside 2: picture from below (upside down) low radiator fluid level
-
Thank you all. I'll look for a shop to take a look. I'll let you know once it's fixed.
-
Decided to give it a shot and drove home. Temperature stayed normal downhill and on the highway. In the city went up a little higher, not sure if unnornal. Does this rule out any of the suggested issues or confirm any? It sounds a lot like what Linda says. That being said a couple of weeks ago drove from Oregon to California over grants pass which is pretty significant incline and it was hot but Motor never overheated. Today just after 20 minutes up it was boiling and outside temp was not hot.
-
Hi all, New problem. Was about to leave for a 4th of July trip. About 1 hour 15 min in and going uphill, I saw that the temperature was getting up and towards the red (outside temp was around 70 degrees). I slowed down and once it hit the red, I pulled over and stopped. Some steam came from under the hood and some yellow coolant was coming out from the overfill Reservoir. Waited a couple of minutes and popped the hood. Coolant was boiling and took about 10 minutes or so until the boiling in the Reservoir stopped. Waited about 20 min and continued to the next town which was 3 minutes uphill. Within that time it again went from a medium temp to hot. Stopped at the gas station and bought some collant and refilled. Saw that it was on the low mark but I assume this was to the amount that was blown out when the car was overheating and the coolant came out of the overfill Reservoir. (BTW collant in the Reservoir was sucked back in the system after I started the motor again after a while. Anyways after refilling the coolant, I drove around for about 5 minutes to see if anything changed. Temp went down while going downhill but went up to almost red when going uphill. Decided to stop and called roadside assistance. Now waiting to be picked up. Wanted to check what you all think it is and how much it'll cost approx. Appreciate any thoughts. OH btw I don't see any leaks under the hood. See a few drops somewhere under the driver seat. Also was driving for about 45 min on the highway and about 30 min uphill before the issue accursed. Thx Nico
-
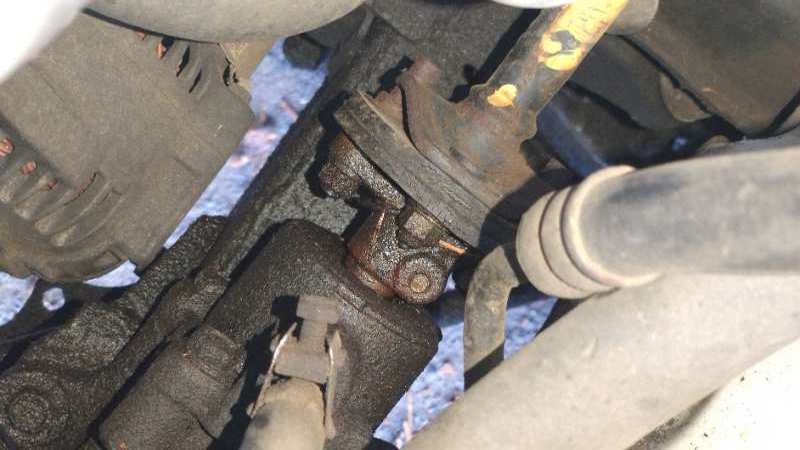
Hi all, One problem solved, another coming up. Just took a 1500 mile trip with the sunrader sitting on a 1987 Toyota truck. After coming back, I realized that there was a bunch of oil on the right rear wheel. I saw that before but didn't think much. Something must be leaking. I would like to get some help fixing it (I would like to watch but not do it myself since I haven't done anything like this before). I thought I found a good place that takes care of old Toyota trucks in Portland but they let me know they won't work on cars that old. I would like to get someone I can trust but not sure how to find someone here. Also, the power steering has been making weird noises. It sounds like the gears are grinding on each other while it was still working but last time I moved the RV, the power steering stopped completely. 1. Any idea what the oil issue is? 2. Any recommendation on where to go to get it fixed (here in Portland) 3. What to do about the power steering? Thank you very much as always. Pictures attached. Nico
-
Leaking window. Need help for quick fix
KonCon replied to KonCon's topic in Coach ApplianceTech Issues
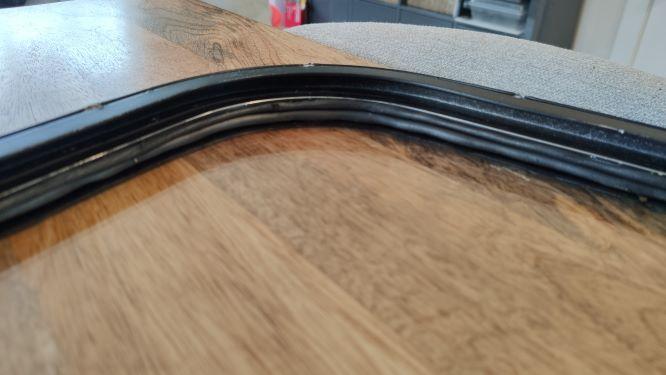
Ok finally I find the time to answer. First of all huge shout out to linda who has been a tremendous help finding a way to fix this. She basically told me everything I needed to get and do and then I just did it and it worked. My highest respect to your knowledge/skills linda and your dedication and eager to help. Really special!!!! I didn't take a lot of picture during the whole repair but I will try to explain. First of all I bought this Butyl tape for car glass. It is a round, semi sticky roll of black butyl tape. It is not as sticky as the one I used to seal the window once I put it back in. Next, I bought this TRIM-LOK rubber seal. I believe Linda recommended 3 yards but I bought 4 just to be safe. Just as a side note, 3 yards would have been enough (obviously). The idea was now to put the Butyl tape around the inside of the frame for both frame halfs, slide it over the glass, press the glass on the seal and squeeze in the rubber gasket to create compression. Something like this: (yellow butyl tape, blue glass, black gasket) To get this done i did the following: lay the glass on 4 blocks so the glas is elevated Put the butyl tape inside of each half of the frame. I left the sticky protection on so it faces up. Then I pressed it a little down on this side so the butyl tape would get more of an oval shape. This created a gap that was big enough for the glass to fit removed all the sticky protection from the butyl tape slide each half of the frame onto the glass so it does not touch the butyl. Once in place screw both halfs back together. Align the glass and lift up the frame so glass sits now on butyl tape. Remove the blocks and lay down everything. Press the window on the sealant. To create a gap where I would be able to fit in the gasket, I used a plastic putty knife and used it as kind of a lever between frame and glass to press the glass down. This was really tough and actually broke 2 of the putty knifes. There is probably a better way to do it but it worked. This created a gap that was large enough to force the gasket in. I used water and a tiny bit of dish soap to help get the gasket in. It took a few times to figure out the best way to do it but I was able to force the gasket in. This required a lot of elbow grease and caused a blister or two :). But in the end the gasket was forced into place. Trimmed the butyl that was squeezed outside between glass and frame. put the window back in its place using the white sticky butyl tape and screwed in the frame. Put some clear silicone on the cracks where the two frame halfs meet. The first day I poured so that was a good test. The gasket on the top of the window was a little wet so first I thought there might be a leak. This is when I put the clear silicone on the cracks. Gasket was dry moving forward. In retrospect I think it was just the soapy water that I used to force in the gasket that came out. This is what the window/gasket looked like when installed \ And here with the window back in place. Really happy so far with this solution. Again HUGE THANKS to linda.
-
Leaking window. Need help for quick fix
KonCon replied to KonCon's topic in Coach ApplianceTech Issues
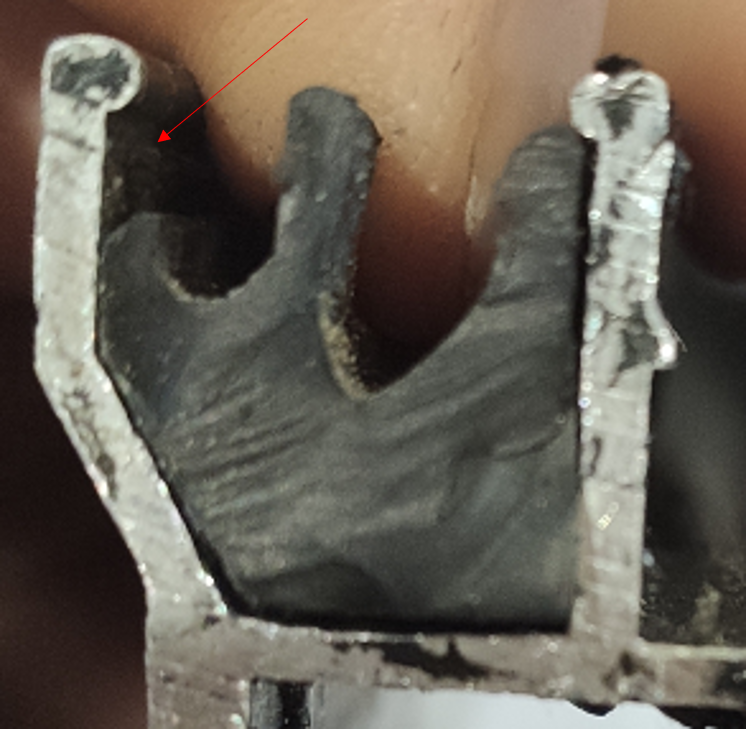
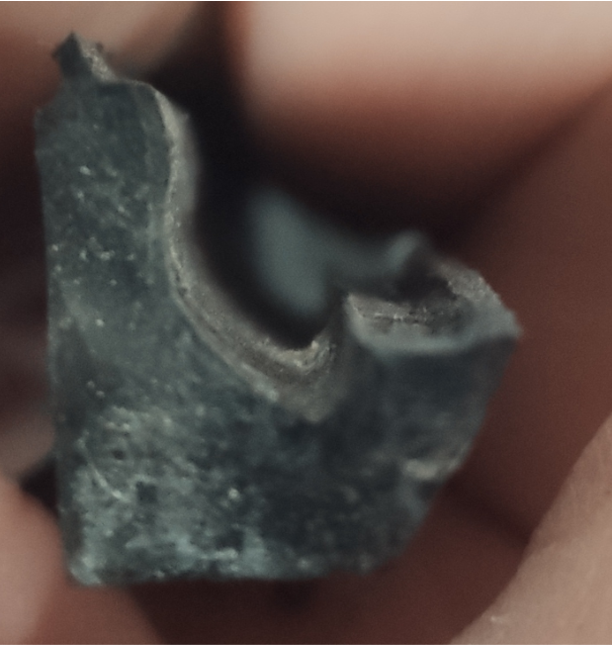
Attached my highly professional measurement pictures. I hope this helps a little bit. I could see that a little piece is missing where I put the red arrow but it actually doesn't necessary look like something was torn of the rubber piece on the surface. I only have a tiny piece that looks complete. Most of it (and that's also not much) looks like the piece in the picture below that clearly has some parts missing.
-
Leaking window. Need help for quick fix
KonCon replied to KonCon's topic in Coach ApplianceTech Issues
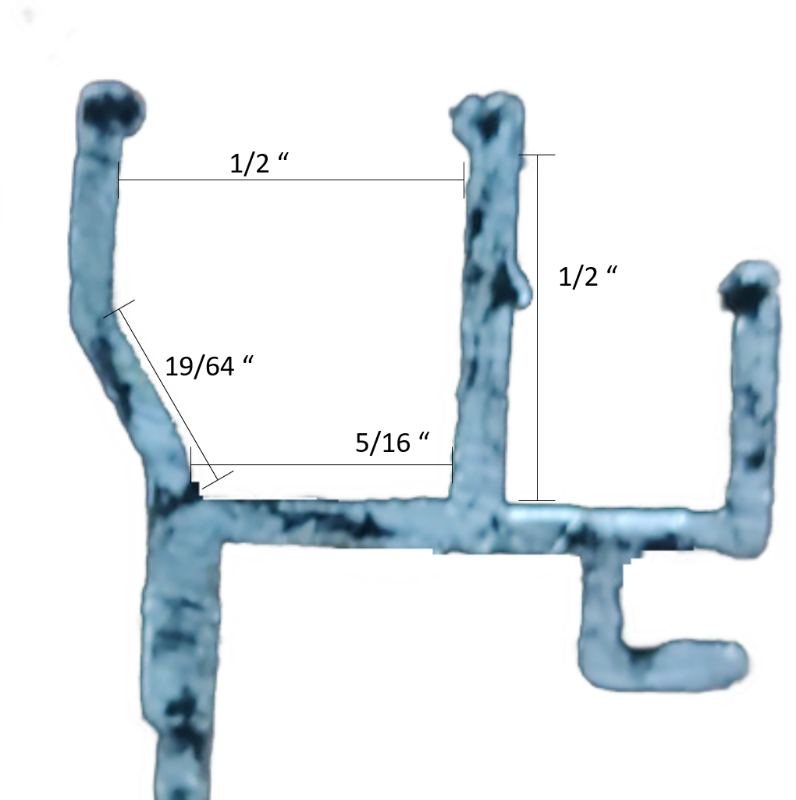
I do have a little bit left, most of the gasket is pretty destroyed so not really useful anymore. I will take detailed measurements tonight. Thanks again so much for your help. Really unbelievable!!! -
Leaking window. Need help for quick fix
KonCon replied to KonCon's topic in Coach ApplianceTech Issues
I think I misunderstood something, although it's a bad excuse because now thinking about my logic, it doesn't make any sense. You live an (hopefully) you learn. Anyways the hole in the shell is 30 3/4 wide and 13 1/2 high. I reached out to a few places but I'm not very optimistic I can find anything. A bit bummed out my stupid mistake causes that I have to replace an original part but it is what it is....