neilp
-
Posts
123 -
Joined
-
Last visited
Content Type
Events
Profiles
Forums
Gallery
Everything posted by neilp
-
Thanks for this information, good to have an alternative, although I cannot find anywhere with the in stock!
-
Good thought. I'll check, although I'm fairly confident that the one that is leaking has an issue at the rim seal area. I did have a tire place look at it and they suggested a new valve, but were no help on a source for them. Honestly the stems that are on the wheels seem past their best. The schrader valve inserts (correct term?) are not located well on some of them and I have to poke around to check the pressure or fill the tires.
-
I also ride - and likewise replace valve stems with tires. I don't cover the mileage that I used to on two wheels these days, so tire replacements can be several years apart and the thought of a valve failing at speed is not a good one...
-
Thanks for that part number Linda - just what I needed! The shipping is a bit steep on that ebay listing! I'll call the local Toyota dealer and see what they can offer.
-
My 1993 Itasca has metal valve stems and one is leaking slowly. I cannot find the correct replacements after searching local auto parts places. Has anyone replaced these and got a link they can share? Or the product name / reference number? I need to get that one replaced and would like to replace them all when I get the tires replaced, which I should do before long.
-
Sorry if I wasn't clear - the freebie is a flasher to make the turn signals work with LEDs on older models. Looks like it spoken for if JND wants it! But do get the rear LEDs! Good safety upgrade I think.
-
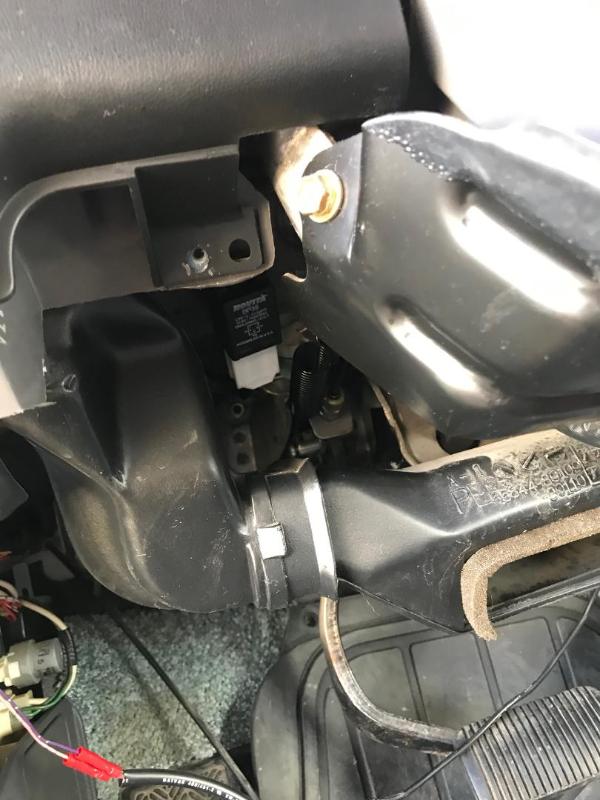
You are welcome to the one I have and you can give it a try. I suspect it will work as I got the part number for it on here. I know a $7 part is not the give away of the century but it seems a shame to trash the thing! Send me a PM with your address and I'll get it off to you. The flasher unit is located above the brake pedal in a spot that it will have you doing the dashboard limbo so that you can get to it! At least it is in my 1993 v6 - might be different in a 4 cylinder.
-
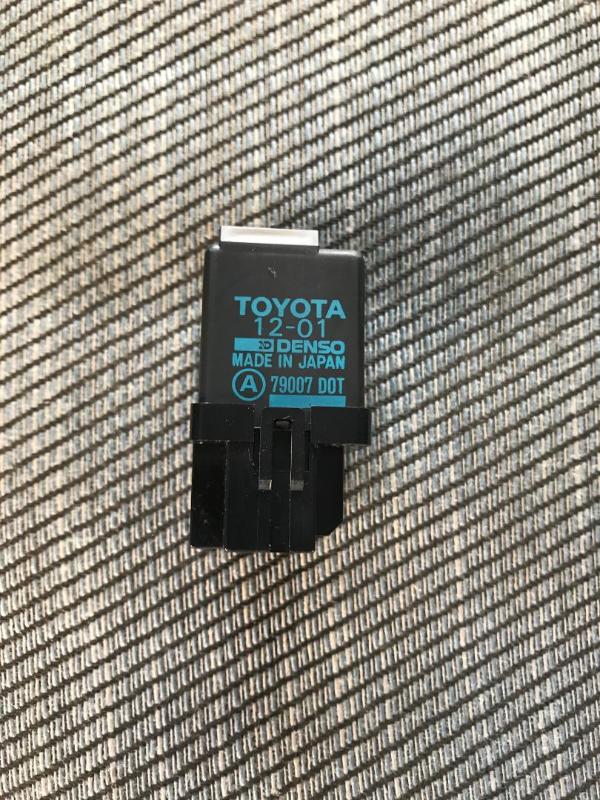
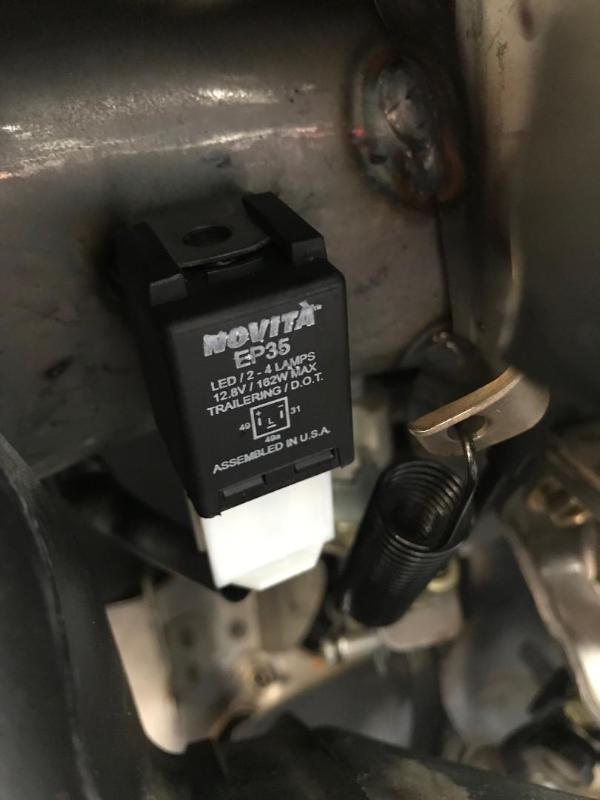
I recently converted my rear lights to LEDs. I ordered what I thought to be the correct LED flasher unit from Amazon. It is one that allows you to adjust the flash rate, based on the EP34. https://www.amazon.com/gp/product/B07HYHNSY7/ref=ppx_yo_dt_b_asin_title_o03_s00?ie=UTF8&psc=1 When I installed it on the camper it did not work, and I bought another locally, an EP35 this time. The EP34 and EP35 are very similar except that the polarity is reversed. I think the EP34 may be correct for older ToyMos. Mine is a 1993 (1992 chassis). I'd guess that the earlier 4 cylinder models may use the EP34. http://novitatech.com/?q=aftermarket/products/flasher-quick-reference Anyway I now have a spare adjustable EP34 flasher unit that may well work in earlier applications. Free, if you can use it let me know and I'll mail it to you. A very small token of my appreciation for this community and all that I have learned here!
-
That looks nasty! I know I should drop the tank, although the gas looked clear at the filter. I fitted the Toyota part today and as expected it bolted right up and does not leak. Definitely avoid the "Carquest" brand part for this job as thy are defective. My son worked at Advance Auto for a while and told me that these are often returned for fitment reasons. What worries me is folks driving around leaking gas unaware. Scary. So far no misfire, but my camping trip next weekend will be the real test.
-
Thanks, I agree I probably should drop the tank. I'll see how it runs once I get the filter installed. For others doing this job and who find this thread I'll add a couple of links that I found useful: Yotatech thread with pics 4 runner forum thread about leaking fuel filters Annoying but somewhat applicable YT video
-
Yeah, if there's still a misfire I'll pull the tank and get it professionally cleaned. I've had to do that on other vehicles and it's worth paying someone to do it properly. And if I pull the tank I'll get a new fuel pump because pulling the tank is not a job that i want to do twice! I'm still hoping that the filter fixes it! I have the new one from the dealer but need the time to install it - likely over the weekend.
-
My camper has had a slight misfire ever since I bought it two years ago. Not bad, and it's intermittent, but definitely fuel related as it improves with a full tank of gas to the point of being unnoticeable. And it gets noticeably worse when the gas level is low. I think I may have to drop the tank and clean it. If that's need I'll replace the fuel pump while I'm there. But I figured that the first step is to replace the fuel filter. I bought one at Advance Auto (I know, I should know better) and it will not stop leaking... Some google research informs me that many aftermarket filters have this issue with the fittings being the wrong design to seal properly. Grrr... I have a new Toyota part on order at 3x the price arriving tomorrow. At least I'm at home and not on the orad somewhere. The good news is the filter may be the culprit. The gas from the tank line looked nice and clean. The gas coming out of the filter was murky and brown. Anyone else had this much fun replacing the fuel filter?
-
Apologies for not replying sooner I just saw these posts. I used one of the Progressive Dynamics upgrade kits as linked above. The convertor install was straight forward. Take pics of the wiring in case needed later, remove the old wiring. Take out the old unit and install the new one. Attach the wiring from the new convertor. The unit I installed came with a 12v distribution panel. Simple enough to install: remove one wire at a time and attach to the new board. It all bolted in to the same spot the old one had been in. The only real difference is that the new 12v panel has fuses to protect against an incorrectly installed battery - this also should protect against a short in the cable to the battery. All in all an easy install, and some good peace of mind that the battery is not getting ruined by over charging. And the old ones do run hot!
-
I know that some years have reverse threads on the lugs on one side - someone will be along in a moment or two and confirm but I think the 1985 or 1986 models were the ones that had this "feature".
-
I installed a PD convertor about a month ago. I have yet to hear the fans come on either, I'm assuming that this is normal... but interested in other folks experiences.
-
I just upgraded my tail lights using the Bargman 47-84-005 LED replacement unit that is a direct bolt on replacement for their original incandescent unit on my Itasca Spirit. I read a number of threads here about using a replacement flasher unit to normalize the flash rate. For those not aware of this issue, the LEDs draw less current than an incandescent bulb and cause the OEM flasher to cycle faster. You can add a resistor in line with the lights but to me this reduces the value of the upgrade as you would them be drawing the same current as the original bulbs. Anyway I wanted to post my findings regarding the replacement flasher unit. Looking at posts here and on other Toyota sites the Novita EP34 was recommended. However this did not work for me. Some further research led me to the Novita EP35 as the answer - I think there are two wires flipped so you can likely use either if you rewire the OEM socket that the flasher plugs into. All works well with that flasher unit. This one also has the mounting tabs so that it will attach to the original bracket where the EP34 does not have these mounting tabs. Toyota must have changed the wiring at some point - maybe 4 cylinder vs 6 cylinder? Mine is a V6: 1993 camper, 1992 chassis. I thought it worth posting a new thread so that folks can find this as there are several threads on this topic.

-
Trim/molding/seal between the front and underside of the overhead
neilp replied to htioki's topic in General Discussion
I have the exact same issue. I'm planning on trying some of this stuff: https://www.amazon.com/InstaTrim-Flexible-Self-Adhesive-Caulk-Solution/dp/B07Q6LCCH6/ It is also available at Home Depot. Any one tried it? -
Thanks for the advice, I got the job done. For anyone doing this in the future: - I positioned the Toymo with the cab on my drive's "downslope" - I have about a 3 degree slope. In the past I jacked it up the other way and the camper would wobble on the jack stands like a teeter-totter. Scary. - I put jack stands under the frame just in front of the rear springs. - This was sufficiently stable that I could jack on the differential to raise the axle as needed to get the space for the air bag install. - I also used a scissor jack under the U-bolt plate to lift the axle end and get the U-bolt clearance for the air bags. The old air bag fittings were badly corroded, I had to cut many of them off using the grinder when there was space and a Dremel when there wasn't. The U-bolts needed a long breaker bar and a lot of effort to get them moving. Test drive results: only a few miles but it feels very different with 40 psi in the air bags. It felt as though I was riding on the springs rather than the bump stops as it did in the past. I think a bit more air would feel better. I'll be experimenting! All in all a PITA job, but the advice above was very helpful, thanks again!
-
Excellent, thanks for the confirmation - that is about what I plan to do. Seems like the best and safest way to go. Getting the old air bags off has been a task so far. Snapped bolts everywhere including the bump stop. So next step is to remove those broken bump stop bolts as they are in the way of the new bags. I'm hoping that there's room for the grinder. Then on to removing the other side. Slow progress especially as I have to fit this project in between work commitments!
-
Hi Stan, Thanks for the info. I think the brackets have room on mine but have yet to get to check that. Did you jack the camper up on the frame and then lift the axle to get the space under the u-bolts?
-
My '93 Itasca came with a 3T air bag system that is no longer working so I've bought a replacement Air Lift set up. I'm currently working on removing the old system which is a bunch more fun that I needed... a lot of rusted bolts. Still, progress is being made albeit slowly. I'm beginning to think about the install of the new set up which goes where axle bump stop is located, between the axle and the frame. it looks to me like I'll need to jack up the frame and put it on stands, about 2" higher than it currently sits so I have clearance to install the new air bags. I'm thinking, once the u-bolts are loosened, a jack under the axle will create the clearance needed to get the air bag lower bracket underneath the u-bolt above the axle. This seems to be what the instructions are suggesting. Any advice from those who have installed these before would be appreciated! TIA
-
I made myself a short "jumper" cable about 6" long with a battery size crocodile clip on each end. If my motor battery dies I can jump around the isolator and start using the coach battery, but no need to move any batteries around. Quick and easy solution to this problem and $0 cost as I had all parts.
-
I was turned away from Discount Tire on Slaughter and Manchaca and about 6 of the used tire places. I guess I'll try that Discount Tire location when I need them balanced again. Thanks for letting me know!
-
Hi, I'm in Austin also. I'm south, in the Davis / Brodie area. I was recently looking for somewhere to balance my wheels and had a hard time finding anywhere that would do it and had a machine that has a large enough "cone" adapter for our wheels. I tried Discount Tire, NTB and a lot of used tire places that all said no. I ended up at Walmart who did it but the process was not easy. Most recommended going to a truck tire place, I think there's one in Kyle. Please let me know if you find a better option!
-
Got the job done. I had to do one side at a time and use the jack on axle housing outside of the the pumpkin. I know this is not recommended so only took some of the weight of the wheel so there was less tension on the shock. Aligning the shock to get it on the stud was challenging as well. On one side I ended up cutting the strap and using a ratchet strap to get the length I needed to get it on. The rear shocks had been changed in the past and were some huge Gabriels. A lot larger diameter than the new KYBs. Test drive says I still have some vibration which is disappointing. It is a bit better though. I did manage to nick some wires with the jack so tomorrow's task is to fix that issue. Sigh.