Galvanized Knight Posted June 7, 2012 Author Share Posted June 7, 2012 I starting working on the exterior. I removed the front fenders and lower valance. Then began to fit my new wide fenders. 1 2 3 They nearly stick out as wide as the Chinooks body. Hopefully more progress after work tonight. Quote Link to comment Share on other sites More sharing options...
Davidadro Posted June 7, 2012 Share Posted June 7, 2012 You are rockin’ that Chinook! Fantastic ideas and workmanship! It pleases me to see that one takes pride in their work, and uses their checkbook freely when taking on a project they do, as I am not one to do a rebuild with getting old parts, and getting by with something sub-par just cause it was a cheap fix. My hats off to you for going out of the box, and putting in what you want, and where/how it should be, like the floor heat, and multiple fridges. The placement of your items were functional and attractive, and with the long term in mind. AWESOME JOB! Peace! Quote Link to comment Share on other sites More sharing options...
Galvanized Knight Posted June 10, 2012 Author Share Posted June 10, 2012 Fabrication photos: Friday and Saturday night. Jeremiah and I worked on a frame to bolt in the 1980 Celica seats into my 1980 Toyota Pickup. And Here is the beginning fabrication of brackets for the 3000lbs air bags. I know I said I was against them but I have them and its worth another try... What do you all think about airbags? Also I rolled over the vinyl edge of the tongue into the cab. Tomorrow we'll finish mounting the airbags...pictures to come Quote Link to comment Share on other sites More sharing options...
Galvanized Knight Posted June 11, 2012 Author Share Posted June 11, 2012 Drilled, Notched, and Rounded Corners of the air bag kit. 1 2 With that all done I painted and mounted up the bags. 1 (5psi) 2 (90psi) 3 (You can see both bags in this picture ) I still need to center the upper bracket and bolt them through the frame. Pumped up It can raise the rear about 5-6" 1 (Watch that first step its 36" 2 no more saggy rear end. eye pleasing forward rake. Big jump into the drives seat too (42") I'll be on it again tomorrow afterwork. Quote Link to comment Share on other sites More sharing options...
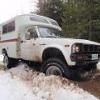
Galvanized Knight Posted June 11, 2012 Author Share Posted June 11, 2012 Had to kick the Chinook out of the shop today. Need some room to work. While it was outside I decided to snap a couple pictures. 1 2 3 I am trying to come up with some striping for the beast after its all been painted white but haven't come up with anything yet. What do you think? Tonight I hope to get that seat bracket drilled painted and mounted. I am thinking of storing my couch batteries and inverter under the front seats. 1 3000watt inverter 2 4 pack of batteries. I have 4 of these packs so 16 batteries all together. 115ah +/- 3 Details of the batteries. Not sure if their going to work but I had them kicking around the shop. Quote Link to comment Share on other sites More sharing options...
Derek up North Posted June 11, 2012 Share Posted June 11, 2012 I think your air springs are over extended @ 90psi. There should be a spec showing an acceptable operating range/installed height. You could damage them. Quote Link to comment Share on other sites More sharing options...
Galvanized Knight Posted June 11, 2012 Author Share Posted June 11, 2012 I think your air springs are over extended @ 90psi. There should be a spec showing an acceptable operating range/installed height. You could damage them. I wont be running them at that pressure. Just an example of the min - max . I did look around for specs but I couldn't really find anything. I originally bought these for my Dodge 1994 B350 but never used them. Here is the installation manual that came with them http://www.firestone...lation/2109.pdf All I can find is there min pressure of 5psi and max of 100psi. Once I get her loaded with gear I can play around with the pressures some more. Maybe end up running them at 50psi? If you run into a chart like that let me know. Still thinking about put some in the front too . Thanks GK Quote Link to comment Share on other sites More sharing options...
Galvanized Knight Posted June 11, 2012 Author Share Posted June 11, 2012 I have a wire on this 80's westfalia fridge I need help identifying. maybe a ground for the thermo couple?? I does not show up in the diagram on top of the fridge. More Fridge information I have four of these guys and the best two are going into the Chinook. Quote Link to comment Share on other sites More sharing options...
Derek up North Posted June 12, 2012 Share Posted June 12, 2012 This is the closest I could find. Looks like you're aiming for 5.5"-6.5". http://www.jegs.com/i/Firestone/385/6781/10002/-1 Quote Link to comment Share on other sites More sharing options...
Galvanized Knight Posted June 12, 2012 Author Share Posted June 12, 2012 This is the closest I could find. Looks like you're aiming for 5.5"-6.5". http://www.jegs.com/...5/6781/10002/-1 Cool thanks Derek! I'll start taking measurements. with and without loads . Quote Link to comment Share on other sites More sharing options...
Galvanized Knight Posted June 14, 2012 Author Share Posted June 14, 2012 More progress yesterday after work. -Went through the front brakes again and removed the plastic fender inners, they don't really fit the new wide fenders. -Installed backing to repair the old fridge and furnace vent holes. I glued (pl400) in plywood from the inside and screwed around all the openings. Once the glue has cured I'll remove the screws and grind down the edge of the fiberglass. I should end up with a nice flat recessed platform to start fiber-glassing from. No pictures this time, didn't bring my camera to the garage. If I am not to tried I'll be at it again tonight after work. Quote Link to comment Share on other sites More sharing options...
Galvanized Knight Posted June 25, 2012 Author Share Posted June 25, 2012 http://anchorage.cra...3048215912.html Just bolt on some 4x4 tires and you're ready to go...lol Quote Link to comment Share on other sites More sharing options...
GrantD Posted July 26, 2012 Share Posted July 26, 2012 I have nothing to add to this thread. However, I did just want to say that I spent and hour reading every post in this thread, watching the videos, looking at the pics etc. Very inspiring. Mr. Galvanized you are making me feel very inadequate! Great job and kudos to you, I can't wait to see your finished product. Quote Link to comment Share on other sites More sharing options...
Haleth Posted November 23, 2012 Share Posted November 23, 2012 Insane build man. Excited to see the interior when you're all finished -Lance (awesome name by the way; I swear I'm not biased) Quote Link to comment Share on other sites More sharing options...
MontanaChinook Posted November 23, 2012 Share Posted November 23, 2012 I am jealous of your skills. I've got a 78 Newport Chinook (non pop top style) and an 83 Toyota 4x4. With my fab skills...never shall the two be one... Quote Link to comment Share on other sites More sharing options...
zero Posted November 23, 2012 Share Posted November 23, 2012 Here are some progress pictures on the Chinook. This is the double drawer underneath the sink. its notched for the plumbing. Are you making all the cabinets and drawers yourself from scatch? I've got a 1978 pop-up Chinook I'm working on. I figure I'll spend the whole winter on it and hopefully use it next spring and summer. I have a Chevy Blazer "Chalet" camper like in the photo you posted. Mine started out with a 350 gas engine and three-speed auto with no OD or converter-lockup. Got around 11 MPG at best. I switched over to a turbo 6.2 diesel with a 4L60 trans (OD and lockup), along with 3/4 ton axles. Gets a best of 16 MPG now which is OK, but not great. I'm sure it would get 23-24 MPG with a 3.9 liter Cummins. Some time I hope to swap one in. What does your 4WD Chinook get for best gas mileage? I'd guess at 15-16 MPG maybe?? My Chinook has got a dual-wheel full-floating rear in it now. No way do I trust the OEM one-ball-bearing per axle setup it came with. I know I'll be a little over 4000 lbs. on the rear, now and then. I also just stuck a W50 five speed trans into in. Direct swap for the original 4 speed W40. Did you have any issues with your roof? Just about every Chinook pop-up I've seen is partially caved in. Quote Link to comment Share on other sites More sharing options...
zero Posted November 23, 2012 Share Posted November 23, 2012 3 Details of the batteries. Not sure if their going to work but I had them kicking around the shop. My Chinook now has dual inverters; a 1500 watt modified wave, and a 2000 watt so-called "true" sine-wave inverter. That and a pair of 225 amp-hour deep-cycle batteries in back - not under the hood. That and a Delco 140 amp alternator. Ironically the newer tech Delco CS144 alternator is hardly any bigger then the original 45 amp Nippo Denso alternator the Chinook came with. The dual 225 AH batteries works out perfect for what I do. Will run a 900 watt microwave which is the main reason. Anything less results in a DC input voltage drop that will trip an inverter breaker. I also have an AC cheap dorm-type refrigerator in it. It can run for days just off the batteries with no rechage - but that doesn't happen since all my camping it stop and go. Camp at night and drive during the day. Quote Link to comment Share on other sites More sharing options...
TDH4L Posted October 2, 2016 Share Posted October 2, 2016 Any update on this Chinook? Quote Link to comment Share on other sites More sharing options...

Recommended Posts
Join the conversation
You can post now and register later. If you have an account, sign in now to post with your account.