


bwolfgti
-
Posts
71 -
Joined
-
Last visited
Content Type
Events
Profiles
Forums
Gallery
Posts posted by bwolfgti
-
-
does anyone make an aftermarket, nice looking rim for the sunraders?
-
Today i did 4 coats of zep. Happy with the results

-
Also painted the rear storage door and lower refrigerator vent door and replaced the screw cover moldings on them and also the screw cover molding all the way around the seam of the camper.
A heat gun made installing the screw molding a lot easier. A bit time consuming but not sure i could have done it without heating it up.
-
Pretty much done removing,replacing, repainting, resealing etc. everything on the outside of the camper. Today i used Barkeeper friend as Linda suggested. Worked great. I used a long handled brush to wash the whole camper. The roof was the worst with thick, crusty stuff that had grown on it over the years. I scraped off what i could with a scraper, and what was left came off with a good scrub with Barkeeper Friend.
On the right hand side you can kind of see where i scraped the crusty stuff off but not completely
getting ready for Barkeepers Friend
one good scrubbing and cleaned up pretty well
whole motorhome scrubbed
-
-
Barkeepers friend available at most hardware stores does a fantastic job of cleaning all the crap off of fiberglass.
https://www.google.com/#q=bar+keepers+friend
Finish off with a coat of Zeb for a nice shine
https://www.google.com/#q=zep+floor+polish
Linda S
Ok i will try that. thanks Linda
-
those are cool. You need to put an object next to them for reference. Hard to tell just how small they are.
-
Replaced the pop up vent on the roof and also the two smaller round vents. Just about done removing/replacing and sealing up everything on the outside of the camper. I still need to give it a good wash and try to get the stains off the roof, so if anyone knows about a good fiberglass cleaner, please let me know.
old vents
two of the new vents installed
the other vent and new a/c cover
-
very cool, hope to see more updates soon
-
Man why didn't you think of that earlier. That looks a ton better than any stock thing we could have found. Very cool.
Linda S
Thanks, i had found some real similar to this but the company wasn't going to have any in stock for months. So then i got thinking it wouldn't be too hard to make, and it cost me nothing lol.
-
today i installed a new a/c cover, since when i got the rv the original one was gone. Also took all the vents off the roof and ordered new ones, so i'll know everything is sealed up good. Replaced the dented up upper refrigerator vent also. My fuel door surround was plastic and broken and caulked like no other. I couldn't locate a replacement so i went to my friends shop and fabbed up a new one in aluminum.
-
So i removed the water heater because it had quit working anyways. I did the bypass on the water line and plugged the lp line for now. I can always install a new water heater in the future, but i don't really forsee us using it too much in the next few years. I cut the outer flange off the water heater and repainted the door and will use that space for a little extra storage for now. I also reinstalled the front windows. I siliconed the glass to the frame and put new rubber bead around the glass, and then butyl taped the frame to the shell. I'm very happy with the results. Also i've ordered a new stove vent cover for the outside and a refrigerator vent cover, and done some other minor cosmetic things.
flange cut off water heater. cleaned up and painted door also
water heater bypass and gas line plugged
front windows reinstalled
-
All squishy stuff no syrofoam. Like super sticky play dough. Like this.
http://www.amazon.com/Butyl-Window-Flange-Camper-Sealant/dp/B0070O93HA
I put it directly on the window edges then push the window into place firmly. Make sure and use enough so that some squeezes out on the side when the window is screwed in. Easy to clean up with a plastic putty knife. The smaller windows it stuck fast enough so I didn't even have anyone outside to hold the window in. On my big back window I did get the kid next door to put his hand up there just in case but he really didn't do anything. Stuck really good all by itself.
Linda S
Ok, i picked up some 3m stuff today. AS soon as the glazing trim comes, i'll be putting the windows back in.
I also did the flasher modification so the led turn signals would flash at normal speed.
-
The standard for installing RV windows onto the camper shell is butyl tape. Stay flexible for many years and I have never had a leak after using it on any Rv. I've done quite a few of them. Glass can break. With the butyl tape it is not so hard to remove the window for repairs. I would also seal the glass to the frame before installation. The windows were all intact before they were originally installed and it's a lot easier to place the window into the frame when on a flat surface to center it.
Linda S
ok sounds good. Do you use the standard butyl tape or the stuff with the styrofoam in the middle?
-
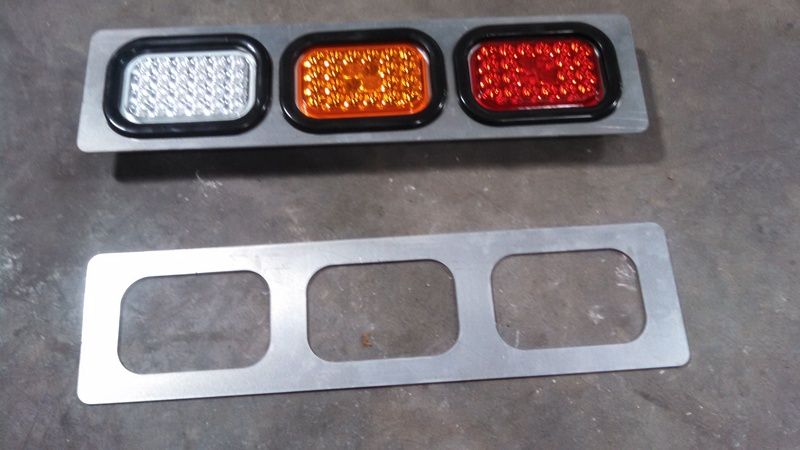
I changed out my taillights and installed some LED lights that I got from fleabay. I also had a problem with the new lights being smaller than the old lights. I made spacers from aluminum diamond plate that I obtained form a scrapper. I will be changing out all of the marker lights when the RV comes out of storage.
These lights are much brighter that the originals and since they are sealed in epoxy, I hope that they will last a long time.
In the last picture, you can see the cargo carrier that I have mounted on the back of the Escaper. I have LED taillights mounted on that also. At night the back of the RV is very bright.
Those worked out well Bob, gotta be innovative when it comes to these old campers, thats for sure.
Great job but I'm pretty sure that rubber bead trim is not what seals your windows to the frame. I have the same Hehr windows in my Tiger Provan. Glazing bead is just trim. The windows are sealed to the frame with auto glass sealant like this
Mine were leaking but not all the way out and I sealed them with Captain Tolly's creeping crack sealer. Since yours are all the way out I would recommend to auto glass sealer or email Hehr and ask what you should use.
Linda S
Thanks Linda, Yes i will be sealing the frame to the camper and then the glass to the frame and then installing the new glazing bead. Mine werent really leaking, but i hated how ugly they looked with all the silicone on them. I install windshields part time so i may use windshield urethane to seal them to the body, otherwise NP1 is a great commercial sealant that i've used in the past when i worked for a commercial glass company. I'll keep you posted.
-
Love the frames,where can I get them my 85 Sunrader taillights are worn out
and half of my clearance lights don't work.
Bigdog
I actually had a few extra sets cut in case someone needed some. I have them on ebay listed here
-
So i decided to try and clean up the front window frames instead of cutting new glass with new rubber. I used a electric grinder with the wire wheel attachment and got them to clean up nicely. Then i painted them black. I just ordered new rubber glazing seal. The window frames are made by Hehr so finding the glazing seal didn't prove to be too difficult. (part# h009-643)
30 years of silicone
glass out and frame cleaned up
+frames painted and drying on the heated floor
-
I mounted the front and rear clearance lights today and also the taillights. For the clearance lights i drilled about a 1 1/4" hole in the middle of where the clearance light would be mounted so i would be able to use the fish tape to pull the new wiring. As far as i could tell the power for the clearance lights runs from the passenger rear corner and ends at the passenger front corner light, so if any light in between isn't hooked up, then the lights down the line won't work either. I used self tapping stainless steel 1 1/2" screws to mount the lights and 3/4" self tapping stainless steel screws to mount the taillight panel. The original screws were so rusted i just had to break the lights off, then grind down the part of the screw that was sticking out.
fish tape
taillights and revers lights lit up
brake lights on
right turn signal on
-
Yeah the tail lights look great. All the info you can give about the clearance lights would be appreciated with lots of pics please. Those things seem to be one of the hardest things for Sunrader owners to deal with.
Linda S
Before i seal them up and screw them down, i'll take more up close pics
-
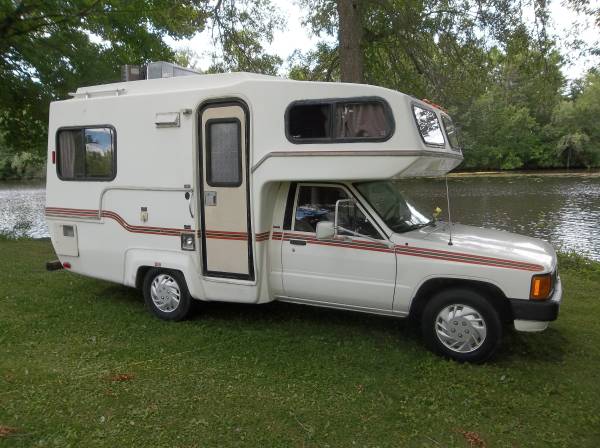
So we bought this 84 sunrader this past summer in Wisconsin and are currently trying to update it a bit. It is very solid as it was originally from Texas. I'm in the process of switching all the exterior lights to led as well as the interior lighting. I also removed the front windows and will be getting new ones cut to fit the new rubber. Attached are a few pics of the lighting process. The wiring for the clearance lights was a real pain as the original wiring is impossible to splice into. I ended up using a electrical fish tape (if thats what its called) to pull new wiring. I'll try to update with more pics later. The taillights i had 1/8" aluminum plates cut to size that i think will work really well. Any suggestions are always appreciated.


 +
+


84 Sunrader Led Taillight And Marker Light Project
in Improvement and Do-It-Yourself Projects you have done to Share!
Posted
If the parking lights didn't work before and aren't working now, i would guess it is a wiring issue somewhere or a blown fuse possibly. Have you checked the fuses?