


bwolfgti
-
Posts
71 -
Joined
-
Last visited
Content Type
Events
Profiles
Forums
Gallery
Posts posted by bwolfgti
-
-
On 6/23/2016 at 9:47 PM, funkyninja23 said:
Damn man- That Looks Really friggin nice!
Thanks, lots of time put into it, but at least it didn't cost alot of money to do so!
On 6/24/2016 at 9:20 AM, Totem said:I'd love to buy a custom fuel fill box cover off you like the one you made
If you could send me your old one i could fab one up.
On 6/25/2016 at 3:04 AM, Allan said:I say it is best to choose an interior colour that is aesthetically pleasing to the both of you. My interior is white; The former wood-like panelling was claustrophobic. As for lost value for straying from original? You already crossed that bridge with the wheels. There comes a point when something looks so much better than new that the value goes up.
Yea i think we are going to just paint it the way we would like. As long as its done nice i don't think it'll take away from the value. As for the wheels they are still the original, just painted and chrome rings put on.
On 6/25/2016 at 10:12 AM, linda s said:It's a house. Decorate it like you would a house. Not many people choose to paint the whole inside of their house white. Coordinating colors with fabric in subtle tones creates an expensive finished look. If in good shape, leaving some of the wood, like maybe just bottom cabinets, can add interest. There are online programs for home decorating where you can do mock-ups and see how you like it.
Linda
Thanks for your input Linda, always appreciated. Curtains were made up over the weekend and she did some priming and will do some painting this week. I'll be sure to post pics. Also a few more little tweaks are in the works. I'll keep you posted
")
-
Next up the gf is making new curtains for the interior and we want to recover the padding for the seats. Also whats everyones opinion on updating the interior/flooring and painting the walls/cabinets white? Would it be best to leave it original as possible or do you not think it would detract from the value of it?
-
Took the mirrors off yesterday, sanded them and repainted.
-
Just found this post today and you did an awesome job, great job on sticking with all the trials and tribulations of doing something no one has done yet. Sounds like its a reliable set up once you got all the kinks worked out.
-
wiper arms repainted and on and also i used the windshield urethane on the upper corners where i notched the molding to fill in the gap.
-
14 hours ago, payaso del mar said:
where did you get the molding?
Yes I got it on ebay. I ordered 75 feet of it so if you need some let me know and i'll sell you enough to do a windshield if you want.
14 hours ago, Derek up North said:It's all over FleaBay.
-
Cleaned up a few of the surface rust areas and used touch up paint before installing the windshield. I bought a 31mm universal windshield molding to take the place of the original metal trim. I've used universal molding on quite a few vehicles and usually have good luck with it. The top corners of the windshield are a tight radius so i did have to notch the molding so it wouldn't pull off the glass but i'm going to go back later after the windshield is installed and just use a little black touch up paint so you really won't be able to tell that the molding is cut. Over all i was pleased with the molding.
new windshield
touched up
molding on
notched corners to make the radius
installed
-
Looks amazing, like a brand new camper. I keep debating on whether to do the same to the inside of the sunrader......
-
Nice, looking forward to the pics, as i've never taken one of these off yet.
-
Did you ever finish this project or get any farther? Just found this thread today and read thru it.
-
On 4/7/2016 at 0:53 PM, payaso del mar said:
oh my my oh hell yes Toyhome put on that party dress.........
you're really inspiring the way you're fixing that thing up. please post lots of pix that windshield work, as my IPO replaced the windshield but butchered the valance reinstall....held in with silicone....
Thanks i'll be sure to take some more detailed pics. I ordered some touch up paint also. There are a couple small spots of surface rust i need to clean up before the windshield goes back in. Unfortunately the new windshield is 2-3 weeks out, my supplier was out of stock, so it is coming from Ohio.
-
Started back at it, cleaning it up a bit more. Pulling the windshield to clean up around the windshield frame and replace the trim with a black rubber molding instead i'm thinking. I broke the windshield pulling it out (not a surprise) but have a new one coming. Gonna paint the wiper arms black again also.
-
very cool rig. I'd have put some factory tinted windows in though. Like snail powered said, it'd be tough staying in there too long with no windows.
-
Had some new decals made for the front and rear of the camper. Put the rear one on today, haven't gotten to the front one yet.
before
after
-
sweet looking rig. Looks to be in great shape.
-
Can't wait to see pics. Sounds like a great setup
-
On 2/7/2016 at 8:56 PM, linda s said:
I would love to see some interior pics. Your heater outlet is forward of mine. Way forward. Wondering where everything is set up inside. Is your furnace under your closet?
The black looks good. My bumper is starting to show some rust. I might do the black thing too
Linda S
yes the furnace is under the closet. I wonder how many variations of layouts they had for these?
-
Got rid of the silver front bumper today and went with black
-
Another nice improvement
Washed my toy with bar keepers now the Zep any suggests for the application? Thanks
wash it again with bar keepers friend to be sure it is as clean as you can get it, let it dry a day. I bought a sponge mop at the local hardware store and applied it with that. Keep a rag handy because sometimes it'll run and you need to wipe those up. And do as Derek said, multiple thin coats. I think i did 4 total.
-
I hated the hubcaps on the camper and aftermarket wheels don't exist for these so i decided to have the rims sandblasted and then i painted the gloss brown to match the side stripe, put on chrome trim rings and chrome lug nuts. I like this look much better.
-
What paint color did you use for vent covers? Looks like it matched well
Thanks
Yea i was very happy with the color match. It is Rustoleum Canvas White
-
Today i got rid of the stock carb and put on the popular weber 32/36. Removed the carb and all associated vacuum lines, egr, smog stuff etc. Really opens up the engine bay and doesn't look likes such a bowl of spaghetti. Won't be able to take it on a test drive for a few months yet, but it starts right up and idles nicely so i'm looking forward to it.
egr block off plate i made out of aluminum
carb on and only 2 vacuum lines to hook up
-
Where did you get that great spare tire cover???
It was on the camper when i bought it so i'm not sure where the previous owners bought it. sorry
well, it's hard to test that parking lights aren't working right now since i have no idea how to wire the new LED lights properly. any wiring tips? all i have is the photo i attached..
Yes like Derek said, you need to get a multimeter so you can test which wires have power when you turn the switch to parking lights, push the brake pedal, turn the turn signal on etc. An extra person in the cab doing that for you while you are measuring which wires get power would be helpful. If you aren't getting power to a wire when you should be, then its more than likely a blown fuse or a broken wire somewhere down the line.
Tip #1:- Buy a multimeter.
agreed
-
wow. nice!
maybe your local RV dealer will offer you a parts discount if you refrain from parking your 30 yr old rig where it will distract customers from the new ones on their lot......
Haha, i should check into that. Its still far from perfect but as good as it is going to get without doing a full resto on it.


84 Sunrader Led Taillight And Marker Light Project
in Improvement and Do-It-Yourself Projects you have done to Share!
Posted
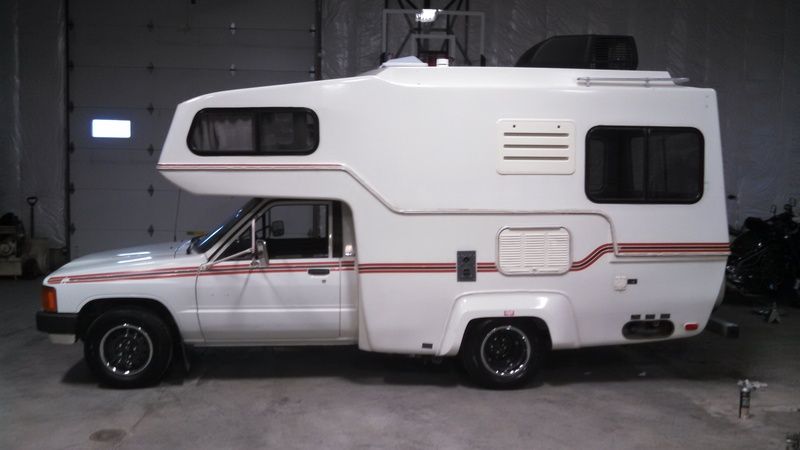
Thought i'd put up a few pics of it in its natural habitat") Also i installed HID headlights last week. Much brighter over stock.
Also i installed HID headlights last week. Much brighter over stock.