hunkaman
-
Posts
457 -
Joined
-
Last visited
Content Type
Events
Profiles
Forums
Gallery
Everything posted by hunkaman
-
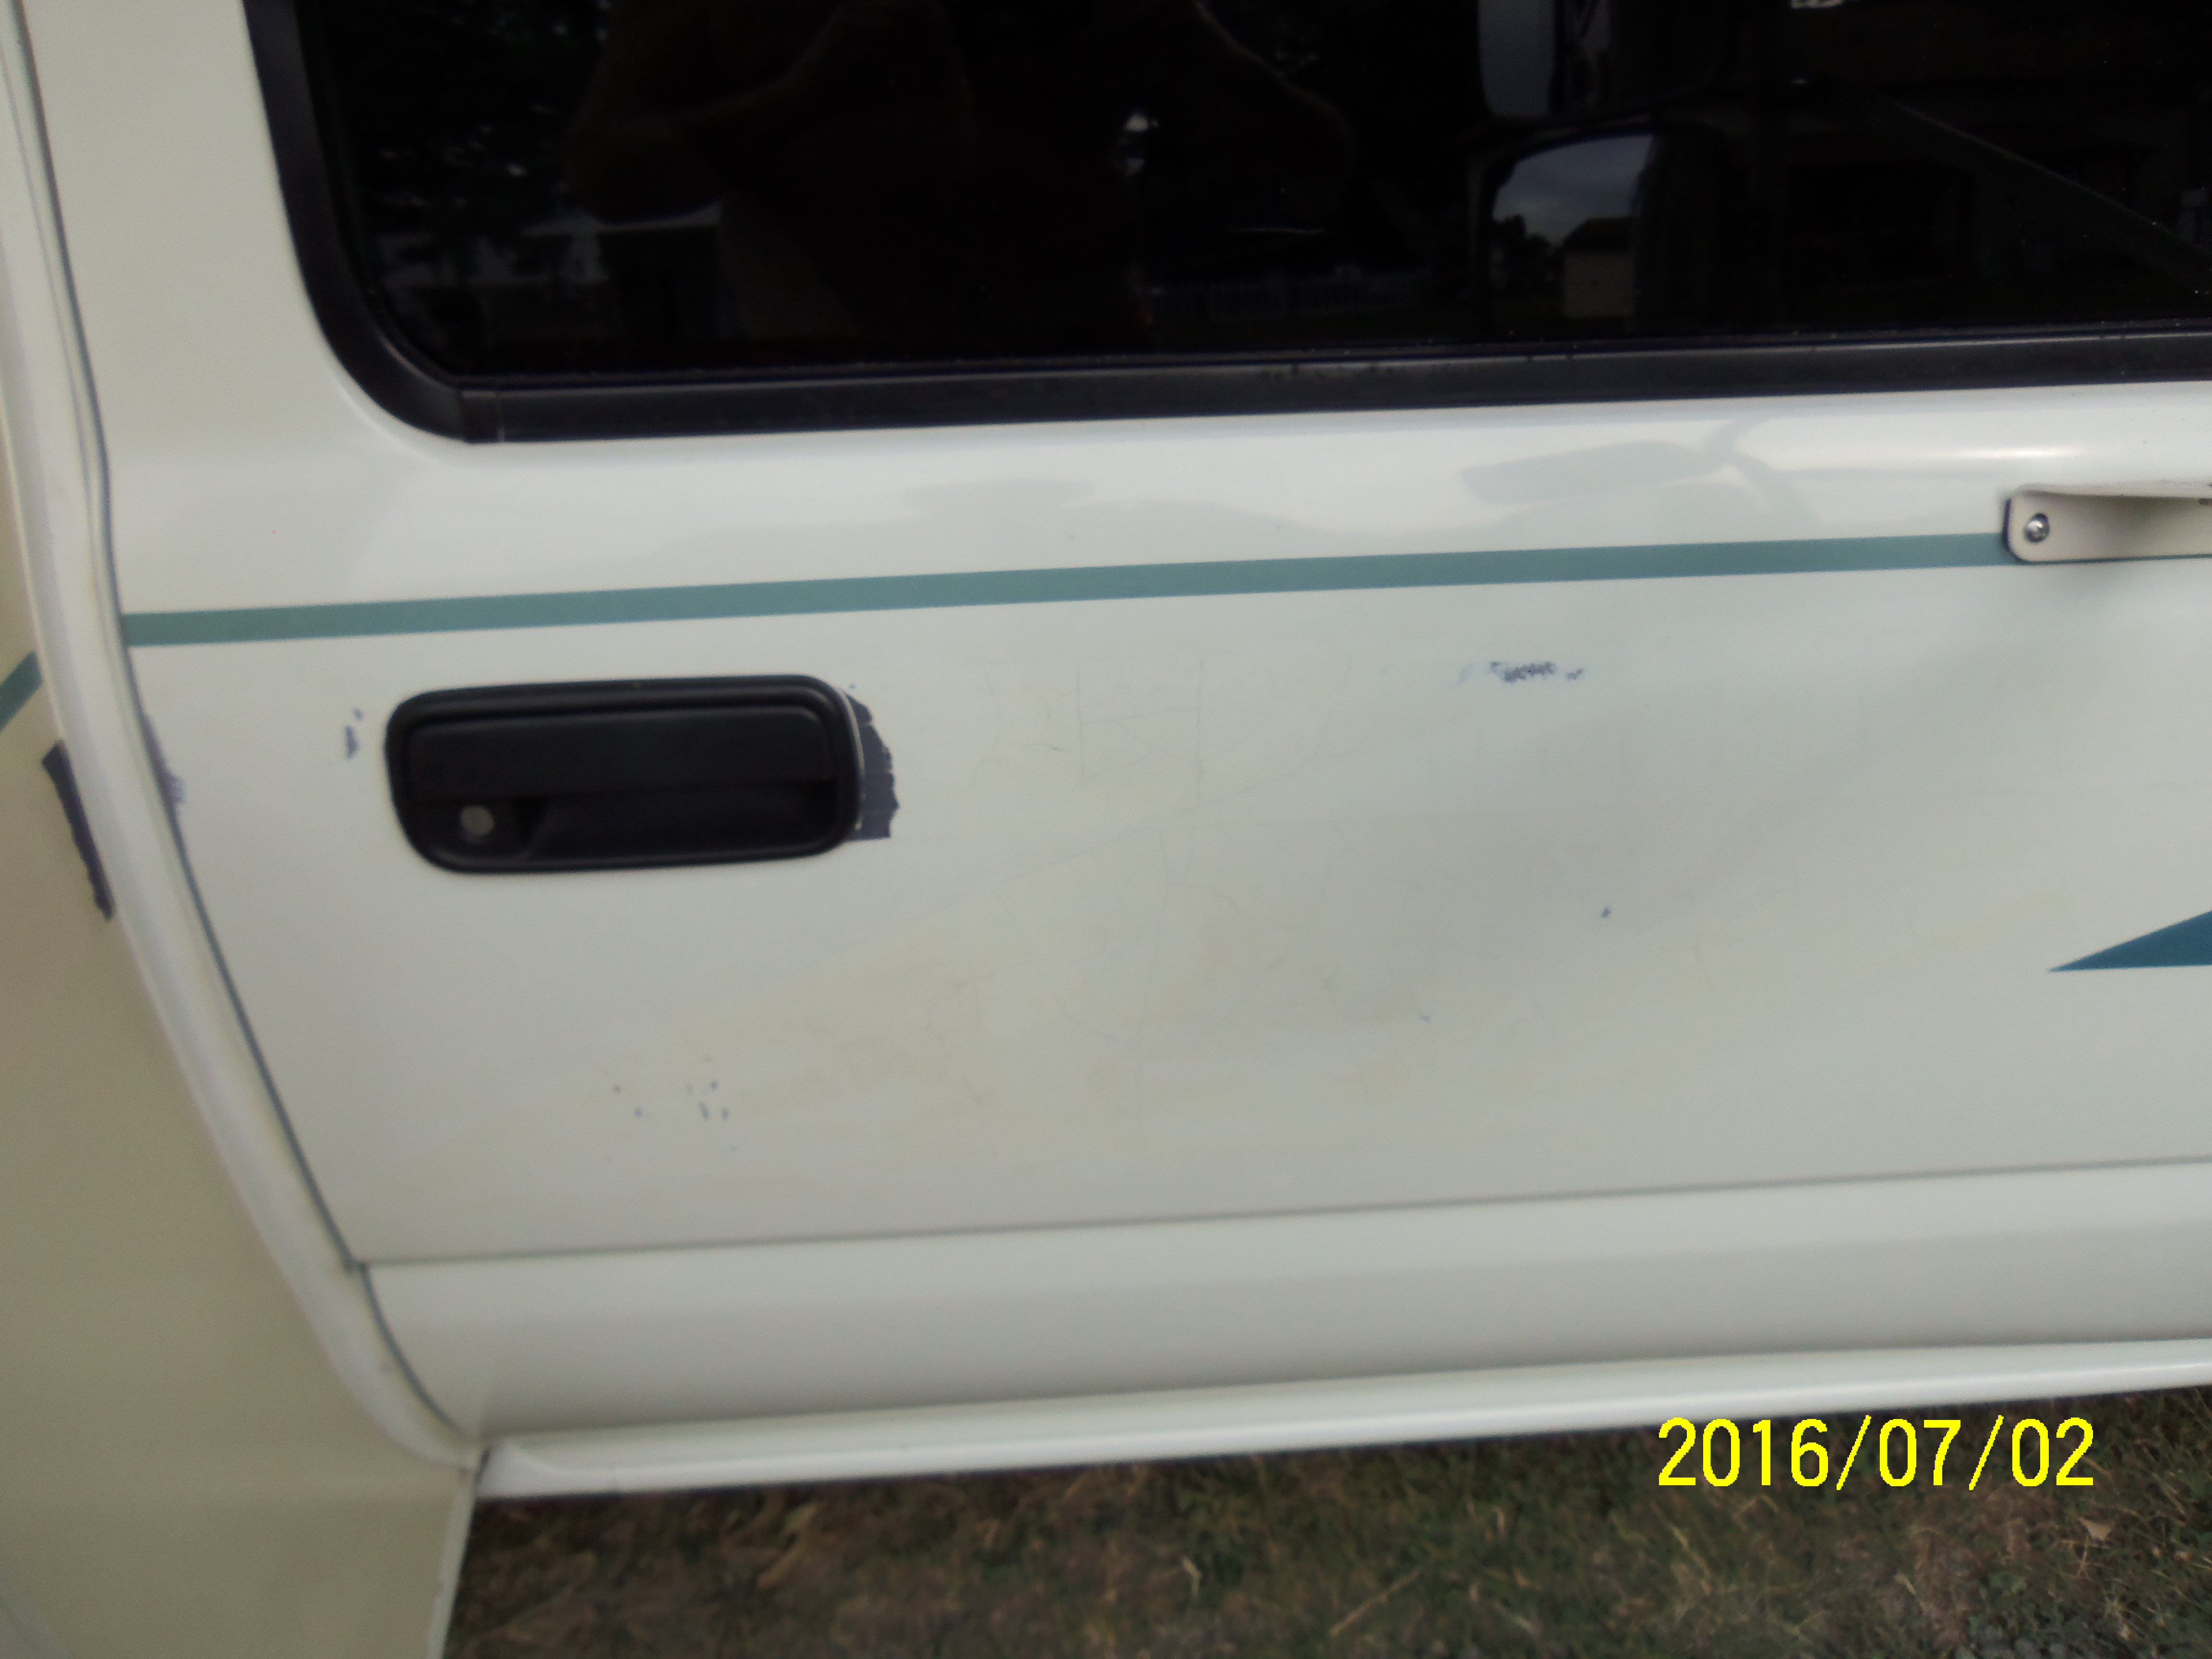
hey there, good looking rig, thanks for all the pics-- i'll add my 2 cents on the metal body parts. over the years i've had great results with dupont #7 rubbing compound. if the paint is oxidized, faded, tree sap, road tar and grime, dupont # 7 works great. my application method is to have a spray bottle with water and mist the rubbing compound then using an old tee shirt, transfer a small amount onto the tee shirt and in circular motion apply to your painted body parts. the mist of water acts as a lubricant of sorts , you don't need much of the compound, a little goes a long way, it will dry to haze , then wipe/buff off with clean tee shirt. you will have noticeably cleaner and smoother paint finish, after i apply and wipe off the compound, i wash, dry and use a car wax of choice ( i really like maguires carnuba gold, cleaner/ wax ) lots of elbow grease, but in my opinion well worth it. keep us updated on your progress ! joe from dover
-
hey there jp--what a great story, and so the journey begins. fantastic looking rig. welcome to the group. since you mentioned in your initial post, you have scouted the forum before becoming an owner, so you know all the wonderful people that share their knowledge and experience that inhabit this site. as you continue to update your rig please share with all. again, WELCOME!!!
-
hey there palfreyman, your pics indicate you have a little work ahead of you. but don't become discouraged, you will have a fine rig after a little TLC. not sure about the condition of your tanks, someone here will have the correct advice about the tanks and any other issues or questions that you may have. WELCOME and have fun. thanks for posting the pics. nice to see another buckeye with a toya !!! joe from dover GO BUCKS
-
hey vermonter, thanks for the input, sounds as though you've "been there. done that", as far as getting a toy-in up and running. i did not think of the face book option. i agree that you would want to reach a wide audience. as i have posted earlier, this is an idea for me right now, i want to do some research locally, and maybe get a better idea of how this may come together for next year. thanks so much for your interest, if this thing begins to take momentum, possibly i could ask to pick your brain ?? I've never been to The Great State of Vermont, ironically, i had planned a late summer trip which involved going through vermont to Maine, unfortunately, my winnie was (and still is ) in the shop for a new roof. a memorial day rally in Vermont would be great. joe from dover
-
City driving is hell! Do remodels help with the clunkiness?
hunkaman replied to Dgillies's topic in General Discussion
hello, i believe linda is correct. based on the fact your rig is an 81, and not knowing if any upgrades have been made to the suspension, you may benefit from looking over the front end. new shocks, tie rod ends, ball joints, etc. also the rear end shocks , look at the springs and air bags may be helpfull. my friend has an 85 granville, he basically replaced all the front end componets, and new shocks on the rear and he is very happy with the handling and enjoys a very smooth, quite, ride now. parts are available and in the overall not that expensive. good luck. joe from dover -
hello. please excuse my ignorance, are you saying the 1000 watt inverter obtains power from the 12 volt coach battery and then powers the microwave ? if i have described this correctly, does this process not drain the coach battery severely ? thank you in advance for educating me. joe from dover
-
hi there jeff- the zep wax thing is awesome. my friend has an 85 granville that he applied the zep product on. i have not seen it yet,but he is overwhelmed with the way it turned out. he said it looks show room new. if it looks as great as yours, i will be doing it to mine. thanks for the pics. should buy some zep stock lol. joe from dover
-
hi there, i too have been researching new decals for my rig. oddly, my situation involves having one color of the three color graphic scheme fail. with some advice and info from this forum, i was able to remove the failed graphic with out damaging the underlying surface. i used old school methods and traced the outline of the graphic i needed to replace and took the full size pattern to a decal shop. the price for replicating the graphics varied from $250.00 to $625.00. i have learned the vinyl material used for exterior graphics is far more expensive that non exterior vinyl. also for self installation, you can have the graphics made with a "backer" sheet for a much easier application. hope this helps. joe from dover
-
hi and welcome to the wide, wide world of toyota motorhomes. i am a relative new owner myself. i bought mine just over a year ago. if i may offer some advice ? first of all, this site is invaluable for help of any kind regarding these units. I have found the people here have a vast store house of experience and knowledge they freely share. secondly, you will find that you will be required to invest in your rig. in the sense that this is a "motor" home, just as your house needs updates and repairs so goes with your rig. initially it seems all you do is replace parts or repair things, but once you get past that part you really enjoy and have pride in your rig. your profile states you are from ohio, where exactly? i wish you well and please use this forum for help and sharing. joe from dover.
-
how "pricey" and do you have any pictures to share? thank you in advance.
-
hey there totem, thanks so much for the reply. your insight is very helpful. as i've stated before on my posts, i am a newly addicted toyota motorhome advocate. these things are great. this site is an absolute wealth of info. I love the exchanges on all the various topics, and especially if photos are involved. this thought of a toy in or event is appealing to me for a host of reasons. i think it would be wonderful to have face to face encounters with others owners, check out other rigs, and general fellowship. where i live in Tuscarawas county, is about 25 miles south of the NFL hall of fame in canton, ohio, just as a point of geographical reference. Our area has a substantial tourist industry due in large part to the amish community. we are off interstate 77. we are very close to many camping areas, privately owned and state run through Ohio Dept. of Natural Resources and Muskingum Watershed Conservancy District. there seems to be a festival every weekend within a 10 or 15 minute drive from Dover. I thought i would contact the county tourism office and speak with someone there for additional guidance and info. your advice about setting a date one year in advance makes total sense, and offering certain activities during the event helps me. at this stage i am just thinking out loud, but maybe the info concerning the event should possibly contain links to the areas attractions, lakes, festivals, etc. ? I do wonder if attendees generally remain at the campsite area for the duration of the event, or do they want to travel from the event site to explore local points of interest or attractions, shopping, etc. ? asking this question is in part due to the obvious in as much as i do not think owners of our rigs tow other vehicles as the larger motor homes can. This part of the state is mostly rural with very few public transportation options. another thought/question, should these events be scheduled for weekends or any stretch of days ? thanks again for your feedback, it is what i was hoping to receive, with the help of others ideas, advice or input, such as yours, i may plant the seed and see how it grows. thanks again totem, and what the heck MICH. isn't that far maybe the future holds a toy-in for two LOL
-
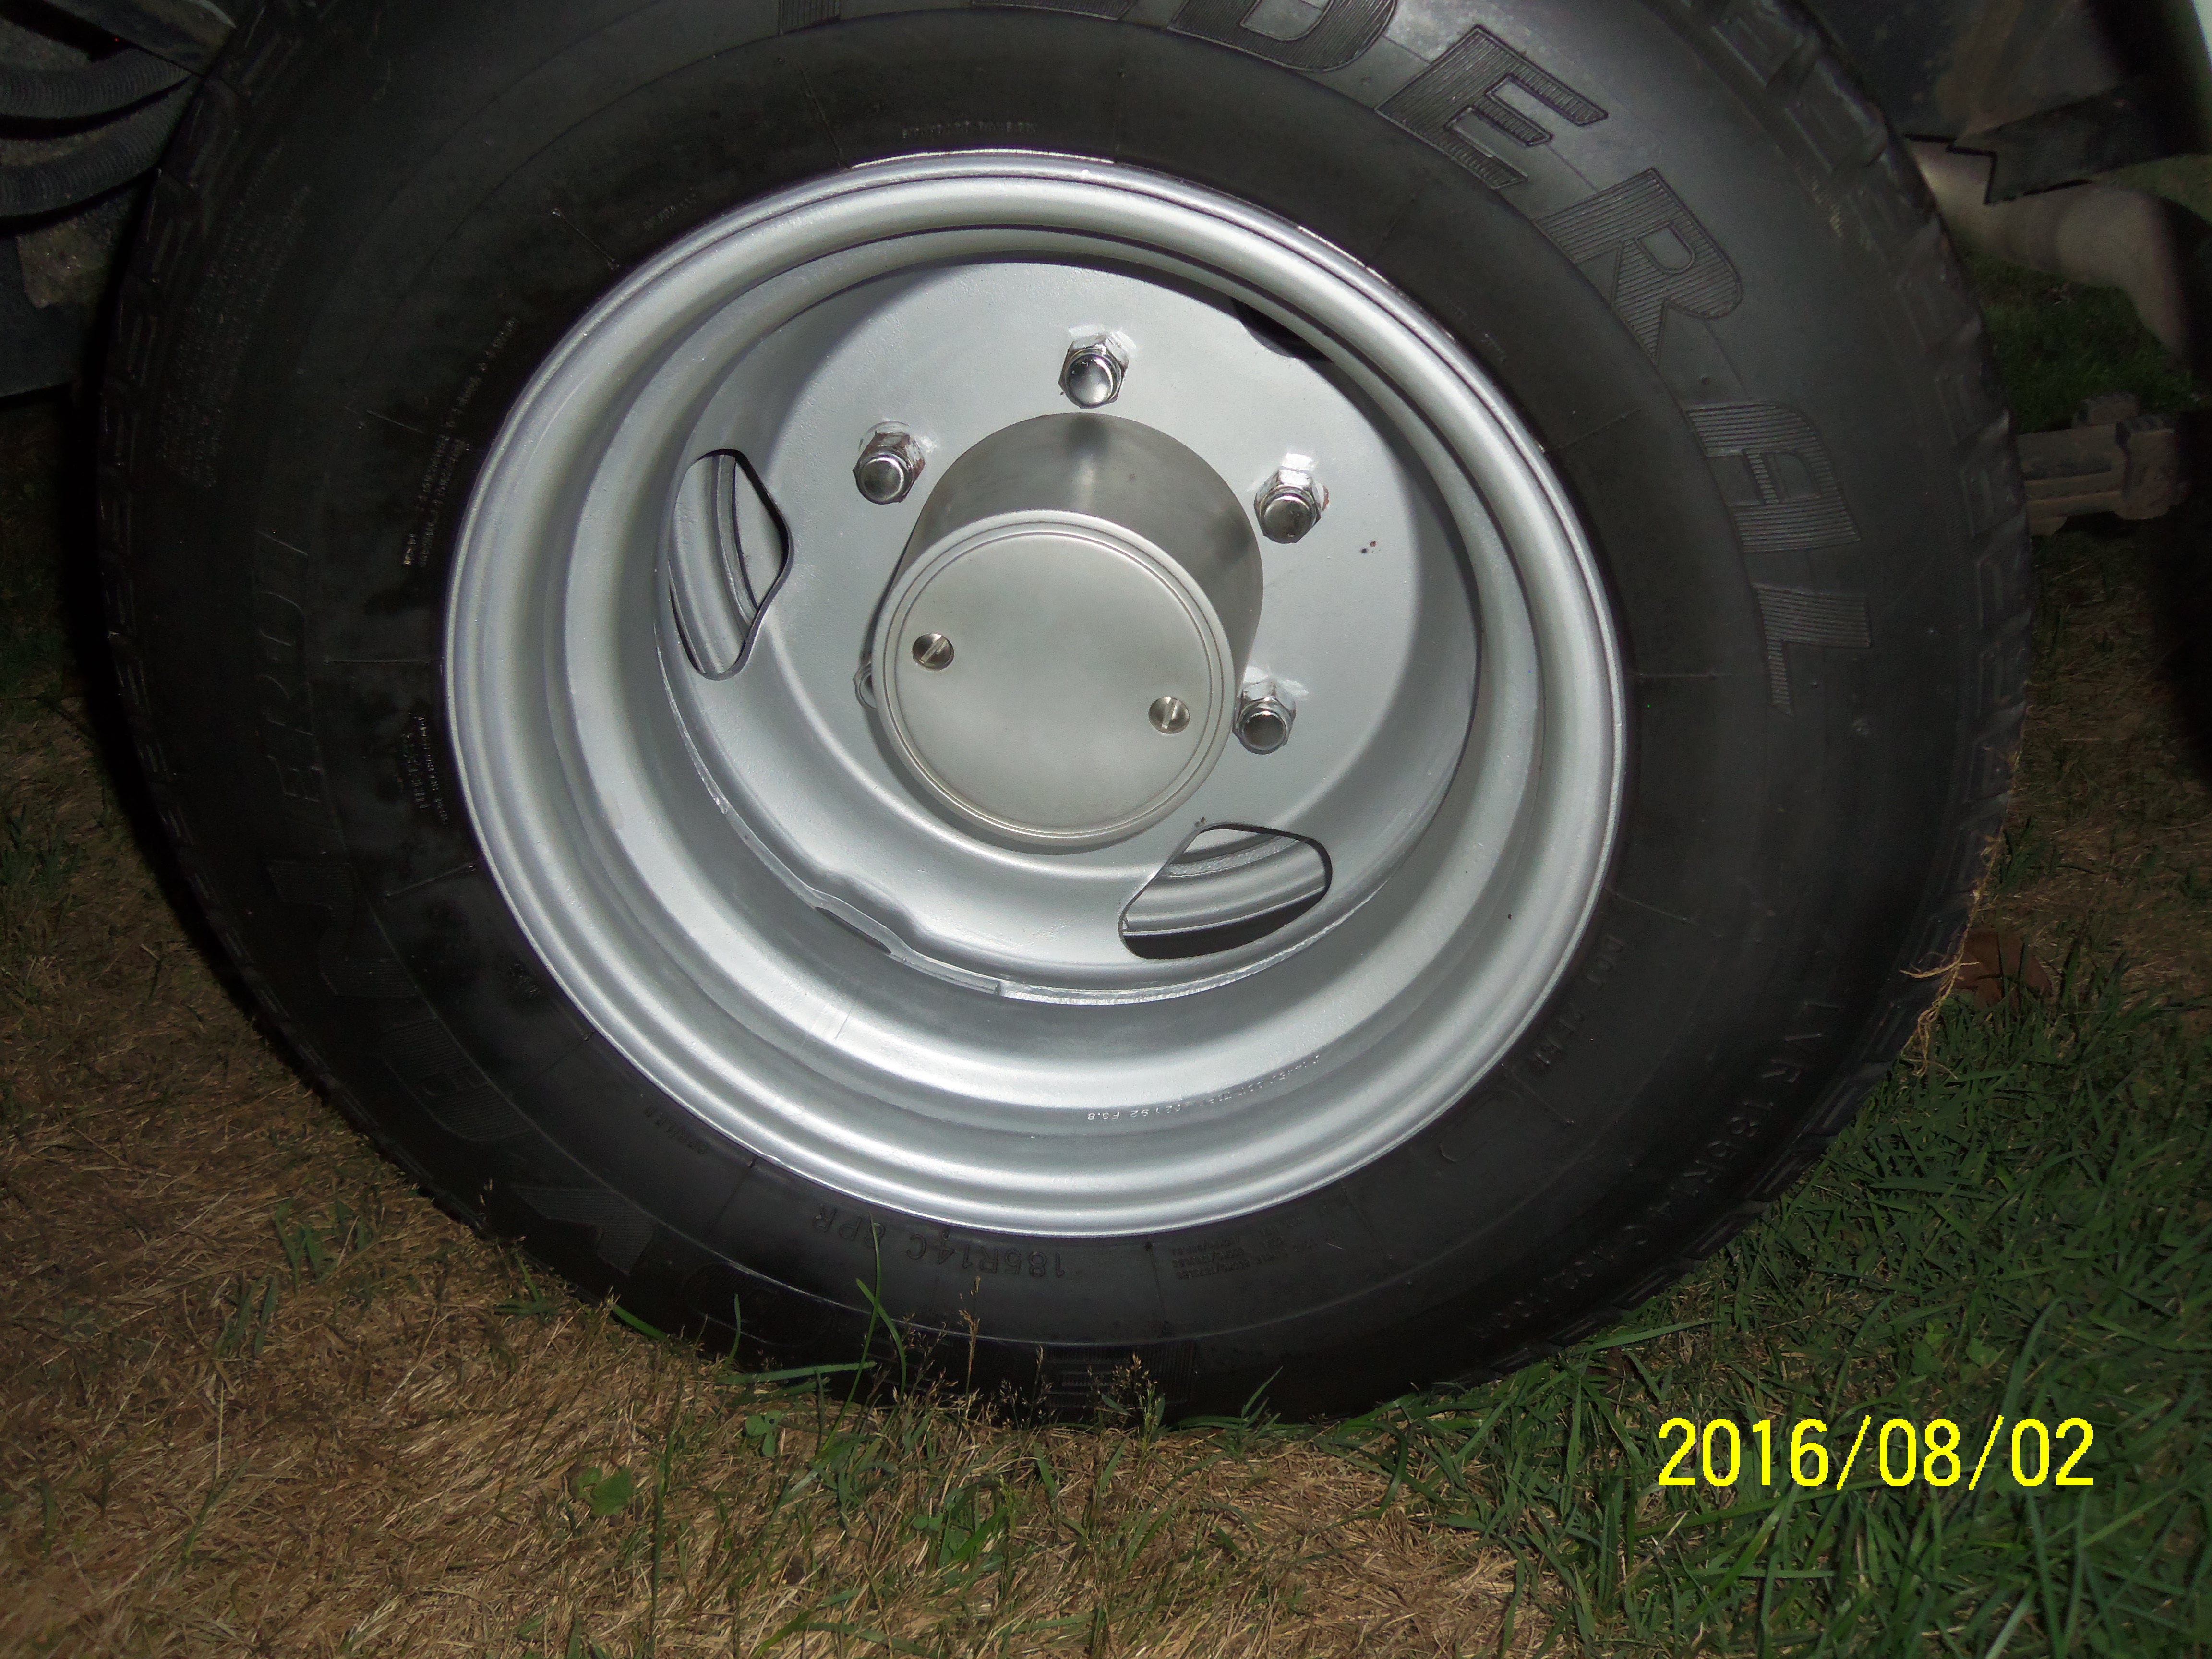
wheel repaint
hunkaman replied to hunkaman's topic in Improvement and Do-It-Yourself Projects you have done to Share!
hi jeff thanks for the reply, was not aware the hub covers were "coveted", lol- you mentioned about a 4 1/2 inch "disc" does that mean you have the hub cover and not the disc that has the two screw holes for securing to hub cover?? have you considered making a disc from a piece of plastic ?? there are several techniques using simple hand tools to cut a circle to an exact size easily. If you have access to a band saw, even a small bench top style, you can cut a circle with a homemade jig. other tools i have used to cut materials into circles, are : jig saws, hole saws, a circle cutter attachment for a drill press, and using a vertical belt sander and an oscillating sander. -
unfamiliar tandem rear wheel rig are they rare ??
hunkaman replied to hunkaman's topic in General Discussion
thanks for the reply jdemaris, that info confirmed that is a "ez rider " model not the Express. in your opinion, is this worth trying to part out? i am definately not looking for a resto project. -
hi to all. I came across a rig that has a tandem wheel set up. I am admittedly a relative newcomer, but i do not believe i have seen this wheel arrangement before. the person that owns it is an elderly woman who has stored it outdoors uncovered for about 8 years. It is in poor condition, but the motor did start recently. It has the 22r carbed motor with stick shift and 60k on the odometer. the interior is surprisingly in good shape. the exterior is another story. some rust on the hood, and a coach window broken. It is the rear kitchen design with the bathroom behind the drivers seat. I believe it is a 1976 model year and called an "express" not sure about that. It also has two batteries under the hood. anyone out there that has some history on this thing? The owners daughter wants to sell it, not sure if it is economically viable for restoration, possibly for parting out? any comments, feedback, suggestions or info help with this would be greatly appreciated. thanks in advance.
-
hi there and welcome- very nice looking interior, clean and in great shape. is this your first toyota rv ? just asking because this is THE place for help of any kind. i am a newbie, bought my rig one year ago. i have received priceless info from all the fine and knowledgable people that are involved here. i really enjoy pictures of all the different rigs, so thanks for your post, hope you are a frequent visitor here. joe from dover aka hunkaman
-
hi to all, there seems to be very few toyota motor home events, rallies, or toy-ins that i am aware of. does anyone have a list or schedule for these events? I live in east central ohio ( dover ) , and would love to know if there are opportunities within a few hundred miles from me that i could attend. also, i was wondering if anyone has actually organized a toy-in. i thought of contacting our county tourism office and suggesting an event here in dover at our fairgrounds. any one care to offer any related experiences, advice or suggestions for starting an event?? right now it is an intriguing thought. thanks for your interest and help in advance.
-
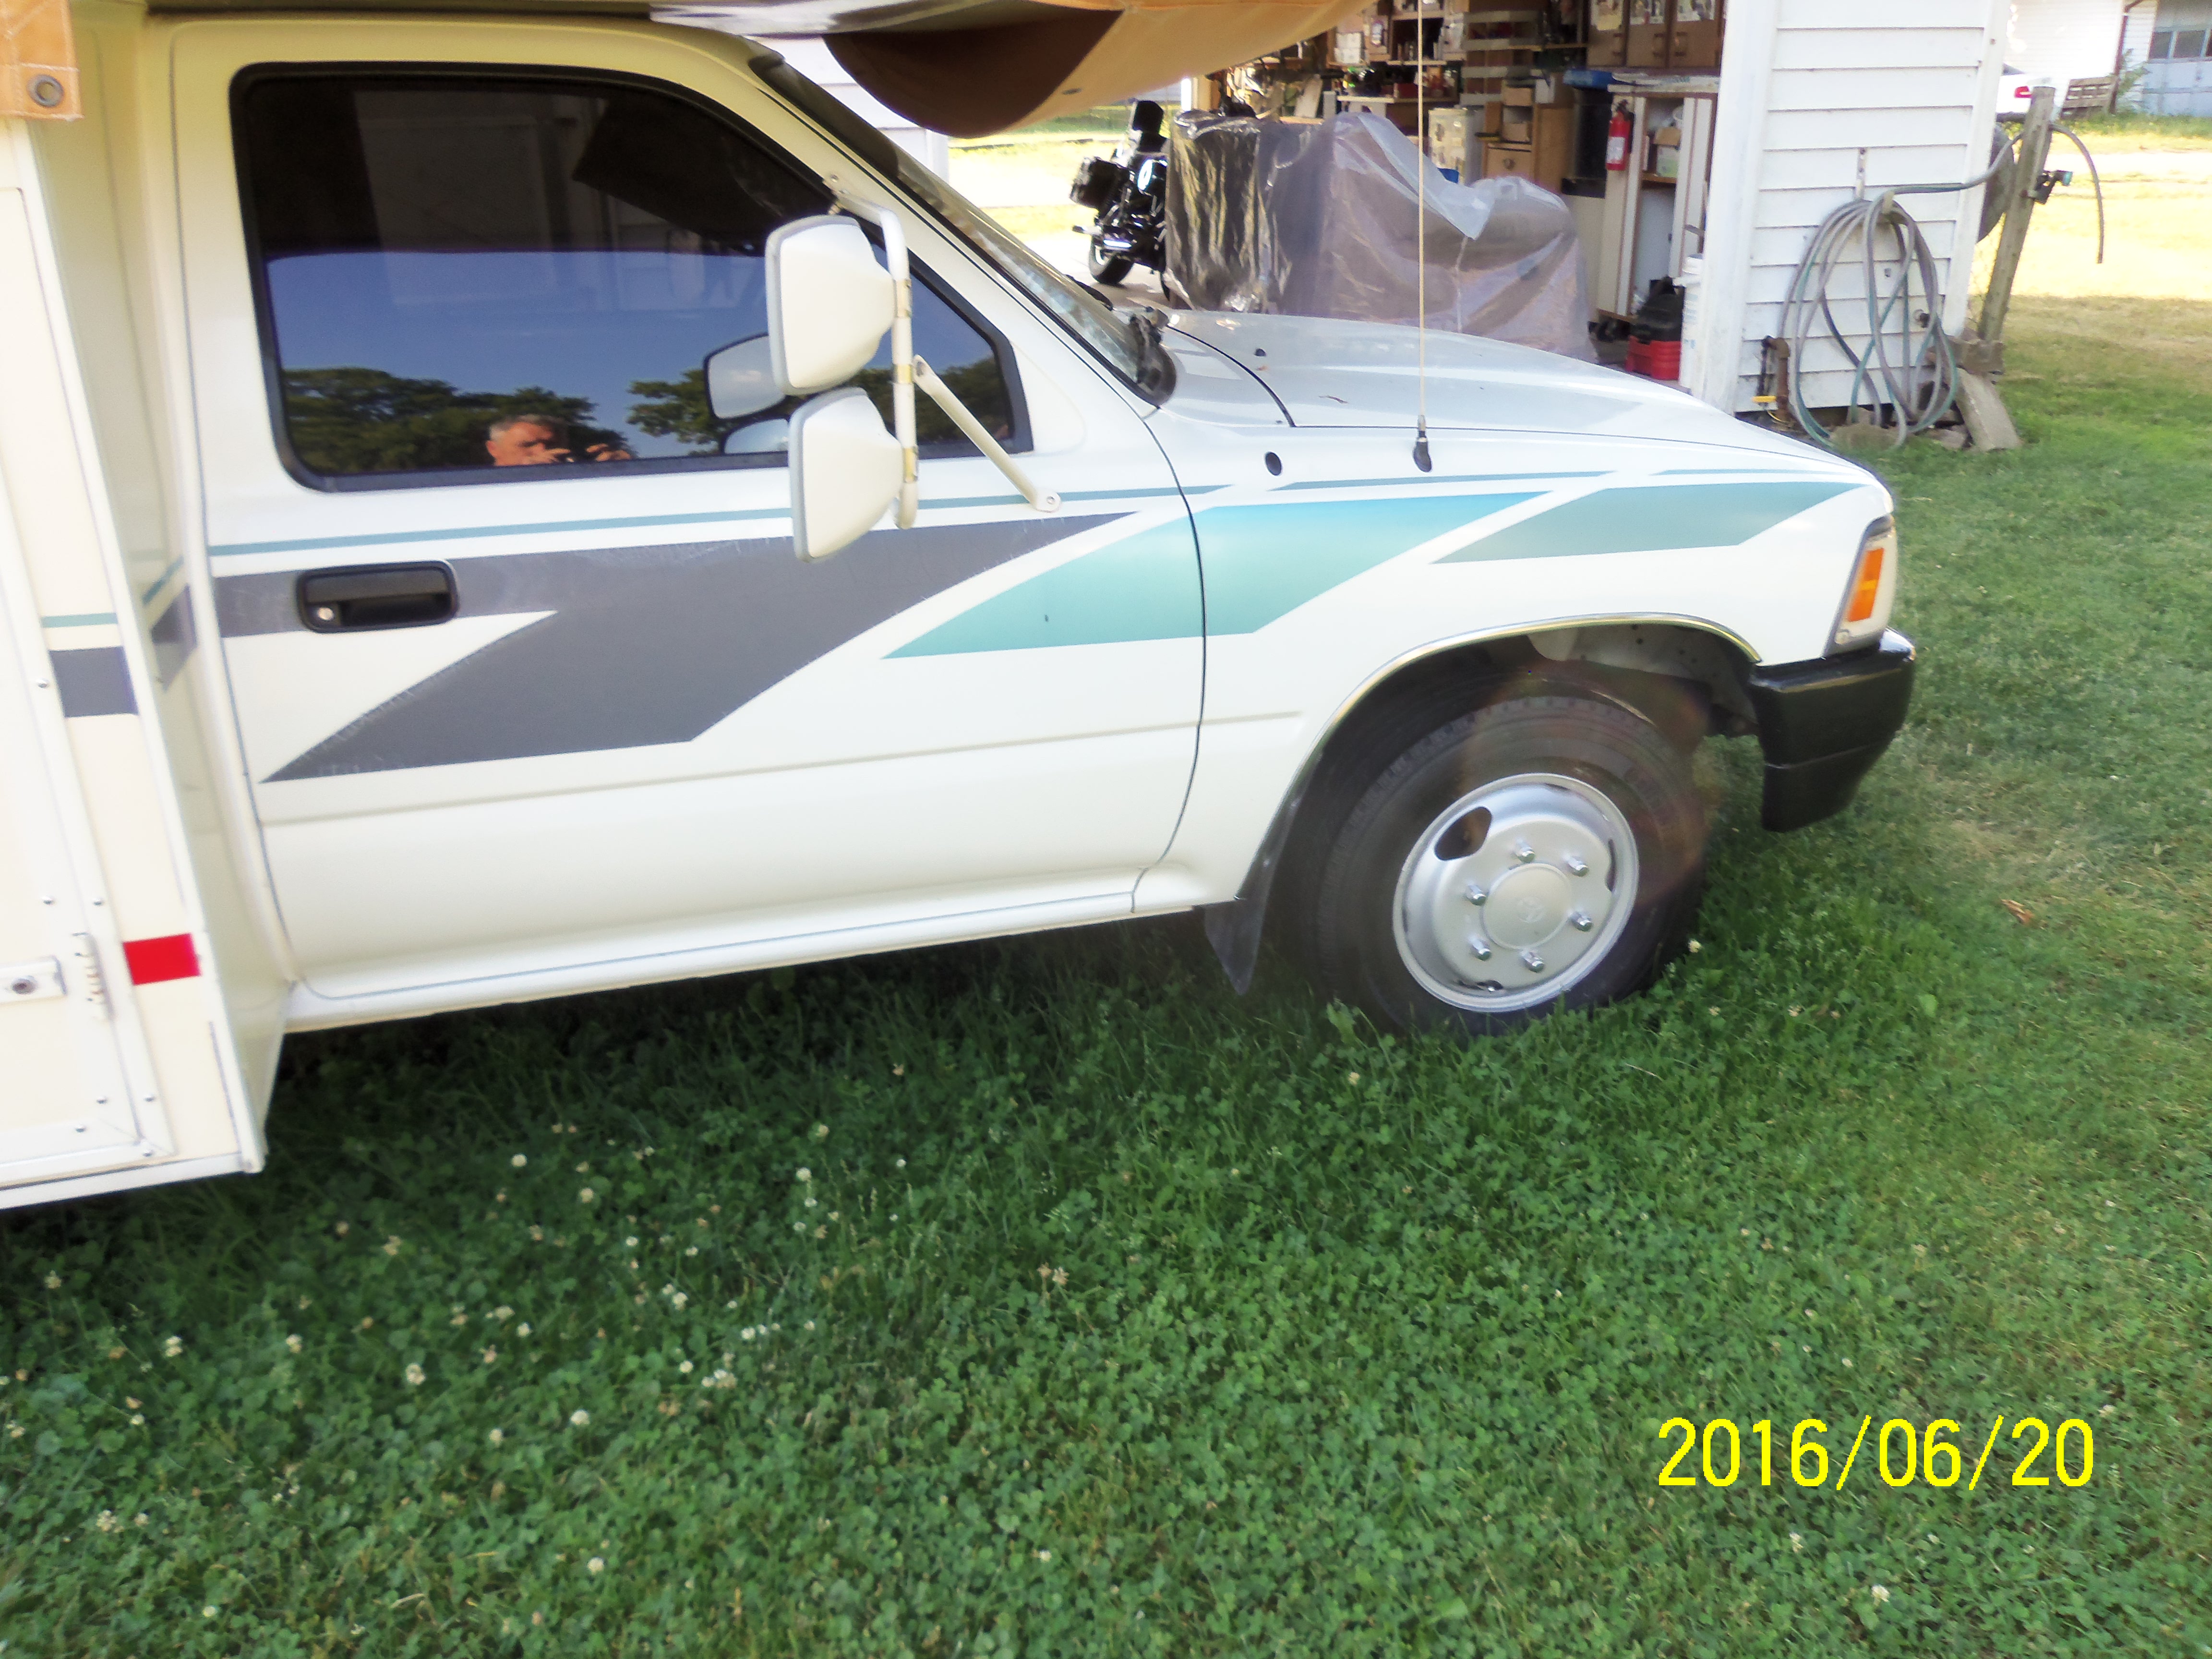
hi there jeff-- i started my regraphic project earlier this summer while waiting to get my winnie in the repair shop for a new roof. i inquired on this site about removing the old graphics, and was given some very useful info from the fine people here. i am currently waiting for some price estimates from a couple local vinyl sign and decal shops. the local shops are going to cut the curved graphics i need to replace as well as the straight tape. the shops will computerize my pattern and then cut the new material for me to install. so far i have had two estimates, one for $250.00 the other for $625.00. big difference, i have one more price to get. i will post pics after i get the new graphics on, this is what i have now. thanks again for your help with my previous questions.

-
wheel repaint
hunkaman replied to hunkaman's topic in Improvement and Do-It-Yourself Projects you have done to Share!
i made a cardboard template to cover the axle. the masking and sandblasting was a pain in the butt. after the paint dried, about two days, i waxed the wheels inside and out with a quality auto wax by mother's car care products. thanks for viewing, comments, and questions. -
thought i would share this. my rig has been waiting all summer to get a new roof installed. so with all the down time, i decided to "dress up" the wheels a bit. they were not horrible but some minor rust issues and just were not "pretty". so i jacked her up and removed the wheels. did the front two first then the back four. step one was masking both sides of the tires, then sand blasting. a note of caution here if anyone wants to do this as i have, i used a silica fine sand available at a masonry supply store. you MUST USE A RESPIRATOR with this material. after the sand blasting i used wire wheels to smooth out the little bit of roughness left after sandblasting. i also used some scotch brite pads here and there. next step was wiping all surfaces with denatured alcohol to remove and residue from the previous steps. next was a coat of rustoleum primer. and finally the top coat of silver paint. i chose not to change from the original silver color, i found a pretty close match
-
that looks great - i have the same project for my 92 winne warrior. I am only replacing the one color ( of three colors ) on my rig. for whatever reason the mauve color failed, the blue and green are fine. a few questions please: did you purchase the pre-masked premium vinyl tape ? was the application to your rig easy enough to do ? any tips or advice you can pass on ? do you know if the company you bought the tape from can cut Shapes if provided a pattern ? thanks in advance and again what a great looking rig, very eye catching and professional look, great job
-
hey there wade: your roof issues are sounding really close to mine. i have a 93 warrior winne with the thin alum roof. my story? background, bought almost one year ago. only made one short (150 miles round trip ) voyage last sept. was raining from time of departure to return. at times heavy rain, mostly steady drizzle, noticed absolutely no leakage until may 2016. after a severe hail storm. my winnie was stored from nov 1 to april 1 in indoor storage. only noticed leakage when felt dampness on the couch/bed behind drivers seat. when i got the ladder out, saw that the hail broke the front roof vent cover. but also noticed dozens of bubbled up areas on roof surface. scraped away the bubble areas and realized the aluminum under the thin coating had degraded resulting in trapping moisture throughout the entire roof area, rotting the plywood below the aluminum sheet. currently it is in the local rv shop getting entire new roof with new interior ceiling panels as well. has been in shop all summer may get it back next spring, insurance paid the cost, approx. 6k what is troubling to me is this damage was already there and undetectable to me. the hail storm broke the vent cover , but the rv guy said the damage from the bubbles on the roof had been going on for some time prior to my buying the unit. after that first, and sadly only trip, last sept in the pouring rain the whole time, i would have thought any roof leaking should have been evident. but it was not. no visible water stains, standing water, or other signs. i spent many hours in and out of the rig before i indoor stored it on nov. 1 and noticed nothing that would have alerted me to the roof issue. i am also a newbie to motorhome rving. and this site is wonderful. so many helpful and knowledgeable owners willing to share their information and experiences. what i learned is a couple things: one, if your roof does not leak KEEP IT THAT WAY, and two, rv roofs require rv materials, they have special needs due to flexing, expansion, contraction, uv damage ,etc. hope you get yours all fixed and water tight, good luck joe from dover
-
i have a 1992 Winnie Warrior , would like to purchase a bug shield/deflector. since i will be buying online, i really don't want to order one, only to find it really does not fit, so my question is, has anyone out there purchased one that fits, and if so, could you please offer a brand, and model number ? thanks in advance for your help and interest.
-
just came upon this post - my friend has an 85 granville - he wanted to mount his honda 2000i on the back as well - concern for weight being first and foremost - extended the rear 18 inches - used 1/8'' polished aluminum treadplate for platform - took two square plastic milk crates - cut the sides (one each) joined each crate with aluminum extruded "u" channel with pop rivits then mounted to tread plate with stainless self tappers and stainless washers - plastic, aluminum and stainless equals no rust and light weight. the milk crates are pretty much standard in height, width, and length, and it just worked out that the honda fit like a glove after the two crates were cut and rejoined. another project done at the same time was welding a post to the bumper and fabricating it so as to hold the front and rear spare tires .the rear spare, ( 6 lug dually) is positioned between the bumper and rear of body, the front spare ( 5 lug) is mounted directly in front of dually, on outside of bumper. fabricated and welded brackets to post for each wheel, bought wheel studs at auto parts store and welded to bracket to mount each wheel. had to adjust each bracket and studs so both would line up in front/back of each other due to different bolt patterns. works really well. studs for each wheel are facing out, so you can remove one spare without removing the other. allowed enough spacing that each spare can be covered with it's own cover. my friends rig has a ladder on rear to roof, so had to place spare tire post a bit off center, to avoid obstructing access to ladder, tail lights and license plate. was just enough area to mount the generator crate that it fit nicely with out overhanging the rig.
-
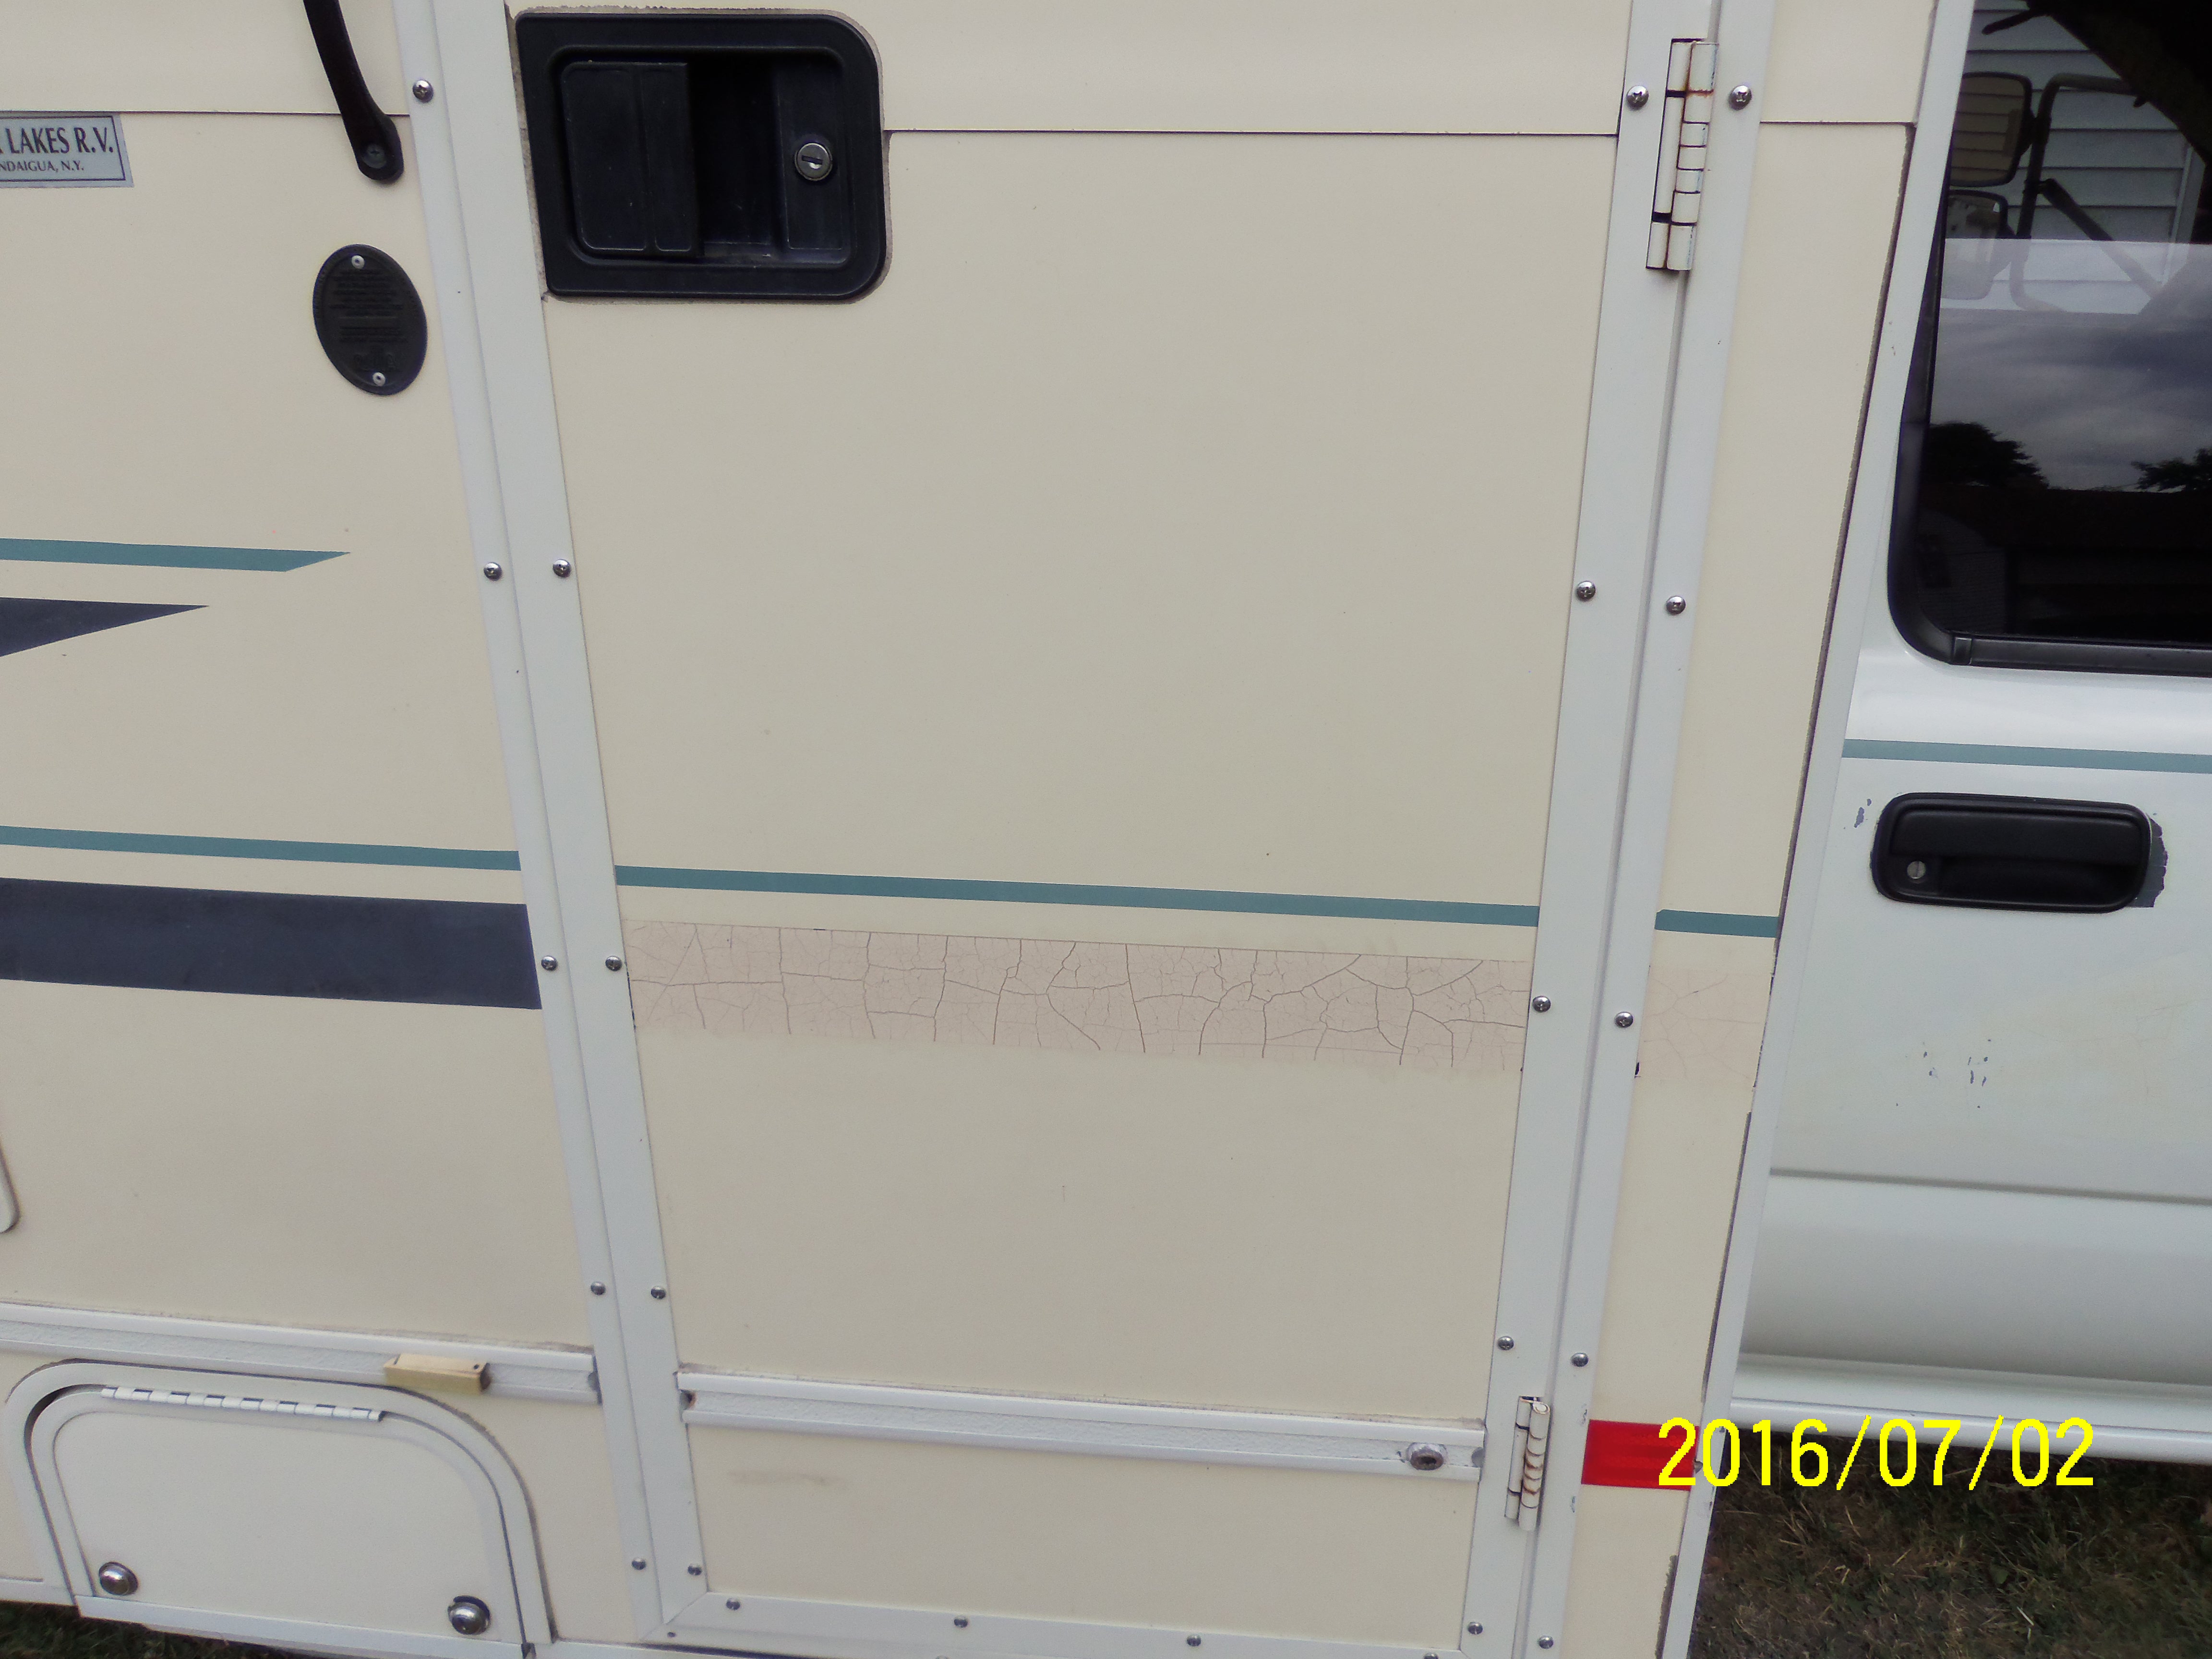
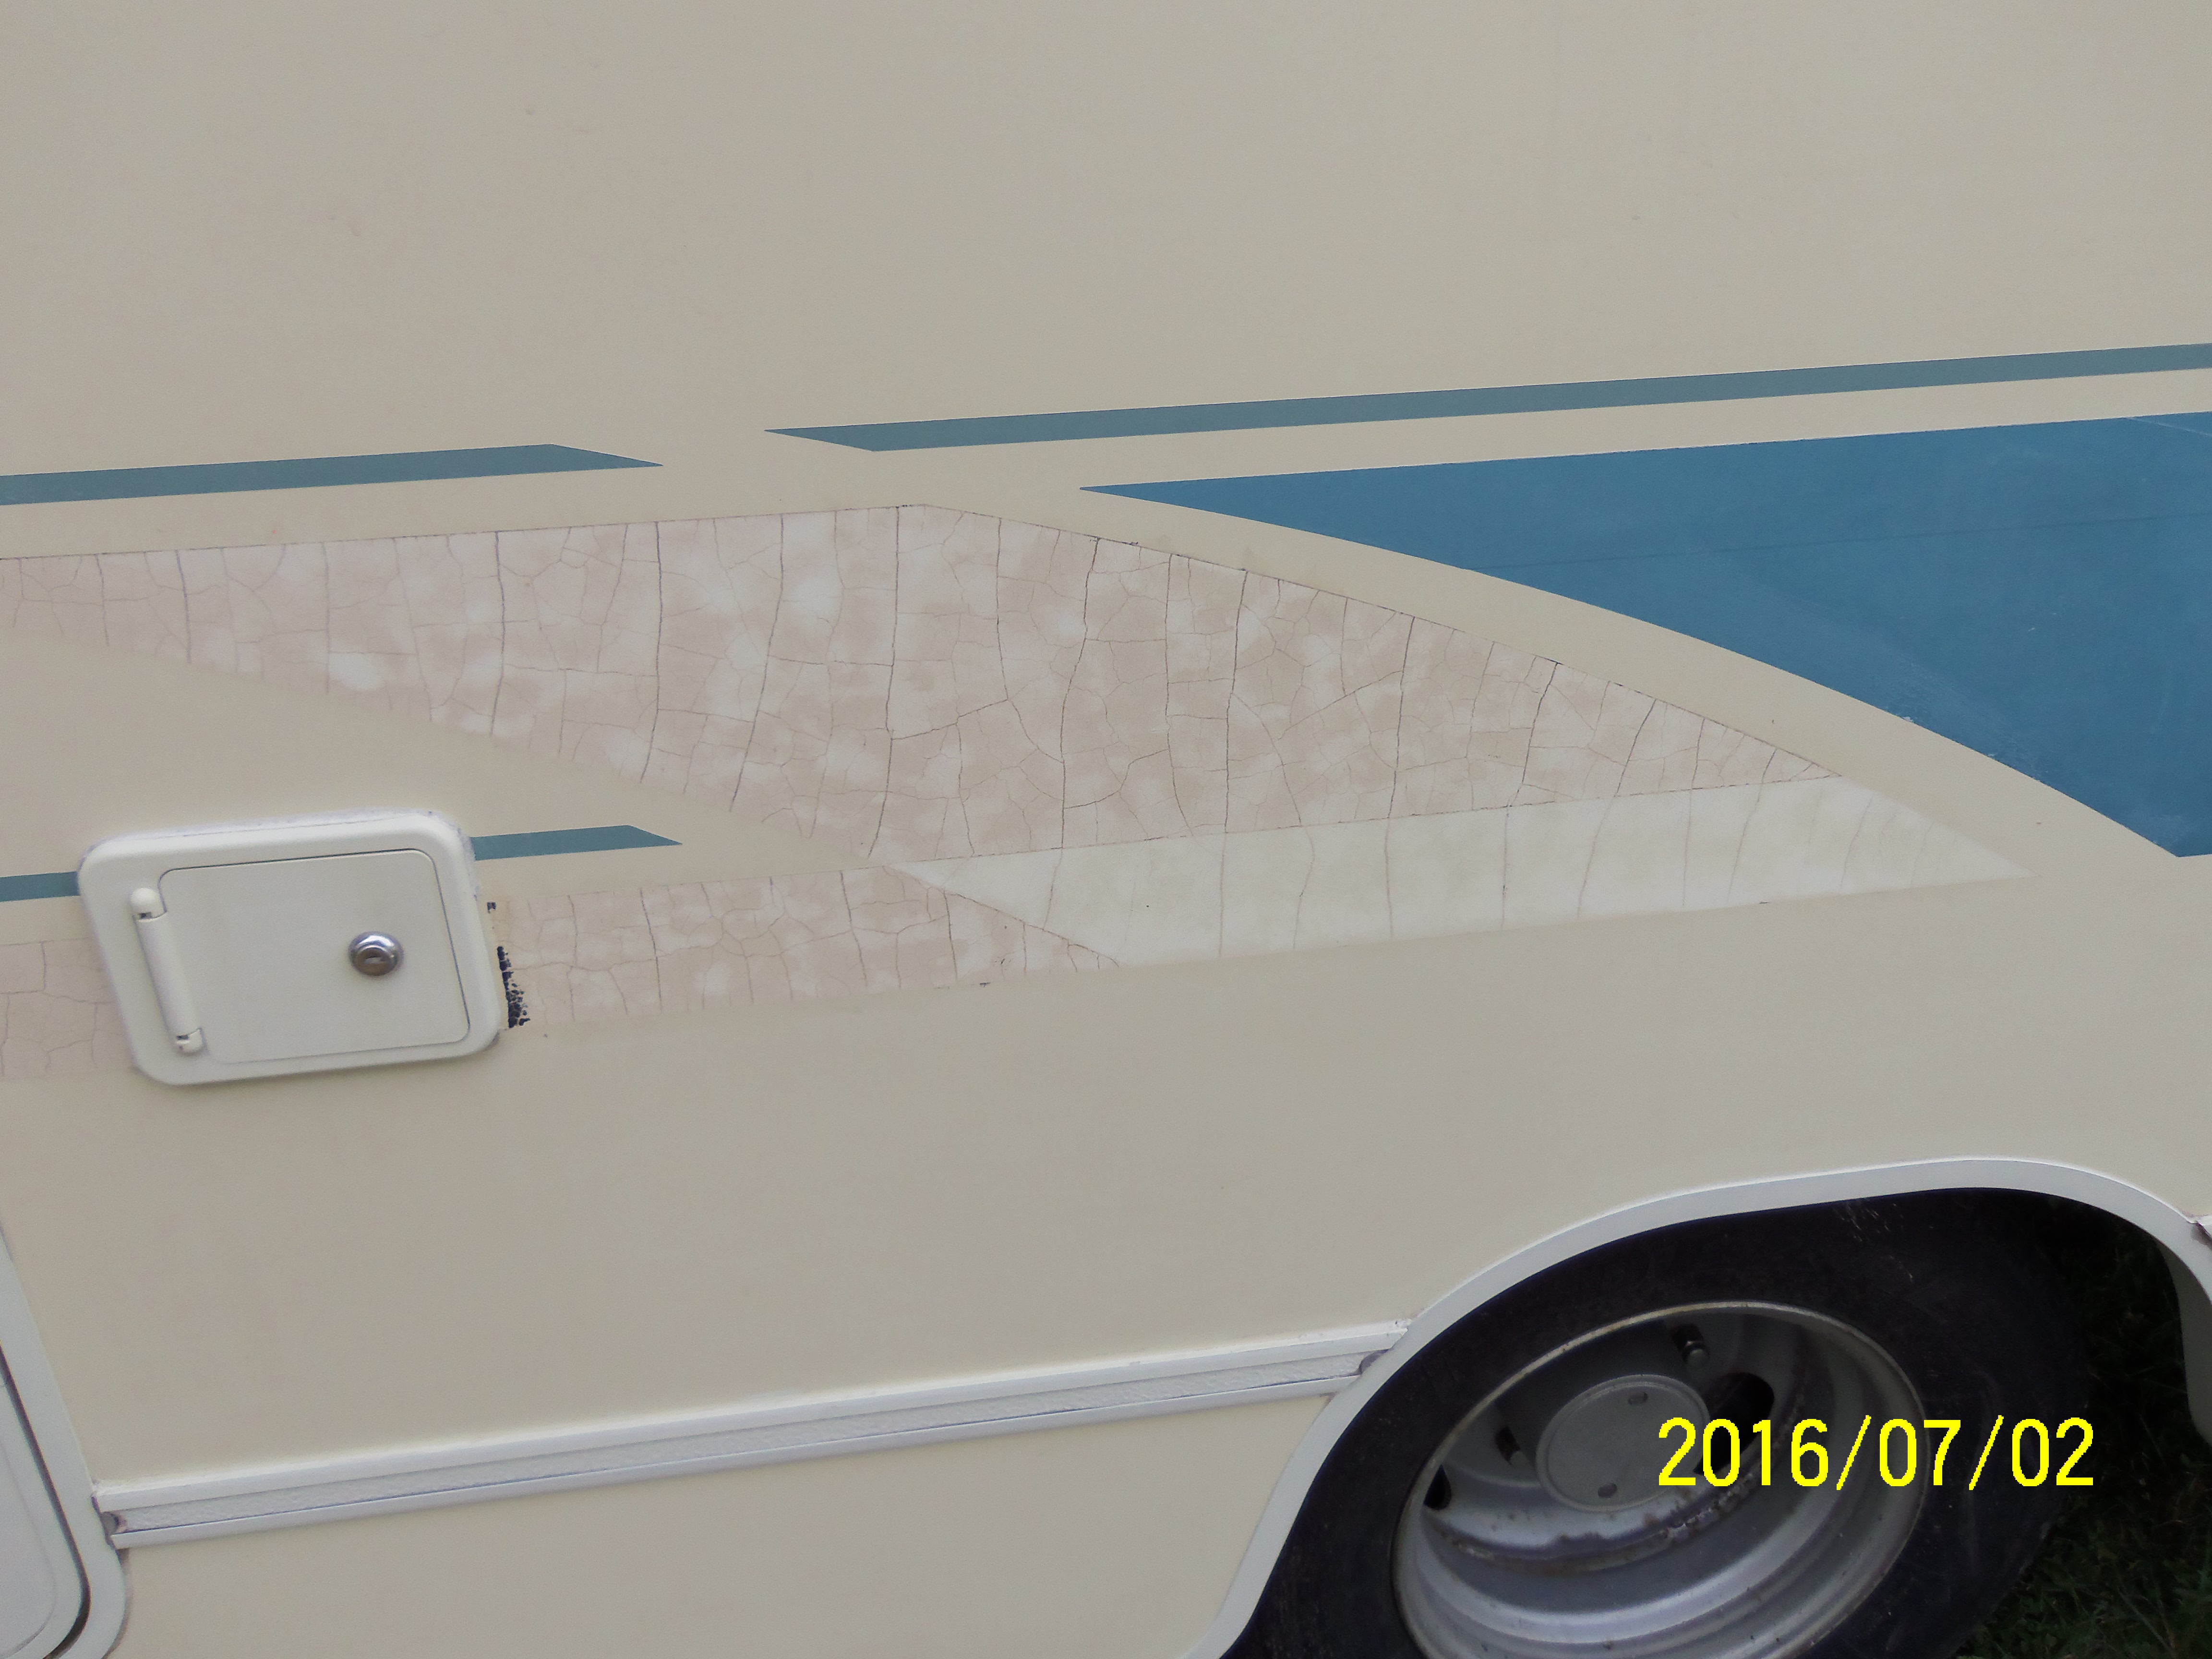
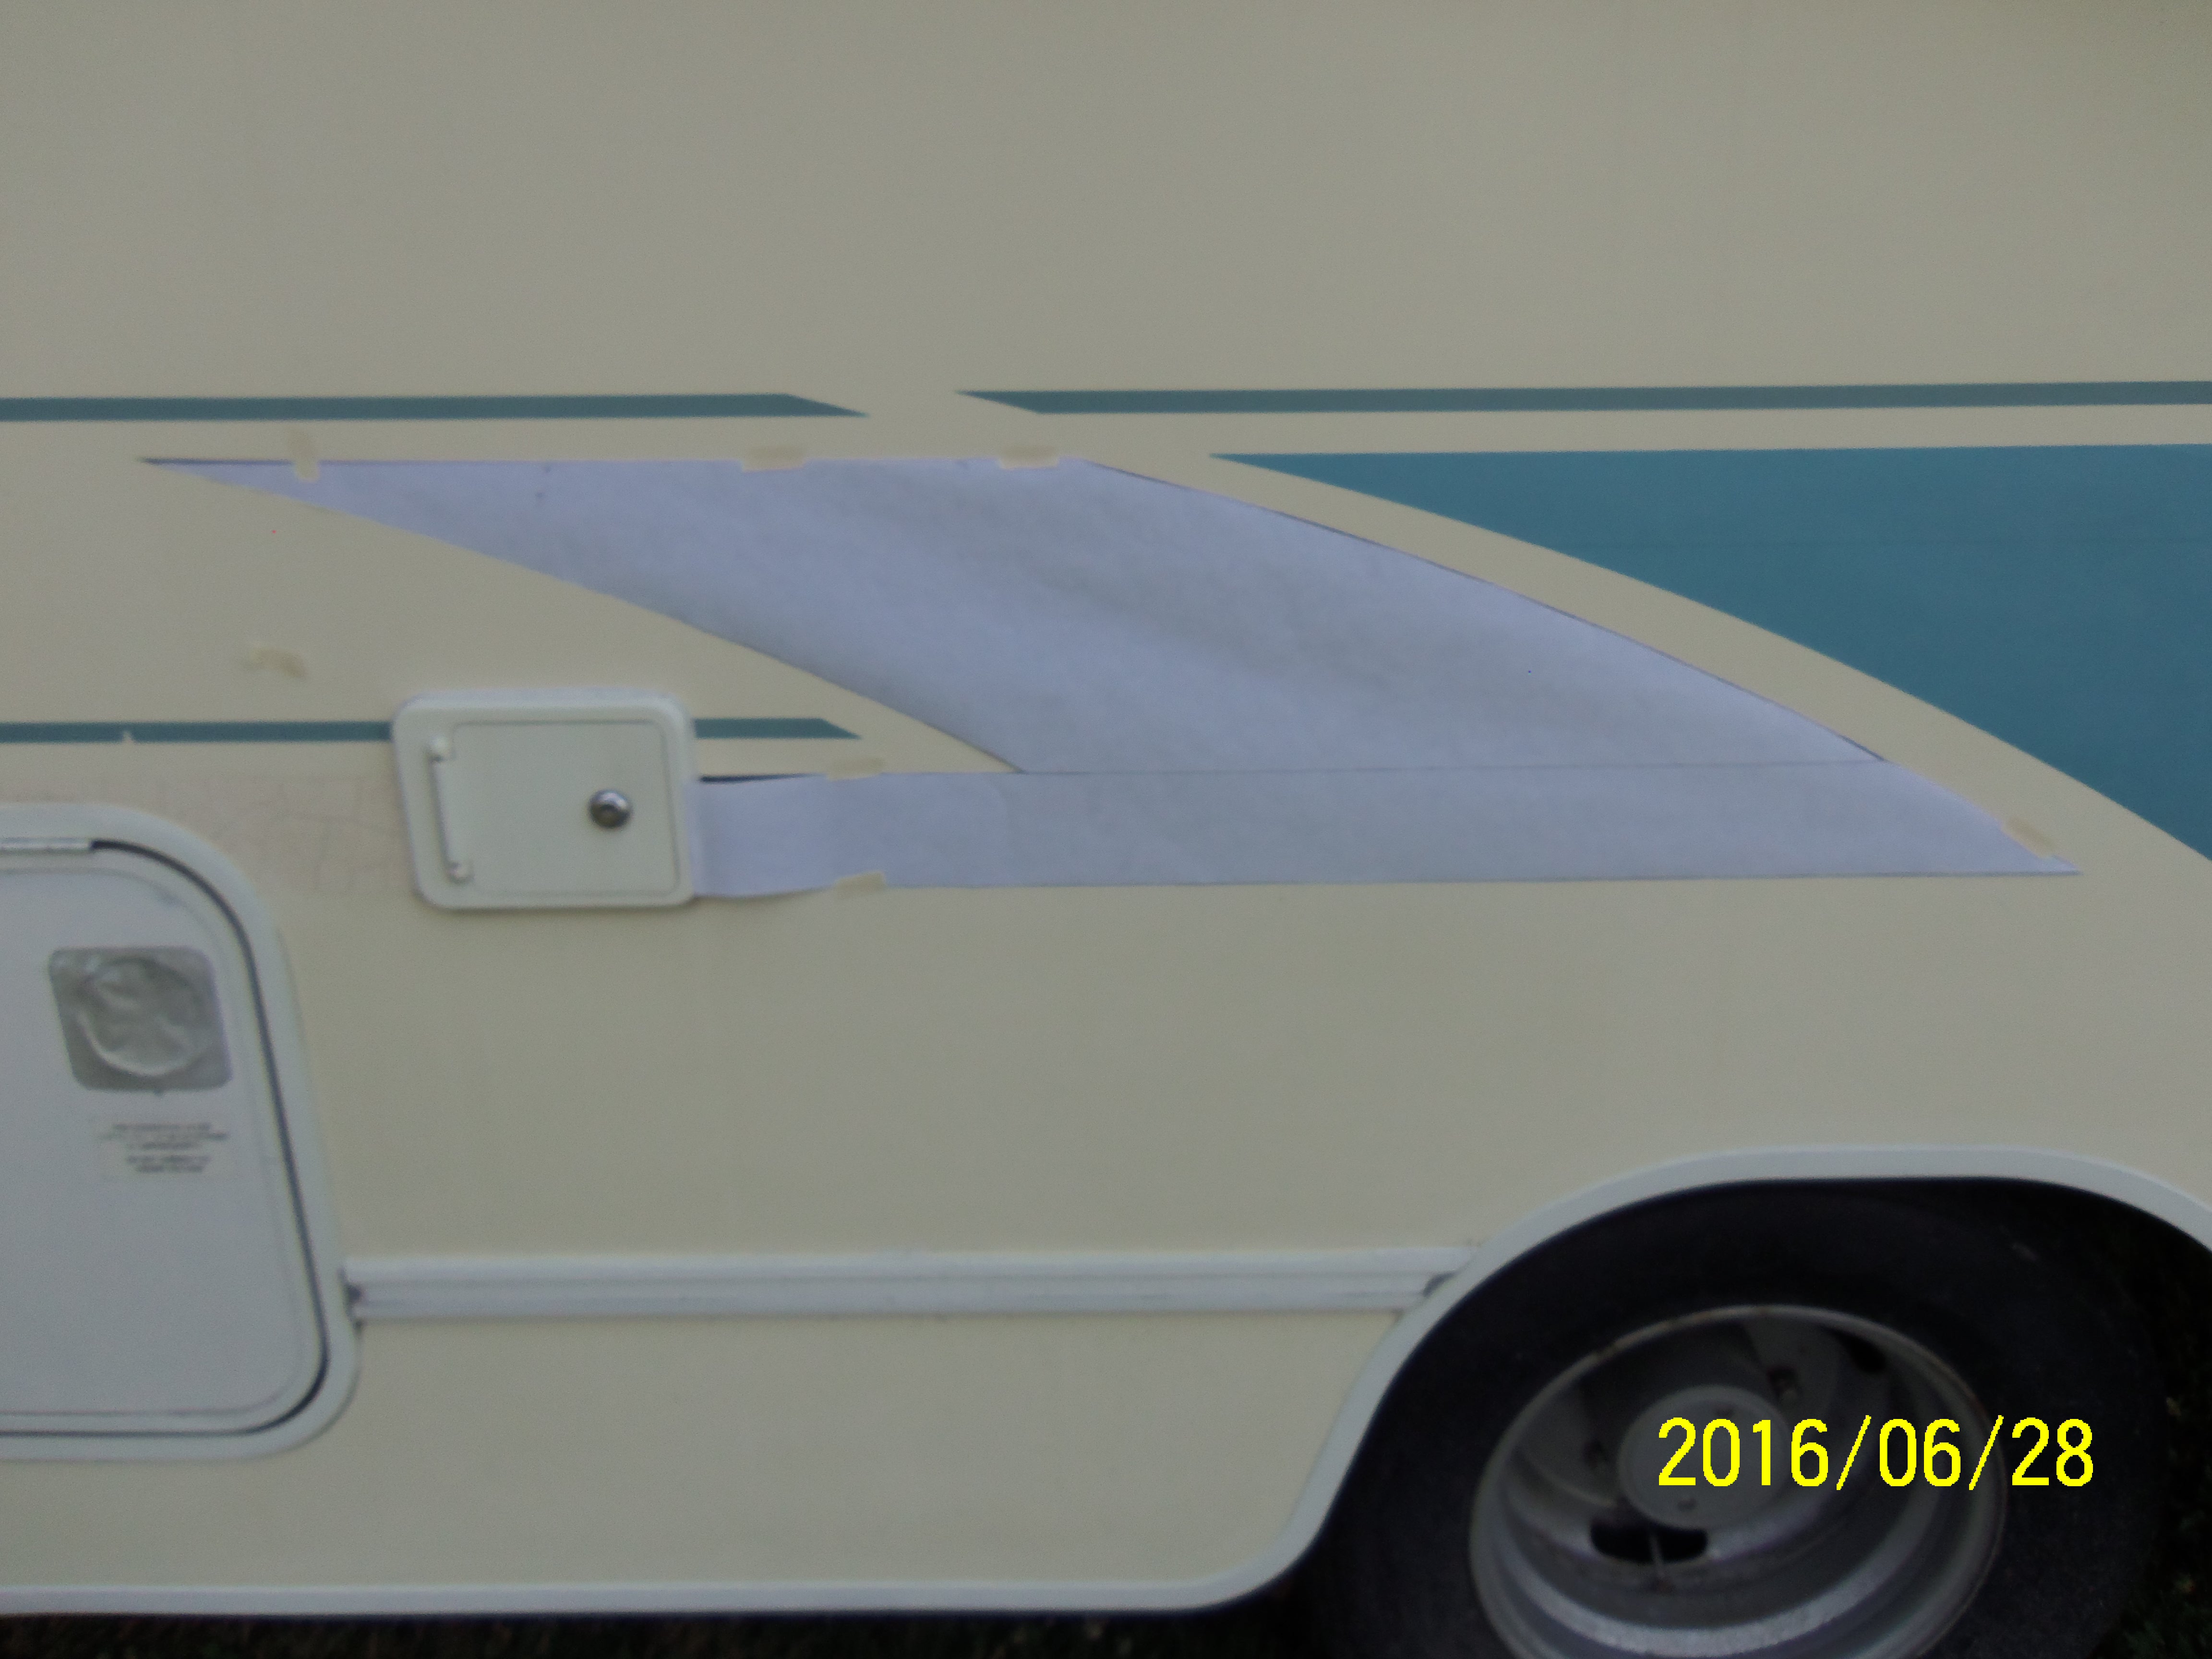
hello to all - a bit of a follow up on the graphic removal- thanks to the advice offered - I purchased a "pin stripe" removal eraser from a local auto body paint and supply store. the price was $12.00 plus an drill adapter for another two dollars. the eraser worked well, although I am sure it would have performed much better had there been no paint OVER the graphics. the instructions tell you not to exceed 4000 rpm, this is stamped on the eraser wheel as well. problem is , I own several drills, and even the electric one that I can reduce the rpm , is still above the recommended 4000 rpm, so I used my deWalt 14.4 rechargeable. obviously takes a lot longer, but I was very pleased with the results. as advertised the eraser does not affect the underlying finish. I have decided to not replace the graphic on the doors of the cab, as the underlying paint can be buffed out and looks very nice. the coach is a different story: the crack lines from the vinyl actually telegraphed to the gel coat finish of the coach and left a permanent "STAIN" on the coach body. it is not residue, but an actual stain. after erasing, and cleaning with goo gone product, the area is as smooth as can be but the crack imprints are visible, soo, the new graphics will be reapplied and therefore cover the stain marks, and of course greatly enhance the overall look of the rig. I have taken a photo history of this project and will post it when done in the hope that anyone out there can benefit from my project. thanks to all the advice/comments, I really appreciate it. joe.
-
Hello to all, I would be very appreciative if anyone can help with my problem removing the graphic tape on my 93 warrior. first off, I am very confused as to why only one color of the three color combo of graphics failed. obviously all three colors of graphics were applied at the factory at the same time, but for unknown reasons of the three colors only the MAUVE, has degraded, (severely cracked) whereas the powder blue, and light green graphics, while faded somewhat are really in very good shape. Anyone care to offer a reason or comment on this? The mauve graphics had been painted over a medium grey at some point prior to my owning the rig. At this point you can still see the cracks telegraphing through the grey paint, and as compared to the rest of the graphics looks quite ugly. so, I am attempting to remove only the failed mauve graphics and wish to replace with an aluminum or silver colored graphic vinyl material. My immediate concerns and questions are, what materials , techniques, and products would be helpful in the removal without any damage to the gel coat fiberglass siding, and are there any sources to purchase the original design of the graphics. most of the material I am replacing is a simple two inch and two and 3/4 inch tape, but on each cab door and further back on the coach on each side is a curved design I would like to replicate. My Winnie is pretty much pristine in and out with this one exception, any help, ideas, or suggestions would be a blessing, thank you all in advance, joe.