Ctgriffi
-
Posts
633 -
Joined
-
Last visited
Content Type
Events
Profiles
Forums
Gallery
Everything posted by Ctgriffi
-
 I did end up replacing just the bushings on that one shackle (big pita, 3-4 hrs) and then swapped in my KYB shocks (30min for both!). Truck drives WAY better over bumps now. Shocks I removed were about 1.5" in diameter and so weak I could play em like an accordion. New shocks are double the size and look like they belong on a Humvee!
 -
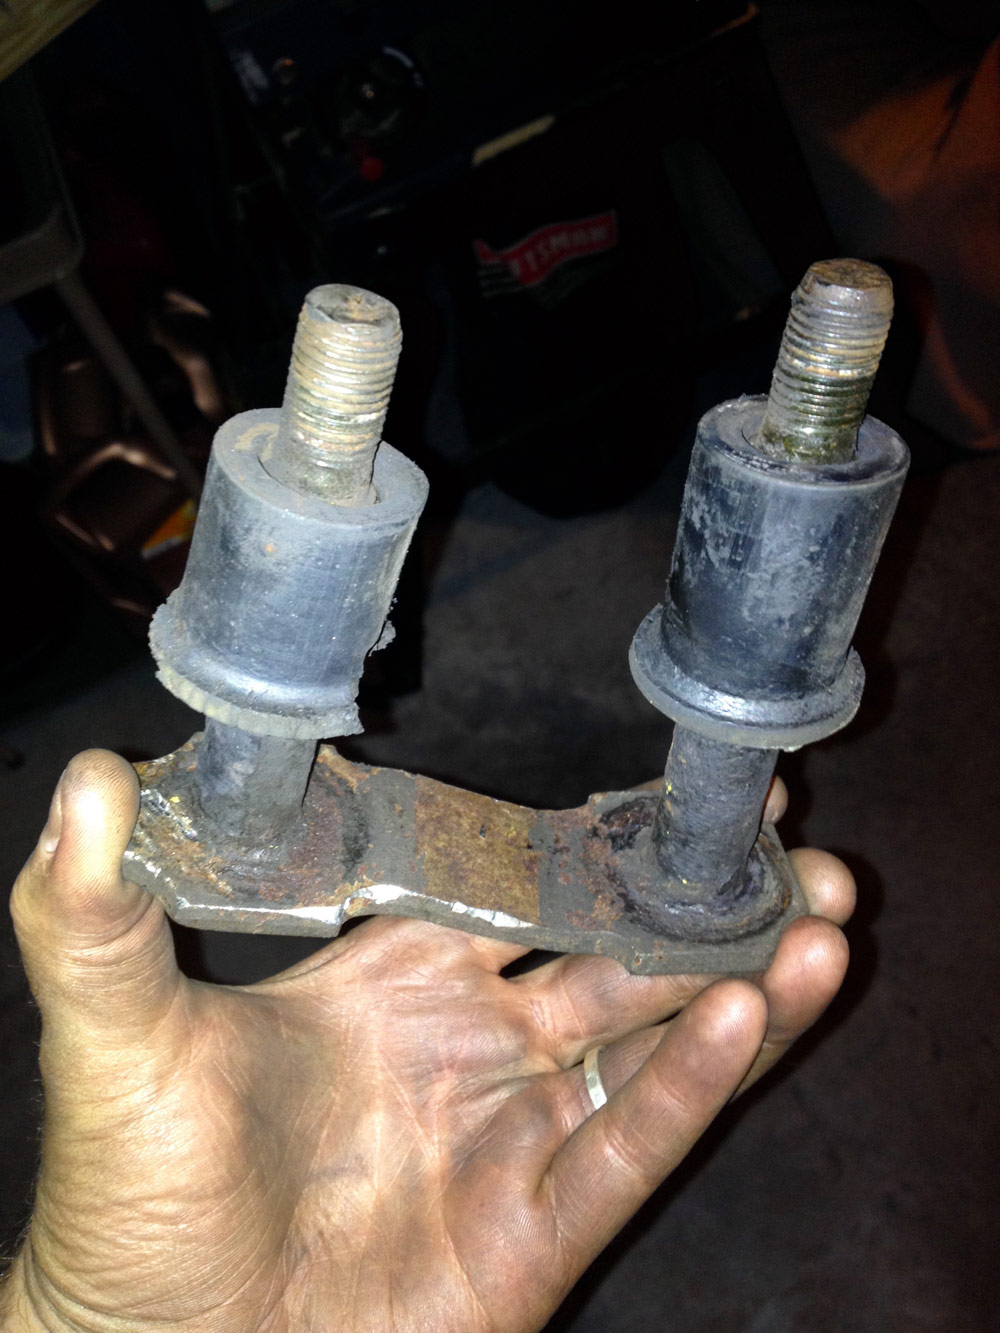
Thanks for the help, people. I did have the frame up high enough to let everything hang down, and I had a jack under the axle, which I adjusted up and down to try and find the sweet spot to free up the leaf springs. However, this did not seem to help. (Maybe because I only had one side of the RV jacked up... the chunk of driveway that's available for this project isn't wide enough to work on both sides simultaneously.) Anyway, after about 2 hours with a hammer, C-clamp, and pry bar, I got this one rear shackle free. The (not very) funny thing is that the bushings don't look that bad (maybe they're not original?). One of 'em is torn a little, but I think that's probably due to abuse from the pry bar. I also removed one of the skinny, little shocks back there, and it feels surprisingly weak/flimsy; my new KYB Gas-a-Just shocks look like a million bucks next to the old ones! Anyway, I'm very short on time to get this all finished, so I'm considering just slapping new bushings on this one shackle, bolting up the new shocks, and calling it done... for now. How does that sound?

-
No problem, thanks for posting. I feel like maybe there's some magic position that will free the pins up, so I can beat em out of there.
-
Anybody out there tonight?! Trying to swap out these bushings and I can't seem to figure out how to get the tension off the leafs, in order to remove the pins. What am I missing?
-
Thanks for chiming in, Skydancer. I ordered the recommended set with all the same size bushings, 18-1001, and hope to install in a few days, along with a new set of KYB Gas-a-Just shocks. (Hope this all goes smoothly; heading out of town in the Warrior next weekend...)
-
I've had problems with gaps between the shower walls and the pan too; the back wall of the shower (next to bumper) is the most affected on mine—almost looks like the rear body of the camper is slowly pulling away from the rest. I've had some success with running a good bead of caulk along the widening seam and then covering it with this sealer trim product. I'm not sure how permanent it will be, but it looks pretty decent, if you take your time. (Make sure the shower is very clean and dry before attempting for best adhesion.)
-
Yeah, my 91 Winnie has the valves sitting, conveniently, right on top of the bumper. They shouldn't be hard to track down though, if you crawl under there and look at the bags...
-
Basically, when I tore out my carpet, I cut a clean line across right where the cab begins. Then, after laying my flooring, I capped that whole edge with standard silver nosing; fastened that nosing right into my subfloor with small, ridged nails. I don't think I have a photo of that, but it was very straightforward and turned out nice.
-
Don't mean to hijack this thread, but if anybody knows (with confidence) the Prothane PN's for spring/shackle bushings on a 91 Warrior (90 chassis), I'd love to hear about it...
-
You might be right. I found a manual for these heaters on Atwood's site, and it does mention the proper air gap. I'll give that a shot, thanks.
-
Fuel Mileage Of Cab & Chassis Trucks Over Time
Ctgriffi replied to zero's topic in General Discussion
A little late to be posting, but I'm just going to chime in with stats from a recent 1,000+ mile trip in my 91 320RB Warrior (V6, auto, 60-65mph, 2 adults + 2 small pooches, luggage, etc): 12-13mpg -
I don't have all the unit specs with me right now, but just wanted to mention that my water heater became inoperable towards the end of a long trip recently. I've got the little 4 gal, propane-only unit with the Jade control box. I've used it several times over the past year, and it's always been fine. After de-winterizing this year, however, I noticed that some mud daubers had moved into the large heating tube (and maybe elsewhere). I cleaned them out as thoroughly as I could with a long screwdriver and my handy little shop vac—had to remove the pilot assembly and small L-shaped burner tube to do this. Anyway, after I got it all back together, it fired it up successfully. But, during the recent trip, the water never got as hot as it used to be, despite my jiggling the thermostat control back and forth on several occasions. On the last night of our journey, the main burner refused to ever catch although the pilot would light easily... so, anyway, I went back inside and, a few minutes later, heard a muffled boom and felt the coach noticeably rock. (!) Needless to say, I did not make any further attempts to light the WH that night. (At the same time, btw, fridge/stove/furnace all continued to run just fine on propane.) I'm thinking I need a new thermocouple or, possibly, a completely new control box at this point...
-
Yes, we were on 412 quite a bit on the way down, and I completely agree with your assessment. It's kind of a nightmare... Avoided that area completely on the return trip and came up through central Oklahoma on a beautiful, smooth state highway—I think it was 69. Very enjoyable.
-
Thanks Linda, you're the best! After lowering my air bags to 30# and dropping my rear tire pressure (they were higher than I thought), we experienced some relief on the roads. I'm still going to put shock-replacement on my list of to-dos, though, so I appreciate the advice.
-
Would love some part numbers and recommendations (links too!) for front/rear shocks. I don't want to go dirt cheap but don't need the gold standard either. Thanks everyone!
-
Really, so you always run with 30psi in the bags? The fill valves on mine are labeled "50psi min." But I'll try 30 if you think it'll help.
-
We are at the halfway point on a round trip, 1000+ mile journey to Waco, TX. Engine and tranny are doing well (thank God), but I am dreading the drive home due to the extremely rough ride we experienced today. To explain... This is the first "major" trip we've done in our new-to-us, 20' Warrior, and I worked hard to try and make sure everything was shipshape for the drive (including a brand new set of Nexen SV-820s). We left from our home in SW Missouri and I was very happy with the smooth, relatively quiet highway ride, tested at up to 70mph. All this changed when we transitioned to the roads and highways of Arkansas and Oklahoma; it was virtually a nightmare of continual hammering and banging for many hours. I remember one curving entrance ramp in particular: every eight feet of the ramp was a new slab at a different height, like trying to drive down a massive staircase. My wife and I were both afraid that something might come apart in the process and, sure enough, when we arrived in Waco, we discovered that the oak face frame supporting the shelf our microwave sits on had torn apart from the buffeting. I hope that more damage doesn't surface in the AM, but I don't know... We're both stressed and exhausted. So, am I way off in left field on this? Does this sound like a normal cross-country trip in a Toy RV? I mean, what the hell?! (Btw, I'm running between 60-65mph, tires all near 55psi, air bags at 60psi.)
-
Yeah, I noticed that too. Those DOT tanks look like a good deal, but the difficulty with mounting one in the provided space might preclude it. (Also, I see the Manchester tank on eBay has a sticker that states, "Fill in the vertical position only!") Jdemaris: You mentioned cleaning up the tank and hitting it with a rust stabilizer. What kind of product were you thinking of? Also, in your opinion, would it be dangerous to work with a sawzall (or grinder with cutting disc) near an empty propane tank?
-
On a related note, I like the idea of using a kit like this to allow for hook-up to an external DOT tank, if/when needed. I guess then the issue becomes... how do you safely (and legally) carry a standard 20lb DOT cylinder with you?
-
I think it's actually mounted to the frame, just behind the cab on driver's side. According to a little research (and what I remember from glancing at it a few times), I've got an ASME tank similar to this one (top of the page). Shouldn't be too difficult to remove and inspect at some point. Those tanks are $400+ though, which I wouldn't be able to swing in the immediate future. Hence, my question about 'options'... conversions, retrofits, etc.
-
I don't like seeing all that rust either, Linda. What are my options? What's the cost of a replacement tank and is the job doable for a serious DIY'er with a lot of tools?
-
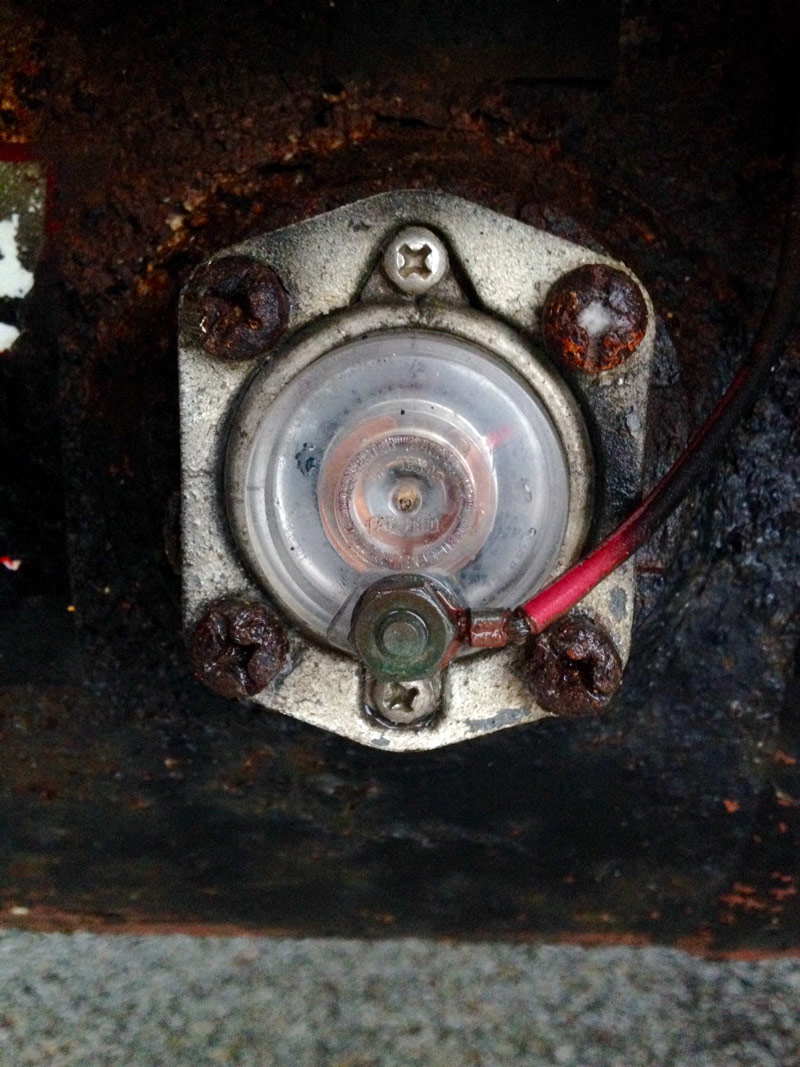
I'm pretty new to the world of propane, and I could use a little advice with the following: We're getting ready to head out of town on a 3-day weekend trip, and I noticed that my levels panel showed that propane was getting low. Stopped at a local propane dealer this morning and, after convincing them to come out of the building into the pouring rain, they gave me a fill-up. Apparently, they could only add 3.3 gallons, which cost me just $6.26. Afterwards, I took a look at the gauge on the (very old) tank and snapped the photo below. The red indicator is at about 2 o'clock. Should I be concerned that only 3.3 gallons was needed? Is the tank reasonably full? Appreciate the help!
-
Thanks everyone for the great suggestions. I really need to pull this all together quickly before we take the Warrior to Waco next weekend—work's keeping me busy right now, and time is getting short!
-
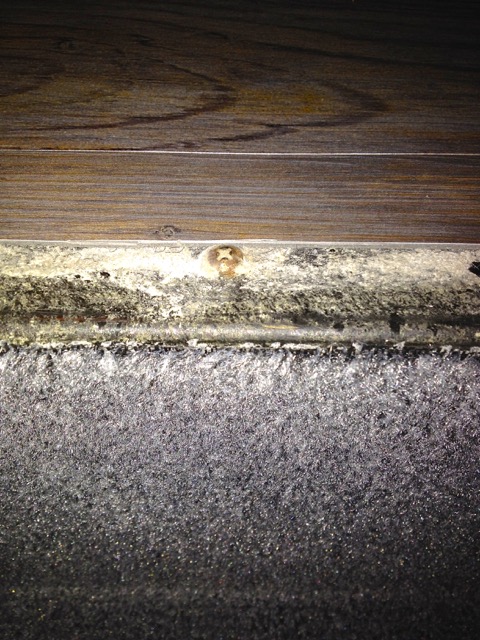
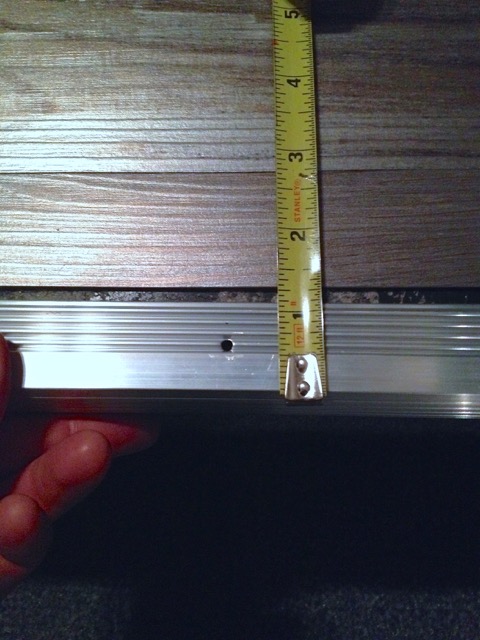
I don't really like posting photos when stuff still looks like crap, but they should help illustrate the little predicament I've got. (Snapped these on my phone in the dark tonight.) As mentioned before, I brought the vinyl as close to the screw heads as I could. (And, top of vinyl is very close to level with the top of the screws.) Last photo shows me holding a piece of standard stair edging in place—and the remaining 1/4" gap.
-
Unfortunately, this system is preventing me from seeing the full-size photos (permissions?), but the thumbnails look great, Don! Very sharp stuff. Did you mention earlier that this was a vinyl product you used? If so, did you have any difficulty with the raised screws and stairwell edge?