dolphindriver
-
Posts
28 -
Joined
-
Last visited
Content Type
Events
Profiles
Forums
Gallery
Everything posted by dolphindriver
-
Thanks for the replies - you guys are right - probably easier to replace the whole center slide brace and mount.
-
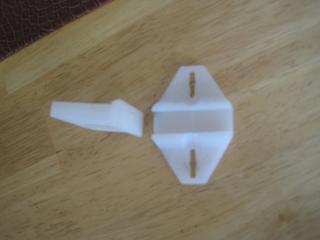
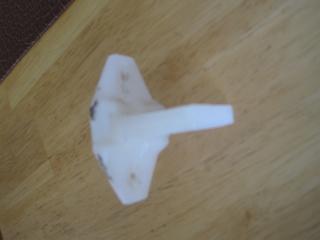
I have an 1989 Dolphin. One of my drawer endplates is broken - so the drawer always falls out. It is an old two piece design - where one piece goes into the metal center bar and then fits into the plastic endplate screwed into the wall. I have no luck finding it online - so I wonder if anyone knows where to get this item. Here is some pictures - one showing the 2 parts separate and one showing how they fit together. Thanks, Kirk

-
Your carberator is probably all varnished up unless the previous owner drained all the gas out of it prior to not running it. These carbs are tricky - they are not designed to be rebuilt - they want you to buy a whole new carberator. The small passageways can be very difficult to get the varnish out of. It is possible to rebuild I think - but I don't know where you would get the carberator kit from. Gas Onan's are designed to be run/exercised every month.
-
Furnace won't light up and blows cold.
dolphindriver replied to aptruncata's topic in Coach ApplianceTech Issues
I just had this same problem on a camping trip this weekend in the mojave wilderness area (camping at the sand dunes). I knew I had gas at the stove and the igniter was firing. I had to recycle the thermostat at least ten times to finally start the furnace. Once it was lit - it worked great all night (on and off - down in the 30s). I don't know, but I expect there was some air in the gas lines (as I had not used the furnace for a long time) and each ignition cycle only allows a small amount of gas/air to be released to try to light the furnace. You may also have a low spark on the igniter - perhaps turn the truck on while you are going through the multiple recycles or plug in to a/c power. That said - it is unclear how your two tank system works. Look at the hoses coming off the tank - to they come together right away so that both tanks provide gas for all appliances. Or do the hoses from the tanks go away separately. If they go away separately, I would try switch the hoses on the tanks and seeing if the furnance works then (or if the stove then doesn't work). You should be able to follow the separate lines to see where they go. -
I first looked on the other toyota truck websites (truck only - not motorhome) and found the dimensions. When I got the bearing out, I checked its model number online to verify the dimensions. It is a standard bearing (6204) - you can get them at local autoparts shop, but they were quoting me from $25-$30 dollars for the bearing and I already was ordering $50 bucks worth of stuff from Amazon, so shipping was free. Vanman makes a great point. You do need to get the socket/pipe to be pushing against the race, not the middle part of the bearing. Search on line for how to install a bearing if you have not done it before.
-
The Problem: I would hear a bearing noise at 60-65 mph in 3rd gear (auto) and 45-50 mph in 2nd gear. If I went faster the noise went away. Felt it was a bearing on one of the accessories or one of the idler pullys. Figured I would change the easiest one - the idler pulley on the power steering belt. However - when i went to the Toyota dealer - they only stock the the whole unit (not just the pulley or the bearing) at a cost of $200. Local autoparts stores did not carry the pulley either. The Fix. With a 14 mm socket - you can take the pulley off the bracket. Using tools around the house (two 2x4s, large socket, and a rubber mallet - you can pop the bearing out of the pulley). Buy this bearing from Amazon for $12. http://www.amazon.co...ils_o05_s00_i00 Using the above tools - plus some grease and a big c-clamp - carefully press the bearing back into the pulley. Reinstall the pulley. Problem fixed.
-
Here is another humble opinion on the subject. 1. Agree with the rear bathroom set up with kids. This put the kids up close to the driver/adults when you are on the road (either on the couch or at the dinette) as opposed to the back of the bus where you can't see/yell at them properly. Also closer to the truck a/c if you live in a hot place. 2. The units with the couch and dinette in the front give you 4 seat belted places for the kids to sit (or non-driver adult if you let the 6 year old in the front seat - which is what we did on our trip with our 7 year old). 3. The dinette units are always going to feel tight with four people with any of the smaller RV (below about 25 feet) no matter what the brand. 4. Depending on how big you guys are adults, you should have no problems sleeping four in your family (two on the bed over the cab) and if your not to big - two on the jacknife couch (which is super easy to set up). You still have the option of the dinette as well. One member said his kids liked to sleep under the jacknife couch. If the older kid wants to bring a friend, you can bring a small tent and air mattress and have overflow sleeping outside. 5. Decide if you are the type of family that will spend most of the time outdoors or will you want to spend a lot inside the RV. If you want to spend a lot of time inside when you are parked - you may need a bigger one. Are you going to drive it twice a year and set it up for 2 weeks at a time in one place or drive from place to place and go out on a lot of weekends? We love the small size for driving, parking, and the better mileage. I bump my head on the a/c pretty much everyday and only one person can work in the kitchen at a time - but we really enjoy the convience of this size RV. Go look at some nice toyotas and also other brands. As was stated before, if you buy smart - you won't lose much money and your family be fine in this size toyota RV for 2-3 years, then you can decide what you really need/want. Cheers,
-
Just drove through a lot of the route 66 this summer (Palm Springs to Oklahoma City). The texas panhandle does not hold much. My suggestion for your midway meeting point is Tucumcari, New Mexico. There is not a whole lot to do around there - but Tucumcari has the most (and best) selection of vintage restored signs, motels, stores, tourist traps in its business section. It is really fun to see all the old places there.
-
I have an 89 Dolphin that only had 35,000 miles on it before I left. There are pros and cons for a vehicle with such low mileage - mine had been sitting for quite a while before I bought it. I had to replace all the vacuum lines, several electrical lines were chewed by rodents, and many things in the camper part needed to be replaced (all faucets, heater fan, both water heater and refrigerator needed to be worked on, the generator's carburerator was gunked up from lack of use). If I had a choice, I would have picked a higher mileage unit that was used and maintained on a regular basis over a low mileage unit that had stored like mine was. In either case you do have to be prepared to drive with the flasher on going up hill or into a head wind with all the other vehicles passing you on the interstates with speed limits of 75 and 80 mph.
-
Because I am a teacher (and slightly touched in the head) we decided to take our Dolphin (22 ft with 4 cylinder 22 re), my wife, and seven year old son on a long cross country trip this summer. 9000 miles MPG 14.4 (note – tried to go at least 62 mph most of the time. Truck a/c was always on. Either the water tank or the black/grey water tanks were always close to full.) Had two bikes on the back Only saw 4 other Toys (or Nissans) on the entire trip. Started in Palm Springs, CA – went to Utah then dropped down to I-40 through to Tennessee. Then up to Washington, DC, Philly, New York, and Boston. Went up to the Muskoka area in Ontario, Canada. Then back to Chicago, Mt Rushmore, Yellowstone (we came in via the Bear Claw Highway at 10,800 feet – great road) and back to Palm Springs. Dolphin ran great. Only problem was a leaking extension on the inside rear dually. I only caught it by doing a thump test on the tires in the morning, otherwise it could have been a mess. I highly recommend taking off the extension on all 4 rear tires if they are original. This is the second extension that leaked on my Dolphin. Pretty amazed the Dolphin made the trip so well. Thanks to this website for helping me get the motor home ready.
-
Thanks for the reply. I will get the a/c looked at when I get a chance. I was out of wifi range at some state parks in arkansas and tennessee. Cheers
-
I did search on this and couldn't find a clear answer. We are in Arkansas - its really humid - and the roof a/c is generating a lot of water. It (the water) just seems to sit on my roof - is there supposed to be a drain line/hose or does the water just pool up there. Cheers, Also - my roof a/c runs with a cycle (woo-ahh, woo-ahh) such that it makes my generator sound like it is hunting when I run the a/c off the generator. Can I get my roof a/c serviced or is it pretty much a sealed unit that you run until it stops running? Cheers again.
-
Just a quick poll of opinions. I have a 4 cylinder 89 Dolphin (88 Toyota) - 35,000 miles on it - that typically runs with the temperature gauge below 1/2 (maybe about 1/3). We have started a trip from Palm Springs, CA on the way to Las Vegas and beyond. Both days on the trip the temperatures have been between 102- 105 degrees. On the hills and grades my temperature gauge goes up to 3/4 of the way up the white section. My thought is that I don't have to worry about it if the temperature stays in the white. I don't lose any coolant and the truck runs fine. The temperature cools right back down on the downhills, on the straights it cools down, but takes a while. I also never here the fan kick in - people talk about it sounding like an airplane. But at 45-60 MPH I don't know what effect the fan would have anyway. I also had the original radiator repaired with a radiator shop welding a small pin hole. In discussion with the radiator shop, we felt that the patched original radiator would be better than a replacement. Should I worry about this or not? Your thoughts would be appreciated. Cheers,
-
Thanks for all the input. The dolphin is in the shop getting a/c worked on. When it comes out of the shop next week I will do something. Its nice to know my vehicle isn't going to catch on fire. If it doesn't look like too much work, I will try the relectix under the carpet - otherwise I might just get some cheap floormats for both driver and passenger sides and glue some aluminum foil on the bottom. Cheers
-
I am from California so I often drive in bare feet. I was driving home last weekend from the desert (air temp was about 100 degrees - engine temp was just a bit above half way) and I noticed that my right foot heel (on the gas pedal) was getting pretty hot. The carpet in that area is worn out a bit, so I was not too concerned, but I wondered if anyone else has noticed this and come up with a fix. I was thinking of adding a piece of aluminum on the underside of the car to make a modified heat shield. Or does this indicate a problem with the exhaust/or catalytic converter. Or is it just normal operating temp and I should just put my shoes back on (I don't notice the heat with shoes on). Cheers,
-
Mouse eaten water lines above the black water tank?
dolphindriver replied to campergal's topic in General Discussion
You need to find out where the leak is. You may be able to see something by looking up from the water heater area inside the coach, or mine has a access door on the outside that allowed me to see the bottom of the pipes going to the shower faucet ( and pick up parts that I dropped when replacing the shower faucet). If it is the shower faucet needs to be replaced, you will have to cut the paneling on the kitchen side. Waiter has an excellent write-up on this http://toyotamotorhome.org/forums/index.php?showtopic=3837&st=0&p=21235&hl=shower&fromsearch=1entry21235 Cheers -
[Newbie!] So... what's it like to actually drive a Toy?
dolphindriver replied to A.j.'s topic in General Discussion
My 2 cents worth. With a 7 and a 9 year old - you will want the extra 3 feet - go for the 21 foot models. They drive basically the same. It can get pretty tight in these units with 4 people. I think you will be happier in the long run with the extra room in a 21 footer. Cheers, -
Common breakdown parts to carry with on road trips
dolphindriver replied to MAXXFabrication's topic in General Discussion
I think that there everyone has different comfort levels for the amount of "prevention" that they are comfortable with, just like everyone uses their motor home in a different way (from people who only stay in rv parks to those folks who drive far off the grid) I am sure that some people on the board are most comfortable with carrying no tools and just having the local mechanic fix it - and that is the correct choice for those people. And I am sure that some people are most comfortable with all the tools and all the parts they can carry (I think these are the people for which this thread was started) - and that is the correct choice for those people. I am somewhere in between. I carry a lot of tools and a AAA RV card with a free tow up to 200 miles. So I would get towed to a town, stay in my RV, and wait for the part to come in if the local Autozone didn't have it. That is the best choice for me. Cheers, -
John's DIY's are the best. I used his DIY's to change my heater blower motor and my shower faucet. Here are a couple things that helped me on the shower faucet on a 1989 Dolphin. 1. Make sure your faucet needs to be replaced. If the faucet is leaking it may be the washers or the anti-siphon valve - check those first. Here is a link to the Phoenix faucet troubleshooting guide. http://www.faucets.c...k%20develop.pdf . This would be much easier than changing the faucet. 2. If you do need to change your faucet, you can order a new one from Phoenix with the proper sized posts (out the back) from Phoenix direct. It cost me 19$ + $5.00 shipping, and I received it in one week. John cut his, I tried to do that as well, but I am not as handy as he is - so my connections leaked after I cut them. Once I ordered the new unit with from the factory with the 1 1/4" posts - it was a piece of cake. Make sure to remind the Phoenix people to send the small profile metal washers rather than the plastic ones. There was a nice lady at Phoenix who help me with the order (lstarcher@faucets.com Lori Starcher). 3. Cut a big enough hole so that you can work comfortably. I dropped a couple of things with my fat fingers. At least put a towel or something underneath to catch dropped things. Thanks John. Cheers,
-
Thanks for the replies John and Dennis, Good helpful hints. I did not have any Liquid Nails, so I just used wood glue - not quite as strong - but I think it will hold up OK. Still having a little trouble with the screws for the furnace exhaust - as I have to use those screw holes. Probably John's hint of using adhesive for caulking will work the best. Cheers
-
I have some screws into the walls of the motor-home that are loose and need to be replaced. Some are from the outside in (city water hook-up) and some are inside (the screws that hold the cabinets up). The screw holes are old/loose so I cannot just put in the same size screw. I know that I can just put in one size up bigger screw, but I am wondering if there is some other way to reinforce the screw hole. I have an 88 Dolphin - so it it that type of construction. Is there anything I can spray into the holes, let set up and then screw into or some other method that people have used that worked. Thanks,
-
Onan 2.8 Carburetor Cleaning DIY (no removal)
dolphindriver replied to dolphindriver's topic in Electrical
Option 2. If you don't want to take the float chamber off (if you think your carb is not that badly varnished/gunked) you could just start at step 7 in the procedure I laid out. The theory is to get a high concentration of solvent/carb cleaner through the carburetor. You cannot put that high a concentration in the gas tank of the motorhome, so you need to just disconnect the fuel line from the carb (close off the original fuel line at the fuel filter somehow) and use a new fuel line to pour in a suitable concentration of gas/carb cleaner to get rid of the varnish/gunk. I suggest 2/3 gas and 1/3 SeaFoam or other solvent - people have used lower and higher concentrations of solvent - up to 100 % solvent for a short duration. Cheers, -
Let me start by saying I am not an expert on small engines, but I distilled a bunch of information from the web and it worked well for me. My generator had 14 hours on it (1989) and had not been run in a while. Surprisingly, it did run at first, but I had to hold the choke to make it run. Finally the generator would not start at all. My generator needed the choke on because very little gas was getting through the carburetor and the choke makes it run richer (less air). Any generator that has been sitting or not exercised will have varnish and gunk in the carburetor that keeps it from running - or makes it run rough. You need to clean inside the carburetor on the fuel side. Spraying carb cleaner in the air intake will not work at all. Here is what worked for me, without taking the generator off the coach or taking the whole carburetor out. Writing it out makes it seem much more complicated than it is. 1. Disconnect the fuel line from the carburetor (it connects the float chamber) and move the fuel filter out of the way as much as possible. 2. Unscrew the brass bolt on the bottom (underneath) the float chamber. The bolt will come out - it has some holes in it and an o-ring. It will probably be gunky. I think it is 1/2 inch or 12 mm. 3. Carefully twist the float chamber back and forth and pull down and it should come out (just a press fit on mine). Don't be scared - it is just one bolt and the float chamber - you don't have to disconnect any linkages or touch anything else. (you will spill some gas if there is some in the chamber - so get some rags under it). 4. Spray the parts of the carburetor you can now see (still attached) with a good carb cleaner (I used "Deep Creep"). I also sprayed up the hole where the bolt screws into the carburetor body. Make sure you get the float mechnism. Spray the cleaner in the fuel line connection as well. Do this a few times to get as much junk out as you can. 5. Take the float chamber and the bolt you removed and soak in a solvent (I used Deep Creep in a very small container). Take the o-ring off first (but don't lose it). I soaked and used paper towels/rags to get rid of all the varnish and gunk. I would let it soak, then come back in an hour and work a little bit, repeat. I was able to clean out the inside of the bolt (hole down the middle and two small hole on the bottom) with just paper towels (you do not want to scratch the inside - but a soft pipe cleaner would probably work great). Take you time and keep letting the solven do the work (overnight is good). Mine was almost spotless when I put it back on, but I still had some rust/gunk at the bottom in one place. Make sure you clean the hole on the inside barrell of the float chamber (I turned that plastic thing both directions with lots of Deep Creep - but then put it back in the position I found it). 6. Once the gunk/varnish is cleaned out of the chamber/bolt - put it back on the generator in the same position it came off. Don't forget to put the little o-ring back on the bolt first. Tighten the bolt down. 7. Get a small container (I used a clean coke can). I filled it with 2/3 gas and 1/3 Sea Foam (or another carb cleaner). You could adjust your ratio as you see fit. Buy 2 or 3 feet of fuel line (1/4 inch inside diameter) and find a small funnel that will fit in the fuel line. 8. Very Important - put a stopper in the fuel line coming from the fuel filter (or otherwise the fuel pump will pump gas over everything). I just used a short stuby philips head screw driver - it fit into the fuel line and I tighted the hose clamp - it held fine. 9. Attached the fuel line you just bought to the carburetor - hold the other end of the fuel line above the carburetor, and (using the funnel) pour the gas/sea foam mixture into the fuel line. You just need to add enough to fill up the float chamber. When no more will go in, carefully allow the extra gas/seafoam in the fuel line to run back into the coke can (put the can and the fuel line end below the level of the carburetor). 10. Move the fuel line and coke can away from the coach for safety. I also let the spilled gas evaporate for 5 minutes. If you are confident, you could probably keep the fuel line attached to the carburetor, but I disconnected it each time. 11. Start the generator - if you are lucky it will run. Let it run until it stops (float chamber empty). Then repeat steps 9 - 11 a few times. After that - let it run for a little while - then stop the generator. This will keep the gas/sea foam mixture in more parts of the carburetor. Let it soak for an hour - then repeat. When you get tired of this - just reconnect the regular fuel line it should run fine from then on out. 11B. If you generator doesn't start - you can try removing the jets from the carburetor and spraying deep creep in there (make sure you count your turns carefully as you unscrew them so that you can put the jets back to the correct depth). I feel that if you tried to run the generator a little bit each hour - with the gas/sea foam mixture in the float chamber - there is a good chance that it would break down the varnish over time and start to run. 12. Pour the remaining Sea Foam and gas/sea foam mixture into the trucks gas tank. The theory is that varnish/gunk blocks up the carburetor. The carb passages are small - so even if you take if off the whole generator and soak it - you will probably not clean out all the gunk in the small passages. As long as the generator is running a little - if the solvent is in the float chamber it will pass through the carburetor and devarnish the little passages. One guy on the web said he a couple times a day over the whole week on a really bad one and the generator finally ran well. I was pretty amazed that it worked for me, considering it was not running when I started. Certainly cheaper than $300 new carburetor.
-
Window lockstrip (outside gasket) problem
dolphindriver replied to dolphindriver's topic in General Discussion
Thanks for the video John. It is helpful for resealing the whole window frame. I think my window frame seal is fine. But I just have the outside lockstrip on the window itself (that little black piece of rubber that presses against the glass/plastic on the outside) that has shrunk. I don't know if I need to do anything - or if when I replace it I can use a sealant/caulk or if I have to use new lockstrip (a bit pricey at least $1.00 foot). Cheers -
Hello All, I have a 89 Dolphin that has been sitting/not maintained for a long time in the high desert. On all the RV windows the lockstrip (or outside gasket) has shrunk and is pulling away from the corners. What are my options? 1. Do I have to do anything - or does the lockstrip provide a water seal as well? 2. If I have to replace - what are the pros and cons of replacing with new lockstrip/gasket or just using a window sealer to fill the gap (I think waiter did it with window adhesive on his front window). 3. If I have to get lockstrip - how hard is it to install. Sorry for the multiple questions. Cheers,