clay
-
Posts
16 -
Joined
-
Last visited
About clay

clay's Achievements
")
Newbie (1/14)
-
GK- progress looks awesome, your interior is inspiring. took mine out for a night this last weekend, long way from finished but good to get some ideas on what i really need. to continue the thread highjack of mounting on other toyota chassis, check out 63" chevy spring swaps- super common in the offroad world. usually both spring hangers have to be moved since the spring is so much longer than stock, would be easy to position the axle just where needed and gain some payload capacity at the same time..
-
Hi jabberwocky, apologies for not responding to your earlier pm, kept slipping my mind. I should update my thread with some pics of the new floor. As for jacking the coach to get it off the frame, i just used a few jacks and jackstands at the rear "basement" as i call it, wherever you can find something solid enough. I used ratchet straps under the cabover to eye bolts in the ceiling. when gutted, the whole coach isn't too heavy, i could hold the front end up by myself. after suspending it, i slowly crept the truck out, moving jacks and stands as necessary. we replaced the floor in three sections; wheelwells forward, behind wheelwells, and the basement. used an old wood chisel to cut through the fiberglass tape between the shell and floor and a sawzall on the floor. the shell is pretty floppy without the floor in it, take caution. i think the front of my coach splayed out a little, had had to get a little creative to get it to seal again. Copy the piece that you took out and replace it, we fit the sections together kinda tongue and groove style. glass in and remount. easy right? don't get intimidated, its not rocket surgery and many of the steps were new to me too. have a really handy father in-law who has been a great help. pm me your email, i will forward you some of the emails i exchanged with Nolan (quadlight on here i think), owner of the rootbeer 4x4 chinook and has probably forgotten more about these than most people will ever know. he has been really helpful with thorough answers to my questions. clay
-
2013 Toyota Chinook Newport Kootenay Edition
clay replied to Galvanized Knight's topic in General Discussion
Hi GK, still following your other thread, then saw this new one. I daily drove a 1980 mini truck for a few years, much like you i really love their lines (if not the cramped interior). actually have a rear half of a '79 cab in the side yard that i had dreamed of grafting on to my old rig, before i traded it for the chinook. this guy's thread on marlin inspired me, though he has really slowed down on his progress. http://board.marlincrawler.com/index.php?topic=12165.360 some good fab work there, may give you some ideas. -
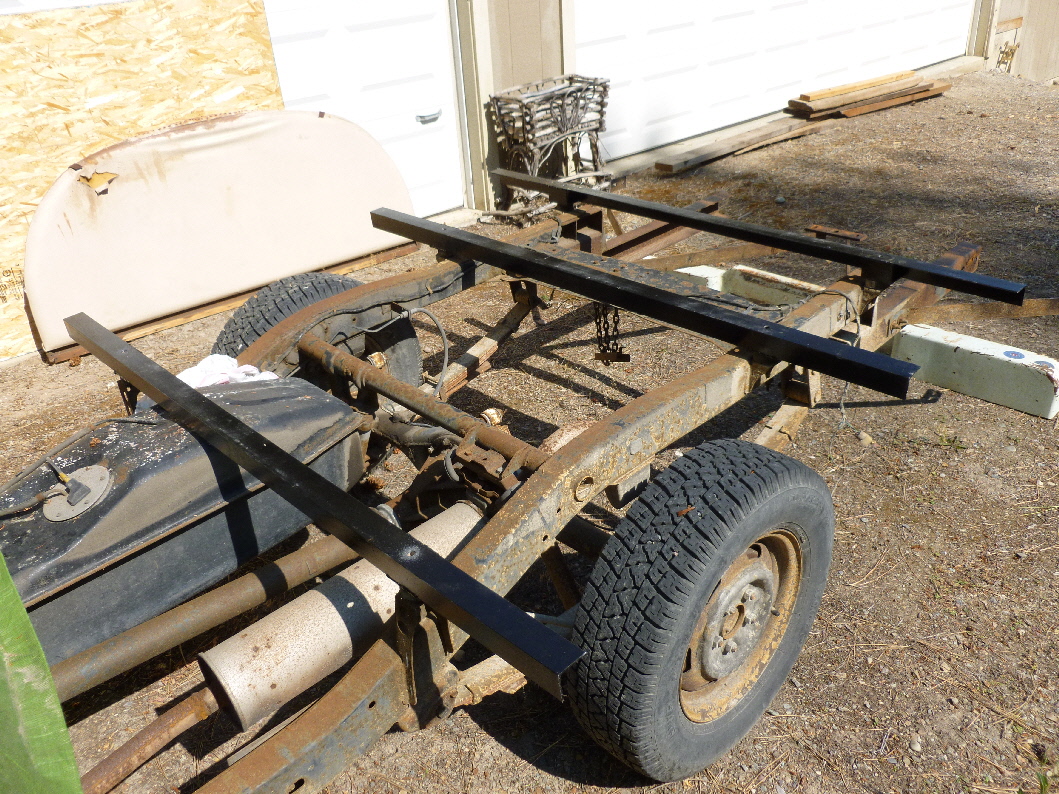
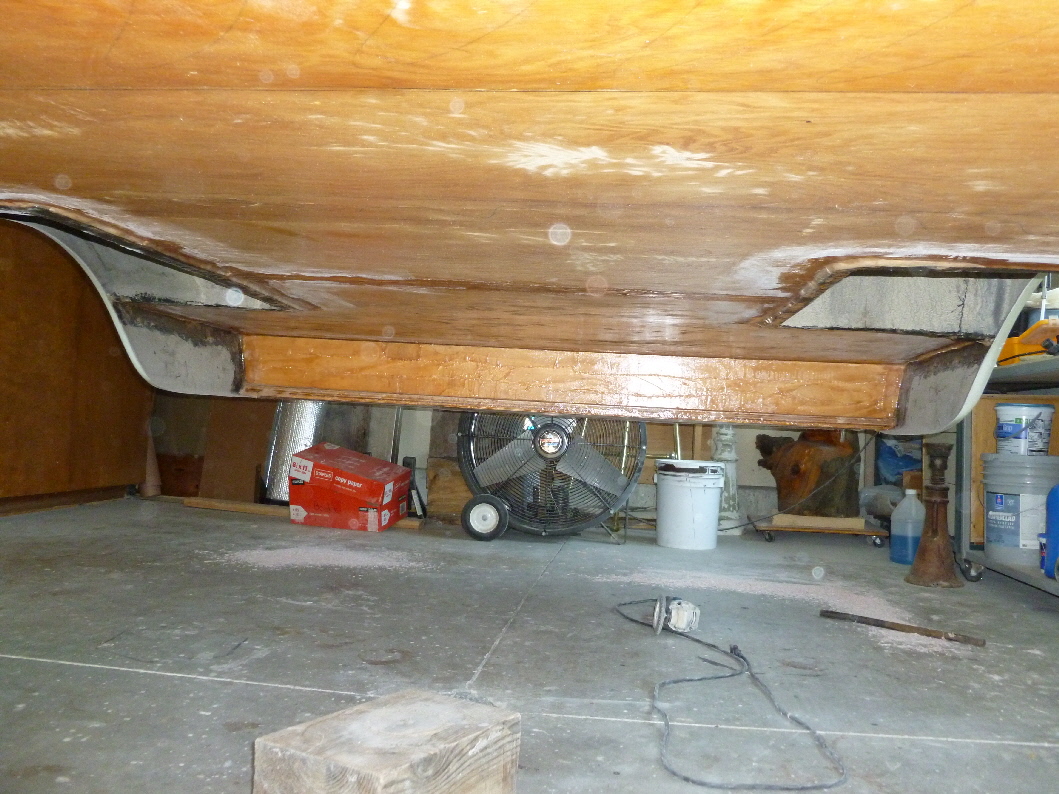
Been getting a few hours a week in on the chinook project, finally sitting on the chassis again, ready to be bolted down. Still not entirely sure what my plan is with the cab-camper seal and attachment. In the pics you can see the new under camper supports: 2x2 angle boxed where the chassis mounts are. For the floor rebuild we used 1/4" ply for the top and bottom, with either 3/4" foamboard insulation or 3/4" plank where bolts will pass through or extra strength is needed. i ended up putting two coats of epoxy on the floor bottom as my coating- easier to repair/add to later, same price as 2k epoxy paint/cheaper than bedliner. Hopefully by next weekend i'll have come up with some seal ideas and the camper will be bolted back on the truck!

-
got some work done this week, today i glassed over all the misc. holes in the coach. left the two big ones on the drivers side, planning on those being slide out tables/kitchen stuff. the rest i covered up. i plan on keeping it pretty simple and modular. no shore water, heater vent (may go catalytic propane someday), etc. father in law has been rebuilding the rear door. we've been waiting on our marine plywood order so we can get the floor rebuilt, missed the truck this week, should be in on thursday. plenty of other stuff to do, but would be nice to get that floor in and remount the coach. tomorrow going to tackle some more 'glass work and put some LED tailights in the bumper- glassing over the stock light holes- fewer holes in the coach to let water in the better as far as i'm concerned. any one need a left tailight for cheap? right one (i think) is busted up a bit. hey chichi, thanks for the thoughts. i put a weber in one of the 1980 4x4s i've had... didn't really see much improvement, same with headers. from my experience, i like the stock stuff when its in tune. it just works. no matter how much $$$ you put into them, they're still a carbed cyl. a 3rz-fe out of a tacoma however... more pics soon
-
i'd love to put it on a 4x4 chassis down the line, but for now its going back on the '77. it'll stay toyota either way.
-
Demolition day! Drove down to the in-laws today and lifted the coach off. the coach removal went far smoother than i had planned, no bolts were rusted in place (maybe a first for me), found almost all the cab-coach attachments quickly (didn't know about the sheet metal screws on the top of the pass thru). between a floor jack and wood blocks and a few ratchet straps it lifted right off and i drove the truck out. we decided to replace the whole floor and will be doing it in two segments and a third for the "basement" in the way back. using an old wood chisel we cut the glass tape at the wall/floor junction all the way around the front half then sawzalled down the middle- out it came. my father in-law is an incredible wood worker and all around handy guy, over the next few days he is going to recreate the floor with 1/4 ply on top and bottom, some stick framing and filling the voids with 3/4 inch foamboard. i have wednesday off and am planning on heading over and hopefully installing the front bit of the floor and working on demo'ing and building the back part. now some questions: -i assume the garden hose between the cab roof and cab-over of the camper was not the stock seal. any tips on what to use when it goes back on? -am currently planning on using 2k epoxy primer as my seal on the bottom of the floor, not going to put sheet metal back on. also thought about spraying a 2 part bedliner over the primer, but not sure if its in the budget. any thoughts appreciated. pics here http://www.flickr.com/photos/claymorrison/sets/72157626659420283/
-
Any progress? I like the direction of your build, look forward to the interior build out. Also have lots of friends in missoula if you need a driveway to camp for the concert let me know.
-
ever check out expedition portal? lots of DIY builds there like your plan. you should build it.
-
thanks 5toyota. i've had a couple of trucks with the 20r too. i have most of the mechanical issues under control now, also have an appointment with a real mechanic to go over it, do the fine tuning on the carb and let me know if i missed anything or safety issues. now i'm getting some cash together to start work on the floor rot. i've found the drivers side behind the wheel well and in front of it near the metal support leg are the only rotten places. not sure if it would be easier to replace sections of the floor that are bad or just lift the coach off the chassis and do the whole floor at once and be done with it. my father in law will help (well equiped wood shop, even has some epoxy i can use). i assume the lower layer of ply will be bad too. while i'm at it i was planning on improving the coach-chassis connection with some 2x2 angle across the width of the floor as well. any tips or thoughts from anyone who has done floor work would be great. thanks
-
Toys are getting better gas milage and cost more?
clay replied to craige's topic in General Discussion
i get a kick out of the mpg claims in adds these days. the last time gas was high, seemed like every other add in the classifieds claimed "great mpg!" 1980's suburbans, fullsize sedans with v8s, didn't matter- great mpgs! -
yeah, i have a FSM for my '76 land cruiser project- very helpful with great in depth knowledge for a single, stock model. the book linked to above just seem more helpful with general repair and diagnostics as well as explaining a bit better in layman terms. was able to get it charging at the correct voltage this morning, now onto tuning the carb a bit better (runs really smooth when cold, then rough at idle when warm), then tackle some of the leaks and floor rot issues.
-
Some day i'll learn from my past mistakes, such as checking fuses before i get any deeper into a problem! Engine fuse was blown, i think i shorted it when i messing with the voltage regulaor earlier. now the oil light is off, and i'm back to overcharging. i'll go back to tinkering with the regulator, maybe now the adjustments will do something to the voltage level. derek- that book is so much more helpful than haynes/chilton crap!
-
that makes sense, i've just never seen anything on an oil pan before. these pre '79 models are new to me. had a heck of a time getting the old filter off, maybe i bumped the connector loose. also the electrical on this thing looks like my 3 yr old did the work! few wires under there look to have been left unmolested. hard to trace a wire that changes color with every splice. quite a few places where the insulation has worn through as well. thanks for the link derek, i've seen that authors VW book, didn't know there was a toyota one. i'm a big fan of having as much knowledge as possible, no matter how basic. my self taught wrenching skills can use all the help i can get.