waiter
-
Posts
2,282 -
Joined
-
Last visited
Content Type
Events
Profiles
Forums
Gallery
Everything posted by waiter
-
 Yes, I would actually like something that goes across the entire front end. Depends on cost. No need protecting a $10 bulb with a $50 screen.
 -
if you have a "Discount Tire" outlet. they will special order AND they will beat any advertised price, including internet.
-
Thanks. I'm also looking around for screens for the front (rock screens for the grill/lights)
-
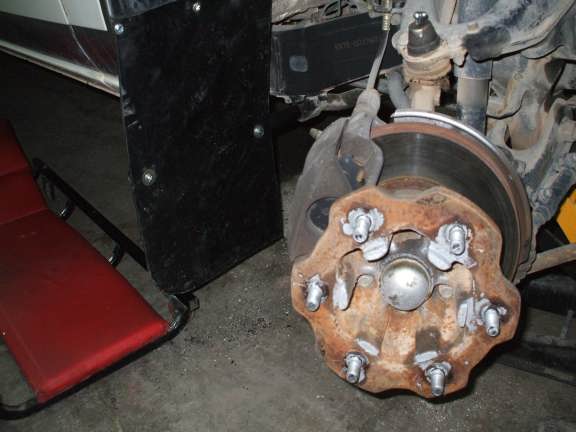
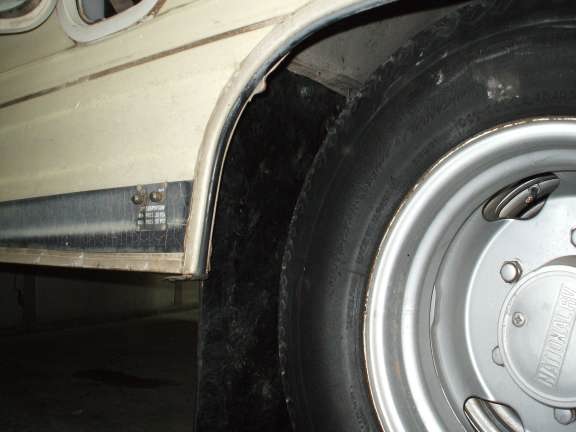
I added mud flaps to the front and rear wheels. My main concern is gravel and crap getting kicked up and destroying the plumbing, wiring, etc under the coach. Also sand blasting (gravel blasting) the door panels behind the front wheels. I'll be traveling on about 800 miles of gravel road in the next few months (Northern Alaska) and this is sort of preventative measure. There is brace behind the rear wheel that supports the coach. We beefed that up and used that for the rear mount. While doing this we broke the air lines for the air bags. Not a big deal, the air lines were very brittle, broke easily, and they really needed to be replaced anyway. Also replaced the fittings that went into the airbags. The front flaps were screwed into the fender and inside skirt. We also welded a tube brace to the frame to help add support for the flap. While we had the front wheels off, we replaced that very hard to get at fuel filter.

-
It wasn't 3m brand - it was a store brand (sorry, I wrote the first post from memory, and you know how that goes)
-
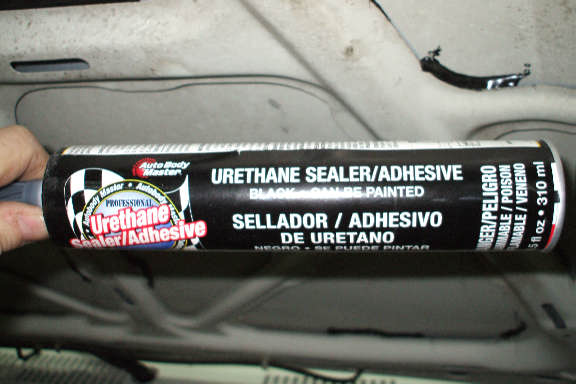
The back of the my hood was pressed down and it had separated from the frame structure. It looks like maybe someone had climbed on the hood. I cut a small piece of wood about 12 inches long, I braced one end against the back of the hood and frame and the other end rested on the engine valve cover. I slowly closed the hood on the piece of wood until it popped back into its good condition. I opened the hood again and squirted this glue all along the hood frame where it contacts the hood. I again put my piece of wood in there and lowered the hood against the block of wood to press the frame against the hood. Left it like this for 24 hours to allow the adhesive to cure. Looks great, and the frame is secured to the hood. This Adhesive was suggested by the Auto supply house. They supply paint and body supplies to auto body shops, so they know what works.
-
Duplicate
-
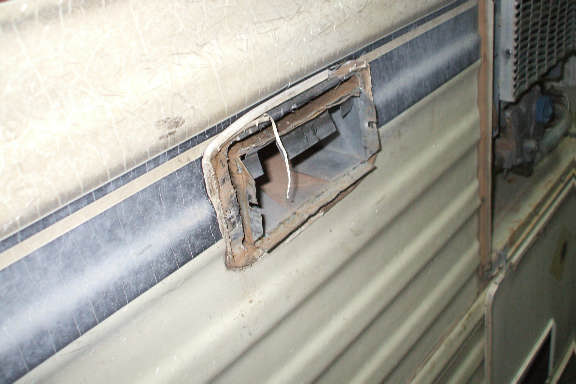
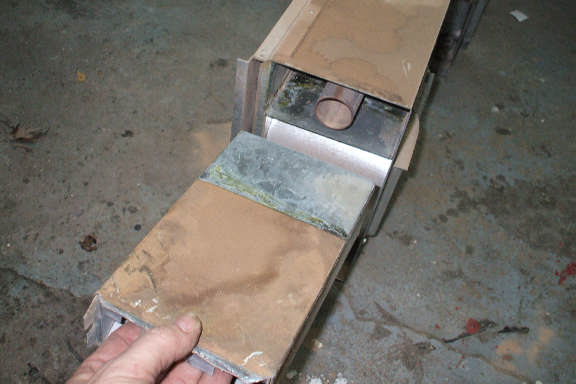
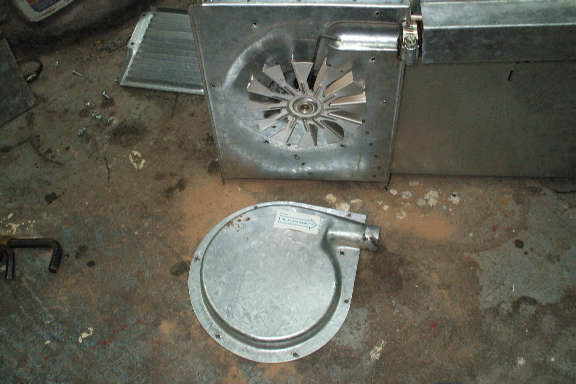
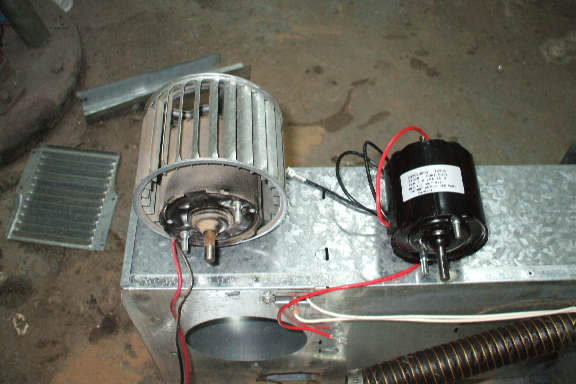
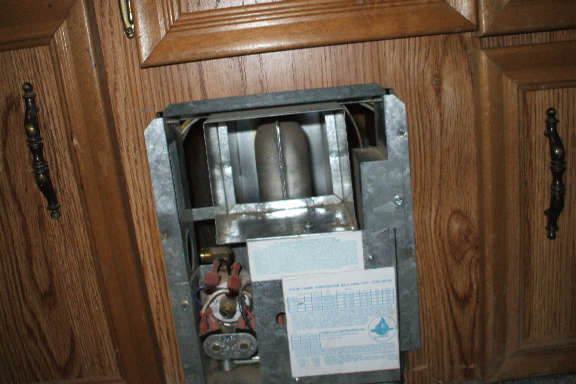
The Blower Motor would squeal for about 30 seconds when the furnace started, then about 5 seconds when it shut off. The Motor has oilite bearings, once they are dry,That's it, the only way to do a permanent fix is replace the motor. I ordered a new motor, and was ready to get to work. I started this job a few days ago by removing the four screws that hold the furnace in and disconnecting the propane line. The furnace should slide out with some wiggle, but it wouldn't budge. I looked for hidden screws and found none. I posted questions here and the Yahoo group, Everyone agreed that it should slide out, The one thing I didn't do was remove the exhaust tube, but the furnace should be able to slide out without removing it. (just won't be able to get it back in). OK, lets remove the exterior tubes and see if there is anything in there that's keeping the furnace from sliding out. So, I went to the outside and removed the exhaust tube, it slide out easily, However, the intake box wouldn't budge. It was frozen to the furnace. Since I wasn't going to remove the intake box from the outside, the only option was to leave it attached to the furnace. I used a pair of pliers and carefully bent the four flanges down so I could pull the Intake box through from the inside. Back inside, a little wiggle and the Furnace now slid out. I clipped the three wires that went into the furnace and pulled it completely out, intake box and all. Once the furnace was out, I was able to break the intake box loose from the furnace and then proceed with the motor replacement. The flexible tube cover comes off, and the fan shroud comes off to expose the combustion air blower. Once that fan is off, remove two screws that hold the motor, the motor and heat blower can be pulled out the other side. Remove the heat blower from the old motor and put it on the new motor. Reinstall the motor into the furnace, install the combustion fan and the shroud. Then hook the blower up to 12 volts to make sure it isn't rubbing against anything. Reinstall the furnace back into the coach, hook up the wires, and cycle the furnace to make sure the blower kicks on. Hook up the propane, and on the outside, I straighten the flanges on the Intake box, and reinstall it and the exhaust air tube. That's it, no more squeal.
-
You need the manual. A very good one (Factory Manual) that has theory of operation, etc. is located over on the Yahoo Group. If your not a member of the group, you should join. A lot of the same people that are here, but a different format. ( I prefer the Web site based (here), some people prefer the e-mail based groups (yahoo) The link to the manual is located in their "links" section. Its actually in Google Docs (yes, you'll need to have a Google Docs username/password, but believe me, this is worth it. The manual is 84 meg and 1400 pages. This manual is a must have. so make sure you have a good high speed connection. http://autos.groups.yahoo.com/group/toyota-campers/links OK, there is a good troubleshooting section for EFI. If the fuel is bleeding back, it could be either the Regulator or the fuel pump. However, before you do any of these, you might want to try a chemical solution first. Get a bottle of the best (Chevron) fuel injector cleaner and run a tank of this, Its possible it could free up a stuck valve in the fuel pump or Regulator, and besides, it will probably help clean the injectors. At this point, I would say your down to a Regulator, or a Fuel pump.. The regulator will be easy to replace (and its the least expensive). The fuel pump is in the tank, You may need to drop the tank to get at it. John Mc 88 Dolphin 4 Auto
-
I was looking in the book last night. (full 1400 page service manual for 88 model download at the Yahoo Group) It should be behind the drivers side floor kick panel. The original one does NOT look like the one you bought.
-
Does she have a sister??? Did she paint over the old decals that couldn't be removed??? I'm thinking of doing the same thing, then shoot the whole Coach portion with clear coat.
-
Nothing quantitative yet. Just simple DC voltage checks. With the battery disconnected, I see 13.52 Vdc on the DC circuits when Shore power applied (Converter supplying all the DC power) Battery connected, I see 13.02 Vdc (no shore power, battery has good charge) It jumped to 13,52Vdc when I applied Shore power. (Converter doing a slight charge to the battery) When I first apply shore power, I don't hear the usual CLUNK, Instead I hear the fan kick on for a couple seconds.
-
Did you find it??? 5Toyota mentioned about 4 ways not working.I had this same problem with the 4 ways.I squirted WD40 in the switch and after 5-6 times they started to work (dirty switch) As a matter of fact, I went around a squirted WD40 in everything, locks, hinges,doors, Solved a lot of problems with a truck that had been sitting for most of its life.
-
Mine has a rear wall mount,but as you said,one of the bolts goes all the way through and large area washer on the inside.
-
Thats a good idea (the ribbon stuff)!
-
I was in the Air Force 1970 - 1980, Flew EC/RC-135s Now I drive a LongEZ I can afford the gas for it :-) www.iflyez.com
-
Viking, I know where that lug wrench is that you lost . What went into the black tank! Toilet, Batch sink, and Shower??? What model is this?? John
-
LOL LOL LOL:ThumbUp::ThumbUp::ThumbUp::ThumbUp:
-
Very Nice. Mine probably won't be that good, but certainly much better than when I started. :-)
-
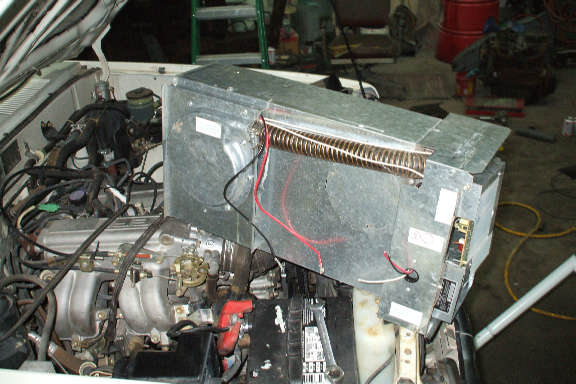
Got a little work done today. Upgraded the Converter to the new WFCO unit - Took about 2 hours Installed the Wife's cool clock. I put the Outside Air Temperature sensor in the external Refrigerator compartment. I wire tied it against the forward wall . this area should get a reasonable outside temperature, even when the refrigerator is operating. Installed new blinds in the Kitchen and the bathroom. Working on the truck AM/FM radio. The original was a dial one. I'm putting in one that's out of a 94 Camry. Photos later
-
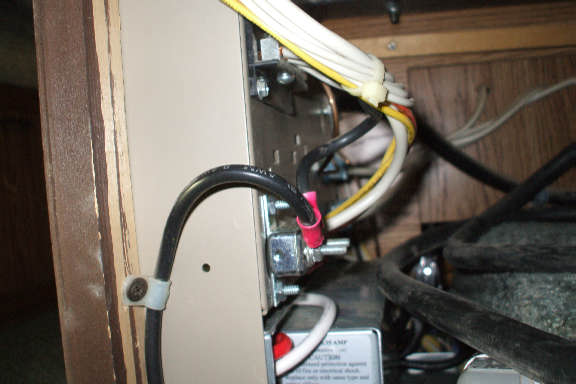
Upgraded the original Equipment Converter to a new technology power supply. The original unit has a history of cooking batteries and only puts out 25 amp. The new WFCO 9855 has a three stage charging system so it can do a trickle charge all the way up to a 55 amp charge. You can read about it here. http://www.bestconve...t-Kit_p_47.html The upgrade went almost exactly as the instructions said. I say "almost". In my particular unit, there is a 45 amp fuse in the 12 volt line, I had to reposition this fuse and drill some new mount holes. Other that that, perfect. These are the Instructions for doing the upgrade: http://www.bestconve...FCO_ep_8-1.html NOTE - I also added additional Circuit breakers and a MAIN circuit breaker. (not shown in these photos) - Scroll down to see how I did this. BEFORE CONVERSION AFTER CONVERSION REPOSITIONED FUSE
-
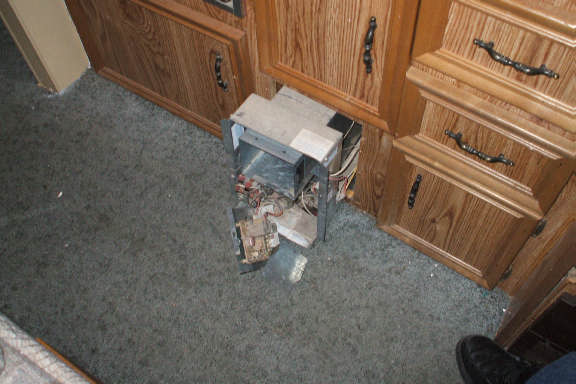
I took the four screws out that hold the furnace to the wood frame. I removed the propane line. I cannot get the furnace to budge. I looked in all the cabinets surrounding the furnace, I didn't see any screws or bolts. What am I missing??? 88 Dolphin, Furnace is below the sink.
-
I'll mess with it tomorrow and take some photos
-
I'm planning a 10,000 mile trip to upper Alaska in late spring. I'm looking at everything on the MH, mechanically, brakes, suspension, bearings, U-joints, new belts, hoses, filters, plugs, wires, cap rotor. Added a very large Trans cooler. Added a remote starter, I call it "The poor Mans Onan" :-) Fix the Cruise COntrol Upgrade the Truck AM / FM radio to a newer year (97 model radio plugs right in) Added AM FM TV DVD player in couch Add 1600 watt 110 Vac inverter Upgrading the converter to one of the 55 amp 3 stage. New Couch battery, new starter battery Upgraded the propane to the ACME connector and new regulator. Replaced all the roof vents Painting inside, fixing a little mush wall over the driver. I'll put new tires on it just before we leave (replace 15 year old tires, with good rubber) We'll be doing a couple "Learning" trips over the next few months. but I'm really looking forward to this Adventure.
-
Try some #200 sand paper, wipe the wire with it. That should clean it enough to accept solder. I bought some washers and some sealant string. I'll try replacing one this weekend and see how it works out.