waiter
-
Posts
2,282 -
Joined
-
Last visited
Content Type
Events
Profiles
Forums
Gallery
Everything posted by waiter
-
I found a place that will make replacement screens for the ones that I'm missing, it looks like about $62 each. These are the two large windows (one on each side) I'm in the process of doing measurements to make sure what they make will work OK. In my communications with them, I asked if they would do a discount for a small group purchase (instead of making one, they would make 10, the same size. Anyway, if your interested, let me know. These are for an 88 Dolphin. I'll post the measurements for my Dolphin windows tonight after I get home. This is the link for the folks that make the screens. http://tinyurl.com/62yeytr John Mc 88 Dolphin 4 Auto
-
Seems like the speed is back OK now.
-
Good Point, Double check to make sure you have a jack and lug wrench, and a spare tire (all hold air) A lot of the stuff you can purchase at local Walmart. I bought mine in fair weather (New Mexico) and drove it back to Cold weather ( Ohio) Before I hit the cold weather, I stopped for half a day, did a quick roof seal job (just enough to last the winter) and fixed some of the little things that needed attention now (do it while I'm in warm weather) Good luck JOhn Mc 88 Dolphin 4 Auto
-
I had access to a 6ft slide rule in our physics lab. good to 5 decimal places if I remember correctly. You had to make reservations to use it. My first calculator was a Texas Instruments 6 digit LED model, four function ( + - * / ). It had a 3 position slide switch for the decimal point, 0, 2, 4. Cost $99. I thought me wife was going to divorce me over that one. Now I can get a full function Scientific Calculator, credit card size, just by opening up a new checking account! I think we're getting old!
-
That is one of the advantages of having one of those phone cradle modems, you never notice when things come to a screeching halt. I had a 100 baud cradle modem, To slow, so I built a 300 baud modem, WOW, Lightning fast.
-
Looks like the forums are at it again. A corrupt DB could be doing this also. Has the forum Database been compressed and tested?. There should be a link in cpanel to allow maintenance on the DB to do this. JOhn Mc 88 Dolphin 4 Auto
-
Can you post a couple photos of it. I'm going to try to repair a crack in mine without removing it, but it would be nice to see what it looked like if I did decide to take it out. Thanks JOhn Mc 88 Dolphin 4 Auto
-
Flashlight Toolkit (sockets, wrenches, screwdrivers, etc) 2 tubes caulk tube roof sealant and caulk gun (get the kind that flows) 1 inch paint brush (for spreading sealant) small wd40 / lubricant gallon RV antifreeze (dump some in each drain) gallon auto antifreeze spare thermostat duct tape thick plastic sheet (10 mill) 2 each 1057 bulbs (turn signal) 2 each 1046 bulbs (couch lights) window cleaner paper towels sleeping bag 6 ft step ladder
-
Linda; Don't want to hijack your thread, but these guys you linked to also can do replacement screens. All-Rite replacement screens I've been looking for someone who can do these. Thanks JOhn Mc 88 Dolphin 4 Auto
-

Major roof repairs
waiter replied to pelagic's topic in Improvement and Do-It-Yourself Projects you have done to Share!
Bob; 7000 btu, does it do the job??? I was looking specifically for smaller units, in the 7000 range as these can easily be run from some of the portable generators. -
LOL LOL LOL :ThumbUp:
-
Goto the cloth store and buy the cheepest Dacron fabric they have (MUST BE 100% DACRON). It will probably be cheeper than wax paper or saran wrap. JOhn Mc
-
Peel Ply - Dacron Fabric - Does a couple nice things, levels out those transitions between layers (no sharp edges), creates a surface that is ready for bonding if follow-on layups are needed. Anytime I do a layup, (vacuum bag or otherwise) I always use Peel Ply. Wax paper shouldn't be used, it leaves wax residue that must be cleaned in order to get stuff to stick to the previous layup. I use common saran wrap, HINT - Foams are different - Open cell will do exactly what you said, water will creep between the cells. Closed cell won't do this, also closed cell is very good for structural properties.
-
Brian; Good looking glass work. (I built an entire airplane with fiberglass and foam, so I have a little experience. Look at www.iflyez.com Anyway, the shower pan in my Dolphin has an 18 inch crack in the pan. The pan is different than yours as mine doesn't have the toilet stool as part of the shower. And my floor is smooth, like the bottom of a bathtub. The photos of your pan repair give me a little insight as to what I may run into while repairing mine. Thanks for taking the time to post them. Here's my plan: My shower floor is firm, Its obvious that the shower was not used with the damaged floor pan. I'm hoping th pan is fiberglass and not plastic. If its fiberglass, my repair will most likely outlast the the vehicle. If its plastic, it just depends what kind and how good the repaired section is able to bond to the plastic. (From your photos, I'm betting mine is also glass. I'll stop drill the crack by drilling a 1/4 hole at the end of the crack. I'll drill several holes beside the crack so I can squirt urethane foam under the pan. The Foam acts as adhesive and can also support structural loads (weight on the floor) After the foam cures, I'll use 120 grit paper and sand the pan about 3 inches on both sides of the crack. (scratch it so epoxy can bond to it) I'll then glass two layers of 2 inch wide BID (Bi-Directional) glass over the crack. and place peel ply over that. After cure, pull the peel ply, sand the entire pan with 200 grit, then prime and paint. This should leave a very small ridge in the pan (where the glass cover the crack) but I don't think it'll be a problem. A word about Spray Foams. There are several types of the Spray Can foam available. Use the stuff that has the Red label, NOT the blue label. The Red label is Urethane (is rigid and firm after cure, can support minor structural loads and also acts as an adhesive), The Blue label is Latex (remains a little flexible after it dries) John Mc 88 Dolphin 4 Auto
-
I just ordered a set of those giant lego's. My goal, Try and find a spot that's level front to back, and best I can side to side. Use the lego's mainly for front to back. (In your case, you may want a little leaning side to side until you get the roof fixed. As for the frig, I read in their documentation (Dometic) that there are two styles of heaters, a square one and a round one (The little chimney thing where the propane flame goes up) The Square ones are more sensitive to leveling than the round ones. Don't know how to quantify this, but there it is.
-
Derek; e-mail me your address and I'll drop a CD in the mail. I've been downloading all the manuals that apply to my Dolphin, waiter -at- iflyez -dot- com
-
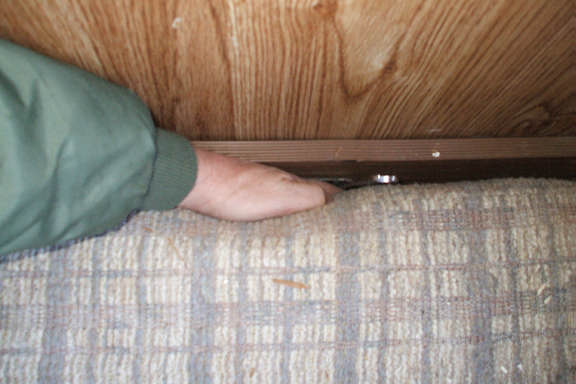
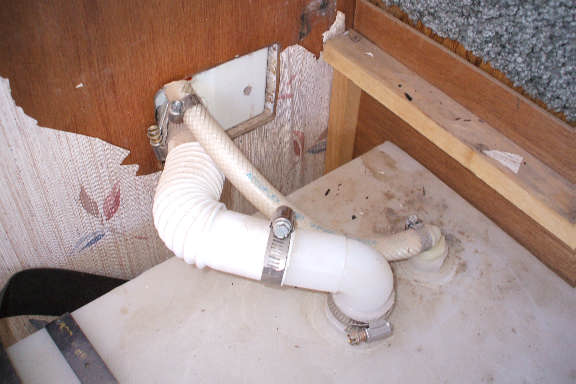
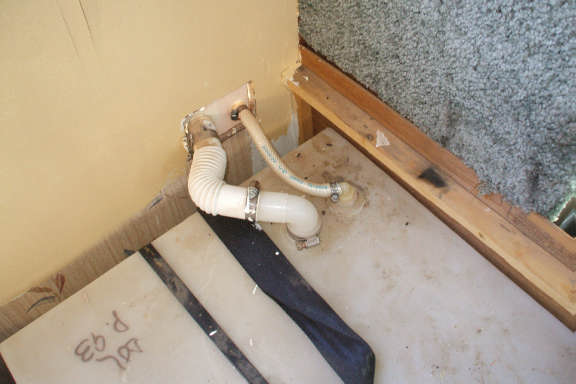
I needed to remove the Sofa so I could paint behind it. I'm glad I did, because I found a couple other problems. This applies to an 88 Dolphin, but your may be similar. Look at the photos. On the left side, get a flashlight and look down between the cushion and the frame, you should see a couple bolts that go into the cabinet. Remove the drawers from the cabinet and look up inside, and you'll see the nuts for these bolts. Remove the nuts washers, then slide the bolts out (There were four on the left side, I only put two back) There were no bolts on the right side, the couch frame just rests on the wood structure, nothing holding it down on the right. Once the sofa is out, you can see the electrical, wheel well, water tank, etc. While cleaning and vacuuming, I noticed the vent line for the water tank was broke, so I repaired it while I had the sofa out Also, While the sofa was out, I added a 120 Vac plug at the forward lower section of the sofa. Now I can plug stuff in from the drivers seat.

-
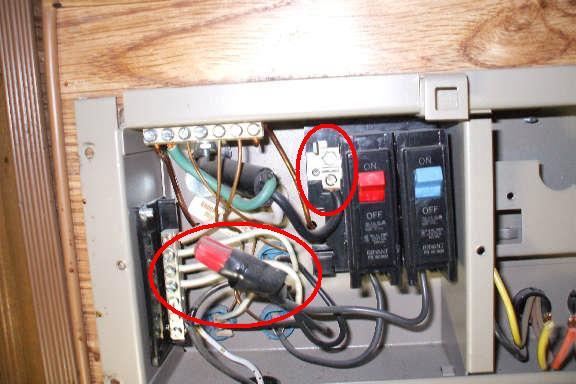
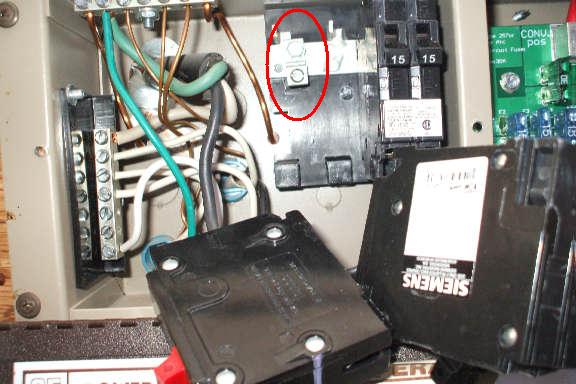
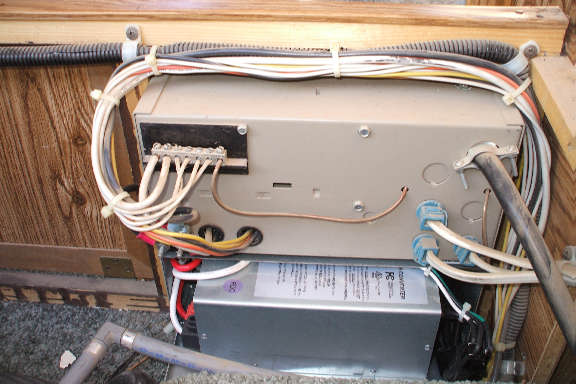
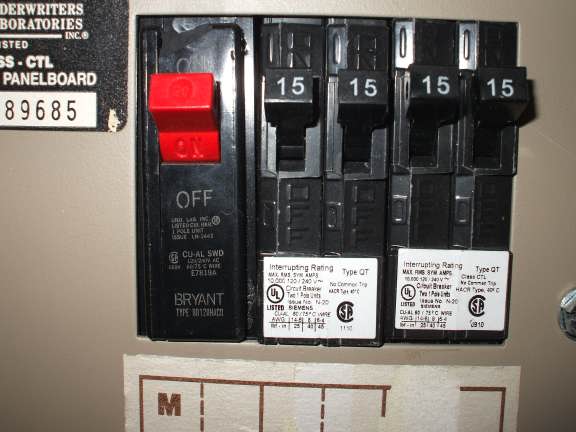
Two additional items you may want to consider when upgrading your converter; Adding an Shore Power Circuit breaker, and putting the 120 Vac circuit on their own breaker. This Mod will cost between $6 and $20 depending how much the circuit breakers cost 2 each - Double 15 amp - $3.00 at Menards. You want the Seimens or Cutler Hammer compatible breakers) I reused the original RED 20 Amp breaker as the "MAIN" 20 amp breaker, and separated the loads that were feed by the Blue breaker and put them on their own 15 amp breakers. This way, I can turn off the different circuits individually if there are any problems. Remember , The breakers are not there to protect the load, the breakers are there to protect the wiring in case the load become defective. WARNING *** UNPLUG AC POWER BEFORE ATTEMPTING TO DO THIS *** This is a photo of the original Converter with circuit breakers; 1) The Shore Power input line (AC Cord) is not fused or protected. It goes to a terminal that feeds the Circuit Breaker backplane. (top middle) 2) All the 120vac outlets, including the 12 volt converter are all tied together with a red wire nut. (left side) and protected by the Blue Circuit Breaker (15 amps). 3) The Red circuit breaker (20 amp) is for the Air Conditioner (I don't have one, I have an exhaust fan) Remove the two breakers (The top pops out, then a slight lift to unhook them form the backplane) Remove the wires from the bottom of the breakers. Remove the Shore Power wire from the lug, then remove the lug from the circuit breaker backplane (3/8 socket). If you don't remove this lug, you can't add the third breaker. You can buy double breakers, I used 15 amps as I don't have an Air conditioner. I removed the wires from the red wire nut and put each load on its own 15 amp breaker. This allows me to turn off individual loads in the event of problems. Install the two double 15s where the Red and Blue used to be, then install the Red on the left position. (Hook the bottom of the breaker onto the backplane, then push in at the top) Connect the Shore Power wire to the bottom of the RED 20 amp breaker. This breaker will become your Shore Power MAIN input breaker. NOTE - The photo on the left shows a 30 amp MAIN breaker, I changed this back to re-used the RED 20 amp breaker as the MAIN. MAIN 20 amp RED #1 15 amp - 12 Volt Power Converter #2 15 amp - Air Conditioner #3 15 amp - Outlets right side (including Frig) #4 15 amp - Outlets Kitchen and Sofa Since I had the sofa removed, I took a photo of the back of the converter
-
If you do Carlsbad Caverns (east of El Paso) While in El Paso, I would recommend a day trip to Jaurez (pronounced War-ezz) if you have current passport . Park your ToyHouse on the US side and walk over Speaking of the Beach - You MUST stop at White Sands (about 20 miles west of Alamogordo on US70) (Visit the Space Museum while in Alamogordo) Also check into Sun Spot, It a solar Observatory northeast of Alamogordo. They used to do tours. Also - Vally of Fires - 35 miles north of Alamogordo. acient lave flow and historical ties to the Trinity Site (First Atomic bomb) Lincoln National forest 35 miles Northeast of Alamogordo (Birthplace of Smokey the Bear) Oh Yah and Roswell - 50 miles Northeast Home of ET I was stationed at Holloman AFB (Alamogordo) back in the 70's, Loved this part of the country JOhn MC 88 Dolphin 4 Auto
-
Painting inside and need to either remove the sofa or the lower cushion so I can paint behind it. How do I get that thing out????? I can't see any bolts?
-
Mine also. There is a lip but doesn't appear that an awning was ever installed.
-
I installed a new Wineguard Disk type TV antenna on the roof last week as part of my Roof Repairs. This antenna comes with its own power supply / amplifier / Cig Lighter wall plug module. I was going to install the new wall plug module where the original one was (On the underside of the cabinet above the frig). I went to the Converter box and started pulling 12volt fuses to kill power to the old wall module so I could swap the modules NOPE - all the fuses removed and the module still has power:waaa: I'll trace the wires tonight but I'll bet that the module goes directly to the battery (there are two large post type fuses (40amp) under the table seats near the battery, I just about bet the module goes to one of these fuses. If I find it is fused, I'll probably just reinstall the original unit, It will have a high current Cig Plug, but the TV antenna portion won't work, as it won't be connected. I'll probably install the new Wineguard module under the cabinet above the couch, Thats where the TV is. Routing the TV Antenna coax over there is no problem, The new Wineguard module will get its power from the Converter box . I may put an ON/OFF switch to kill power to the TV and module. (The TV stays on The TV is an Under-cabinet AM/FM DVD player TV. It runs great on 12volts. Got it on E-Bay for $110 (New, missing remote control) I'll do more pictures when I finish.
-
The front window (the cabover window, long skinny one) has a couple cracks. I want to replace this window I have a couple options. 1) replacement Acrylic (plexiglass) window. 2) make a Lexan window (it will never break, but optical quality isn't as good as acrylic. 3) replace with a sheet of metal painted black to look like a window. Guarantee never break, Optical qualities really, really bad. the window is approximately 10x56 inches Anybody got a source for a replacement ??? John Mc 88 Dolphin 4 Auto
-
Very nice, but they put the steering wheel on the wrong side.
-
DONE. Thanks for the heads up.