DanielJanse
-
Posts
11 -
Joined
-
Last visited
About DanielJanse

DanielJanse's Achievements
")
Rookie (2/14)
-

-
 Rare
Rare
-
 Rare
Rare
-

-
 Rare
Rare
Recent Badges
-
So, in order to let my experiences help others, I am going to jot down a few extra thoughts on this discussion. There is an activated charcoal vent cap solution available from Amazon (OdorHog) that would probably fit right over the vent pipe as shown in the picture from Linda. It's only $70 and you can add back more charcoal as needed. Now I wish I had this on my Starlite again. But, not sure if I mentioned the other issues with my plumbing. All drain pipes are rigid ABS plastic. Over time, the web of pipes appear to have twisted and a few joints completely separated or were close to doing so. I first noticed this when I saw the drain pipe from the shower separated from a T that enters the gray tank. The T is just a little too rotated to allow an easy reconnect. Also, the pipe extended at a slight decline from the sink P trap is almost twisted out of its connection down to the same T. Maybe the gray tank got jostled or over time the hot-cold cycles of Idaho had this effect. The T entering the tank is solid at that joint. My guess is more of a time effect. The pipe-pipe glue started to fail and thus things started to move because they could. A large section came completely free when I gave it a little shake. In summary, if you have one of these old things don't trust your factory installed system anymore. I think that for these plumbing issues I will turn to flexible pond PVC pipe. It will be easier to work with and can move with the vehicle. For the stink pipe...jeez, I don't know. I cut a rectangular "door" next the the battery compartment that gives me access beneath the shower pan. It will be a nice storage area for the sewage drain hose in the future. From there, I could see that the grommet attaching the vent pipe to the black tank was unattached. I think it had been poorly installed to begin with as not enough plywood was removed around the hole to the tank and the grommet was not going to fit. WTF, right? No one is ever going to see it anyway. I removed enough plywood (with a hand chisel and utility knife, cursing) to probably get it seated. But, what to do? I can remove the old pipe in 6" sections or so and I'm considering doing so just because I hate it so much. Then, maybe just make a vent port much lower. Ideally, it will have a hose attachment so I can move the opening about 10' away. Maybe even add a little inline fan w/ or w/out a charcoal scrubber. As for the new holes in my RV...ouch. I bought a used bass boat and I guess the original owner found ways to gouge the exterior pretty good. He used some kind of white marine epoxy that has been on that thing for YEARS and is hard as a rock. That will be my "fix". It's just amazing how things can snowball during a project like this. I was just trying to fix the power to the vent hood. Oh well, look at the light coming that that pipe joint...
-
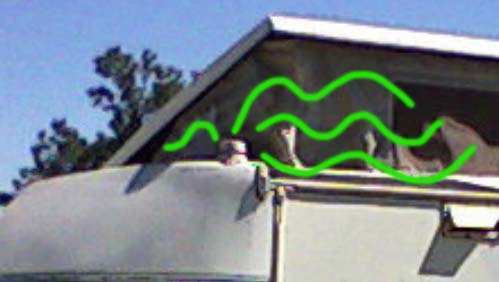
Congrats on getting the site back up. My first responses when I saw the image you found was (1) Thank You and (2) I Wish my Starlite had that installed. But then I considered the silliness of this placement...right outside the canvas windows. I modified the image to show the inevitable outcome of such an install. I would never repeat that mistake. It would require a chainsaw to gain access to do so anyway. I would guess that my version is 2.0 in response to consumer complaint but who knows. I have a vent pipe inside the wall in that same corner but it runs right up the seam line. The termination point is lower than the nose section, but extends up 4-5 feet for some stupid reason. Like most things about an RV, the intent was never to get something OUT if it ever needed replacement. This area is super-thick with wood. I know because I chose to find out what was going on with a hole saw. When I spotted a spring mechanism inside the cap of this pipe, I realized what they had intended, mostly. Under the proper conditions, I would predict that the pressure could build up high enough to create a sort of methane pipe bomb...or at least the check valve would release all that smelly goodness right in the wall behind the shower. Lovely. Is this even up to whatever code must have existed? RECALL! LOL. Here's a few more insanely stupid things this company did. 1. Carpeted the entire rear section...and then laid all the fresh water appliances (tank and heater) and AC unit right on top. (Gag) 2. I can't find a single piece of exposed hardware in stainless steel and this was when stainless was actually cheap. 3. Rear set belts are bolted to the plywood, not the frame. 4. Some of the ugliest MIG welding I have ever seen. 5. The staples that hold the structural wood together...ugghhh. Ever try ripping apart 1"x2"s that are stapled from both the side facing you and the side facing the fiberglass shell? Nightmare. 6. Wallpaper 7. My 12 volt system seems to be fused, twice...head scratcher there. 8. That terrible drawer track design...like a chest of drawers for a 5 year old. More to look forward to, I'm sure.

-
That is the same vent used on the gray tank from sink and shower. My concern is that it will not be effective enough at allowing gases to escape and a wind from the wrong direction would be most unpleasant. There is a reason that larger RVs put these things on the roof. I'm not sure what you mean about having been vented properly to begin with. Everything I have worked on seems factory made. The vent pipe, in particular, had only one chance of being inserted where it is (between the shower and forward cab) and that was during construction. It has a spring-activated valve at the end that suggests to me that it is only activated when suction is applied as during emptying. For some reason, this end was situated about 5 feet above the tank. It's as if they considered adding a proper roof vent but then remembered it didn't have a roof! Don't be too surprised by engineering incompetence. It explains a hell of a lot about the world.
-
OK. Just bought this '89 Starlite a few weeks ago and have been working on it nonstop. Water damage was BAD. No appliances want to work. New AC, water heater, parts for the fridge. Then, while rewiring the vent hood, I look down and notice that the drain pipe from the sink is NOT connected. Both ends are there but decided at some point to separate. FUN! I shook the entire section and it came loose. At least I have something to take to the hardware store. So now I don't trust the plumbing and start looking at everything under the shower. Black tank vent pipe separated at some point and seems to rise into the wall but not vent anywhere. What the heck! I guess they decided that with a pop-up top that it was OK to get vent the sewer into the wall! I have gone to the trouble of cutting into the exterior to visualize what is at the end of this "vent". It appears to be a check valve so it only opens when the tank is being drained. This is the challenge of an RV with a extending roof...how do you vent the sewer tank? Gray tank has a nice little vent from the drain...no biggie, but the black tank? I don't like the idea of gases building up in the tank and being held back by a check valve. Perhaps this RV is considered a "weekender" and black tank issues can be limited by a short time on the road and/or frequent draining. I'm not sure how to proceed, but I'd like a better solution that really vents the black tank. But just think of the issues. You add a vent, pop the top and then the stink goes into your canvas "tent" windows (especially with unlucky wind direction). For some reason, powered venting fans WERE available but are no longer so. Anyone dealt with this...any ideas?
-
Leisure Odyssey water heater replacement
DanielJanse replied to DanielJanse's topic in General Discussion
Never Mind! I just looked again and see where it pumps back from the tank. -
I'm looking at the the plumbing on my little Starlite and wondering if it just allows the water heater to be used when hooked to city water. I don't see anything but a T from the city input line that feeds the heater. Is this a common way that they plumbed these RVs or am I missing something? I'd like to try and supply water from the fresh water tank as well. Thanks!
-
I can see where the seat position would need to be changed as it rotated. The driver's side seems super cramped due to the bathroom wall at its back. Really hoping the Honda seats are a bit less deep to allow for some added room on both sides.
-
True but I would like to keep it as close to "made for autos" as I can. The bass boat seat option doesn't look as secure as the van ones. Ebay has the van version for about $80 which isn't too awful.
-
Has anyone ever added the ability to swivel the passenger seat to use as a nice recliner while parked? I was wondering if any of the available adapters for Sprinters or Transit vans might "fit" the Toyota hole pattern. Am already looking into a swap for Honda Civic seats as suggested in another thread. Heck, I'm a welder...might just buy one and make it work. LOL!!!
-
I will take some pics. It is a 4 cylinder, non-dually. Last owner beefed up the rear suspension with heavier springs. Ran great through some nasty hills around Springfield and Branson, MO. I found this lovely Instagram of living in an Odyssey. https://www.instagram.com/theleisureodyssey/?hl=en Creator seemed to use CAD design to reimagine the interior floorplan. Impressive. The big rear window is such a great frame in her photos. I'm inspired and will need to be as a lot of work is in front of me. LOL
-
Hi. I just got one of these and its roof has a bit of sag. It sat out in an Idaho field for 10 years so I'm guessing the snow weighed it down. Anyone have a roof from a retired Odyssey that could be recycled?