canadasunrader
-
Posts
175 -
Joined
-
Last visited
Content Type
Events
Profiles
Forums
Gallery
Everything posted by canadasunrader
-
Hello all. I realize that the fuel gauge is a problem in the Toyotas, and there are many answers here on the forum. My fuel gauge is not working. I can not get a vehicle inspection/registration etc without a working fuel gauge. Argggggggh. I took my 86 21' Sunrader to my mechanic this weekend suspecting that the problem is the sending unit, which he confirms it is. He says the first option is to drop the tank and clean the unit and hope that that solves it. Otherwise, no one sells the sending unit. Finding one in a bone yard is the only hope.... and not a good one at that. I am not a mechanic so forgive my questions, but would it be feasible/possible to just completely replace the tank with a 'new' one? Are they expensive? Is this a solution? Thanks again. Rick
-
Thanks Jim. Really appreciate that description. I live here in Victoria BC and we have a lot of boat folks. I'm sure if I need I can find someone to help with this. For now maybe I will search out some life seal. Part of the problem as I see it [and as Linda has pointed out many times] is these windows tend to bow with time. Perhaps I was a little hasty in getting them back in before giving them a good chance at straightening out. My holes seem good, and right. My windows fit with a very acceptable gap, so I don't think it's that. I plan to pull the one problem one out next week and try again to get it in right. If it's not one thing.... Always an adventure. Rick
-
Jet. Yes, it was a lot of 'fun' playing with those windows. I have only done it once so far. And I still have a small leak on one side that will force me to pull it out and try again. What finally 'fixed' it for you? And, yes, that is just cheap mahogany door skin. If you poke around the lumber yard you can find the most amazing things. I wanted to curve something into that space and that is the best $8 I have spent so far. A little tricky bending it in there, but is good now, and insulated behind. I plan to stain that piece as it turned into a nice little feature. Thanks Jay. I don't want the house to be a dark box of wood so I got up this morning and began putting the first coats on a few things. I tend to like the dark tones, and wood is so warm to live in, so it's hard for me to go completely to the light side. But I will try. I am - as usual - doing things in a completely unconventional way for a number of reasons. What I am sure many here can sympathize with is the problem of not having a fat stack under the bed to draw from whenever you need/want something. I haven't got the battery or all of the electrical things I need just yet, so I can't close everything up. It's ok doing it in this chaotic way, and as I have said before, ideas and solutions come with time spent not quickly finishing just because you can. It's far better to just hang out and think of the Sunrader as a big chess board. If you move too quickly for your own little brain you end up making mistakes or boxing yourself into things you may want to change later. And as far as the COVID goes, it is a big PITA, but one positive around here at least is that it has slowed everything right down. I am reluctant to just run to the hardware store every time I desire something. Instead, I have been limiting my trips and attempting to use a lot of materials and tools I have on hand. We'll see how it all plays out. These are interesting times. And I'm happy to have the health and time to work on this crazy project. Rick
-
It's been a while. We have been quaranteened here for what seems like forever. Actually... I've been at work on this 86 Sunrader for nearly three months. It's Groundhog Day. Get up. Coffee. Head out to the Sunrader. Work all day. Come into the house around 6pm for dinner. Watch a little Netflix. Sleep. Repeat. Just a quick update here to follow up on our complete gut and rebuild. Just today I finally insulated the back wall and got the wall board on. It was a struggle - as everything is - but it's on. Seems a shame to have to paint over the mahogany board. Working on a lot of things at once now.... onward and upward. Rick

-
Ok, sounds good. I don't have a riveter, so are you suggesting thin bolts with washers into a backing plate?
-
Hmmmm. Jay. As far as cabinets go I just measured off of that outside edge of the wheel well. I wanted my space to be much more wide open than the original so my cabinets angle outward from there giving me some more room. And Derek, can you please let us know how to reattach the ladder the 'right' way? I am going to take mine off and once painted etc reattach. Derek please let us know how. Thanks, Rick
-
Thank you Jetalkington. Yes, LED, and thanks for the tips. Rick
-
I haven't even looked at rear cameras yet. Just thought I'd ask. Maybe someone here knows something.... and can advise
-
Thanks Jay. Did enough wire come with them? Or did you add your own, or tie into the existing? And are you going to install a backup camera, if so which one? Rick
-
Hey Jay. Can I ask a stupid question? You just replaced all of your running lights. I just ordered some. Are they easy to install? Rick
-
And that second one looks good. How many feet did you use?
-
Oh.... I thought you were talking about your bumper...
-
Looks really great. What do you mean by screw cover? Rick
-
Jay. We don't have a smog inspection here in BC. We used to but they stopped it a few years back. The inspection I need is to get it registered and licenced here as I imported it from California. Everything else seems good on the list, but the fuel gauge has to be working to pass. It's a pain in the behind, but will be nice to have a working gauge in the end. For the studs I just used a good Sika adhesive, but I am guess that if you want to do it "right" you probably should use an epoxy. I did not because it is upwards of $40 a tube here. So I make do. Nothing I have put on the walls is going to have much pressure on it so I feel good about it. Mostly it will just hold the 1/4" wall panel. The upper cabinets are screwed into two headers I ran across the sides at the top, and into the ceiling frame. The Rockwool has been perfect in price and the installation is fairly easy. Certainly not as nice or easy as say Thinsulate, but again cost was a factor for me. The batts are very easy to cut down to fit with a bread knife. And I just used some 3M spray glue on the wall to hold it on. Rick
-
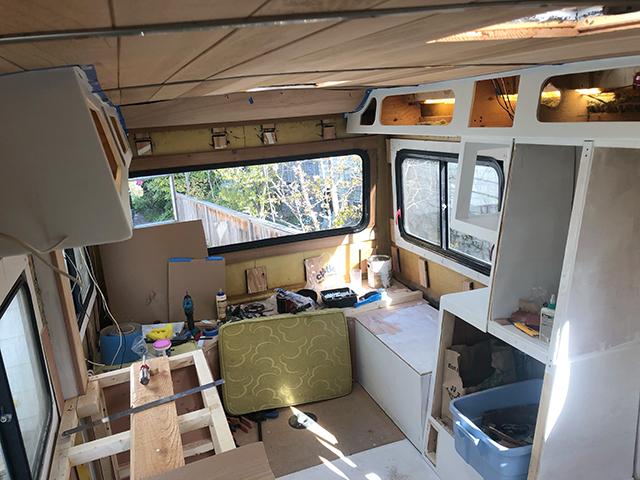
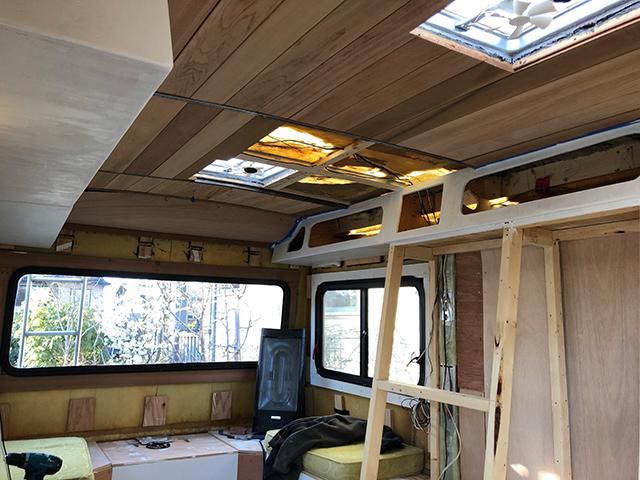
Jay. Here are a few pics of what I have been up to in isolation. We have our van listed for sale [what a terrible time to try and sell a vehicle] so I am waiting on some of the more expensive items I need in order to continue. In the meantime I have been plugging away at the cabinets and the ceiling. I don't have a clue of what I'm doing but making it up as I go along. As said before, I built a two foot square space in the bottom cabinets where a steel door will front the safe. A while back I pulled off the two plexi windows and did everything I can do before reinstalling them. I was hoping I could finish the cabover area completely after doing that but there is a small trickle leak when it rains hard on the one side so I am stuck now with what to do with that. Frustrating. Otherwise, once we get some cash flow again I plan to get all the battery, solar, lights stuff and wire all that in. Can't really button anything up completely until everything is wired and working. One hurdle we have is that our fuel gauge has never worked. And I can't even take it for an inspection with that not working as it will not pass. I've been reading about the issue here on the forum. Seems to be 'normal' with all these toy homes. But what a pain in the behind. I am not a mechanic, so deathly afraid to begin poking around in there. My biggest fear is that I will screw it up somehow and then have to have it towed to a mechanic to get fixed. Anyway..... considering the world in crisis right now, these are all small, first world problems, and I feel lucky to live where I live and that my family is healthy and doing well. I hope yours is in the same boat. Rick
-
Interesting way to deal with the vents, Jay. I just fiberglassed everything up because I am not planning on having too much in the way of appliances - except a fridge, which doesn't need the large vent in the original Sunrader. Also, those older doors, locks and boxes are often rusty old toast and if I'm going to have an outside access compartment I want to get one built or order something new. My only suggestion as you move forward planning your interior - be flex, and leave yourself some room to change and for your new ideas to filter in. In architecture we talk about livability studies, and light tracking. Spend some quiet time inside meditating on how the flow will go once you are living there. Too often, motorhomes get jam packed with every bell and whistle known to man, every nook and cranny crammed with stuff. Especially in these crazy times it's nice to think about all the things we don't need, as opposed to everything we believe we do. Just my two cents....
-
Looks great. Can't wait to see what you do with your blank canvas.
-
Jay. I know it's hard to give up headroom after working so hard to get more space. I struggled with it, but I wanted something up there that was a little more than just white panel. Did you buy the rear lights online? I cleaned mine - probably the originals - up and repaired what I could and they seem good for now. And, yes, it will be a big step getting it water tight and moving on. I am still struggling with one of the plex windows in the front that has a very small leak that I can't seem to figure out. Frustrating. Rick
-
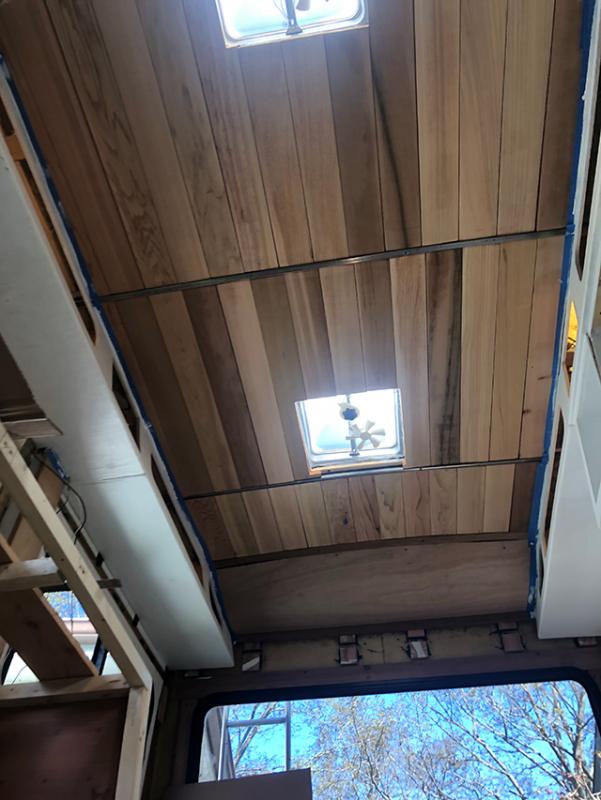
Jay. The cedar is nice because it is bug and rot resistant. Usually it comes as 1x but some mills will plane it down thinner. I thought about putting panels into the ceiling and then painting them, but it was too tempting to do something different. As far as the windows go.... Take one out to give one a go. Lay it front side down and take all of the butyl/putty/tape/glazing out. I lightly used a heat gun to soften it up. Use a wire brush and clean it all up as good as you can. Then wash and let dry. Clean and sand the window hole inside and out. Get fresh butyl tape and retape the flat outside area in the back of the window. Put the window back in. Some of the butyl tape will squish out. Trim that off. I finished all the windows with some really good polyurethane caulking along the top. I'm not sure what that is in the photo you posted. Someone else will have to chime in on that. Looks like the part that holds the window into the frame. Is it all one piece? Or is it putty that has been put in there and is chipping out? Rick
-
Jay. Maybe post a picture of the window/windows you are looking to fix? Yes, there is a plethora of info on those front plexi windows here. I am not building out my home specifically as an RV. More on that later. Rather, it will be mixed use for me, with a little business and a little pleasure. So, I will have no bathroom/shower. And no built-in stove. I want a fridge, counters, storage, lights, seating. As to your question on wiring: the led lights require very light wiring... search that. They require specific dimmers, if using. Otherwise, the wire I am using is pretty basic and not heavy duty at all. Just needs good, solid ground. Overall, I am doing this unconventionally with little to no expertise or talent - like a lot of newbies here I'm making it all up as I go along, with lots of help here and on other forums and sites. Here's a photo. I put cedar tongue and groove on the ceiling. It smells great, is very light and looks like we actually know what we are doing. Also it's easy to find here in the PNW and relatively cheap. I did not have any of the original cabinets when I bought this Sunrader. So I just made some up from scratch. I have limited tools here so it was a challenge. But I made some out of cardboard and trimmed here and there until I had something I can live with, then made them out of plywood, screws, glue, bondo and paint. I'm excited to be able to use a couple of excellent B+W speakers I had in my kitchen a while back, and they will sit in the middle rectangles. These upper cabinets will have doors at some point, and a colour - who knows on that? Also, on the drivers' side wall over the wheel well I am building a large safe out of steel. The door will be two feet square. ibuilt one of these in my van and it has saved us a lot of headaches.... and does not cost that much to build. It works with a simple Master lock and key. And is very difficult to break into. I hate how easy these RVs are to get into and I don't want to have to worry about what little expensive stuff I have when I want to go hiking etc. Anyway.... I'm just making all of this up as I go along and appreciate the sounding board here. I love the fact that it's taking way longer to do all of this than anticipated, as it has allowed the project to evolve and change with new ideas. On a positive note: we went to Mexico a few weeks ago [made it back just under the deadline] and dropped the Sunrader off with a mechanic. We were very worried as we had no idea what condition he is in mechanically and we wanted to just get a good baseline reading on everything. Good news, motor, trans, clutch etc all in "excellent condition." His words. And now we can spend that money that we didn't have on getting new airbags, shocks etc underneath, and making sure everything is mechanically as sound as we can afford to make it. Yay!! Onward now and upward on the inside as we slowly moved towards.... well, somewhere. Who knows what we will end up with. Rick
-
Looks really great Jay. Nice work. Which gasket are you talking about on your windows? There are hundreds of posts in here to look through with windows as the subject. I'm sure all your answers are there. Let me know if you need any specific help. For me, I am just finishing the ceiling and attempting to get my wiring diagram together.... Can't afford to get the batteries etc just yet, but planning. Also built all the upper cabinets and they are now in. And have moved to building my safe and a lower cabinet etc. Take care in this crazy time. Rick
-
I used fiberglass resin on the inside, but switched to epoxy on the outside. There is no need to use much mat on the outside. Just a few small bits here and there where the screws went in. I used a grinder and ground out space where the screw holes were and used epoxy and small pieces of mat to fill. Filling the void from the inside is the easy part. It's the fairing outside and the sanding and more sanding and more fairing that is less fun. Good luck....
-
Hmmmm. With all due respect, the easiest way to fill those large holes in the fiberglass shell is: 1. Cut a piece of plywood that is about three inches bigger all around than the hole. And put a good layer of packing tape on one side. 2. Screw the ply to the outside tightly covering the hole, making sure packing tape side is inside. 3. Grind off the screw tips inside as close to the fiberglass shell as possible. 4. Gather your epoxy, or resin, materials together. Fibreglass mat is best for this use as it is much stronger than cloth. Cut several pieces of mat beginning smaller than the hole gradually getting bigger until you have about 4 or 5 layers ending with one that is two or three inches bigger than the hole. Use the roller to roll to the outside all of the extra epoxy. When completely dry, remove the plywood and begin the process of finishing the outside. Rick
-
Thanks Linda. MIxing up a good batch of epoxy paste is probably best, but you can't beat how cheap bondo is and how easy it is to work with. There are a lot of mixed reviews on the web, but many pros use it regularly with great results for a lot of different projects.
-
All I'm saying.... is it works for me. And I am simply passing on the info.