

AtlantaCamper
-
Posts
269 -
Joined
-
Last visited
Content Type
Events
Profiles
Forums
Gallery
Posts posted by AtlantaCamper
-
-
6 hours ago, jjrbus said:
70 seems about tops without white knuckles
That seems like a pretty accurate statement from my experience.
My previous camper was a 1965 VW bus with a camper interior and it could only go about 60 before you hit the white knuckles. I drove that VW for over 20 years until I graduated to the current rig. So you can understand that when I first got the Yoterhome up to 70 I was amazed at how stable it was and how _amazingly_ fast I was going! Now that a few years have past with the RV I, like Fred, am yearning for something like a Cummins 2.8 turbo diesel...
-
11 hours ago, BBC3 said:
components to a happy refer
These are all excellent points.
Leveling is essential for these units. About +/- 2 degrees I'm told is where you need to be. I've been lazy and parked for a hike or whatever and found the fridge warmed up. It recovers ok but takes some time to catch up. It is a tedious aspect of these units for sure but no way around it. I put the Ride-rite air bag controller/pump in my rig and I use it a lot to get the rig level enough each time I park. I took some time and carefully mounted some Hopkins 08525 graduated level indicators because I got tired of trying to find the right spot for the bubble indicator (yes, bottom of fridge is not all that flat so it's not a good place to monitor from).
A temperature monitor is a great idea. That will give me a much better idea of how things are working.
Using an ice mass in the fridge is another good tip. It's like a cold buffer. I'll try this out. I keep two plastic bins in the lower section of the fridge and keep most food in these hard top containers. At mealtime I open the door and take both containers out and close the door. I sort though them and get what I need and then put the two bins back in one swift move. I think this helps minimize the time the door spends open.
I also use a fan mounted to the top fins to move air through the back. I have it going through a temperature switch so it only goes on when the back fin area is above about 90F. The solar fan is a good idea too!
I'm going to throw out one other thing to be aware of, although hopefully nobody will ever experience it first hand: the dreaded ammonia smell. If you open your fridge and smell ammonia then you need to address it. Almost certainly this means you have a leak in the inside coils. It's harder to notice from the outside but if you detect a faint ammonia smell you should take it seriously. I was fortunate enough to have this wonderful experience and this meant that my cooling section had to be replaced. I bought the "Amish built" refurb unit you can find on ebay for my Dometic RM2401 and it was $415 after I sent back the core. Install was pretty straight forward and quality and customer service is excellent. The replacement works great and I have had zero issues with it. I recommend this refub option as it's a lot less than a new fridge.
-
2 minutes ago, WME said:
Boring math...
Very useful numbers, thanks WME! 3 days per gallon of propane at 100F is really quite good I think and this is pretty much worst case scenario.
-
37 minutes ago, BBC3 said:
how much gas I'd need to run just the fridge each day
Are you asking about gas as in gasoline or gas as in propane? It takes very little propane to run the fridge. It takes uses a small flame to generate the heat it needs to work. Using the Honda generator is very inefficient as it would take a lot of gasoline to generate the small amount of electricity needed to run the 115VAC heater. You can get about 2 to 3 days (I'm told by a fiend) running the fridge on a battery if that's the only thing it's doing. Also very inefficient. Propane is the way to go on the fridge.
Sounds like you got it fired up! Great! It is really hard to see the flame in that stupid prisim indicator thingy. I have to squint and block out all the light and I still wonder if I'm really seeing the flame or not. Just something one has to deal with.
Yes, it takes a very long time to get cold. You will know it's working if you open the back hatch and feel the hot burner area where it's boiling the ammonia and then you will feel the cold on the fins inside. I start mine up the day before I leave. I leave it on propane while driving though others turn it to 12v. I had issues with the flame blowing out while driving but proper adjusting of all of the baffles and it hasn't gone out since while driving.
These RV fridges work by boiling ammonia with a heater (propane, 12v or electric), then the ammonia gas absorbs heat when it goes through the system and eventually condenses back into liquid ammonia. Then it boils again and round and round it goes. To work efficiently you have to get rid of the heat from the fins on the very top of the back panel . Make sure air flow isn't blocked in the rear.
I have gone to a system myself where I use the fridge in parallel with a small Yeti-clone cooler. I put drinks and ice (like ~5 to 6 pounds per day usage) in the cooler and other stuff in the fridge. If you put warm stuff (like room temp beer) in the fridge it takes a LONG time to cool them down and robs the fridge of most of it's cooling power. ONly cold things should go in the fridge and limit the time the door is open. An ammonia fridge can get cold, but it' just can't move a large volume of heat. If you work with these limitations you will enjoy it.
-
1 hour ago, BBC3 said:
I can't get the gas lit.
One thing to check is to make sure the line is fully purged. Light the stove and make sure a burner stays fully lit. Then turn that off and go back to trying the fridge again. I have to hold down the pilot button and then click the igniter and keep holding the pilot button/valve open while looking through the tiny window to make sure the flame is on. After like 30 to 45 seconds i can let go of the pilot push button/valve and then the pilot will stay lit. If it let it go too soon it won't stay lit. Sometimes I have to light it several times to get it to stay lit, all the while holding the pilot valve button in. Usually in these things the flame has to heat up a thermocouple that makes the pilot valve stay open, plus further purging might be needed in this initial lighting process.
If this doesn't work then you might need to get into the guts of the burner and make sure it's all clean and the themocouple is in the pilot flame. You are getting something to light (it just goes out) so it sounds like the igniter is working and there is some gas there. These are good signs.
-
13 hours ago, Grime_Divine said:
what exactly do you mean by using the engine to break?
When you leave your foot off the accelerator pedal when going downhill a vacuum is created in the intake manifold. The drivetrain spins and the vacuum in the intake created by the cylinders/valves creates the braking effect. It doesn't hurt the engine and takes some of the load off the brakes. It works best if you shift manually, typically into second (or first on really steep parts). RPM/speed is the same as going uphill so max ~25 in 1st and ~45 in second.
Both Moccasin Creek State Park and Tallulah Gorge State Park are fantastic spots. These are Georgia State parks inside the National Forest so you can make a camping site reservations at both state parks here: https://gastateparks.org
-
I've taken my 21 foot 1987 Sunrader with a 22re and auto trans up and down the hills of N Georgia - typically right along the Appalachian Trail. Yes, you can do it and you have already had some good advice about how to do so. The climb is not long, but near the top at a few places it does get pretty steep for a short bit. It's not uncommon for me to be in 1st gear doing about 24 mph right at the top. Second gear is my typical climbing gear on those roads. I manually shift through the hills. They are mostly two lane roads with the occasional passing lane.
I generally end up getting up to about 210F on trans fluid temp at the top, which isn't that bad. I put a trans fluid gauge in specifically so I could monitor temps on these hills. That's the most common location to take my rig and I've been doing it quite a bit. For a little while I was concerned that I was heating the trans fluid too much but I don't think that's the case. Hot, yes, but not too hot. Without a temp gauge I'd just stop at the top and put a hand on the trans to make sure it wasn't too hot. BTW, I pulled my trans fluid pan the other day to check/change the filter and have a look. Pretty sure the original factory gasket was still on there. At 87k miles everything was perfectly clean, no indications of overheating, no metal bits in the pan except for a small amount of black metallic 'paste' stuck to the magnets. The filter was completely clean, but I changed it anyway.
Brakes are another thing to be aware of of course. Make sure they are working decently. The first time I came down the other side of the hill I experienced some 'brake fade' and that was a little disconcerting. I often use engine braking on the way down now. I've re-done my brakes and now I have no problems coming down. Fortunately the hills in these here parts are not very high so even if you have some minor issue the overall climb/decent time is short.
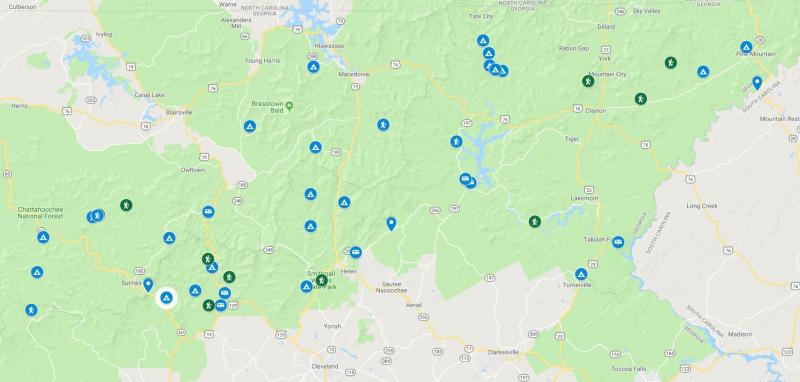
FYI, there are quite a few WMA (Wildlife Management Areas) and Federal campgrounds in the Chattahoochee National Forest that are really fantastic - but these are first come first served and don't have reservations. Many are boondocking type places. We always manage to find one open though. Here is a snapshot of a map of places we visit in the NE corner of Groegia in the Chattahoochee National Forest, PM me your email and I could send you a link to the Google Map if you are interested:

-
Your comments and questions make it pretty clear that you understand the limitations and issues involved here. There is no great solution, and you listed the basic options for dealing with it. Personally, I choose option "A":
18 hours ago, lopezg273 said:a. Switch off the overdrive, stay in 3rd gear and drive up the RPM's and give my engine an early death?
High RPM's are not a problem. These engines have no problem running in the 3000's (although I'm speaking of the 4 cylinder, not the 6 but I assume that 6 is also just fine up to 4000 with no problem). I run about 3600 and 62 MPH as normal in 3rd gear. I rarely turn the OD on. Yea, it's loud, but I've got power, MPG is fine and I don't worry about overheating the tranny fluid due to torque converter slippage in OD. Running 65 in 3rd is not unreasonable, you just have to get used to the sound and feel. Then you use OD in the rare circumstances where it can keep speed.
18 hours ago, lopezg273 said:c. Is there a better option?
Given that you have a lock-up OD gear you may benefit from a gear change in the rear. (mine is a 4 banger so I don't have lockup in OD). If you put a 4.88 or 4.56 in the rear then you are going to be able to use OD at higher RPMs on the highway and this may help the OD work better and let you get up those minor hills without so much trouble. The downside to me is that with the 4.88 the top speed in 3rd gear is limited. I've been watching for a used 4.88 to show up locally for a decent price so I can try this gear instead of my 4.1 diff, but haven't found one yet. There are various gear calculators out there that will help you figure out what the RPM would be in which gear. I think you can read the VIN tag and decoding it will tell you what the stock diff gear is in your rig (odds are it's 4.1). You can always go back to your 4.1 if you don't like the results with the different diff.
I found the addition of an aftermarket tach to be time and money well spent. It's really useful to be to be able to monitor the RPMs even with an automatic.
Changing to a manual transmission is another option, but that's too much work IMHO.
-
On 5/20/2019 at 12:35 PM, Utah-Clay said:
Next suspension project is to crank the front end up a little bit.
If your torsion bars are working properly and not worn out then you can crank them up to get a bit of lift. One of my torsion arms was worn out and I had to replace them both. The amount of lift you can get will be limited by the bumpers and the amount of control arm travel you want. You start running into problems with anything over about 0.75" above stock height (see FSM for how to measure reference front end ride height). You also run into limitations with alignment, although with a '92 you may have the cam type adjustment instead of the shims that I have on my IFS '87 front end. On my rig the ability to align while maintaining decent control arm travel was enough of an issue that I went with a ball joint spacer to compensate. See this post about how I used a ball joint spacer to get 1" of front lift:
On 5/20/2019 at 12:35 PM, Utah-Clay said:I installed the AirLift system with a compressor and two gauges and individual control.
This is the same kind of set up I'm using (Ride-Rites, not AirLift, but same functionality) and I'm running about 35 PSI in each bag and I can change it on the fly to compensate for changing road conditions and to level the rig.
-
I did determine that the "input frequency adjustment" will change the max speed that the cruise control will maintain. Before adjustment (likely factory setting) the max was 59 mph, now I can change the frequency to allow for faster speeds in cruise control
I had to adjust it about a quarter of a turn towards the "B" label to get it to go up to about 68 mph as the max speed in CC. Moving towards "A" reduces the max speed allowed.
I did not make any changes to 'centering' or 'sensitivity' as the system seems to be functioning fine for the moment.
-
I have that same model of Honda generator. This newer EU2200i has a little more output than the older EU2000i.
It will not start my Carrier 13.5kbtu AC unit by itself but with the Micro-Air easy start add-on I'm able to start and run the AC unit.
There is a little more discussion on this topic here:
-
On 5/6/2019 at 11:02 PM, WME said:
My problem was hot 100 degree days at over 7000ft.
This is a good point. I have only tested at 1000 ft at 90 degrees F. It is certainly possible that I will not have as much success with the 13.5kbtu AC + micro-air starter + Honda 2000i combo under more challenging temperature and/or elevation conditions.
I should also note that I have the newest EU2200i not the EU2000i generator.
-
30 minutes ago, jjrbus said:
Wish I had room for an inverter mini split
I did consider the mini-split option. It's hard to find room for the install and they are not intended for 'road use' -- and I'm not willing to be the tester for such things. The efficiency of these mini-splits is so much higher than the older technology found in the roof top AC systems that I almost went that route, but then backed off to go the micro-air soft start route with a traditional roof top unit. It's really a shame that the manufacturers have not been able to do the R&D required to create an improved generation of rooftop AC systems based on the proven mini-split technology. Apparently the RV's are too small of a market to justify the risk/expense. The best they have come up with is the better quality low profile units out there now, but they do not have the improved efficiency of the new generation of mini-splits. I'm happy enough now being able to run a traditional roof top AC with the smallest Honda generator via the micro-air widget so I shouldn't complain.
39 minutes ago, jjrbus said:my HOnda 2000 will not start my 11000 btu AC with a hard start capacitor under all conditions
I couldn't start my 13.5k Carrier (old unit) with a hard start cap reliably either (although it would start under some conditions), which is why I splurged on the micro-air device. Glad I did. FYI, I have heard that the ability to use the micro-air is dependent on the particular AC unit so YMMV. If you can't start your 11k unit at all with the Honda and a hard start cap the micro-air may possibly not be able to do it either? They have great tech support so you can likely ask them if it should work and maybe even be able to return it if it doesn't.
-
20 hours ago, RVdaytrader said:
Seems you can buy a delay on make timer for the fan circuit and do the same thing.
When I was looking for an AC soft-start option I saw this product. It is my understanding that it is basically a combination of hard start caps and a delay. This is enough to start the AC because the fan motor is not trying to start at the same time as the compressor. I'm glad to hear that this worked for the OP with a 13.5k unit and the Honda 2000i as that is the setup I have as well. This sounds like a good middle ground option with the simple hard-start cap being the most basic approach, this fan-delay plus cap device in the middle, and the micro-air easy-start at the top end. If this fan delay+cap method works for you then there wouldn't be a need to shell out the cash for the more expensive mico-air device.
I ended up getting the "board only" version of the MicroAir Easy-Start and with the cap and an enclosure it was about $230 total. I can move it from one AC unit to the next one so I figured it was a good long term investment. The micro-air easy start is a very advanced device compared to the fan delay approach. I've been really impressed with it so far. yes, a little more complicated to install and set up but I have had zero trouble starting my AC unit with this device installed. I can even start it in eco mode.
-
The CC is working after the 100 ohm 10W resistor install. 10W may be on the low side as it still gets warm if you sit on the brake. I put it in an extra heat sink to dissipate heat. I'd suggest a higher wattage resistor if you are about to do this mod for yourself. Otherwise its working correctly. However, I'm unable to get CC to maintain speed at over 59 mph. If I engage above 59 it slows down to 59 and then holds speed. Another user (Waiter, now gone from the forum) had the same issue but I'm wondering if anyone else has had this issue on this particular model of cruise control and successfully made it work above 59 mph? I'm assuming it's a matter of adjustment but it's a bit time consuming to systematically do the tests because you have to get the rig moving each time you make an adjustment... There are three things that can be adjusted:
"input frequency adjustment" this is likely the main thing that impacts the max speed, but apparently adjusting this also impacts the other two adjustment parameters.
"centering adjust" - adjust this until speed when "engaged" button hit is the speed the rig maintains.
"system sensitivity" - rate of increase when hitting a hill for example.
Maybe three is some other adjustment/factor I'm not taking into account to override this low speed max with cruise control. Thanks for any help.
-
For those that have the same CC module I'll post a little more info on this LED brake light cruise control modification issue.
This is the type of cruise control I have (no vacuum on servo):
Those pictures above are taken from user "waiter" and the posts about experiences with this CC system.
I did an additional test now that I have a confirmed working system. I was able to swap out my modified OEM flasher with the new Novita EP34 electronic flasher module and the cruise works properly with either flasher. The reason I think this system is tolerant of the different types of flashers is because the CC module has connections to both sides of the brake switch and thus senses it pretty directly (see wiring table below) - it's going to turn off when the switch is closed no matter what flasher is present. The relay isn't necessary, but the low resistance path to ground on the cold side of the brake pedal switch must be present for this system to work.
So it seems the key to the whole deal with fixing (this particular model of) cruise control after a LED brake light upgrade is to add a low resistance component from the cold side of the brake switch to ground. This is how I've wired it now (basically stock with the addition of a resistor to ground on the cold side of the brake switch):
This is the description of the wiring I found on a piece of paper wrapped around one set of wires:
Part 25004, OEM Replica Series Main Wiring Harness for Automatic or Manual transmission
These are the color/function for the wires on the electronic control unit connector (not equivalent to all wires on the two multi-pin connectors used to connect the arm and servo unit to the main electronic control module):
Red – Ignition Wire (12V source when key is on)
Orange – Hot wire of brake switch
Blue – Cold wire of brake switch
White – diesel only clutch switch (unused/not connected on mine)
Green – ground
Brown – to coil detector
-
21 hours ago, darrel said:
flasher I installed from auto zone
I got the part and it was easy enough to install. Indeed it works! - and the flasher rate seems very reasonable to me. I also found that it will turn off the cruise control too! So it seems with this LED electronic flasher there is no need for a relay or diode. When I push the brake pedal the power to the cruise control control unit is turned off.
However, the flasher does not solve the issue of getting the cruise control to engage. It seems mine still needs to see some low resistance to ground on the cold side of the brake pedal switch (which tells it that there is a working bulb present) before it will allow the cruise control to engage. So as a test I wired a regular old 12V DC filament bulb between the cold side of the switch and ground. When brake pedal goes down this bulb comes on in parallel with the LED lights. I took it for a spin around the block and sure enough! the cruise control came on and then went off with the brake pedal. Looks like I'm set!
I'll get a small power resistor at perhaps 100 ohms (which will send about 2 watts of power to ground) maybe a 10 watt rating or better resistor and that will give the dummy load needed to allow the cruise to engage. And with this handy work around fix of using this nifty LED flasher it seems I no longer need to wire up a relay to fool the cruise control into turning off.
-
13 hours ago, darrel said:
Read my earlier post about the flasher I installed from auto zone.
Very interesting. If I understand it correctly you solved the hyperflash and cruise control issues simultaneously by simply replacing the OEM flasher with the novita ep34 . This seems like a simple and inexpensive thing to try. They have one in stock at the 'Zone just down the street. I'm assuming that I have to do a minor bit of extension wiring from the socket to connect the novita ep34 flasher outside of the kick panel because it's not a direct fit replacement of the original.
-
1 hour ago, donttreadonme said:
Do you have information on how the led light installation affects cruise control. Is is somehow hooked into the activation of the brake lights? How do you fix this.
I have not actually competed this fix/modification on my rig yet because I don't use cruise control that much. It's on my list; however, it looks like the info I have is not complete. Maybe someone else can fill in the details.
The cruise control is integrated with the stop light and uses the filament resistance and/or current to determine when to turn it off. I believe that it also looks to see if there is a working bulb present before it will even turn on as well. The LED's mess all of this up because they do not look/behave like a filament in the circuit. So we have to modify the circuit to fool the cruise control into thinking that 1) there is a working filament (incandescent) bulb present when activating cruise control, and 2) when the brake light switch is pressed/activated we need to fool the cruise control into seeing this so it turns off when you press the brake pedal. In the circuit below you can see one approach to doing this that requires a relay, diode and 100 ohm resistor. Unfortunately I do not know the specs for each of these parts yet. The relay needs to be small and low current so that it doesn't make a huge clicking sound every time you press the brake. The diode and resistor need to be the right values and right now I don't know what they should be. The diode may not even be essential. When the brake switch is off the cruise control sees 100 ohms and will turn on because this is good enough to simulate a filament. When the pedal is pressed the relay is activated and makes the connection that makes shows the cruise control 12V and this turns CC off. I'll try to find more info but maybe someone else will know or perhaps post a better circuit that has been validated with toyhome cruise systems.
-
1 hour ago, odysseybernard said:
Anyone else use the Monroe sc2914?
I put that one on recently and I have the same reaction as you. Yea, it fits, but not very well and it's really kind of annoying because the only proper option out there is the expensive OEM one.
This is the problem point where the dampener attaches to the steering linkage:
The fixed Eye hole at the top of the dampener mounts with a rubber bushing. Due to the angle of the dampener relative to the bolt attached to the steering linkage the bushing has to distort a lot. The bushing is taking a beating as the steering is turned left to right.
The shock part of it also feels a little "too stiff" in my opinion, like it doesn't let the steering straighten out naturally after a turn and i have to help it get back straight. With the (leaking) OEM one it returned to straight more easily without as much intervention on my part.
-
How well does it work out in terms of where the fenders are on the shell relative to the wheels on the truck?
Will the shell have to sit kind of high on the bed in order to get the "sleeping loft" to be above the truck roof?
Perhaps you could take the bed off and weld a basic angle-iron frame to the truck rails. You could put boards into this frame to make a flatbed when you need that kind of truck, and then remove them and mount the camper shell right onto this frame when it's time to go camping. maybe even just U-clamp the shell to the flatbed frame so it can be more easily removed. With the right design you could still have the "drop floor" along the center walkway in the camper. You would probably have to get up under the shell and do some welding to do this. Just a thought...
-
8 hours ago, Maineah said:
If all else fails Dinosaur boards, they are the best hands down
I agree with this. It's probably too late for this install as you already have a new board (unless you can return it?), but for those reading in the future that need to replace a furnace board, the Dinosaur boards are the best option. In particular because they have a significant improvement in the design compared to many of the original hydroflame boards that prevents the battery from running down once the battery voltage runs below a certain voltage. The original boards would keep running the fan and re-trying the spark/igniter no matter what the voltage is, but once the voltage goes below a certain level as the battery gets flat the igniter fails to make a spark. I believe the igniter needs a voltage above a certain level in order to ignite the gas. So if the voltage is low and the spark won't light the gas then the fan keeps running until your battery is totally dead. Dumb design. The Dinosaur board is smart enough to stop trying and not kill the battery.
-
I had a similar issue with some peeling Zep and I used the Zep stripper. It works amazingly well at removing the Zep wax. It dissolves it quickly and easily and then you rinse it off. I was very pleased with how fast and effective the stripper is. It left the gel coat surface ready for re-waxing with no need for the BKF. I supposed I could have touched it up with BKF, but the surface looked really clean and even with just the stripper. Then I re-waxed with thinner more even coats and it looks better and is holding up better than the first time I applied the wax (which I put on too thick on each coat).
-
Apparently this one is up for grabs in Colorado, posted yesterday in CL:
https://denver.craigslist.org/rvs/d/byers-ft-toyota-coachman-rv-motor-home/6869702433.html
"ITS FREE TO THE FIRST PERSON ABLE TO TOW"
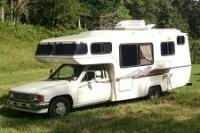
1984 21' "Coachman"
Wow, this is a pretty cool deal for someone who is willing to put the work in to get it back into good shape.


Fishing Pole Storage?
in Improvement and Do-It-Yourself Projects you have done to Share!
Posted
This is my fishing rod holder. Cheap 4 rod horizontal rack mounted above rear window. Not great, but it works for kids poles and take-apart poles.