


AtlantaCamper
-
Posts
269 -
Joined
-
Last visited
Content Type
Events
Profiles
Forums
Gallery
Posts posted by AtlantaCamper
-
-
14 minutes ago, Maineah said:
I would not run it inside of a compartment under any circumstance
He's right. you can't remove the plastic as it's critical to the cooling air flow and it should not be run in a compartment. Even if the compartment has 'venting' (even with the door/hatch open) and you connect the exhaust to the outside it is not a good situation. The generator will overheat because it will just recirculate the hot air in the compartment - the passive venting to the outside won't be enough to cool it. I've tried it - doesn't work well. Unless you do a whole lot of modifications to the compartment and the generator it's not a safe way to go. Putting it on a bumper outside is the only easy option to run it 'attached' to the RV. In all cases you should be concerned about the exhaust. If it collects under the RV then you have issues. Many use a "Gen-turi" device to vent the exhaust upwards. (DIY gen-turi can be made for very little $ with parts from lowes/home depot) Most folks with one of those little gennys store it in/on the RV and then pull it out and put it 15+ feet from the RV to run it. Quieter for you and runs cooler and overall less complicated and safer. If you take the Kohler out you will have to build out a storage area. if you are lucky you will be able to put the little genny through the door sideways and then you can strap it down for storage. Then take it out when you need to run it.
If you can get your Kohler running that might be the most direct and cost effective approach at the moment. Even with a new muffler it's still going to be loud though, but it will do the job.
-
4 hours ago, prodrumernate said:
it does engage and then stops at times
When it does manage to engage, does the AC blow cold air? If that is the case, then it's a good idea to change the clutch first. I'd suggest changing the AC idler bearing/pulley at the same time. I had to go back in and change that pulley a few months after i changed the clutch so I wish I had done both at once. The only hard part is sourcing the correct clutch and pulley as your system is probably not OEM and was put in aftermarket by the RV maker - I think that is how most of ours are done.
Oh, and I'm glad to hear you tracked down your fuel issue. Good deal that it wasn't the pump itself.
-
4 hours ago, prodrumernate said:
when ac compressor engages.can hear what sounds like grinding
Make sure it isn't just the clutch. I had to replace my AC compressor clutch once and it was sure a lot easier than replacing a compressor...
-
1 hour ago, WME said:
temp vs pressure
Good to know that pressures are basically the same for a properly operating system with a particular refrigerant. I wasn't sure if this was the case or if there were specs specific for a particular compressor. That chart is for R134a. Although the pressures seem to be relatively close, R12 is correspondingly a little higher. For example if R134a should be 36 psi, R-12 would be 43. I found a handy chart comparing R-12 and R134a, plus it adds an extra level of detail by specifying the relative humidity and giving the temperatures of the discharge line out of the compressor:

The link you sent had a super handy summary of how to interpret the pressures. The only time you add refrigerant is if both readings are low, which seems fairly obvious although its nice to see it in writing. Otherwise it is fairly intuitive in terms of the what and why when you have one side higher than normal and the other side lower.
-
3 minutes ago, Donnie said:
not sure if Toyota used a sight glass in their system back in the R12 daze
I have not seen a sight glass so far. I believe most of these systems, including mine, are aftermarket AC systems, not OEM. The label is gone on my compressor so I can't read anything to get a model number.
I'm trying to determine what the "proper" pressure readings should be but I have not found any reliable data so far. Anyone know if there is a 'standard' aftermarket compressor type and spec for these rigs (mine is '87)?
Pretty generic data I'm seeing on R12 systems is between 25 and 40 psi on the low side, and high pressure reading of 200 to 225 psi. I haven't been able to get the time to measure my system yet.
-
1 hour ago, jjrbus said:
Check the pressures if they are right do not add any refrigerant!
Yes, this is absolutely the right approach. If it is anywhere close to correct working pressures (still have to find those specs... :0) then I'll leave it alone and not do anything. I'd rather have a working system that is "cool" than a blown compressor (_not_ 'cool'). I should be OK if I just go slow and watch the pressures.
I don't have a recovery tank so if the re-charge approach doesn't work I'll be doing a full swap over to 134a.
-
Very good insights Odyssey 4x4, thanks! I'll watch the pressures carefully. I can imagine that a system with poor seals on the o-rings might hold just enough pressure on the low side to work a little but then the additional pressure from the charge might just sneak past those o-rings pretty quickly and come right back to the cool-but-not-cold performance level.
45 minutes ago, Odyssey 4x4 said:considering the system is still R12, it's likely still the original compressor
This is quite likely the case. If my experiment fails then I'll go the full replacement route, but I'm not going to have the time for that any time soon. It's a $33 investment for the R12 and doesn't take a lot of time. I've got a backup plan to find the remaining R-12 a good home too. Regardless of success or failure on my rig there will likely be R-12 left over and I've got two old cars in the neighborhood that could use a charge and I'll make the rounds once the can is open. Once that can is cracked I can't imagine it would be willing to stay in that can for any length of storage.
-
I'm thinking of giving my cab AC system a charge with R-12 to improve the cooling ability of the cab AC. The system is working and I don't think there is a real 'leak' to speak of, but I suspect that over time some of the R-12 has been lost past the seals. The AC compressor and clutch function and I do get cool air. Cool, not cold. At a temperature of ~87F ambient and ~50% RH the temperature at the vent is about 57F. Should be ~40F to 45F. If it works, it would be a noticeable improvement and I rely on the cab AC while driving to keep the folks in the back a little happier.
I have all of the things I need to do this: manifold gauge set, an unopened 12 oz can of actual R-12 refrigerant, can tap and connectors and thermometer. It's something that has to be DIY I believe because no shop will do this anymore with R-12. While I have not done this process myself before I have read up on the process and I'm willing to give it a try. A mechanic friend who loaned me the manifold is willing to help too. Worst case is that I screw it up and I have to switch everything over to R-134a. It seems so much easier to just give it a goose with a charge and let it stay as R-12 for now. As long as I don't over charge it I should be ok and I suspect that the charge would last a few years. Anyone have comments or can anyone correct my assumptions if they are totally off base?
This is my compressor rear end. Note that the low side connector access is blocked by the support piece that connects between the engine and the under side of the intake manifold. I suppose I'll have to remove that to do this job. It's all pretty tight in this area due to the extra house battery being located in the engine compartment:
(if the resolution is good enough on the upload, the keen observer will notice a spider in the bottom right corner of the picture - probably blinded the little guy when I took the photo...)
Before resorting to a charge, I did go through the rest of the system to make sure there were no obvious issues. I got access to the evaporator coils by removing the fan behind the glove box (the fan had some seeds and tree bits in there that rattled around on max fan speed so I needed to get in there anyway). With the fan out you can stick a cell phone up there and take a picture. This is before I cleaned the coils:
I had 2 cans of coil cleaner that I was going to use to clean the house HVAC coils. Turns out that after doing this residential job there was just enough left over to clean out these coils. Before you do this make sure that the drain tube for these coils is clear - mine was partially blocked and I had to blow backwards to get it really cleared out. You can't see what you are doing but there is just enough room to get the can up there so you can spray the foam, again using the cell phone camera to check:
The coils after rinsing with a hose (all water drained out and then I left it alone to dry for 3 days before retesting it):
My coils were not all that dirty, but I did get a noticeable increase in overall air flow after this procedure. Next time you are in there cleaning out your cage fan you should check your coils!
Speaking of this darn cage fan behind the glove box - that thing is always getting some gunk in it and making terrible noises. There isn't any filter on the cab air intake as far as i can tell. I think the air comes from either the vent outside near the wiper arm connectors (lever on 'fresh') or from under the dash (lever on 'recirculate'). I think the junk comes mostly from the 'fresh' setting when stuff drops in after getting in from the outside vent inlet. Is there anyplace to put a make-shift filter on the 'fresh' intake side? I'm thinking of just using the 'recirculate' setting and then putting a simple screen filter over the inside intake that looks like this:
Should be pretty simple to tape a square of filter over this inlet. something that is open enough to not hinder airflow but a tight enough screen to keep the larger stuff from getting in the fan.
Thanks to any who might be able to inform me about this R-12 charging task before I go off and try it.
-
3 hours ago, justicefire1 said:
Found sewer hose but it just pulled right out.
Typically you will have a hose stored in the bumper (right side, with orange circle in image below). you pull this out and connect it to the valve to the waste tanks. Other end to a sewer drain. My valves shown here are right near the rear bumper (with the upside-down "Valterra" cap under the marker light). There will be "pulls" to open the valves, one for black tank, one for grey. Your valves could be in a different spot. Do you see anything like this on your rig?
-
To me this is an interesting topic you bring up as I have been pondering how I might improve the integration of a canoe (or any 4 person boat really) with a 'YoterHome.
What a beautiful and elegant boat that is! A piece of art as much as a boat. I would never have conceived of such a thing, and then the incredible craftsmanship on top of the innovative design! Goodness, it makes my red-neck canoe portage methods look all the worse! For those who didn't check the link yet, this is the object in question:
You could pack that thing up into the top over-cab bunk and off you go! Unfortunately at $2200 for the completed boat or $1315 for the kit that far exceeds my budget for such things. Still, that's not a bad price at all for what it is.
Now, (brace yourself) contrast that with my hand-me-down canoe that is crudely strapped to the top of my 'YoterHome:
My goodness, what a mess. But it's the only way I can manage to take the canoe with us without a trailer. We have a system where two people can get it up and down and it's (mostly) secure when traveling. (note the strap hook points are "eye-hooks" like one would use in a pickup truck bed attached by swapping the eye-hook with a bolt on the metal roof supports) It works, but it's a sail on the highway and kind of a little embarrassing on the road, but I am in Georgia so I don't get too many looks. We took it out last weekend for a nice trip down the Chattahoochee river while we boondocked at a county park right on the river bank. Quite nice, despite the heat and humidity.
As an aside, the reason I took the picture above was to document the mud I got into that day. We had camped in a field the night before in a WMA (Wildlife Management Area - free boondocking with a fishing or hunting permit). It rained really hard the night before and I took an untested dirt road to the next fishing site. Unfortunately we got to a point where we couldn't go back (no room to turn around) but going forward was a muddy river of road that had just been carved up by some good 'ol boys a few hours before just off the main highyway (I was told later that I came across a super popular spot for mud driving post heavy rain...). I had to plow forward and make it about a quarter mile to the main road, but it quickly became a real mess. 4 to 6 inches of mud and I was suddenly mud-bogging. I have never had that camper so out of control. almost 90 degrees to the road around a corner at one point. It was a wide muddy road with deep ruts where the good 'ol boys had dug in as hard as they could and I was sliding across the road and bouncing across those ruts like that RV was the pickup truck it thinks it is. I had to keep the pedal down or else I was never going to get started again. It was get through or get stuck. Fortunately I made it though, but it was really close to being stuck.
I guess in hindsight it was pretty fun (my boys, 5 and 9, sure thought it was cool. "Do it again Dad!") Yea, right. Here's some detail to show you how much mud was flying at that point. You don't stack that much mud onto the rear step unless you have the tires spinning...
It's not like I was going to "crash", the only risk was just getting 'stuck'. Overall I guess I wasn't all that worried about being pulled out of the mud because just a mile or two behind me we had just left a proper Southern Tractor Pull and there were like a dozens tractors like the one below that probably would have absolutely jumped at the chance to pull me out of the mud (note the roll cage - and see how the front wheels are clean the rears are dirty? that's because the fronts hardly ever tough the ground when it pulls the sled cause it rides the 'wheely bars' in the back):
I showed my 'wheely bar' wheels to some of the tractor guys and they had a darn good laugh (really).:
The tractor guys wanted me to enter the "1-ton class" as a joke (they would have even paid my 'hook-up fee'), but I wasn't going to humiliate the 'ol 22RE by doing that.
Jeez, I think I've gone a bit off-topic... sorry about that, WME. I think we started with a super fancy take-apart canoe but I ended up somewhere totally unrelated and vastly less sophisticated....
-
A picture of the cruise control device or model/brand info would be helpful in the diagnosis.
Do you have the original filament light bulbs installed or have you installed any LED's in the light system?
The most simple thing to do would be to clean the contacts of the brake light bulbs. The cruise controls typically look for a low resistance on the brake circuit and bad contacts can mess that up.
-
56 minutes ago, Derek up North said:
You'll regret hacking up the fender flare at some point. That looks like an easy repair.
I agree with Derek. Leave it alone until you have a plan to repair it properly. Don't cut more. Until then it is only a minor blemish to an otherwise really good looking '88 'rader. I've also got an '88 'Rader with a rear entry, although my bath and kitchen are swapped compared to yours. Yours looks great and looks ready to provide you with a lot of good times. (if you want to know how to convert the lower fold out sofa-bench into a king sized bed, let me know...)
In this discussion topic you will find some ideas about how you might color match some epoxy repair material. Maybe once you figure out how to build a proper fiberglass repair base you can color match a top coat using these tips:
Marine Tex: https://www.amazon.com/gp/product/B0014419V0/
I'd suggest that you buy the Marine Tex kit (~$15) and some powdered mica colors to tint the epoxy. The tints can be found in the range of $10 to $15 at Amazon or Ebay. It would be enough to do that whole section if you had a roughed-in base layer shape already in place. I have no idea how to do the fiberglass repair to do the base layer though.
-
1 hour ago, Odyssey 4x4 said:
Why are people steering away from the standard RV units in the first place?
For me it's 1) noise, 2) high current draw on startup making generator use tedious, 3) overall low-ish energy efficiency, and 4) I want my roof back
I think all of those complaints could be addressed to some extent with the mini-split technology if properly packaged for RV use. But until that day comes I'll stick with a standard roof unit.
-
6 hours ago, Odyssey 4x4 said:
dropping a tank
Odyssey 4x4 is right, dropping a tank down is the way it's "supposed" to be done. I can see the allure of cutting a hole in the floor and getting to it that way. But do consider taking the tank down first if indeed it becomes obvious that you need to change the fuel pump or otherwise get into the tank. You may find that even if you cut a hole in the floor you can't easily get to all of the bolts and hose connectors for example.
If it's like mine there are like three bolts on an angled support at the front and back of the tank. Yes, it's a pain to figure out how to support the tank on a jack of some sort and lower it down. I used stacks of 2x4's on each end and stepped it down until I could get at the pump. You want to get the whole rig up on jack stands pretty high if you can as it makes it all much easier. I had to get to the wires and fuel line connections on top of the tank to loosen them before it would come down. Unpleasant for sure, but do-able. Be sure to drain it before you start in on this if possible as a heavy tank is harder to deal with.
-
37 minutes ago, linda s said:
Your old pipes are polybutyl too and new valves would be made for Pex
You probably won't be able to find the right poly parts anymore if that valve starts leaking. I had a leak issue at that valve and basically ended up replacing everything around it with pex parts. The valve itself I think just came from Lowes. This is what it looks like now:
The water tank on the right, there is a Tee to the drain and to the pump. That's the 30A electrical line on the bottom. I use the pump method to drain the tanks because the valve is slow, but then I use the new valve to drain the rest. I'm not concerned now because it's a standard valve part.
I have been slowly replacing all of the poly plumbing with pex. I only do it now when I have a leak/problem. I keep a pex repair kit in the camper in case something happens on the road. The poly is still working fine and it's too much of a pain to to a complete replacement with pex so I'll just nibble away at it as it fails.
-
3 minutes ago, Maineah said:
you would be better off connecting to a 20 circuit instead of both on a 30
This is a good point. If you only have one 30A connector available and that is it then you have to go with a splitter. However, many campsites have multiple connectors available, for example one 30A and one standard outdoor household 15/20 amp outlet. If you can put one camper on the 30A connector and the second camper on a different connector at the power post then you will likely be better off. The 30A to regular household 20A connector is a good approach in this situation.
-
2 minutes ago, fred heath said:
portable units
Don't be tempted by portable units. They have to have tubes connected to the outside to blow hot air out to cool the compressor. The ones with one tube pull air from inside and push it outside, and the make-up air has to come in from outside. In the small area of a camper this is ineffective because it's so small, you end up pushing cooled air outside. Other portables have "dual tube" setups with a pull and push tube to cool the compressor. This is better, but still not a good idea because the units are designed to evaporate the water that condenses inside instead of draining it. This takes a lot of extra energy. Also, the portables are not small either. The window units are much more compact.
I recently had a central HVAC system go down and I got two temporary units to use until it is replaced. One was a 11k window unit and the other was a 14k dual tube portable. The 11k unit has way more effective cooling power than the 14k unit. this is primarily due to the heat (energy) used to evaporate the condensate in the portable. I've been very disappointed with the portable unit, but I needed one of them to not hang out a window so that's what I had to work with. The 11k unit was half the cost of the 14k unit too. My high relative humidty in Atlanta certainly impacts the comparative efficiency.
-
9 hours ago, pmstaats said:
I really do not like the rooftop units
I completely understand. I think WME's link to Waiter's install is a good option for you. I find that the window units are really cost effective and not horrible on an energy efficiency rating. They are generally rugged enough to handle the task. A main downside is the need to cut a hole in the camper wall and the aesthetics of having the back half of the window unit sitting all the way outside to allow for cooling. The slide out window unit is a good idea if you have the space for it and are willing to cut a hole in the side.
7 minutes ago, Maineah said:Asian motorhomes/campers have been using mini splits for quite some time. They are considerably more efficient and a great deal quieter
I can't wait until reliable, purpose built units for RV use start arriving on our shores. It seems like there is so much to gain in terms of less power to start/run and lower noise. It's too bad that it's so awkward to adapt the existing configuration for use in our rigs.
-
5 minutes ago, Uncle Monty said:
Has anyone bought a rebuilt Dometic refrigerator cooling unit from RVCool.com? They advertise $425.00 plus shipping.
I replaced a cooling unit in my Dometic about a year ago. Very pleased with the result. I bought from https://www.rvcoolingunit.com/ and it was in that same price range after the return of the core. This is the "Amish Built" refurb units and David Force (rvrepair1029@comcast.net) is the sales person. This is a current ebay auction for it:
Installing it wasn't easy, but it's do-able if you have the gumption. I really put my fridge though the paces this last weekend and this refurb unit is solid and works well.
-
On 7/6/2019 at 7:24 PM, AzRetired said:
It won't come on at all.
Unfortunately the standard RV fridge is quite different than a household fridge and there is q bit of a learning curve in terms of how to use one of these effectively. Even getting one to turn on can be confusing. Maybe try looking over this thread and then getting back to us after you have done some more tests to see if heat is being generated in the back boiler and if cold is eventually being felt on the inside:
-
It's a little hard to compare AC efficiency given the information in this thread. Outside temps, starting inside temps, air sealing, direct sunlight vs. shade, humidity, cooling airflow, etc. It's hard to say where the limiting factor is when trying to determine if the mini-split is working well or not. But none of that matters to me because in the end I find myself agreeing with WME's suggestion:
On 7/3/2019 at 7:02 PM, WME said:Forget about a mini split to many unneeded problems. Don't go reinventing the wheel.
Get a 9,000-11,000 btu roof mount AC. Make sure your pricing the same complete kit not just the upper roof unit. Also depending on $$$ available the Dometic 11,000 BTU ac uses less power than the Colman Mach 8 9000BTU unit. This is important if you boondock and see a generator in you future.
If you don't plan to use a genset then the standard roof unit is definitely the easy and simple answer. On the other hand, if you have the technical chops and are willing to deal with installation issues and airflow and who knows what other issues, then the mini-split is certainly an option. I find myself constantly wondering if i'd be better off with a mini-split, but so far I've not gone that route because I want reliability and I don't want to be chasing problems. There are still more questions than answers out there with the mini-splits in RV's.
If you do plan on using a genset like the Honda eu2200i then I still think the standard roof top is still easier in the long term compared to the mini-split because it's more reliable and well tested, but you will have to add the right start up caps or a Micro Air EasyStart or whatnot to buffer the start up current.
Overall I find myself cursing the RV HVAC industry on a regular basis for not making a more energy efficient and quiet HVAC unit for us. The mini-split technology could be applied to RV's but apparently the return just isn't there to offset the R&D costs - maybe the market is too small. So for now I deal with my very loud and power hungry roof top AC, but every time I turn it on I hope for the day that I'll be able to replace it with something that is reliable, quiet and efficient. The current batch of mini-splits don't quite meet that application yet. One day I expect they will ditch my old school rooftop unit, but I'm not willing to be a foot soldier in that battle right now. I just got back from a weekend boon-docking on the Chattahoochee River banks and I was able to stay cool enough in 93+F temps in Georgia with humidity topping out at 95% with little shade to be had. My honda eu2000i and 8 year old 13.5kbtu Carrier AC (with Micro Air EasyStart installed) never had an issue. For now I'll stick with what's proven to work under stress.
-
If you both run AC units plus other items then you are going to be pushing it. If you carefully manage your power then it is possible to do that split (i.e don't run the microwave unless you turn off the AC). In theory you may have enough amps to run two AC units and a few small items and the lights, but in practice what I've found is that the ability to do what you are asking has a lot to do with the quality of the connections and wire. If you have one bad or inefficient connection then you could trip breakers or cause connectors to overheat. Easy thing to do is simply plug it all up and run AC's, then check for any warm connectors or wire. If the main 30A receptical you plug into is old then you may find the head of the splitter WME suggested will get warm/hot. If that's your limiting connection then you may be out of luck. If all is cool and runs dual AC and doesn't blow breakers then you are ok as long as you monitor how much each unit is drawing. Check temps of connectors, that will tell the tale.
As an example, when parked at home I run my rig off of one 15A GCFI outlet. It works fine, no problem running the AC (camper in my driveway is my spare/guest bedroom). However, over time the outlet got "worn", either corroded or whatnot. The result is that there was a poor connection in the GCFI outlet (it was 20 years old...) and a lot of heat buildup. It got so bad that the 15A to 30A dogbone adapter basically melted with a load that was fine for years. I put on a new outlet and new 15A connector on the dogbone but the wire after the cable was still getting hot. I opened up the wire where it was hot and found that the wire itself was basically burned and blackened all the way through the 1 foot dogbone, through the 30A connectors and two feet into the 30A extension cable. New dogbone and new 30A connector after chopping the bad wire and all is good through the new GCFI outlet. No heat, no problems. Bad connectors and overheated wire will limit your ability to draw current. Nice fresh connectors and wire and you get full current draw with no heating of connectors/wire. If you have heat buildup you can feel with your hand, you have a current bottleneck and should address it. Otherwise, I'd say give it a try doing the split as long as you keep your eye on cable/connector temps and overall loads on each unit.
-
On 6/3/2019 at 11:46 AM, Gulfstream Greg said:
components to a happy refer: Pre-cool the refer with some frozen water bottles
I was interested in trying out this tip, plus I wanted to see how much adding air circulation fans inside the fridge would improve overall efficiency, in particular during start-up. I'm pleased to report that ice packs and fans can significantly reduce the start-up time for an RV fridge!
This is going to be a long post so here is the executive summary take-home info:
- The combination of ice-packs and internal fans reduced the "start-up time" (time to reach stable, cold operational temps) from 12+ hours to 4.5 hours.
- The ice-packs had a more significant impact on reducing 'start-up time' than the fans but the fans improved heat transfer to a room temp beer that was put in the fridge during start-up.
- Ice blocks/packs are the simplest way to reduce start-up time (no wiring). Ice blocks alone could reduce start-up time by about 40%.
- Ice packs in the freezer do not impact the main fridge compartment. Freezer and fridge fins are only weakly thermally coupled. Put the bulk, if not all, of the ice-packs in the fridge.
Based on my tests I have adopted a fridge start-up routine that will allow me to start the fridge the same day I'm leaving (I'm always forgetting to do it the night before). I'll put the ice packs in, turn on the fridge and fan. After 4 or 5 hours I'll put the pre-cooled contents in. At that time or maybe a few hours later I'll remove the ice packs and put them in the cooler that I use for drinks and keep in the base of the shower. I find that using the cooler in parallel with the fridge is most effective for my family but YMMV.
These are the items I purchased, some fans and ice-packs:
- Two small Sunon 50 mm Fans - model KDE1205PHV3 fans for $12.95 on ebay https://www.ebay.com/itm/2-X-Sunon-50-mm-Ultra-Quiet-Cooling-Fans-12-V-10-CFM-22-dB-KDE1205PHV3/280833965042 The pair uses less than 0.1 amps and moves a decent amount of air. That's a low enough power draw that I don't mind them being on all the time.
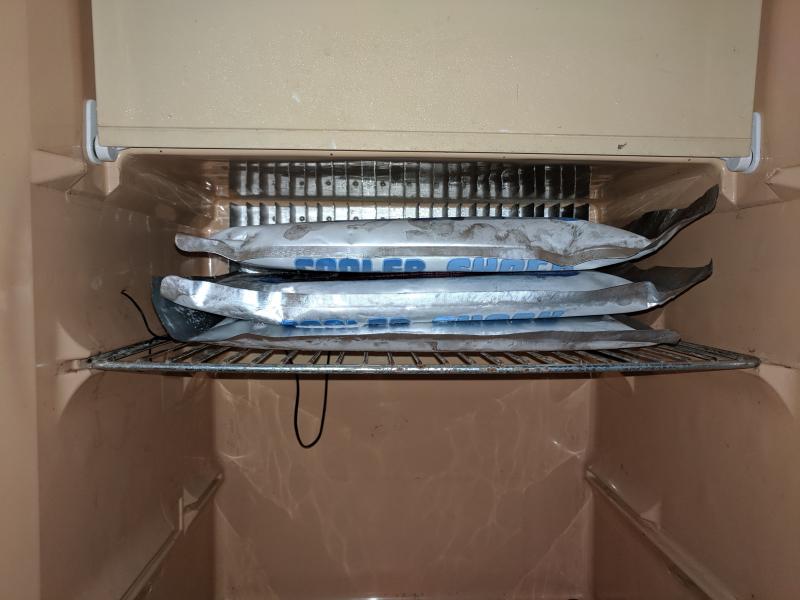
- Cooler Shock: $22.50 for three re-usable ice-packs that are the equivalent of 18 pounds of ice but weigh only 12#. https://www.amazon.com/gp/product/B00V9ITMYC These ice-packs are sized nicely to fit in the freezer or on the wire rack shelf (see pic below). A (free) DIY ice-bottle would certainly be an effective substitute.
Ice packs:
Fans:
The fans are mounted under the fins blowing up. I was able to thread a power wire into the same hole where the thermometer feeds in and wired to an external switch.
There were three variables tested during repeated start-ups from ambient temps: 1) reefer on or off, 2) ice-pack in the fridge or not and 3) fans on or off.
This is a graph comparing the start-up cooling effectiveness after 4.5 hours. Taller bars are better:
Interestingly, ice by itself was almost as effective as the reefer alone over 4.5 hours. It takes the ammonia fridge process a while to get going but the ice starts cooling right away.
One interesting thing I discovered is that the freezer section is not thermally coupled to the coils in the main fridge compartment. I put the ice-packs in the freezer and the cold does not migrate to the fins in the main fridge compartment. While you can put an ice pack in the freezer, the fridge is the section that is slowest to come down to operational temps so I'd suggest putting all the ice packs there.
I would suspect that bottles of frozen water would work well instead of these fancy-pants ice-packs, so you can get a major boost in start-up efficiency for free by just putting an ice mass in the fridge when you start the reefer.
All of these tests were focused only on start-up. I have not tested how the ice-packs impact the actual operational efficiency of the fridge. Presumably they would act as a 'cold buffer' and help the fridge recover more quickly from door openings or putting warm food items in the fridge, but they do take up a good bit of room. I did do one test along these lines by putting a room temp beer in the fridge during the start up tests to see how fast it cooled compared to the fins and fridge walls. The beer lagged behind the fridge wall temperature with the fans off, but with the fans on the beer cooled at the same rate as the walls. While the fan impact on start-up was not all that huge, I think it's going to be valuable to move the air during normal operation. It's worth the 0.1 amps I think.
-
1 hour ago, Derek up North said:
My usual suggestion is to start at 50psi and then adjust gradually until you find a balance of ride, handling, braking and economy that suits you.
I did exactly this process per suggestions from this forum and I ended up with 55 in the rears and 50 in the fronts. This is measuring cold. I have also noticed pressure increasing after driving for a while but I see only about 10 psi increase. I found that at 65 psi (cold) the ride was noticeably rougher.
9 hours ago, lopezg273 said:2) I'm having to fill up this "5-gallon" propane tank quite frequently. It gets down to 1/4 or just a hair less, but when I have it filled, they can never get more than 2 - 2.5 gallons in there.
I have a horizontal 5 gallon tank and I typically get 3.5 to 4 gallons into it if the gauge goes down to 1/4.
The gauges on these tanks are not super accurate and the pressure to volume change is non-linear - which shows on the gauge itself as the needle swing is not the same for 1/4 to 1/2 as it is for 3/4 to full. Maybe the gauge is just off? Maybe it's more than 1/4 full when the gauge says 1/4. Or maybe they are not filling it up to full pressure? I forget if the "full" pressure is determined by a gauge/valve on the tank itself or on the fill hose. Others with more actual propane tank knowledge will probably have a better idea of what's going on than me.
If you really want to know your capacity you can do a few rough measurements and a calculation to estimate gallon capacity.


Code 61
in Engines - Transmissions - Drive Train - Suspension - Chassis - Steering - Exhaust - Tires - Etc.
Posted
I can't remember the process any more. I did it when the head was off and half the engine was apart so my experience isn't super relevant. Can't be that bad though. If I were doing it I'd probably take the radiator out so I didn't damage it. It always amazes me how quickly the radiator comes out.