


AtlantaCamper
-
Posts
269 -
Joined
-
Last visited
Content Type
Events
Profiles
Forums
Gallery
Posts posted by AtlantaCamper
-
-
I'm posting an update to this old thread in order to give some follow up info and an application idea for using the Marine Tex to repair gel coat.
I'm using the Marine Tex White plus powdered mica pigments to make it match the gel coat color:
Marine Tex: https://www.amazon.com/gp/product/B0014419V0
Mica Pigment set: https://www.amazon.com/gp/product/B08HJX1ZHB
I used a 50:50 mix of the 'golden' and 'yellow' mica powders from the $6 kit above and added it to the Marine Tex (before hardener) to get a good color match. It will dry a little darker than when wet.
The key thing I want to share here is a handy application method that really made it easier to get a nice smooth application with good feathering into the original surface with very little sanding required after drying. The Marine Tex is rather sticky and it can be difficult to get a nice smooth even surface - and this can require a lot of careful sanding after drying. It's easy to cut through the gel coat and mess it up when trying to sand down a Marine Tex patch repair. But what I found is that if I use isopropyl alcohol (70% fine, 90% better if you can find it) as a lubricant then I can very easily smooth out and shape the Marine Tex before it dries. I use a purple nitrile glove and either wet a finger or drop the alcohol onto the surface and then rub it to get the Marine Tex shaped and smoothed the way I want. Don't use too much or it will start to absorb into the Marine Tex - just enough to make the top surface pliable and smooth. Add a little more alcohol if it dries out while working.
I use the Zep wax and I strip the area I'm working on down to the gel coat to do the patch and then apply the zep wax over the finished patch.
I've done small chip and hole repairs this way and I can hardly see the repair in most cases. I even did a large 6" diameter patch on the roof where I removed a bathroom fan. (I wedged a wood circle up as a backer and put 2 layers of fiberglass down and then Marine Tex over the top in a thin (~1/16") layer. It's been holding up just fine.)
In one particular 2 square foot area I had some "flaking" of the gel coat where it was lifting off or delaminating from the fiberglass in small flakes with raised edges. not sure what caused it but I was able to make a good repair over this area by applying a carefully color matched batch of Marine Tex and then aggressively rubbing it into the flakes to fill (again using the isoproply alcohol trick) and then I was able to feather the remaining Marine Tex out to a nice thin well blended layer with excellent color match. Even as a very thin layer it bonded well to the clean (roughened) gel coat. Once dry and re waxed with the Zep it looks quite good - vastly better than the chipping gelcoat that was there before. It's been about a month and all of the repairs using the isopropyl alcohol method are holding up great with no noticeable impact of the alcohol on the dried Marine Tex.
-
Hi All,
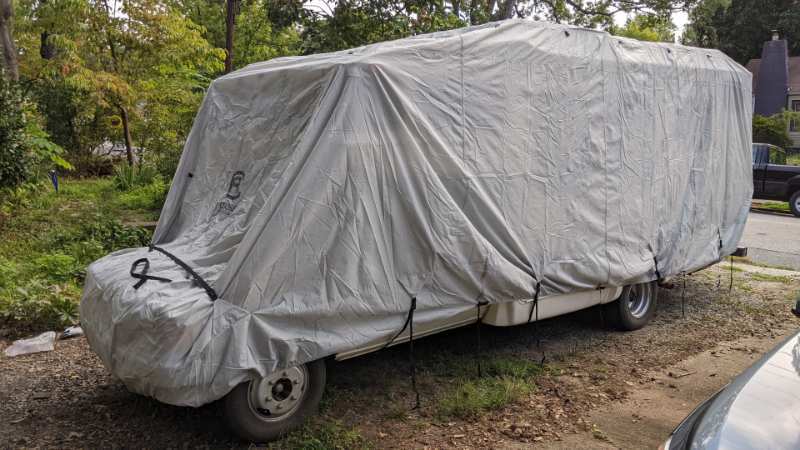
I've had trouble finding a cover that fits reasonably well, but I found a decent option that I believe will work for my 21' Sunrader. I'm posting the info in case others may want to try the same. I've attached images.
This is the cover: SKU# 80-412-151001-RT Classic Accessories Over Drive PermaPRO Class B RV Cover, 20'-23'L x 117"H (Model 2), Fits 20’-23’ RVs
Amazon link ($272 currently) https://www.amazon.com/dp/B072K7J7VT
The cover is for a Class B Sprinter Van and the width (~85") is a good match to the Sunrader width. The key issue in terms of fit is the front where the Sunrader is a bit longer with the cab over bed but the Sprinter slopes off. You can see in the pictures that this is where the cover stress point is, but it's not bad. I will be reinforcing the cover at all of the contact/stress points with adhesive cover repair patches. I had a Classic Accessories Class C cover previously (didn't fit well at ALL) and it tore at the stress points after 3 years but the rest of the cover was ok. The customer support person said you can get a lot more time out of the cover by adding the patches at the specific stress points (corners) where heavy UV is expected.
I have a low profile AC unit but I think this would go over a regular AC too, it would just rise up a little more on the sides at that point. The cover doesn't go all the way down to the edge of the fiberglass body, but that's ok. It rides a little high like highwater pants. I like having the bottom open to keep air flow up. With the straps connected on the bottom and the nice tight fit (there is elastic on the bottom) the wind won't be an issue. It also has a well placed zipper so I can get in and out the rear door. Since I have to park it under a tree that likes to drop a lot of junk this is a good option for me (cant' build a carport right now).

-
The link Linda sent for the "Torsion Bar Set – 84-95 Toyota Pickup 2WD" is what I bought and I'm very pleased with them. $222.88 shipped. The website will say 'backordered' but if you call on the phone they will manually check the warehouse and likely find a pair. The lady on the phone said that the online database isn't linked to the actual reality in the warehouse. I received mine in less than a week. They were pretty easy to put in.
-
9 hours ago, linda s said:
I use a walmart everstart maxx, group 24. Never had a problem with them.
I use the same exact house battery. I keep the receipt taped to the battery itself. If I ever do have a problem then a Walmart is sure to be close by for easy exchange if I'm on the road. This is a key reason I use this battery. The performance has been good so far. The first one I had was worn out after two years and I got a free exchange at that time. I replaced that one with new after 4 years and this new one has been doing well 2.5 years later. So over 8.5 years I only had to buy two batteries. Cost effective, functional, easy replacement on the road. The ~90 amp hour capacity is moderate, but it's been fine for my purposes.
-
On 11/20/2019 at 4:24 PM, mpanzar said:
I haven't measured ride height but based on where the wheel is sitting in the well it looks pretty good.
I hope it has all worked out well for you. Hopefully after the break-in period (not long, mine settled in <40 miles) you will be sitting at a good ride height that keeps your fridge level enough while driving but also let's you put a little air in the air bags too.
-
6 hours ago, Maineah said:
Battery charge chart
I have not found a simple voltage reading to be a reliable way to determine the state of charge. In my experience this chart is only relevant if the battery is at a state of equilibrium, which of course it never is when you want to measure it. The chart works fine if you always let the battery sit for an hour or so before reading though... If you charge and then immediately measure, it's an artificially high reading. If you have a heavy draw and then read, it's artificially low. It's a fine way to get a really general estimate but I prefer the current reading via shunt battery monitor as it is really accurate regardless of draw or equilibrium. Only issue with these is that you have to calibrate and reset the 'full' reading periodically.
-
42 minutes ago, moalaska said:
I could get an aftermarket adjustable valve and put it in place of the factory one under the master cylinder, or probably remove it all together.
Is there a relatively simple way to bypass the valve and find out how it does if you go equal and full force to the front and rears? It might be as simple as installing a barrel connector instead of the valve? Then you can find out what kind of grab you get in front and back but still be able to easily return to stock if it give unexpected results.
I still have the LSPV but it's wired to go 'full to back'. I get decent balance between front and back which I monitor by checking brake/hub temps after using the brakes hard. I get nice even temps all around.
-
33 minutes ago, Ruby said:
I need a full floating axle from a 3/4 or 1 ton (1 ton better) Toyota
Where are you located? I don't suppose you are any where near Georgia? Cause this one is available:
https://atlanta.craigslist.org/atl/pts/d/lithia-springs-1987-toyota-rv-parting/6984285844.html
You can find a decent used 4.1 3rd member pretty easily if your axle doesn't come with one. This is the one available at that link above and will give you an idea of all of the "extras" that ideally would come with a used axle (this one has the drive shaft available too and I'm pretty sure it's a 4.1):
-
15 hours ago, mpanzar said:
did you have to increase the length of your brake hoses?
I did not. I had replaced my brake hoses a while back and I may not have stock ones any longer so YMMV.
-
An update on the installation of those replacement cargo box clips, uh, I mean Jeep hood latches...
The new replacements are not exactly the same size. As far as I can tell all of the available ones are this same size. The new ones are about a quarter inch longer in terms of clamping distance:
The mounting holes all exactly lined up, which was nice. My original blind rivets used to install them were 1/4" rivets. This is a large size rivet and it takes a 'heavy duty' rivet gun to install them. If you have a standard size rivet gun (far and away the more common) then you will have to upgrade rivet guns to install 1/4" rivets or use nuts and bolts. I had to stick with blind rivets because I can't easily get to the back side of the fiberglass to put a nut on a bolt.
In my case the height/length of the new clamps was an issue because the latches were already a tad loose and a direct replacement would have left the box rattling back and forth. On this picture you can see that this actually created a problem over time because the box was moving back and forth slightly and rubbing fiberglass on fiberglass (box to body). This resulted in the worn spot you can see just above the rubber bumper I installed to correct the issue:
I bought some inexpensive "truck trailer rubber bumpers" and sanded them off a tad and bolted them to the box so that they would hold the box about half an inch from the fiberglass body. This solved not only the box to body rubbing problem but also forced the hood latches to stretch a bit and this provides a much stronger 'hold':
This is what my red-neck engineering looks like all installed and clipped. Note the worn part on the body corresponding to where the box was rubbing. Maybe my cargo box was just installed incorrectly/poorly? Anyway, the latch-hold power is much stronger than before and I'm happy enough with the result because any movement will be absorbed by the rubber bumpers. Hopefully if you need to do this latch-swap task this post will help you plan accordingly.
-
10 hours ago, Derek up North said:
you're exceeding the maximum design specs of the tire,
An excellent point. If you run with one tire on a rear axle then you are going to be asking a more of that tire than it's designed for. This idea of 'to carry a spare or not' is a matter of how much risk you are willing to accept. It's ok to exceed the specifications on a tire for a short run, but be aware of when you are pushing the envelope. Go slow and carefully for a reasonable distance and you will be fine. If you push it and over-burden a single on the rear then you can end up stuck with a problem.
I tend to be on the more conservative side of things when it comes to risk of being stranded. I have not only a spare tire, but a spare of pretty much everything that I have determined to be a critical liability. One day on a back road I had the fuel pump fail and I would have been in some real trouble except, by sheer dumb luck, a fellow took pity on me and drove me a long ways back and forth to a part store so I could buy the tools and parts I needed to get going again. If he had not come along I would have been in trouble for who knows how long. It takes one bad experience to change your viewpoint. I like to be self-sufficient, even it it means a little extra weight since I do like to take dirt roads and get out there where nobody would know where I am... So, I'll keep my spare on board.
-
3 minutes ago, Derek up North said:
inflated to 65psi, a single is only rated for 1875lb, well below 2000lb+ a rear axle end often carries
Would you go to the 65 psi max rating for the tire if you ran as a single or would you go higher to like 70 psi while driving to a place to get a new tire?
-
With dual tires on the back it is certainly possible to manage without a spare. You have to be willing to carry the proper jack(s), tools and air compressor needed to swap or remove a tire should something go wrong.
One consideration about the risk of leaving the spare behind in your case would include the quality and age of the tires and how carefully you maintain them. When I first got my rig it had seven different tires on it with different age and tread wear. I would swap out with a new one as they went down. And they did go down - like three times I had to change a tire on the side of the road. I had enough of that and now I have seven new tires that I monitor carefully and take care of. While I do have a spare (it's tucked up underneath - out of sight out of mind I suppose) I have enough confidence in my tires now that I could manage without one. Like Linda said, with the same rim on front and back you can drive on one tire in the back to get to a shop where you can get another one should a tire go down. I'd guess that you might put higher air pressure on the rear tire that is running as a single if you had to drive this way to a tire shop.
You can generally catch a problem before it gets serious. Pressure monitoring will help there, but one of the most common tire failure causes on these light truck tires is from a tire getting 'out of round' or developing a bulge from delamination. You can feel this by simply being aware of when a vibration starts. A tire about to go down from delamination (which can happen to old ties that sit for too long without moving) will be hot to the touch and have a speed dependent vibration.
-
8 hours ago, ToyFish86 said:
I found someone willing to sell me a 1 ton upgrade with 4 wheels included for $700
Is that price for just the parts?
FYI, for anyone on the east coast looking right now, there is a nice complete axle upgrade available on craigs list right now (link below). These are all the parts you want:
https://atlanta.craigslist.org/atl/pts/d/lithia-springs-1987-toyota-rv-parting/6984285844.html
-
8 hours ago, Sandune24 said:
I am shopping around for leaf springs, any suggestions ?
Old Man Emu Leaf Springs are an option. They don't list our vehicles as a "correct fit" but there are two models that do indeed fit and function well. There are two options with the difference being the total 'lift', CS010R and CS009R. The CS010R springs will get more lift than the CS009R model. These springs were designed to lift a truck with regular loading about 2" and so with our heavy load then end up being close to stock height. The CS009R springs have one less leaf (6-leaf like the OEM springs) and will be about 3/4" to 1" lower, but are otherwise identical to the 7-leaf CS010R. Cost is ~$230 to $250 for two springs plus you have to buy bushings (I suggest a poly set rather than rubber). The safe option is to buy the CS010R's and install and check height (it will settle about another 1/2" after break in). If it's too high then remove the extra leaf and check again. Remember that you can also adjust front height a little with the torsion bars to match where your rear ends up. I'm assuming you have a 21' rig like mine and thus similar weight. I started with the CS010R's but ended up removing a leaf. But I have air bags to compensate and fine tune ride height so it's hard to say what would work best for you.
Here is an overly long thread with way more than you wanted to know about leaf springs and ride height:
-
On 11/1/2019 at 11:26 PM, butterflygal said:
a small RV that can go in the outback roads. We think a Toyota might be the answer
As mentioned, unless you are able to find a custom 4x4 Chinook or modified Sunrader it's unlikely that you would be happy with a stock ToyHome (or 'YoterHome') on back roads. The stock Toyota Chinook is on a pretty wimpy truck, but you may get lucky and find someone who is selling a modified one on craigslist or similar.
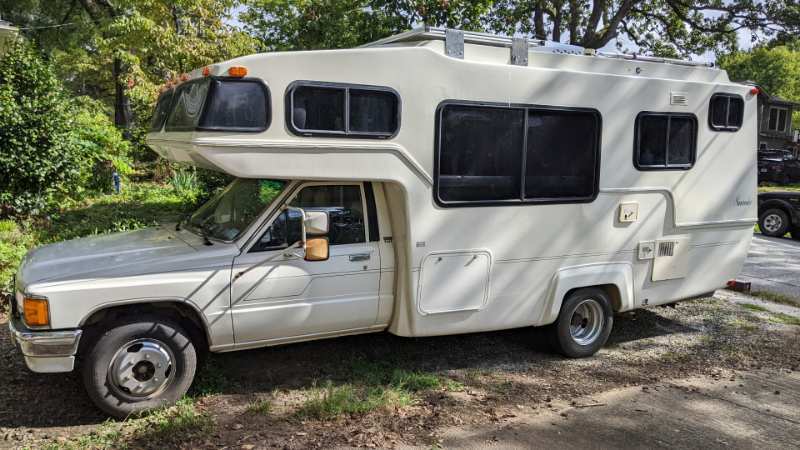
I've got a stock 21' Sunrader and the 1-ton suspension with 6-lug dual wheel rears is pretty darn sturdy. I have worked to get the highest ground clearance possible without major modifications and it's still pretty low. And heavy (though you could likely due with a lighter/shorter model). And its only rear wheel drive. Despite all of that I have no problem taking a forest service road or similar. I've run into problems a few times but it's been able to get through stuff that surprises folks. Still, I've had to turn back due to steep hills and deep ruts - stuff any 4x4 would have no problem with.
-
Attached is a procedure for the headgasket. Perhaps it can be helpful to you. I had originally planned to do just my headgasket but I ended up doing the HG plus a new head, timing chain, and entire front end kit (water/oil pumps/cover). It's much easier and cost effective to take care of any of that stuff if it's needed while you are doing the HG.
Linda has a point about getting a quality gasket and related parts like the head bolts. It's a long and involved procedure and you don't want to have to do it twice.
-
8 hours ago, 87 Oddy said:
Is there a battery monitor that will show these things accurately for 50$ or less?
I installed a $25 battery monitor and it's been working great for me. Here's a link to one like the one I have:
https://www.ebay.com/itm/161129449019
Looks like this:
Mine came with a 100A shunt. With these cheap meters you have to make sure it can actually measure/use both charge and discharge current. Some only measure discharge and they are not very accurate. (there are meters very similar to the one I have without the "charging" label/indicator - don't buy one of those). I've been very pleased with mine and I did test the accuracy of the volt meter and current meter and for a $25 it's dang close to correct. Perfectly fine for RV use.
Install is not simple as you have to do the wiring correctly and add the shunt in the correct place to make it work. Instructions that came with it are bad but I found some better ones online. It's not rocket science to use but you do have to take the time to learn how to calibrate it. Periodically you have to reset it to be 100% at fully charged. All that said I find it to be very handy to monitor the battery and read out the current I'm using with individual appliances. It not only tells you how your battery is doing but it helps you ID the devices that are draining it too.
I think the key to finding one that would be functional on the cheap is to make sure it includes a shunt (100A is good), measures both positive and negative (charge and discharge) current and has some decent reviews. For example the one WME linked to seems to fit the bill and I suspect that it will work fine for him when he hooks it all up.
-
20 hours ago, johnnyhap said:
Fan runs but the pilot does not fire up.
The furnace should have an "igniter" rather than a pilot light. The control board generates a high voltage that makes a spark across a gap between two electrodes on the igniter. The control board won't allow this to happen unless the fan is generating enough power to activate the "sail switch" as Derek mentioned. Sometimes it's hard to tell where the issue is because of these inter-dependent systems. If you hear a "clicking" but no flame then it's likely the igniter that is the issue. It may need adjustment or you could need a new one if you get the clicking with no flame. I had to replace the igniter in my Atwood hydroflame furnace in order to get it to fire up when I first got my YoterHome. I would suggest taking a look inside the burner to see if you can identify an obvious problem.
FYI, this is a link to a thread that discusses power use of the batter to run the furnace and the potential to run the battery down if the furnace doesn't fire up:
I also found that replacing the old thermostat with a simple cheap (battery powered) digital one was a worthwhile improvement.
Let us known which brand/model of furnace you have and someone might be able to get you a relevant manual if you don't already have one.
-
Well, At least I've figured out what they are and so I can replace with new. They are "Hood Clamps" often used on Jeeps.
Here's some on the amazon for like $13 a pair: https://www.amazon.com/Smittybilt-7601-Black-Catch-Wrangler/dp/B000E3FDTG/
-
If there was a sticker about max weight it's gone now. Hmm, yea, I don't suppose there is supposed to be a lot of weight in there. I had planned to put something heaver in there, maybe 45 pounds, so maybe I'll have to rethink that plan.
36 minutes ago, linda s said:I would rebuild them. Nothing else will look the same
If I abandon my heavier weight plan then yes, rebuilding them would work fine. Darn, I had not fully thought through the weight limitations in that box. Thanks y'all for the heads up on that issue.
-
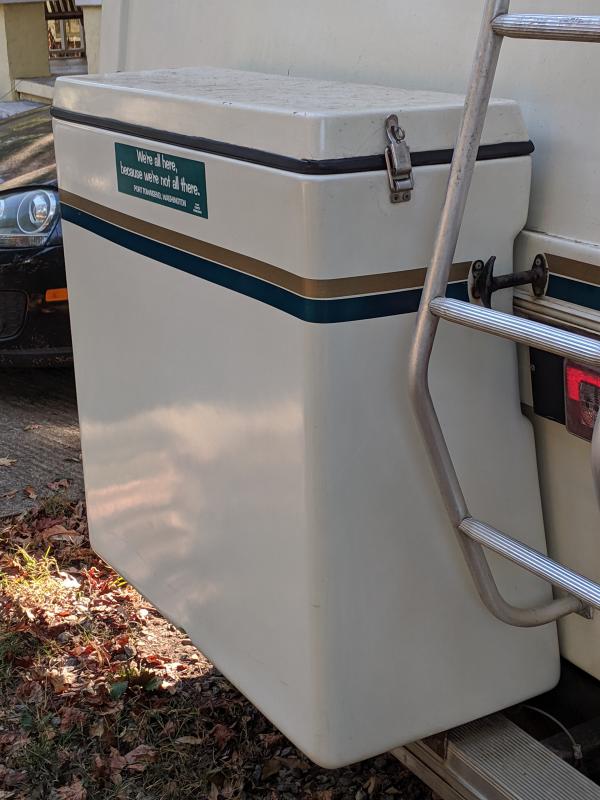
I have the fiberglass rear storage compartment on my Sunrader:
I'm interested in replacing the original spring loaded clips with something stronger and more reliable. They are not all that springy anymore and I'm concerned that if I put something heavier in there that they could fail. These are the clips:
Does anyone have any wisdom about what product I could use to replace them or a better method of attaching the box to the body? I could figure out a way to simply bolt the box to the body but then it wouldn't tilt backwards anymore. It's handy to un-clip the box and tilt it backwards to load and unload so if possible I'd like to keep that feature.
One possible latch I found was this marine hatch clamp:
It wouldn't be a direct replacement because the holes don't line up but the hinge on one end would allow me to mount it to the body at 90 degrees. It's marine grade and I could put a quick release pin in the locking hole to ensure that the latch wouldn't come un-done. I'd have to patch some holes to use this latch, although I have some experience (link) with that after a mis-hap with a nail gun while working one time on the interior...
I realize that this rather narrow and specific request is a bit of a bandwidth abuse, but I thought I'd ask to see if anyone has addressed this issue. Oh, and in case anyone is curious, the bumper sticker on the box is from Port Townsend Washington (where my parents used this RV for many years) and it says "We're all here, because were not all there". It seems very appropriate on a Toyota Motorhome 🙂
-
8 hours ago, ModocMade said:
If I fill tank then switch fridge to lpg, is there indicators letting you know it's working?
Take a look at this thread below. There are instructions on how to light the fridge and how to see if it's working via the indicator:
Before you try and turn on the LPG burner for the fridge, open up the back and take the metal cover off the burner section. Take a look and make sure that there are no objects obstructing the burner. Securing the cover in place is important because if it's not on there correctly the flame can get blown out while driving.
8 hours ago, ModocMade said:I didn't know if my fridge was working till 12 hours later of having it plugged in.
Yea, it takes a while for it to get cold. Once you get it working there are tips in the thread linked above about how to get the best performance out of the fridge.
-
1 hour ago, onesik86 said:
I tried to order a couple parts at my local auto parts store but they didn’t list anything for a Toyota Itasca
If you are trying to find parts for the pickup/truck portion of your rig you need to tell them the year of the "Toyota Pickup" frame that you have - the Itasca company built an RV on top of a 'Toyota Pickup' (1-ton). Itasca only refers to the camper portion.


Are my leaf springs blown?
in Engines - Transmissions - Drive Train - Suspension - Chassis - Steering - Exhaust - Tires - Etc.
Posted
This is interesting - and useful information for folks considering this leaf spring job. Do you have air-bags on your rig? On my 21' I'm using the Air-Ride bags inflated at ~30 to 40 psi along with the 9's and this gives me a good height. With the bags completely deflated the springs are low so I suspect that without air bags the 10's might be the way to go. In general buying the 10's is a safe way to go since it's easy to convert them into 9's by removing one leaf.
I also have an update here concerning the bushings. I initially installed rubber bushings (Moog I believe) and after 3 years they totally gave out. I just replaced them this weekend with Energy polyurethane ones that are much firmer. Hopefully these will last longer. My suggestion would be to skip the rubber ones if you are going to put new leaf springs in. Overall I've been happy with the performance of these leaf springs and I'd do the same if I had issues with the original ones.