

AtlantaCamper
-
Posts
269 -
Joined
-
Last visited
Content Type
Events
Profiles
Forums
Gallery
Posts posted by AtlantaCamper
-
-
Your existing charge converter and isolater are likely fine for the time being. If they are not working well then the worst is that you can hurt the battery - which is why the 2 year free (5 pro-rated) Walmart battery is a good idea. Killing batteries in <2 years is how I figured out my converter was sketchy. For now maybe just get a new battery and make sure to clean up or upgrade the critical hot/ground cables/connectins going to the battery. Your charging options are to run the motor or plug in to "Shore Power" (AC). Just make sure both options are putting >13V to the house battery in charging mode.
The board swap on the furnace isn't really all that hard. It took some time to take it apart, and I replaced the igniter and a few other cheap parts while I was in there. But it didn't take major surgery to put the new board in.
Depending on the time of year you travel will determine how much you want that AC. There in the NW this camper was hard on that heater, but when it moved out South (Atlanta), that AC unit gets a workout and the furnace not so much. Maybe consider travelling in the cooler months if you can.
These Toy homes do require a fair amount of work to make them reliable. The earlier suggestion about changing a tire on friendly ground is a really good one. My first trip out on my own I didn't get more than 30 miles before I blew a rear tire. I was totally unprepared to change it and it sucked. Oh, check all of your tires carefully and replace any that are no good. Tire health is critical. Feel them after you have driven a bit. A really warm one indicates a problem. I started going out on 1 night adventures just to start figuring out the critical things I needed to address before doing longer trips. This allowed me to knock out the big problems and then anything that happened was relatively minor on the road.
-
I ran into an issue with the Atwood furnace where the fan ran my battery down one cold night. It turns out that the furnace control board is designed in a way that cuts the igniter off if the voltage is too low (or it just doesn't fire when voltage drops) but the fan keeps running. The result is that once the battery is too low to ingnite, the fan will then run the battery DEAD. Bad design. Fortunately there is a fix. I installed an aftermarket "Dinosaur Fan 50 Plus Furnace PC Board" (or some similar model from that brand, I can't remember the exact version). It has a smart design that saves your battery if the voltage goes low. It basically turns off the furnace after the battery voltage drops below a fixed voltage I think. You are cold in the morning but your battery isn't run into the ground. A hundred bucks or so on ebay for the board if I recall. You might consider that as an option to improve your rig. I grew up in Portland and i know you will use your furnace more than your AC there! Now I'm in Atlanta and it's the other way around.
As I have gone over my Sunrader electrical I have learned that age has not been kind to it. I currently have a functional electrical system that I'm happy with but it took a lot of work to get there. I had to replace a lot of the original electronics because they got old and flaky or just failed (replaced the charge converter with a Progressive dynamics one, and i installed a WirthCo 20090 Battery Doctor to replace the isolater as two key upgrades). The key wiring connections were corroded so I put in new ground wire or new connections all around. (an aside: recently I replaced the original generator with a Honda 2000 by building a sound isolated generator box in the original generator location - that's an ongoing project that I hope to report on this site more completely one day. Summary is that I've got a small generator fed from the main gas tank that is internal mounted, very very very quiet, and can power my roof AC through the MIcroAir Easy Start. But that's a story for another day).
My house battery strategy is to use a deep cycle battery from Walmart because it's not too expensive (~$100 to $125) and I can replace it under warranty pretty much anywhere on the road if there is a problem. I installed a shunt recently that allows me to monitor current in and out of the battery (only $25 for parts and was easy to install as i was doing other electrical stuff at the time). Now I can tell a lot more about the health of my battery - my favorite part is being able to monitor current in and out.
There are so many parts and pieces on these rigs that have really held up well and are serviceable and so don't need replacment. The key electrical bits are not in that group. There is a lot of benefit in upgrading the charge converter and battery isolater (and heater control board). If you make sure all of the heavy wire between these bits are good with no corrosion at the connectors (don't forget the engine ground) then you will be much happier in the long run if you plan to keep the vehicle.
-
Just a quick follow up for anyone reading this in the future who is planning to do a fiberglass fix. If I were starting over I'd buy the Marine Tex kit (~$15) and some powdered mica colors to tint the epoxy. The tints can be found in the range of $10 to $15 at Amazon or Ebay. Overall that would be a better process because it's one material to spread and sand. The gel coat is pretty thick and by putting the epoxy on a little thick and spreading out about 1/8" past the edge of the repair area one could sand down reasonably flat and blend epoxy and original material without risk of going through the gel coat. It would be easier than getting the paint to layer thick enough to sand. It would be easier to match color with the tint set too. I've done this approach with a vinyl patch kit and it really is possible to get an 'exact' match this way.
BTW, I put the Zep wax on today and it looks good. from a few feet away you have to know what you are looking for to be able to distinguish the patches. I'm happy with the overall repair.
-
Yea, it would be possible to get a custom paint color, but for this job that amount of time and effort exceeded my available gumption at the moment. If I ever need to do a more major repair I'd likely go that route. Since I used a flash in the pictures, the actual match looks a little better than the photo suggests in regular outdoor light. Good enough to cover my blunder.
-
Well, color matching was harder than I thought it would be. The Wimbledon White was pretty yellow out of the can (first image), so I bought a second can of "competition white" (also a generic Ford color, but sort of off-white). I mixed the two paints to try and get a match but the second photo is as good as I could do. I had to add some black to knock it back. Final result is the third image. You can still see the spots, but it's acceptable. One could do better with effort and better tinting supplies. You don't notice the holes now unless you already know they are there. Good enough.
I think the best approach to this kind of project is to try an avoid putting holes into the fiberglass gel coat! The off the shelf duplicolor paint isn't going to be an exact match - and everybody's color will be different due to weathering. Heck, the color of my panel varied quite a bit just in the area of the holes I was patching. Color mixing the paint (or you could color mix epoxy) is the only way I could find to actually make the repair non-obvious. Of course one can always fall back to the map decals to hide a repair!

-
I'm posting some pictures so that someone else who needs to fill a screw hole can see what I ended up with after the Marine Tex.
I stripped the wax with the Zep stripper, scrubbed with Barkeeper's Friend, cleaned with acetone, used a rotary grinder bit to go from rough hole to smooth edged hole (as shown in two pics). I wet sanded with 1000 grit to get it all smooth and flat. I cleaned in acetone again and applied a small amount of the Marine Tex repair, smoothed over with a razor as shown in third pic. I kept the level of the epoxy just below the surface as I plan to fill flat with several layers of paint and then feather the paint with wet sanding into the surrounding gel coat. Linda S was correct that Bondo would have been a perfectly suitable substitute for the Marine Tex. If I had tinted the Marine Tex (a rather difficult task when starting with the primary colors that come in a tinting kit) then i could have made a nice resin matching patch that would be more structurally similar to the fiberglass, but I just don't think structural integrity matters with a small hole like this.
The color of the repair is really bright white and makes the 1/4" diameter divot stick out really bad. So I have purchased the can of the Duplicolor paint and testing indicates that it is a good match - way way better than the polar white of the repair! It's going to take a day or two for the Marine Tex to dry enough to paint and wet sand so I'll post some pics of the finished job later in the week.
Derek, In thinking about it I actually I think I could list a lot more states on the map without cheating. It's been with me for only 4 years but it has been in the family (parents/brothers) since '94 and has been across the country from coast to coast twice in that time. Certainly that amount of travel could cover some blemishes!
-
I use the "Barkeepers friend and then Zep wax" process that Linda S mentioned. It's worked well for me for the last 4 years I've had this '87 Sunrader. Stripper takes it back down to the chalky white dull gel coat finish. As Linda S mentions it should not be hard to match the finish when stripped. Then the Zep wax across the whole area will give it the same general gloss level. I'm not super picky about how it looks overall. I'll even skip the paint if the patch looks good enough (I did find the paint down the street for $8 if I need it). The patch kit will be here Monday or Tuesday and I'll post of pic of how it turns out.
FYI, I recently used the Zep stripper to re-do the rear on the camper. It really takes that wax off quickly and easily. I had put it on too thick and it's facing the sun when parked and it got a bit yellow. I did ~4 lighter coats and it came out much better. I have not had to re-do the rest of the camper (except the roof once) with the Zep in 4 years. I just clean it really well once a year and then put another thin coat of wax on top. It's no stunner but it looks fine.
I do like your map stickers Derek, although I've only done a few states in the South East so mine would look pretty sparse if I went that route! I'm actually experimenting with taking all of the old vinyl decals off the outside because I'm aiming for an overall 'naked' decal/sticker-less look; however, the ghost image of the old decals from weathering may keep me from doing that.
-
Thanks for the info Linda S. I'll get the Marine Tex and see how it turns out. I've got a good set of wet sanding supplies so I should be able to get a nice smooth finish. If it looks good enough after that I'll leave it as-is. But if not then I'll use your suggestion and get that paint.
In terms of matching color I had not thought about actually using paint to cover the (presumably) bright white gel coat repair material to make it blend into the more weathered surrounding gel coat. Brilliant! It's too expensive and tedious to buy and mix colors to make the Marine Tex material the right color but that would be a way to do it without paint. I've got some experience with auto paint chip repair so this would be a pretty easy final step if I want to make it blend better. Sure would be nice to not be reminded of my dumb mistake with the finishing gun every time I see those six bright white dots on the side of the camper...
-
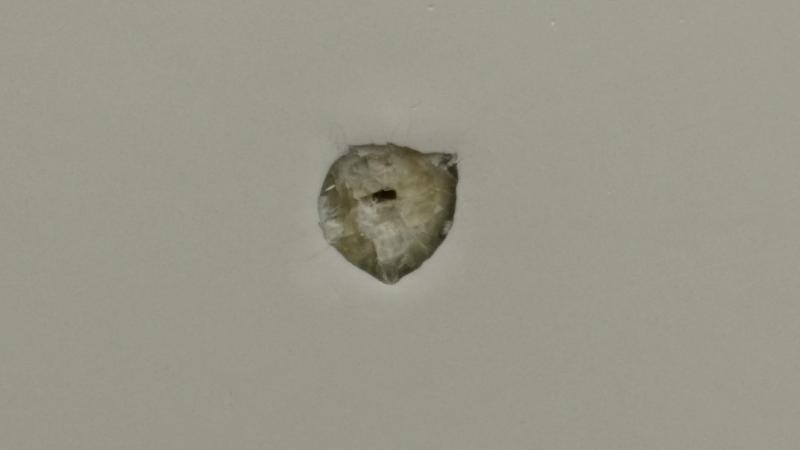
Six tiny holes about 8 inches apart in a 3 square foot area. A picture of one of them is attached. The chipped area on that one is about ~3/16" across Stupidly, I was using a nail gun to attach some interior trim and the nails were just a wee bit too long and poked the holes from the inside to the outside. I'll dremmel them out on the outside to make a ~1/4" cone with clean edges and then fill and sand. I'll strip the wax first, sand and polish and then re-wax. More than likely the repairs will be more white than the surrounding area but I'm not sure if it's worth the trouble to try and color match.
-
I managed to make a few holes in the white exterior fiberglass on my '87 Sunrader. Small, maybe 1/16" to 1/8" across. Basically looks like a screw hole that needs to be filled. There are a lot of gel coat white repair options out there but I was wondering if anyone has had any specific experience with a product that has produced a good result.
This item looks like would work well (shower/tub repair):
https://www.amazon.com/gp/product/B00KO6LTO6/
The Marine Tex is also popular:
https://www.amazon.com/gp/product/B0014419V0/
Both request a constant temp of 55 to 60 F to do the repair process so I'm not doing this any time soon so I thought I'd get some input here while I wait for the weather to warm up....
-
I just finished replacing the Bargman Reflecto lites with the new ones on my Sunrader. It works. It's not pretty when it's done, but it's better than the originals, which were failing way too often.
I used these with the brake/turn/reverse triple: http://www.ebay.com/itm/361900827482 (I swapped the stock location of the turn/reverse to make it look like the old ones with the turn in the middle)
I ordered a piece of 1/4" 12"x24" black plexi as per the previous posts on this forum. I was able to cut the plexi easy enough. It took me about 4 or 5 hours total to hack it all together from start to finish. I was just going for a practical retrofit, not something pretty. The black trim and the offset spacer look pretty ugly to me, but it works. I was not very pleased with the brightness at 12v (motor off) but with motor on (~14v or so) they are nice a bright. A little disappointing on the brightness but it's ok.
Note: use the new lights to set your width of the plexi backer because the new ones are a tad wider than the old ones being replaced. I used the old lights to mark the screw holes and mounted the backer plate, and then put new screw holes in to attach the new lights to the backer plate using the new lights as the template.
I modded the flasher unit by replacing the resistor per the post on this forum describing that mod. The LED's make the flasher think that the turn bulbs are burnt out and so it flashed fast to tell you that. This mod worked to slow that to a normal rate but I may still get a "proper" flasher replacement because the mod just slows down the "warning" signal. So every time you hit the turn signal the flasher still actually thinks that the bulb is burned and this causes a weird hesitation in the turn signal each time you turn it on and then the way it flashes is kind or odd: long off, short on rather than equal time on/off. Nit picky for sure but I think it's gonna bug me. It works, I guess that's the important thing. Now I have to do the cruise control off mod to the stop light with a relay...
I've managed to update all of the lights to LED on the interior, the exterior marker lights and the tail lights. I replaced head lights with modern halogen. I plan to add some bright LED floods as "trail lights" on the front to light up dirt roads as we search for camp sites in wilderness areas. If anyone has any suggestions or success stories mounting bright LED driving off-road lights to the front bumper let me know.
-
12 hours ago, Lee & Joan said:
We tried Atlanta Campers method of double nutting the stud but broke the very first stud off trying to unthread it
Bummer, sorry to hear that. I made an edit to my original post above to warn people about this possibility. Are your studs rusted in and that is what caused them to not turn? I have almost no rust on this camper so perhaps that's why mine came out so easily?
-
I'm not hearing much confidence in the cruise control gizmo. I'll downgrade it's use to flat, long, straight road or other such ideal conditions.
-
I've got cruise control in my '88 Sunrader but until a few days ago it wan't hooked up to the throttle. I hooked it up and it all seems to be in operational condition. It's the motor driven type, not the vacuum type. I'm wondering if there are any words of wisdom about how to best utilize this device.
I'm asking because the first time I tried it out I set it at about 60 mph in 3rd and it tracked fine on reasonably flat freeway. I ran for about 5 miles. All good. Then I think I hit coast, slowed down to about 45 (Atlanta traffic...) and then I think I hit resume. I can't remember if this is the exact sequence of buttons, but all I know is that it then tried to accelerate (I assume to the setpoint of 60), but that didn't happen very quickly and so it kept accelerating until it finally kicked into 2nd at about 55 mph and shot the RPM up high to ~4500! Being a cruise control newbie/idiot, instead of simply hitting the off switch I shifted the gear to neutral instead of drive in my panic. I could have hit the brake to turn it off, yes, but I didn't (cruise control newbie). Unfortunately the cruise control _kept trying to accelerate_ (in neutral) and drove it up to 5500 rpm before I managed to turn off the CC at the "off" switch -- and then all dropped back to normal. Whew, and Dang-it! I'm writing this post to find out if anyone has any comments or knowledge to share that would avoid this kind of issue in the future.
Do I just need to be more careful with how I use the CC device? I'm guessing that it was just my own dumb fault for letting it get so far behind the set point and I should have known that it would basically floor it to try and get back up to speed.... I'm taking the approach that if I get a clue about exactly how the device works and then use it carefully and correctly then I shouldn't have such a problem again. I'm just a little skeptical of this maniacal device now because it was so easy to red-line it with a cruise control newbie/idiot in the driver's seat... If I set it to, say 65, I do _NOT_ want it kicking into 2nd if it gets behind and I'm not paying attention and it decides to floor it to get back up to 65. I'm planning to tweak my gain control to get it to track most efficiently, but I am still skeptical about this thing dropping me into 2nd at high speed because it's gone to max acceleration. Does anyone ever have that problem?
It seems to be a very basic (I'm going to say dumb) device with a servo motor to control the throttle, I think it only has speedometer feedback (no RPM feedback it seems?...) and the frequency and gain knobs controls the way that it 'locks' when engaged and how aggressively it will try to maintain speed. It has a link to the brake light circuit (and the blinkers) to turn it off if you push the brake. But it doesn't know about what gear you are in and it doesn't have a "max" acceleration threshold or a max RPM threshold it seems. So it's a very "manual" (again, I'm going to go out on a limb here and say 'dumb') cruise control and one needs to monitor it carefully if you come to a hill if it can't keep speed. And Obviously one should not be an idiot and 1) hit resume way below the last set-point, and 2) shift into neutral with cruise engaged. Those are two dumb things to do that will send the RPMs towards the red line with cruise engaged.
I'm willing to give this gizmo another chance and try to be more careful and learn how it works, but I'm interested in knowing how others use it. Do you have to constantly monitor it? When it can't keep up what is the safest way to kick out of cruise? I'm guessing that there is a relatively straight forward process to using it safely and effectively but clearly I don't know what that is yet. Any help or advice would be appreciated.
I'm trying to not use overdrive at all these days. I just want to run it as a 3 speed automatic and hit about 62 to 65 mph, which is around 3500 to 3600 ish RPM. She winds up and runs with plenty of power in 3rd but it will still (duh) bog on a hill. I figured that cruise control would be handy along reasonably flat roads because with the RPMs high it should be able to track a set point of like 63 mph without too much trouble. I guess I just need to stay aware and if it looses steam up a hill I need to take it out of cruise correctly.
-
I realize this is a very old thread, but I'd like to document an approach to the cone washers here for anyone who is searching for the solution to "How do I remove the cone washers?"
I re-did my rear axle this weekend. It was at 80k miles and 30 years and it may be the first time this thing was apart. Replaced brakes and bearings, all is good.
BUT I had a devil of a time with the cone washers. I tried all the tricks described in this forum but NOT ONE would come loose. BFH and all, no go. Just a dented edge to the axle end (which I cleaned up proper before putting back on).
This is what worked: I put two nuts on the stud, tightened them together and then backed out the stud itself a turn or so. ALL of the cone washers came loose this way very easily. It did take a little while to go though every stud like this because then you have to tighten them back in too. Still, this was a lot less time than I wasted trying everything else.... Just thought I'd let y'all know just in case someone is able to put this trick to use one day.
NOTE (edit): beware of the possibility of breaking a stud! Lee & Joan (see post below) tried this approach and broke a stud off!
-
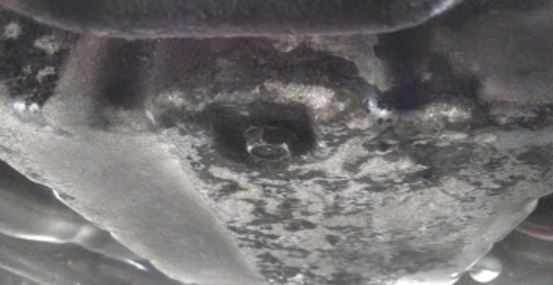
I can't tell if the cooler was an add-on or stock - maybe added by Sunrader? Once I get my temp gauge installed I'll have a better idea of what the temp is and if it seems remotely high I'll increase the size of the cooler.
I do have a drain plug shown in the attached image.
FYI, mine is labeled Asin-Warner Model 03-71 35333, serial 87EF 041745.
My fluid is nice and clean (red, don't know specifically what is in there). I noticed that my fluid level is _very_ high when level with engine cold. Level shows way above the hot level (in the middle of the 'Dextron II' label on the dipstick). This can't be right. I'll check it again later after I've done the procedure pasted below; however, if things are clearly wrong here feel free to let me know.
-------------------------- Transmission level check procedure I found:
1. Drive the vehicle to get everything up to operating temperature.
2. Park the vehicle on a level area.
3. Shift the vehicle through drive and reverse letting the tranny fully engage in drive and reverse. Remember to put it in park before you get out.
4. Leave the engine runniing.
5. Pull the tranny dip stick out and wipe it off.
6. Push the dip stick all the way in so that it is fully seated.
7. Pull the dip stick out and check the level.
If you don't bring it up to temp, don't shift through the gears, don't park on the level, or otherwise skip any of those steps, you will not get a good idea of what your fluid level is.
-
Thanks for the replies. I didn't have my notification settings set up so I only just now realized that I had a couple of replies (such a newbie). I think I have it set up to email notification of all replies now.
Both of the comments reinforce the idea that if I simply drive it in 3rd gear then everything will be fine.
I'll do some reading about how to change the transmission fluid and what to replace it with. Although I abused the auto trans in overdrive for the last ~10k miles, hopefully with some care and attention it should be ok now that I plan to just run in 3rd gear. It sounds like my transmission is behaving normally and the amount of slip is nothing to be alarmed about. Clearly the simple fix is to simply not use O/D.
I have what I believe is the stock transmission cooler - the fluid goes through the engine radiator and then trough the small transmission cooler mounted in front of the radiator. I've got a mechanical transmission temp gauge that I plan to install in-line in the hose going to the transmission cooler. I'll monitor my transmission temp this way and plan on an upgrade to the size of the transmission cooler. I'll try and do some reading to determine if a fluid change at this point is a good idea or if that's overkill.
I think I'll abandon the idea of changing rear gears for now and just get comfortable using the stock power train in 3rd gear.
-
I’m new to this forum, but I’ve been reading a lot of the information available here. It’s very useful and quite extensive. Until now I’ve been able to answer all of my questions with the available posts, but now I’m stumped.
The Issue: I’ve collected RPM/gear/speed data illustrating that gears 1,2,3 are not slipping but OD/4th is slipping up to 15%
My Question: Is OD (4th) gear slipping because the transmission or torque converter is compromised or is this just the way that the A43D behaves?
My Rig: ’88 Sunrader on a ’87 Toyota frame, 22RE, A43D transmission, 4.10 gear, 6-lug 1-ton rear axle, 85k miles
Brief vehicle history: This camper was bought at 22k miles by my dad, handed down to me at 72k miles, now at 82k miles. I recently had the pleasure of doing a head gasket job after I discovered a very minor coolant leak to the outside. I took the opportunity to change the timing chain, oil + water pump, and put a new engnbldr head on along with ‘new’stock fuel injectors, a hedman shorty header and new 2.25” open flow exhaust all the way back. The engine is generally running very well and, I think, has generally as much power as a stock 22re is going to get.
My driving habits: This is my first real experience with trying to understand an auto transmission. I drove it the last 10k miles with OD on and I’ve been struggling to understand why it is so difficult to wrestle this beast down the road. I understand now that if I just treat it as a 3 speed auto trans with OD off that it behaves just fine. Unfortunately it took me quite a while to figure that out. Could I have hurt the A43D by pushing it in OD for 10k miles?
Here is a brief table of data I collected recently after I installed a tach. (example typical/average data shown, I collected >40 data points):Gear
RPM
MPH, GPS
MPH, calc.
Grade
%slip
1
3000
22
22
flat
0%
2
3000
36
37
flat
3%
3
3600
63
65
flat
3%
3
3700
63
66
uphill
5%
4
2600
60
68
flat
10-14%
4
2500
56
65
uphill
15%
4
2500
62
65
downhill
5%
How I determined slippage percent:
I use an online calculator at http://www.grimmjeeper.com/gears.html using the stock gear info for the A43D. I have 25.5” diameter tires (Thunderer 8-ply) but I measured the actual radius from the ground to the center of the axle and the ‘tire squash' at 65 PSI is ¾” and thus the radius I used to determine speed and RPM in the calculator is based on a 24.75” ‘effective radius’ rather than the 25.5” ‘theory’ radius. FYI, my speedometer is off by about 4 mph at highway speeds (too high); I’m not sure why. I used GPS to determine the speed. I’ll order a compensating gear to correct it unless someone knows why it’s off.
Data summary:
The transmission works well in gears 1, 2, and 3 where slippage is minimal. Even up a hill in 3rd the max slippage is only 5%. However, 4th/OD is a disaster. The slippage is high (10 to 15% typical) and it “feels” terrible on the road. No power, no torque. The data in the table is biased towards higher RPM for gears 1-3, but it performed about the same at RPMs in the range of 2500 to 3000 too.
In short, everything ‘feels’ fine in gears 1-3, but OD just has zero to give and just don’t see the point of even using it. Is this normal or is my transmission have ‘issues’ with OD? I know that 3rd is a 1:1 input:output and 4th is 0.688, but jeez, is the way that the OD is implemented in this transmission really that much of a compromise so that it results in the weak performance I'm experiencing?
Further, I still don’t understand how a 20-ish percent change in the rear gear (going to 4.56 or 4.88) will alter the behavior of 4th/OD so that it suddenly becomes useful. But since others report that, indeed, the OD does actually become useful with a gear change, I would ask that if anyone can tell me how this is possible I’d be very appreciative. If my torque converter is the culprit then that would make sense I guess, or perhaps there is a factor I have not even considered…?
I have been seriously considering a gear swap to a 4.56 or 4.88 from my stock 4.10 but now I’m really skeptical of that idea based on my transmission behavior. If I get 15% slippage at, say, 2400 RPM in OD, why would it suddenly behave better at 2800 RPM? Sure, it could be a little better, but I don’t want to be relying on an OD gear that is behaving so inefficiently. I’d rather take the approach of convincing myself that I really have a 3 speed automatic and use the OD only for special occasions.
All of my ‘angst’ on this issue is compounded by my (likely groundless) bias towards wanting to run at lower RPMs on the highway. Maybe if I can just get over it and drive it wound up and forget that OD is even an option (except downhill with a tailwind) then I’ll be just fine and totally ready to roll. I hear so many people say that the 22re likes to run at high RPM and so maybe my key to happiness is simply accepting that fact and winding her up and letting it go.
Based on my current limited knowledge on the topic I plan to keep the transmission and gears just like they are and learn to drive in 3rd gear on the highway. I'm open to any corrections in my approach to wrestling the A43D auto down the highway...


Are my leaf springs blown?
in Engines - Transmissions - Drive Train - Suspension - Chassis - Steering - Exhaust - Tires - Etc.
Posted
I was reading the "New leaf springs" thread started by Yippeekyaa and started wondering about my own spring situation.
I have a '87 chassis with a 21' Sunrader. I have not paid a lot of attention to the suspension yet. I did re-do the axle seals, bearings and brakes in the rear plus put new diff fluid in, but not much past that. No attention to the front suspension. The ride is stable and I don't sense swaying but bumps are jarring/hard and she seems to ride low if I don't have the air up high in the air bags. Steering feels tight with no wandering. Tires are all Rangerer R101's that I keep at 60 PSI. The Ride-Rite airbags are in good shape and hold air well. I put a pump/controller set up in and that lets me monitor the air pressure and fill/empty as needed. I keep the air shocks at ~50 psi typically. Springs are the six stack type. I didn't see any cracks or breaks in the leafs. I think the shocks all around are the original equipment.
This is the view first with 50 PSI in the Ride-Rite air shocks and second with no air (0psi) in the Ride-Rite air shocks:
This is a view of the leaf springs at 50 PSI in air shocks and then with no air in the air shocks.
Note that the springs are essentially flat/straight with no air in the Ride-Rites. Here is a 50psi then 0 psi view showing the arch of the springs:
It seems to me that I'm riding only on the Ride-Rites and the springs are blown right? They shouldn't be flat with no air in the air springs? Or is that perhaps normal? I'm hoping someone knowledgeable about these things can set me straight.
One last consideration on the rears is that the shocks appear to be original. I'm assuming that if I do any work at all I should include replacing the shocks in that process. Or am I just starting to fix stuff that maybe isn't broken? Her's a view of a rear shock (with Ride-Rite shown behind it):